background image


www.xmarto.com


31


Operation Steps: 

1)


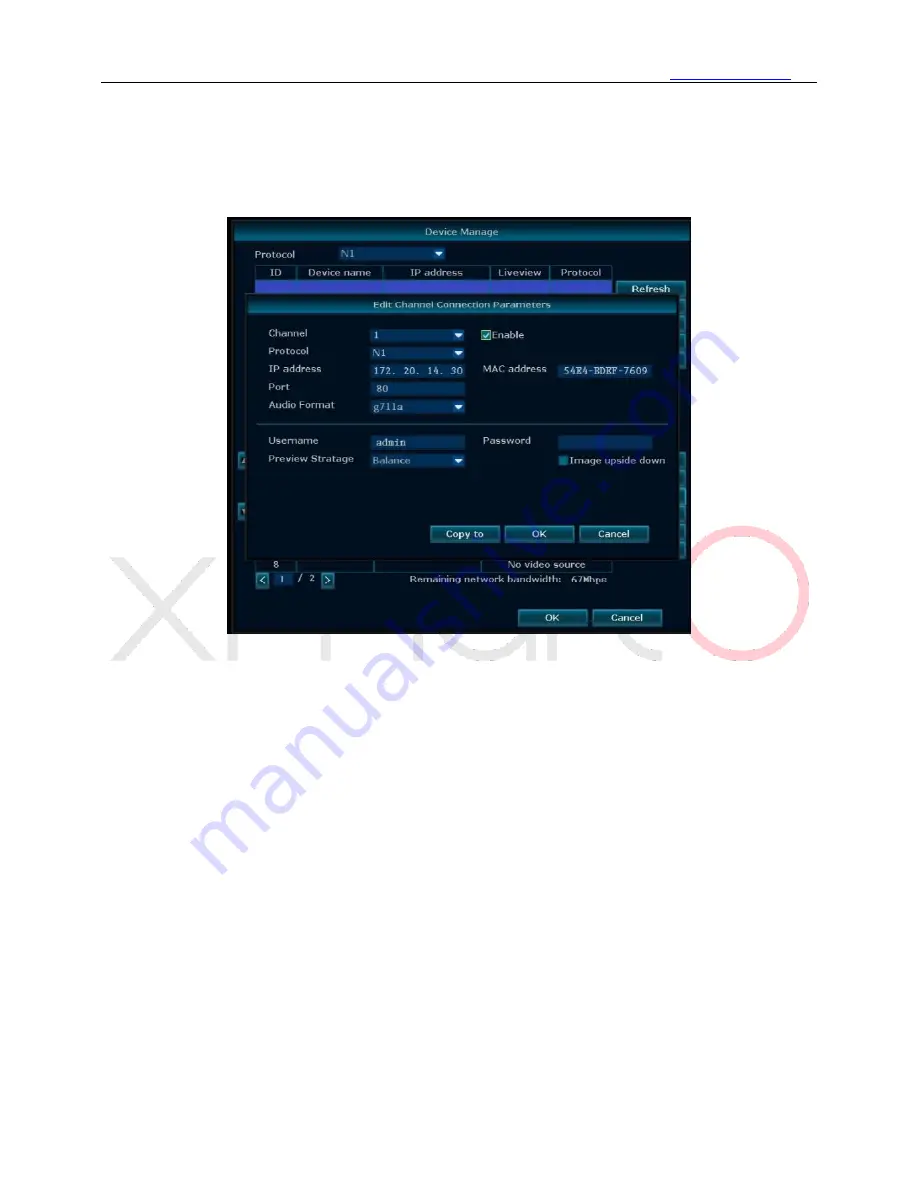
Right click the mouse to pop out NVR main menu, then click “Device Manage” to enter device 

manage interface. 

2)


Select one channel and click “Manual Edit”, you shall then see below Interface. Check Enable, 

you’ll be able to change the channel information here. 


5.4.6 Repeater 

Function:

 Setup Dream Liner feature to boost the wifi signal of xmartO system. 

 
The xmartO Dream Liner technology uses cameras in middle as repeaters. That way, further cameras 
connect to closer cameras 1st, and then to the NVR as a group. This theoretically doubles/ triples the 
current WiFi distance. 
 

Operation Steps: 

1)


Right  click  your  NVR  mouse  to  pop  out  NVR  main  menu,  click  Device  Manage  and  then  click 
Repeater. You’ll enter the repeater interface to setup Dream Liner. 

Содержание WNV Series

Страница 1: ...www xmarto com 1 USER S MANUAL WIRELESS SECURITY CAMERA SYSTEMS...

Страница 2: ...tent in this manual is only for users reference We don t promise it s exactly the same with the products you purchase Detailed information is in accordance with the final products The accessories and...

Страница 3: ...ng Spots 17 4 6 Antenna Mounting Tips 18 5 Getting Started 19 5 3 Startup Login Logout Reboot Close screen display Shutdown 22 5 3 1 Startup 22 5 3 2 Logout 23 5 3 3 Reboot 24 5 3 4 Close screen displ...

Страница 4: ...g 55 5 11 1 General setting 55 5 11 2 Time Setting 56 5 11 3 Screen setting 57 5 11 4 HDD Setting 58 5 12 System Admin 60 5 12 1 System Version 60 5 12 2 HDD Info 61 5 12 3 System Log 61 5 12 4 User 6...

Страница 5: ...when moving it Make sure that the NVR is unplugged before you move it When moving this device be sure to handle it with care Make sure there is good air circulation around the NVR This NVR uses an in...

Страница 6: ...VR system can be widely used for surveillance of home business office villa etc 2 2 System Requirements Please be sure that your PC MAC complies with the following specifications PC Operating System W...

Страница 7: ...www xmarto com 6 2 3 Specifications NVR Specifications...

Страница 8: ...e your home network bandwidth You can use the system to live view record playback and backup even without Internet Dream Liner WiFi Relay The xmartO Dream Liner technology uses cameras in middle as re...

Страница 9: ...standalone VGA or HDMI monitor or TV Motion Alerts Supports email alerts with snapshots and mobile push notifications when motion is detected 80ft IR and IP66 Weatherproof Each camera is equipped wit...

Страница 10: ...he NVR However you will need to manually connect the NVR to your modem router to remotely view on a smart device or PC Mac If you need to add camera to the system or repair camera to NVR you can also...

Страница 11: ...NVR 8 Audio In Connect external microphone to camera to record audio 9 Power In Connect included 12V 1A DC power adapter NOTE xmartO cameras with the audio jack support audio Your camera may not have...

Страница 12: ...in addition to upper case letters 3 4 Input Method Image 3 Name Buttons Function Number 0 9 Type in number 0 9 Character a z Type in letters a z Symbols _ Type in symbols Caps caps Switch capital and...

Страница 13: ...voltage wires or other sources of electrical interference Electrical interference will degrade the quality of the signal 4 2 Camera Installation 4 2 1 Power the cameras NOTE Connect all cameras local...

Страница 14: ...ounting surface must hold at least four times the camera s total weight 1 Locate a camera and choose a location where you would like to mount the camera 2 Indicate screw positions by marking three hol...

Страница 15: ...et cable into the WAN port on the back of the Wireless NVR 4 Plug the other end of the Ethernet cable into a port on the back of your router 5 Connect the Wireless NVR to power using included 12V 3A D...

Страница 16: ...tall Hard Drive You ll need to add a SATA HDD to the wireless NVR and format it to start recording If your system comes with hard drive pre installed then you only need to format the hard drive to sta...

Страница 17: ...on your hard drive 3 Place the hard drive into the NVR Any cables should cross up over the HDD 4 Holding the hard drive and NVR gently turn it over and line up the holes on the hard drive with the ho...

Страница 18: ...he NVR s screen the distance should be too long or there are too many obstacles Please move the cameras closer to the NVR 4 6 Antenna Mounting Tips The NVR s antennas radiate signals to all around The...

Страница 19: ...n the system will pop out below login interface Users must login to do further operations Default Username admin Default Password empty means no password leave it blank 5 2 Setup Guide After login the...

Страница 20: ...2 1 General setting Allow the user to set up NVR s time zone date and time language and keypad type Click Next to continue after finish your settings 5 2 2 Networking Allows users to connect the NVR t...

Страница 21: ...Network your NVR is connected to Internet and is available for remote access Manual Setup Click Manual Setup you ll be directed to below Network setting interface where allows you to set an IP addres...

Страница 22: ...ssfully formatted the status will show Formatted You will lose all data on the hard drive if you format it So please make sure to back up the data before formatting your hard drive 5 3 Startup Login L...

Страница 23: ...TV you have resolution incompatibility issue The NVR s default resolution is 1280 x 1024 which does not work with some of screens You need another screen to display cameras or change NVR s resolution...

Страница 24: ...an power off the device Unplug your NVR from power and the system will shut down completely 5 4 Device Manage Manage your cameras connections with the NVR In Device Manage interface you can add new ca...

Страница 25: ...camera cable end will light up 2 Right click your NVR mouse to pop out NVR main menu then click Device Manage Click Refresh on upper right and wait for a moment you ll see the camera displays in uppe...

Страница 26: ...utomatically connect to NVR and display video on monitor Camera needs to be in the NVR s Wi Fi range More details can be found here http www xmarto com helpcenter article 9 Channel Status Connect Succ...

Страница 27: ...ccupied channel from bottom box then double click the camera in upper box This will add the camera to NVR And once finish pairing you shall see the camera display video on monitor and the channel stat...

Страница 28: ...ir pairing relationship are still existed you can go to Device Manage and click Auto Add to find all cameras back easily Detailed instructions 1 Right click your NVR mouse to pop out NVR main menu the...

Страница 29: ...R firmware cameras will come back automatically after reboot no need to do any settings to add them back 5 4 2 Modify Device Function Modify camera information Operation Steps 1 Right click the mouse...

Страница 30: ...then click Device Manage Advanced You ll see below interface Tips Enable Multiple Network Segment system can search wireless IP cameras that are in different segment as NVR Enable Repeated Add system...

Страница 31: ...ete The camera will be deleted from this channel and you shall no longer see the camera video on your monitor This channel will become unoccupied and show No Video Source under Status NOTE Click Delet...

Страница 32: ...ere 5 4 6 Repeater Function Setup Dream Liner feature to boost the wifi signal of xmartO system The xmartO Dream Liner technology uses cameras in middle as repeaters That way further cameras connect t...

Страница 33: ...e seconds and connect back automatically Click Refresh to check if the Dream Line is successfully built NOTE If you have multiple lines to build try build one each time to avoid system freeze up If it...

Страница 34: ...s cameras Wired cameras can t be used as repeaters Need more information about Dream Liner Check here http www xmarto com dreamliner 5 5 Channel Setting CH Setting 5 5 1 Encode Setting Function Set th...

Страница 35: ...ration and contrast 3 Camera title allows users to change the camera name of each channel 4 Enable Status Display and Connection Status the system status and cameras connection status will be displaye...

Страница 36: ...H Setting Bitrate You ll see below interface 5 5 4 Channel Details Function Check the cameras name resolution bitrate frame rate and firmware version Operation Steps 1 Right click the mouse to pop out...

Страница 37: ...nd show all cameras that connected to the NVR 5 5 5 IP Camera Function Set the mounting type for panoramic camera Operation Steps Right click the mouse to pop out NVR main menu then click System setti...

Страница 38: ...phone you need to connect the NVR s WAN port to your router s LAN port with a network cable After doing this your NVR will get online Only when the NVR is online you can remote access your cameras Def...

Страница 39: ...t NVR s IP address user can set the IP address manually Uncheck DHCP user will be able to set IP address for NVR Subnet Mask Set the Subnet Mask Gateway Set the Gateway MAC Address Set the MAC Address...

Страница 40: ...DDNS function 3 Enter the Domain Name Username and Password Click Test to test your settings 4 Click Apply to save the settings and click OK to exit Tips Currently supports domain providers popdvr 33...

Страница 41: ...own in below screenshot 4 Click Test to see if it is set successfully if yes click Apply to save settings and click OK to exit Detailed Feature List Function Name Function Description SMTP Server The...

Страница 42: ...u need to check E Mail Notification under Video Detection also Health Message Interval only takes effect when you check Enable If failed to pass the test email please assure that you ve enabled SMTP s...

Страница 43: ...below interface 2 Check Enable to enable 3G Module 3 Enter the information of Dial Number APN PIN Username Password etc 4 Click Apply to save settings and click OK to exit 5 6 6 WiFi Setting Function...

Страница 44: ...ng interface the rate indicates cameras connection strength If rate is above 30 it s considered to be good connection while if rate is under 25 it s considered to be weak connection 5 6 7 PTZ Setting...

Страница 45: ...channel you want to copy the settings and click Copy to to apply current channel s settings to other channels 5 6 7 2 PTZ Control Operations Operation Steps 1 Double click the channel you want to set...

Страница 46: ...ting this preset 6 Repeat above 2 5 steps to add other presets 7 Setup complete check Tour Start to modify the rotation speed accordingly as shown in image 40 8 Right click mouse to back to setup inte...

Страница 47: ...t 5 7 2 Time scheduled Recording Function Time scheduled recording enables the NVR to record 24 7 continuously or record in specified time periods only Operation Steps 1 Right click mouse to pop out N...

Страница 48: ...fferentiation You can combine the various recording modes on each channel As shown in below image 5 7 3 Motion Detection Recording Function Motion detection recording enables NVR to record only when m...

Страница 49: ...to set as motion detection recording from the Channel drop down menu c Choose Motion under Detection and set the motion sensitivity d Choose the motion alerts type from Alarm Buzzer Email Notification...

Страница 50: ...elpcenter article 5 5 7 4 Alarm triggered Recording Sensor Recording Function Alarm triggered recording allows the NVR to start recording when any alarm sensor input is detected It works only when NVR...

Страница 51: ...VR main menu then click Video Playback 2 Choose to playback videos of past 5 minutes 10 minutes or 30 minutes Fast playback allows you to playback videos of one channel each time Tips Before playback...

Страница 52: ...Set the Search time and click Search 4 Wait for about 30 seconds and you will see a video list based on your search conditions 5 Click on time bar to choose a time and click Playback to start playing...

Страница 53: ...aneously 5 9 Video Backup Function Backup the videos stored in hard drive to USB flash disk Operation Steps 1 Plug the USB flash disk to NVR s USB port 2 Right click mouse to pop out NVR main menu the...

Страница 54: ...at the USB flash disk have enough storage space and is formatted to Fat32 format 5 10 Alarm 5 10 1 Motion Detection Alarm Function When system detects motion detection in the selected area it will tri...

Страница 55: ...ivity the easier the moving object be detected There are four types of motion detection alarm Alarm Buzzer E Mail Notice FTP Upload If choose Alarm as motion detection type then you ll need to go to R...

Страница 56: ...y to to copy settings of current channel to other channel or all channels 5 11 General setting 5 11 1 General setting Function Basic settings and parameters Operation Steps 1 Right click your mouse to...

Страница 57: ...isplay the Device ID Show Time on Screen Enable to display your NVR s time on screen Position allows you to change the place of where to display the NVR time 5 11 2 Time Setting Function Set Time Zone...

Страница 58: ...time display format 5 11 3 Screen setting Function Set the screen parameters Operation Steps Right click the mouse to pop out NVR main menu then click System setting General setting Screen setting Yo...

Страница 59: ...t a time and 4 means display 4 channels at a time VGA resolution should match with your screen resolution Default NVR resolution is 1280 x 1024 If your NVR outputs different resolution that your scree...

Страница 60: ...hen it is full When click Format system will pop up a dialog box reading All data files will be deleted after formatting click OK to confirm click OK to start formatting Auto delete old files Select C...

Страница 61: ...to pop out NVR main menu then click System setting System Admin HDD info you ll see below interface as shown in below image 5 12 3 System Log Function Allow users to search and check the log records...

Страница 62: ...Configuration is changed Record log Alarm log Device warning and All 5 12 4 User Function Allow users to add delete and edit username and password Operation Steps Right click your mouse to pop out NV...

Страница 63: ...shown in below image 2 Input the new user s Username and Password Check Super user if you want this user to have all permissions 3 Select the permissions you d like to authorize to this user Administ...

Страница 64: ...agement Split Screen Auto switch of single view and quad view Channel Adjust Adjust the image brightness color tone saturation and contrast Setup Guide Guide the user to make basic settings at startin...

Страница 65: ...2 Change this user s permissions 3 Click OK to save the settings Tips Administrator cannot be edited Set Password Operation Steps 1 Go to User interface select admin username and click Set Password Y...

Страница 66: ...m Admin System upgrade you ll see below interface as shown in below imag 2 Download NVR firmware copy the rom firmware file to an USB flash disk s root directory not in any folder Plug the USB disk to...

Страница 67: ...se system will be damaged 5 12 6 System Maintenance Function Allows uses to set the time of NVR auto maintenance Operation Steps 1 Right click your mouse then click System setting System Admin System...

Страница 68: ...en confirmation message pops out Your NVR settings will be restored to factory default 5 12 8 IPC Maintenance Function Allows users to upgrade cameras firmware Operation Steps 1 Right click your mouse...

Страница 69: ...ading firmware 6 Local Remote Access 6 1 Brief Introduction This system supports remote viewing your cameras via smartphone and computer from anywhere in the world Tips Supports viewing your cameras o...

Страница 70: ...in your IE browser in format http youripaddress for example http 10 0 0 12 If the default WEB port 80 has been changed e g to 100 you ll need to add new port number when input IP address in the browse...

Страница 71: ...Explorer IE browser and visit www e seenet com as shown in below image Step2 Input Cloud ID Username and Password and click Login You ll then be able to see cameras videos on IE as shown in below ima...

Страница 72: ...ed to be done on every computer you use to access the system Step1 Click Tools Internet Options Security Internet Custom Level Step 2 Scroll down until you see ACTIVE CONTROLS AND PLUG INS If you have...

Страница 73: ...es you to live view playback and manage the xmartO cameras camera systems on PC You can check and do some settings for your camera system on CMS only when the computer is in LAN network Detailed instr...

Страница 74: ...t want to register an account now you may click Trial to proceed Step3 Tap at the top right corner then tap Add device by ID Add device by ID allows you to view cameras on phone both locally and remot...

Страница 75: ...t password is empty means no password Leave it blank But if you ve set a new password for your NVR make sure to input the new password here Channels Choose the channels of your NVR usually 4 or 8 Step...

Отзывы: