background image

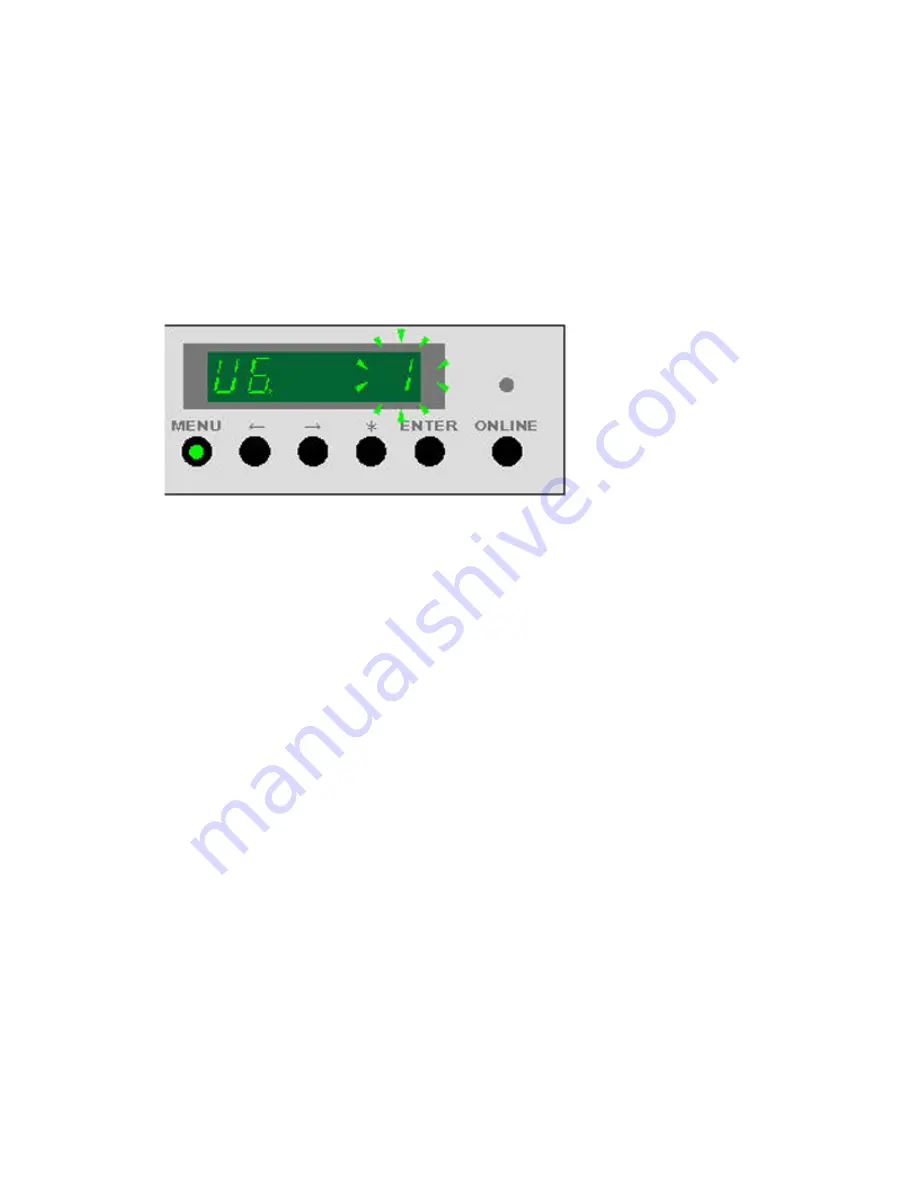
User Mode 6 - U6 (Detack Lamp Control
Mode)

If the print quality of prints made on Film media lack sharpness or are too light in
appearance, a Detack Lamp in the print process can be switched Off using Mode 6. This
setting increases the amount of Toner transferred to the print.

1. With the printer in the Standby (idle) condition, press the Menu Key 6 times to enter

Mode 6.
The Menu Key lights and the display indicates U6 on the left side of the display and
the current setting on the right side.

2. Press Enter
3. Press the <-- key to decrease the value to 0 (Off)

The range is 1- On and 0 - Off

4. Press the Online Key to exit the User Mode.

NOTE

If a higher than normal jam rate is experienced, the Detack Lamp may have to
be switched on again.

NOTE

Factory default is 0, Off.

User Mode 7 - U7 (Attention Beeper
Enable Mode)

This mode controls a beeper sound whenever the printer needs attention. For example,
the printer will beep if it is out of paper or out of toner.

The beeper will switch off when the situation is corrected. It can also be temporarily
switched off by pressing the * key.

7-7

Xerox

®

 Wide Format 6622 Solution

User Guide

User Modes

Содержание Wide Format 6622

Страница 1: ...Xerox Wide Format 6622 Solution User Guide FreeFlow Accxes Print Server V15 0 August 2010 701P50894...

Страница 2: ...registered United States trademarks Microsoft Windows is a trademark of Microsoft Corporation in the United States and or other countries Adobe PostScript PostScript 3 and PostScript Logo are trademar...

Страница 3: ...perator Panel Status Display 1 16 Media and Toner Status Panel 1 17 Powering the System On 1 18 Off Line On Line 1 19 Document Input 1 19 Precautions When Handling Documents 1 20 Copy Strategies for S...

Страница 4: ...e Copy Selections 2 9 Reduce Enlarge 2 9 Reduce Enlarge Using the Scale Factor 2 10 Reduce Enlarge Using Presets and More 2 10 Original Type 2 11 Media Source 2 11 Output Format 2 11 Collation 2 12 Co...

Страница 5: ...up a Default Mailbox 3 6 Delete 3 6 Deleting Documents from a Mailbox 3 6 Delete All Documents 3 7 Delete a Document 3 7 Removable Device Document Lists 3 8 Scanning To a Standard Mailbox 3 9 Step 1...

Страница 6: ...new Color Calibration 3 29 Problems During Color Calibration 3 31 4 Job Information 4 1 All Tab 4 1 Active Tab 4 1 Held Tab 4 2 Administrator Managed Queue 4 2 Job Reprint 4 3 Reprint Jobs with Edits...

Страница 7: ...inter Management Tool 5 11 Image Recall 5 12 Immediate Image Overwrite 5 12 Immediate Image Overwrite Algorithm 5 13 Scan Display 5 13 Set Thumbnail Creation 5 13 Administrator Managed Queue 5 14 Cont...

Страница 8: ...Tab 6 12 How to Access Administration 6 12 7 User Modes 7 1 User Mode 1 U1 Test Print 7 2 User Mode 2 U1 Date and Time 7 2 User Mode 3 UE Low Power Saver Mode 7 4 User Mode 4 U4 High Power Saver Mode...

Страница 9: ...nt Misfeeds 9 11 Media jams information 9 12 Media Jams 9 13 Clearing Media Jam J 01 J 02 J 03 J 04 9 14 Clearing Media Jam J 05 9 17 Clearing Media Jam J 11 9 18 Clearing Media Jam J 12 J 13 9 20 Mis...

Страница 10: ...Xerox Wide Format 6622 Solution viii User Guide Table of Contents...

Страница 11: ...jobs cancel print jobs and change print job priority This chapter describes the overall operation of the Xerox Wide Format 6622 Solution and the functions of its major components You will see the foll...

Страница 12: ...iew Specifications for Xerox 6622 Subject Num Also known as the UI contains the Touch Screen Control Panel and USB ports This is where the operator programs jobs and configures the settings User Inter...

Страница 13: ...and clear media jams Drawer 3 4 Roll 3 4 10 Open to clear media jams and load toner Left and Right Side Doors 11 Displays messages and status indicators Operator Panel and Status Display 12 Rear Side...

Страница 14: ...T Jack 9 Connect the Shutdown Signal Cable here This is used for shutting down as well as for starting the Sleep Mode 12Vdc maximum S L SIG Port 10 Service use only 5Vdc maximum USB Connector Type B...

Страница 15: ...purposes Linear Counter for service purposes Meter A Billing Meter B Service 5 Open to clear media jams Inner Transport Unit 6 Contains service information Service Record Cover 7 Use to identify spec...

Страница 16: ...ending on your model Table 4 Controller Rear View Description No Card Slide location may vary depending on Controller model 1 Cover Release Latch 2 Power Connector 3 Padlock Ring 4 Xerox Wide Format 6...

Страница 17: ...Light 5 Line out Connector Audio 6 Line in Microphone Connector not used 7 USB 2 0 Connectors 6 8 VGA Video Connector 9 eSATA Connector not used 10 DisplayPort Connector not used 11 NOTE On a system...

Страница 18: ...eo Cable UI to Controller for displaying monitor screen contents Both Video Data and Command Status information is transmitted via the same USB Interface The Accxes Controller downloads Printer softwa...

Страница 19: ...0 5 in 0 12 mm Original Thickness Lever 4 Manual controls for the Scanner inactive Use the Start and Stop buttons located on the User Interface Control Panel instead Scanner Control Panel 5 User Inte...

Страница 20: ...o verify Printer operation Job log and error log management Display of billing meter information The Touch Screen displays messages and contains the selection and feature buttons for setting up copy a...

Страница 21: ...The following screen displays the printer only features There is no scanner connected 1 11 Xerox Wide Format 6622 Solution User Guide Product Overview...

Страница 22: ...int from Device Displays the Basic Copy tab Image Quality tab Advanced Settings tab and Recall tab Copy Allows users to store scanned jobs in a mailbox for later retrieval and printing Scan to Mailbox...

Страница 23: ...ter text This section of the keyboard is used to enter text Table 10 Keyboard layout Function Component Displays the characters entered on the numeric keypad Entry Area Use the cursor buttons to move...

Страница 24: ...nables System Administrator and Job Accounting Login access Administrator access requires a secured password Job Accounting access requires an account name and User ID Guest access does not require a...

Страница 25: ...Saver feature automatically reduces the power consumption when no print data is received within a preset period The Power Saver feature has two modes Low Power Mode and Sleep Mode The machine enters...

Страница 26: ...hine in the Power Saver mode press the illuminated Power Saver button The button s indicator light extinguishes the Touch Screen displays the message Warming Up and the machine begins its warm up cycl...

Страница 27: ...cleaned when this button is pressed The Ready Indicator flashes during the cleaning process Exp Clean key 7 Displays the selected media roll for lead edge cut when the SELECT key is pressed Media Rol...

Страница 28: ...identified in the message display as dx x being the drawer number In Use Indicators 3 This indicator displays the remainder of the Media Roll Lamps go off from right to left as the media diminishes Ro...

Страница 29: ...Online Key to take the printer Offline The green LED light goes off the page in process finishes and the printer enters the Offline Mode Print jobs are still accepted to the job queue 2 To return the...

Страница 30: ...ts that have been folded wrinkled torn or had holes punched in them These may result in document jams and tearing When rolled documents are used ensure that the diameter of the roll is 1 6 40 mm or la...

Страница 31: ...ode Continue with Image Quality adjustments as required Scan Mode Continue with Image Quality adjustments as required Copy Mode Set Background Suppression to Disabled unchecked Scan Mode Set Backgroun...

Страница 32: ...nap to Black Old blueprint or sepia with dark background and side to side fading Copy Mode In Reduction mode use Reduction Line Preservation located in Machine Info Admin Copy Options Adjust the copy...

Страница 33: ...edia Roll Select from the Media Roll size s loaded in the Media Drawers Cut Sheet Media Select this to load media in the Manual Feed in Shelf 4 Load the original face down for scanning NOTE Refer to t...

Страница 34: ...match button displays on the Menu screen if the controller detects this condition when it receives a print job Press the Media Mismatch button and then follow the instructions on the screen If you cho...

Страница 35: ...qual to 6 7 inches 170 mm Bond Paper 20 lb 500 ft rolls Xerox Premium Bond or Xerox Performance Bond 18 lb Translucent Bond Roll 1 Roll 2 Roll 3 Roll 4 20 75 g m2 Performance 18 N A Translucent Bond 4...

Страница 36: ...ium Tracing 112 Tracing Paper 90 112g m2 N A Premium Translucent 100 micron Film 4 Mil Zero Solvent A I Elite N A 4 mil Accu Image Film Film European 75 100 micron NOTE Jams may occur if the media bei...

Страница 37: ...re paper media is a humidity of 40 to 45 Keep the following in mind when storing paper media Moisture is not good for media For storage wrap the media in wrapping paper and store it in a comparatively...

Страница 38: ...rinter is switched off as long as the printer is connected to a live power outlet On all the time If the Xerox Service Representative has enabled the Dehumidifier the heaters can be switched on or off...

Страница 39: ...e Spindle out of the Media Core 7 Press the green Media Locking Lever and insert the Spindle into the new roll of media 8 Align the edge of the media with the appropriate Media Width Indicator NOTE To...

Страница 40: ...correctly positioned the printer indicates an out of media condition 11 If the leading edge of the Media Roll is taped cut enough to eliminate the possibility of glue from the tape contaminating inter...

Страница 41: ...rollers Roll 3 only NOTE Roll 3 is the only roll with the Viewing Window used to confirm the position of the lead edge of the media 14 Rotate the feed roller until the lead edge is visible in the cen...

Страница 42: ...ndle and open Media Drawer 3 4 2 Rotate the Spindle in the rewind direction even if the paper is not in the rollers but is loose Failure to perform this step may cause the gear at the left end of the...

Страница 43: ...propriate Media Width Indicator NOTE To ensure that the Media Roll will not slip on the Spindle lift up on the green Media Locking Lever after the roll is in position This action provides a positive g...

Страница 44: ...the Printer indicates an out of media condition 9 If the leading edge of the Media Roll is taped cut enough to eliminate the possibility of glue from the tape contaminating internal printer component...

Страница 45: ...d Lower Feed Rollers NOTE Notice the media in Media Roll 4 feeds from underneath 11 Rotate the Media Advance Knob in order to feed approximately 1 inch 25 mm of media between the feed rollers 1 35 Xer...

Страница 46: ...awers 1 3 and 4 may be loaded when the Xerox Wide Format 6622 Solution is in progress Media Roll 2 can not be loaded when the 6622 is operating 1 Ensure that the Media Roll is not currently being used...

Страница 47: ...Manual Feed in Shelf Bypass 1 Select the appropriate cut sheet for the print job 2 Position the media Long Edge Lead LEL NOTE The 6622 expects all cut sheet media to be fed with the Long Edge Leading...

Страница 48: ...smaller than 24 the 6622 feeds the media when the print job starts 841mm or wider greater than 24 1 sheet only 279mm 11 to 609mm 24 width up to 50 sheets 457mm 18 inch length maximum fed long edge In...

Страница 49: ...d in Shelf Bypass Interrupting a Print Job Setting Up the Basic Copy Selections Setting Up the Image Quality Selections Setting Up the Advanced Settings Selection Setting Up the Recall Selections Prin...

Страница 50: ...arrow key takes you back Delete files using the red X selection The View All selection displays all file types beyond the primary FreeFlow Access recognizes 4 Select Print A message indicates the spo...

Страница 51: ...p 1 Selecting Features Step 2 Entering the Copy Quantity Step 3 Copying the Original Step 4 Stopping a Copy Job Step 1 Selecting Features Making a copy begins by displaying the Copy screen on the User...

Страница 52: ...ormation about this tab refer to Setting Up the Basic Copy Selections which appears later in this chapter Image Quality Tab Select the required image quality features from those displayed on the Image...

Страница 53: ...features and the procedure to enable them refer to Setting Up the Image Quality Selections which appears later in this chapter Advanced Settings Tab Select the features to be setup from those displaye...

Страница 54: ...alue press the C button to clear the entry and then enter the correct value Step 3 Copying the Original 1 Orient the original image face down in the Scanner Feed in Shelf aligning the document with th...

Страница 55: ...el Making Copies Using the Manual Feed in Shelf Bypass The Manual Feed in Shelf Bypass feature enables copying using cut sheet media Only one sheet may be loaded at a time 1 Select Copy on the Service...

Страница 56: ...al does not feed automatically the Scan Start mode may be set to Manual Start In this case press the Start button on the Control Panel For more information about the Scan Start mode refer to the Syste...

Страница 57: ...and Check Plot Scan Display Printer Interrupt Scanned Image To access the Copy screen and the Basic Copy tab 1 Select Copy on the Services menu 2 Select the required features from the Basic Copy tab...

Страница 58: ...largement ratio that does not appear on the Copy screen follow the steps below 1 Select Presets and More on the Basic Copy tab below Reduce Enlarge The Scale Factor screen displays 2 Select from eithe...

Страница 59: ...and change the series 1 Select Copy on the Services menu The Copy screen displays 2 Choose from the following Media Source selections Auto Select The machine automatically selects the correct media b...

Страница 60: ...opy on the Services menu The Copy screen displays 2 Select from the collation options Uncollated Non sets build mode Pages are printed as they are copied Reverse Collation Page n is on the top of the...

Страница 61: ...according to the Document Size for Original Types set to Photo Text Line and Blue Line exclusively This information is useful to ensure the memory can accept the copy set capacity Maximum pages Docume...

Страница 62: ...lete All Images Selecting this button causes all the scanned images to be deleted Change Settings Displays the Copy screen enabling you to change the settings reduction enlargement original type media...

Страница 63: ...rupt to resume the print job it will be canceled automatically as a default NOTE The Print Interrupt Timeout period may be changed from the one minute default up to 99 minutes Print Interrupt Timeout...

Страница 64: ...x as an option 2 Select Scan to Mailbox 3 Select the Image Quality tab 4 Select the best Sharpness setting using the scroll key Contrast The Contrast option increases or decreases the contrast of the...

Страница 65: ...the Services menu The Copy screen displays 2 Select the Image Quality tab 3 Select Background Suppression from the Image Quality screen 4 Select the Background Suppression setting from the Image Qual...

Страница 66: ...Set up the features on the Advanced Features tab for the documents you will be scanning Media Type The media types are Bond Vellum or Film If the media type chosen is not loaded in the printer Media...

Страница 67: ...will display 3 Select the Advanced Settings tab 4 Select Sample Copy and one of the two choices Rendering The Rendering option permits you to specify the type of image processing that will be applied...

Страница 68: ...the left and right sides of the original image reversed Y Axis Copies are made with the top and bottom of the original image reversed XY Axis Copies are made with the top and bottom of the original i...

Страница 69: ...orner Shift 5 If you choose Corner Shift continue by selecting from the options provided 6 Select Save when finished Margins The Margins feature enables you to add margins white space at the top botto...

Страница 70: ...idth Detection Standard Width This features lets the scanner determine the actual original documents width Variable Width This feature allows you to set variable scan widths from 8 2 to 36 inches in i...

Страница 71: ...t equivalent to the dimension you specify will be applied to the original when it is scanned 1 Press the Services button on the Control Panel The Services menu will display with Copy as an option 2 Se...

Страница 72: ...l Panel The Services menu will display with Copy as an option 2 Select Copy The Copy screen will display 3 Select the Finishing The Finishing selections will display 4 Select the required Folder Progr...

Страница 73: ...Information Administration General Administration Enable Disable Image Recall The default setting is Enabled If Immediate Image Overwrite is disabled and Image Recall is enabled you can recall the la...

Страница 74: ...an allows you to review the last scanned image A System Power On Default template can be set to save time and redundancy programming features for commonly run jobs 3 Select Template 4 Check off System...

Страница 75: ...lly zooms in and out on the image Pan In this mode the image may be dragged left right up and down Select In this mode a portion of the image may be selected by touching and dragging over the image Th...

Страница 76: ...Pan and Select modes Best Fit Returns the image to the original scanned view Changes to the Pan mode 5 Touch the Select button to highlight the image 6 Touch the image on the User Interface then drag...

Страница 77: ...FTP directory destination There are 16 possible directory destinations available Scan to Remote Printer Sends the scanned images to be printed on a network printer There are 16 printer destinations a...

Страница 78: ...or use the Xerox FreeFlow Accxes Printer Server and Web Printer Management Tool Setup Guide for detailed instructions Creating a Mailbox Before using the Scan to Mailbox service you need to define a...

Страница 79: ...ilbox are Standard Mailboxes up to 50 total Document List within a mailbox Settings of a mailbox Delete a mailbox Selecting Mailboxes The Scroll to selection is used to link you to a mailbox or you ma...

Страница 80: ...can do the following to your documents Scroll the list Delete Delete All Document List The Document List section located on the Select a Destination Mailbox screen displays the Edit Mailbox Document L...

Страница 81: ...ation The Select a Destination Mailbox screen displays 4 Select the mailbox you wish to delete 5 Then select Delete A Delete Confirmation window displays NOTE Once a mailbox is deleted it can not be r...

Страница 82: ...Select a Destination Mailbox screen 4 Select Settings The Mailbox Settings screen displays 5 Select the Set this Mailbox as the default to set NOTE The default mailbox appears as the selected mailbox...

Страница 83: ...e a Document 1 Press the Services button on the Control Panel 2 Select the Scan to Mailbox feature on the screen 3 Select Destination 4 Select the plus and minus keys or enter your mailbox number in t...

Страница 84: ...ice to highlight 2 Select Document List The Print From Device screen displays Here you see the removable device list of contents 3 Browse the Document List select the document desired and then Print R...

Страница 85: ...Retrieving Files Stored in a Mailbox Step 1 Selecting a Mailbox and Using Templates Scanning a copy begins by displaying the Scan to Mailbox screen on the User Interface Once that is done set up the...

Страница 86: ...the format selected on the Scan to Mailbox tab If Preview Generation located under Advanced Settings tab is enabled you also get a thumbnail in the form of a jpg file The thumbnail image can be downl...

Страница 87: ...Mailbox and Advanced Settings you choose as a Template for future use A System Power On Default template can be set as well to save time and redundancy by programming features for commonly run jobs F...

Страница 88: ...4 Photo Halftone Photo Contone Text Photo Text Line Text Line Clear TIFF PDF CALS Snap to Black 1 bit Packbits Raw Photo Halftone TIFF Grayscale 8 bit Normal Best Compression Best Image Quality Photo...

Страница 89: ...ss Background Suppression 1 Select Scan to Mailbox 2 Select the Image Quality tab and the required image quality features from those displayed on the screen Density The Density option allows you to ad...

Страница 90: ...ices button on the Control Panel The Services menu will display with Scan to Mailbox as an option 2 Select Scan to Mailbox 3 Select the Image Quality tab 4 Select the best Sharpness setting using the...

Страница 91: ...e check mark to enable Step 4 Select Advanced Settings Features You can configure items such as scanned image size and the scan start position on the Advanced Features screen The Advanced Settings tab...

Страница 92: ...below Pixels that were white in the scanned image are printed black and black pixels in the scanned image are printed white 1 Press the Services button on the Control Panel The Services menu will dis...

Страница 93: ...is scanned 1 Press the Services button on the Control Panel The Services menu will display with Scan to Mailbox as an option 2 Select Scan to Mailbox 3 Select the Advanced Settings tab 4 Select Scan...

Страница 94: ...Copies are made with the left and right sides of the original image reversed Y Axis Copies are made with the top and bottom of the original image reversed XY Axis Copies are made with the top and bott...

Страница 95: ...t the desired option Disabled The controller will not generate a print of the scanned image Enabled The controller will print the scanned image 6 Select Save when finished Preview Generation Use the P...

Страница 96: ...the scanner determine the actual original documents width Variable Width This feature allows you to set variable scan widths from 8 2 to 36 inches in increments of 0 1 inch 1 Press the Services butto...

Страница 97: ...s down too hard on the original pull it during scanning or release it before it stops feeding NOTE To prevent document jams when copying originals that contain holes orient the original so that the ho...

Страница 98: ...on the controller in a JPG format The thumbnail image file can be downloaded into Accxes Client Tools Step 6 Stopping a Scan Job Press the Stop button on the User Interface Control Panel NOTE The Clea...

Страница 99: ...ase File Name and Destination select the Clear button located on the Control Panel To reset indexing to zero remove or retrieve scanned files from that destination Scan to Removable Devices There are...

Страница 100: ...d if the Scan to Network feature key is not present and enabled See your System Administrator 2 Select Scan to Mailbox followed by the features and settings desired from the Scan to Mailbox Image Quai...

Страница 101: ...ect Scan to Mailbox followed by the features and settings desired from the Scan to Mailbox Image Quailty and Advanced Settings tabs 4 Ensure File Format type Multiple pages on the Scan to Mailbox scre...

Страница 102: ...er right hand on the User Interface to safely remove the device Scan to FTP The Scan to FTP feature allows users to Submit scanned jobs up to 16 Destinations to File Transfer Protocol FTP destinations...

Страница 103: ...documents If Preview Generation was enabled in Advanced Settings a thumbnail jpg file was also created NOTE Refer to Naming Scanned Files for details if required Scan to Remote Printer The Scan to Re...

Страница 104: ...name is now present in the Destination field 5 Select Scan to Remote Printer Image Quality and Advanced Settings features as desired 6 Load your document into the Scanner 7 You may now get your outpu...

Страница 105: ...printer Contact your System Administrator for this if required NOTE Refer to the Maintenance chapter for cleaning the scanner prior to scanning the Color Calibration targets Cleaning the five Contact...

Страница 106: ...ting Color Calibration Targets screen again If you need to resume start at the Current Color Calibration Session screen 10 You may choose to trim off the excess paper from the printed calibration targ...

Страница 107: ...are feeding a calibration target rather than another document into the Scanner Targets are marked with a title for identification Check that the color calibration target is inserted in the correct or...

Страница 108: ...Xerox Wide Format 6622 Solution 3 32 User Guide Scanning Documents...

Страница 109: ...e client workstation using Web Printer Management Tool or a network Printer Driver All Tab The contents of this tab is a list of all jobs in their various stages of completion Jobs are displayed wheth...

Страница 110: ...printer viewed and released using either Web Printer Management Tool or the User Interface Jobs can also be placed on hold from the same locations Jobs in the Hold Queue consume memory and disk space...

Страница 111: ...n the Job Information screen Whether you are submitting a reprint job with or without edits it is moved from the Reprint queue to the Active queue Reprint Jobs with Edits Perform the following to Repr...

Страница 112: ...ou can customize one percentage value as desired Auto The ratio is automatically set up based on the original document size and the installed media size The document is copied to fit the currently sel...

Страница 113: ...The originals in the set also can be mixed that is of different types text photo etc A maximum of 256 pages may be scanned in each collation job The factory default setting for Collation is None NOTE...

Страница 114: ...em Administrator the Remove Selected button is not present Perform the following 1 Select Job Information from the Services menu 2 Select the Reprint tab 3 Select the job s you wish to delete 4 Select...

Страница 115: ...xx 2 Select the Configuration Miscellaneous tabs 3 Ensure the Thumbnail Creation and Job Reprint Enable boxes are check marked 4 Notice the Job Reprint Policy pull down options and choose the desired...

Страница 116: ...as an Edit button where the user can Edit Job Options specific for printing and then submit the job to the designated remote printer The selected jobs disappear from the Reprint Queue and reappear in...

Страница 117: ...view Most of the features available using the Xerox Wide Format Solution are accessible to all users Some features however are restricted to the System Administrator if the environment warrants it Tho...

Страница 118: ...s the Log In Out button on the Control Panel to access the System Administrator screen Login Options The Log In Out screen shown below allows the user or administrator to log in to the system in one o...

Страница 119: ...pted to enter your login information as you try to access the appropriate features 1 Select System Administrator Log In The Enter SA Password screen displays 2 Enter the System Administration password...

Страница 120: ...OTE You can be logged in as an administrator and as a Job Accounting user at the same time You are prompted to enter your login information when accessing the appropriate features NOTE For more detail...

Страница 121: ...e General Administration settings enable you to display and set the time on the machine change the administrator password shut down and restart the system and perform job accounting tasks If you are n...

Страница 122: ...s reports error messages etc The machine uses a 24 hour clock 0 23 1 Select Machine Information from the Services menu 2 Select the Administration tab Refer to the Machine Information chapter for more...

Страница 123: ...eypad to enter the digit s enter a system password 6 Select Enter 7 Select Close to exit the General Administration screen Job Accounting Overview Job Accounting tracks copy scan and print media usage...

Страница 124: ...and copy and scan options do not display on the screen Disabled Job accounting is turned off The user can access the printer copy and scan operations listed on the Services menu screen Optional Users...

Страница 125: ...ation tab General Administration 2 Select Configure Job Reprint The Job Reprint Options screen displays Shutdown Restart System Power Off CAUTION Powering down the system incorrectly may result in dat...

Страница 126: ...obs run before print jobs Copy Scan jobs finished processing are displayed in the Job Information Reprint queue Copy Scan jobs that did not finish processing are cancelled Shutdown from the User Inter...

Страница 127: ...shut down the system from the Web Printer Management Tool 1 Open the Web Printer Management Tool at your workstation by entering the IP Address of the machine in the web browser 2 Select Utilities Sh...

Страница 128: ...is is the case when the Image Recall function discussed above is enabled Security concerns in some work environments might require that the image recall feature be disabled so that sensitive materials...

Страница 129: ...om 10 of the overwritten area See Online Help in Web Printer Management Tool for more details about using the Immediate Image Overwrite feature Scan Display This feature displays a scanned preview as...

Страница 130: ...o the System Administrator if there is a secure password set Without a secure password set any user can perform these operations Placing all jobs on hold 1 Select Machine Info from the Services screen...

Страница 131: ...screen allows you to set up the values for the time out features The timeout features are defined on the following pages Low Power Timeout Sleep Timeout Features Timeout File Deletion Timeout Print In...

Страница 132: ...lect Save 8 Select Save to return to the Control Panel screen NOTE The Sleep Mode setting cannot be less that the Low Power Mode setting NOTE In European markets the legally mandated EMC directive is...

Страница 133: ...ys 3 Select the Administration tab 4 Select Control Panel from the Administration tab 5 Select Configure timers The Set Timeout Durations screen displays 6 Select File Deletion Timeout from the Timers...

Страница 134: ...serted into the Scanner and prefeeds Use Start key You must press the Start button to initiate scanning after the document prefeeds 7 Select Save 8 Select Close on the Control Panel screen to return t...

Страница 135: ...t know the above information perform the following steps to generate a Configuration Report 1 Select Machine Info on the Services menu 2 Select the Print Reports tab 3 Select Printer Configuration Ins...

Страница 136: ...Setup Guide or Web Printer Management Tool Online Help for network settings instructions Setting up a Static IP Address 1 Select the Services button on the Control Panel followed by Machine Info Admin...

Страница 137: ...Panel followed by Machine Info Administration Tab Network Setup 2 Select Gateway from the Network Setup screen The IP Gateway screen displays 3 Enter the Gateway in the format XXX XXX XXX XXX 4 Select...

Страница 138: ...nabled the network interface utilizes the DHCP to acquire a temporary IP Address for the networked device from a client that is supplying DHCP services on the network Since constantly changing IP addr...

Страница 139: ...te with the resulting DHCP address via Dynamic DNS This feature was originally designed to work with BIND DNS servers version 9 0 or greater but has been shown to also function with some configuration...

Страница 140: ...y Options screen displays 4 Select Select Output Media Series The Enable Output Media Series screen displays 5 Select the appropriate media size series 6 Select Save to return to the Copy Options menu...

Страница 141: ...5 Select one of the displayed Targeted R E preset buttons or select the numeric entry field and enter a Custom R E value using the numeric keypad or the scroll buttons Numeric Keypad shown below displ...

Страница 142: ...tion Line Preservation Use this feature to enable disable line preservation when reducing normal and line mode documents The default setting is Enabled 1 Select the Services button on the Control Pane...

Страница 143: ...tput Formats Use the Configure Custom Output Formats option to define non standard sizes that you expect to print frequently You can define up to six custom output media sizes The sizes that you set u...

Страница 144: ...ze appears within the parentheses 6 Perform one of the following Using the scroll buttons enter the dimensions of the customized output format and then select Save Using the numeric keypad enter the d...

Страница 145: ...e Info Administration Tab 2 Select the Copy Options button The Copy Options menu displays 3 Select Enable Disable Auto Rotate The Set Auto Rotation screen for Auto Rotation appears 4 Select the Disabl...

Страница 146: ...Xerox Wide Format 6622 Solution 5 30 User Guide System Administration...

Страница 147: ...further are the following Media Status and Setup Printing Configuration Reports and Diagnostic Reports Overview of Machine Info The Machine Info menu allows the general users to access some informati...

Страница 148: ...Usage The amount of media that has passed through the machine Area Usage The media used in square foot measurement Control SW Software Version The FreeFlow Accxes Print Server software version display...

Страница 149: ...one prior to scanning your job if the settings on the Copy Media Source screen below do not meet your needs Refer to the Product Overview chapter Media Source for media details 1 Select the Media Sour...

Страница 150: ...NOTE If you change the roll media type or media series you must select the Media Type button located inside the Media Drawer to match that which you are using How to Access Media Settings 1 Select Ma...

Страница 151: ...such as the media size and type must be supported by the printer The printer must be equipped with the print media in the correct size to print If the attributes specified by the print job are not su...

Страница 152: ...printer Configuration reports may be printed from either the User Interface or Web Printer Management Tool on your client workstation The Diagnostic Prints may be printed using the User Interface only...

Страница 153: ...tilities tab 3 Select the Test Print sub task that appears 4 Depending on your information requirements select Minimal Normal Full or PostScript test print Minimal Prints the configuration data Normal...

Страница 154: ...Configuration Test Sample Report Printer This report is a sample printout Xerox Wide Format 6622 Solution 6 8 User Guide Machine Info...

Страница 155: ...Setup Test Print Sample Report Printer Settings This report is a sample printout 6 9 Xerox Wide Format 6622 Solution User Guide Machine Info...

Страница 156: ...Pen Settings This report is a sample printout Xerox Wide Format 6622 Solution 6 10 User Guide Machine Info...

Страница 157: ...figuration tab displays configurations software versions and the availability of the component options as shown below How to Access Machine Configuration 1 Select Machine Information on the Services m...

Страница 158: ...work settings to connect to a remote printer and control panel changes General Administration Change date and time settings job accounting shutdown and restart and change the password Network Setup Co...

Страница 159: ...Lamp Control Mode User Mode 6 U7 Attention Beeper On Off User Mode 7 U8 Custom Setting Plain Media User Mode 8 U9 Custom Setting Vellum Tracing Media User Mode 9 UA Custom Setting Film User Mode A Ub...

Страница 160: ...e Status Display indicates the test print status on steady Test print mode is not available printer warming 000 on steady Test print is available 000 flashing Test print in process 2 Press the Enter K...

Страница 161: ...C5 Correction Mode Minute 7 30 C6 Correction Mode Second 8 3 To change the seconds press Enter The seconds stop scrolling and begin to flash 4 To change the value press the Key to increase the value...

Страница 162: ...ted 12 Press the Online Key to exit the User Mode User Mode 3 UE Low Power Saver Mode NOTE The User Interface has a default setting for this feature and will over ride disable manual settings in this...

Страница 163: ...he printer switches off power to the Printer Fuser Assembly after a predetermined time of inactivity If the printer does not receive a print job or a copy job for the time selected in this mode the pr...

Страница 164: ...nitial Media Cut when the printer power is turned on or after Sleep Mode If this feature is enabled the printer will feed and cut 240 mm 9 5 inches of all 4 roll media when the machine is powering up...

Страница 165: ...nt setting on the right side 2 Press Enter 3 Press the key to decrease the value to 0 Off The range is 1 On and 0 Off 4 Press the Online Key to exit the User Mode NOTE If a higher than normal jam rate...

Страница 166: ...to exit the User Mode NOTE Factory default is 1 On User Mode 8 U8 Custom Setting Plain Paper This mode switches between the standard setting for plain paper and the custom setting for plain paper This...

Страница 167: ...er This feature enables the Service Representative to custom set the printer for a brand of vellum tracing paper that has different handling characteristics NOTE The custom setting parameters Fuser Te...

Страница 168: ...he Menu Key 10 times to enter Mode A The Menu Key lights and the display indicates UA 2 Press Enter 3 Press the key to change the value to 1 On Standard Setting 0 Custom Setting 1 4 Press Enter key to...

Страница 169: ...store the value 5 Press the Online Key to exit the User Mode NOTE Factory default is 0 No Enhancement NOTE This setting can also be made on the Service Mode 4 C7 NOTE The last setting will remain unti...

Страница 170: ...ot checking for the E 26 error 1 On The printer is checking for the E 26 error 4 Press Enter key to store the value 5 Press the Online Key to exit the User Mode User Mode E UE Temporary Clearance of E...

Страница 171: ...is checking for the E 28 error at a normal check level 2 On2 The printer is checking for the E 28 error at a higher check level 4 Press Enter key to store the value 5 Press the Online Key to exit the...

Страница 172: ...Xerox Wide Format 6622 Solution 7 14 User Guide User Modes...

Страница 173: ...Scorotron Wire Cleaning the LED Print Head Cleaning the Machine Surface Cleaning the Scanner Ordering Supplies Toner Cartridge Replacement C 01 When the Toner Cartridge is empty the Toner Empty indic...

Страница 174: ...eral Toner Cartridges are supplied as part of a kit including installation instructions Store the remaining Toner Cartridges in a cool dry place until they are required The Toner Cartridge can be repl...

Страница 175: ...end of the Toner Cartridge Latch and remove the cartridge by grasping the left end 4 Shake the new cartridge several times in order to prepare the contents for use and remove the foam band from the ca...

Страница 176: ...o rotate the Toner Cartridge downward into position until it stops 9 Close the both the Left and Right Side Doors Status Code U 06 will go out The Toner Level Display on the display panel will scroll...

Страница 177: ...en the printer is switched on if the fuser temperature is below 200o F Cleaning the LED Print Head Periodic cleaning of the LED Print Head will reduce print quality problems such as light prints or de...

Страница 178: ...The Scanner Document Glass Sensors Document Feed Rollers and Calibration Strip must be kept clean to ensure optimized image quality for scanned images Clean these on a regular basis and whenever they...

Страница 179: ...been removed 6 Place a small amount of cleaning fluid on the cloth and clean the front and rear Feed Rollers NOTE Rotate the rolls as you clean them to ensure that the entire roll surface is clean 7 P...

Страница 180: ...this product Xerox also offers bond paper vellum tracing paper and film in various sizes weights and grades to meet your printing needs Supply Order Procedure To order supplies for the Xerox Wide For...

Страница 181: ...Misfeeds Media Misfeed Errors J codes Printer Errors E codes Interlock Errors U codes Image Quality Problems Service Call Error Codes E codes General Problems Table 23 General Problems Solution Proble...

Страница 182: ...ing Copying The following helps you solve problems encountered during copying Remedy Check Symptoms Select the media size series that matches the media size Refer to Media Settings Did you select the...

Страница 183: ...Correctly set up the media size series and the media type thickness to match the media that is loaded Refer to Media Settings Is the media loaded correctly and are the media settings correct Open the...

Страница 184: ...s skewed Load the media correctly Refer to Loading Media Is the media loaded correctly Firmly push in the media tray Refer to Loading Media Is the media tray set up correctly If the media is damp some...

Страница 185: ...hine Is the scanning area dirty Black lines are printed Contact your Xerox Customer Support Center Internal components are dirty Correctly load the appropriate media Refer to Loading Media Is the corr...

Страница 186: ...tire media area is printed black Place the document face up to scan Was the document scanned face down Nothing is copied Contact your Xerox Customer Support Center A probable cause is an internal mach...

Страница 187: ...t Center Internal parts may have become soiled The scanned image has black lines Make sure the Original Type is selected correctly Adjust the scan density by selecting Services Scan to Network Scan to...

Страница 188: ...olve the problem Correctly set up the IP address Check if an interrupt operation is being performed If so cancel the interrupt operation Unable to Print Load the correct size media according to the me...

Страница 189: ...not solve the problem contact your Xerox Customer Support Center Internal parts may have become soiled Dirt appears at equal intervals Contact your Xerox Customer Support Center Internal components ma...

Страница 190: ...ith toner Contact your Xerox Customer Support Center There may be an internal machine error The entire paper area is printed black Contact your Xerox Customer Support Center There may be an internal m...

Страница 191: ...original according to the instructions displayed 1 Lift the Scanner Handle to release the scanner latch 2 Lift the Scanner Unit to open it 3 Remove the misfed original NOTE Pull the document slowly T...

Страница 192: ...User Interface Touch Screen Media jams information If media jams occur the machine stops an alarm sounds and the misfeed indicator lights red on the Operator Panel Remove the jammed media according to...

Страница 193: ...es of torn media are left in the machine A piece of media remaining in the machine potentially could cause a fire WARNING If a sheet of media is wrapped around the heat roller or the jammed media is d...

Страница 194: ...ntrance J 13 In Fuser Assembly J 14 Folder Area J 21 Auto Stacker Area J 22 Clearing Media Jam J 01 J 02 J 03 J 04 Table 27 Missfeed codes Location of Misfeed Misfeed Code Media Roll 1 Drawer 1 J 01 M...

Страница 195: ...oll square to remove any torn or wrinkled media by using the Cutting Ledge if necessary 4 Insert the lead edge of the media between the upper and lower feed rollers 9 15 Xerox Wide Format 6622 Solutio...

Страница 196: ...r to feed approximately an inch of media between the feed rollers NOTE Roll 3 only NOTE Roll 3 is the only roll with the Media Viewing Window used to confirm the position of the lead edge of the media...

Страница 197: ...Cut key Approximately 9 5 240mm media will be cut and fed from the printer Clearing Media Jam J 05 When a J 05 occurs the media mis feed is located in the Manual Feed in Shelf Bypass 1 Pull to open Me...

Страница 198: ...een the Cutter and the Photoreceptor Drum 1 Pull out the Bypass Feeder Drawer 1 and 2 2 If a cut sheet of media is present remove it and go to step 7 If the media is not yet cut continue with the next...

Страница 199: ...er clockwise It will damage the Cutter Blade 6 Close the Side Doors 7 Remove the cut media from the front inside of the machine 8 Push in the Manual Feed in Shelf Bypass 9 Rewind the media rolls from...

Страница 200: ...Right Side Doors 2 Turn the Inner Transport Assembly Handle to release the Transport 3 Lower the transport and lock it down by latching the Inner Transport Lock 4 If a cut sheet of media is present re...

Страница 201: ...me position CAUTION Do not rotate the Cutter Knob counter clockwise It will damage the Cutter Blade 7 Carefully remove the media from the Inner Transport area CAUTION Do not touch scratch or damage th...

Страница 202: ...the feed rolls If too much media had advanced it may misfeed 12 Close the Media Drawers 13 If the leading edge is not sufficiently square perform the automatic Initial Cut by pressing the Select key...

Страница 203: ...t and go to step 13 6 If the media is not yet cut continue with the next steps 7 Turn the green Cutter Knob to the right once and only one revolution to cut the roll media NOTE Do not rotate the green...

Страница 204: ...ise to release the mis fed media from the Fuser area 10 Open the Exit Cover to see the misfed media CAUTION There are many hot surfaces inside the Exit Cover The Fuser Roll and Pressure Roll are espec...

Страница 205: ...nd the media roll to the original position which is slightly between the feed rolls If too much media had advanced it may misfeed 17 Close the Media Drawers 18 If the leading edge is not sufficiently...

Страница 206: ...call for service Counter A B error E 06 Clear all jams from the printer then rotate the green Cutter Knob so that the green indicator is in the cutout Press power off then on If problem still exists...

Страница 207: ...open U 06 Open and close the Manual Feed in Shelf Bypass Manual Feed in Shelf Bypass is open U 11 Reset the Manual Feed in Shelf Bypass Right Door Top Rear Cover Exit Cover A interlock is open U 10 C...

Страница 208: ...away from trial edge Increase the trail edge margin setting using Accxes Tools Image too close to trail edge Service Call Errors If the Xerox Wide Format 6622 Solution has any abnormal error which the...

Страница 209: ...mostat error E 21 LED head cleaning motor error E 23 Surface potential control error E 26 Density sensor error E 27 Density control error E 28 Developer disconnection error E 30 RFID IC Tag Error E 43...

Страница 210: ...Xerox Wide Format 6622 Solution 9 30 User Guide Problem Solving...

Страница 211: ......

Страница 212: ......

Отзывы: