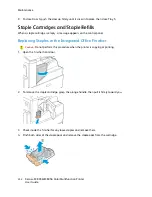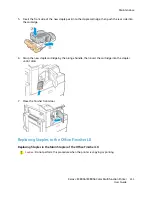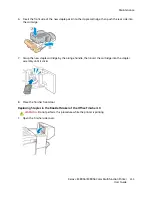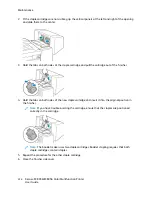
background image

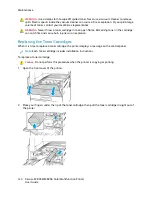
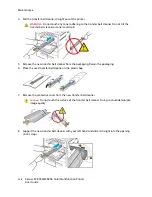
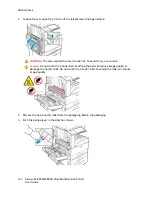
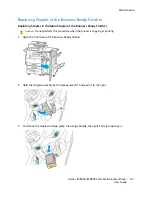
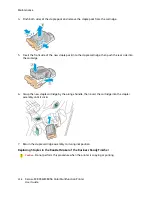
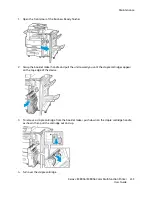
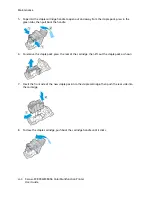
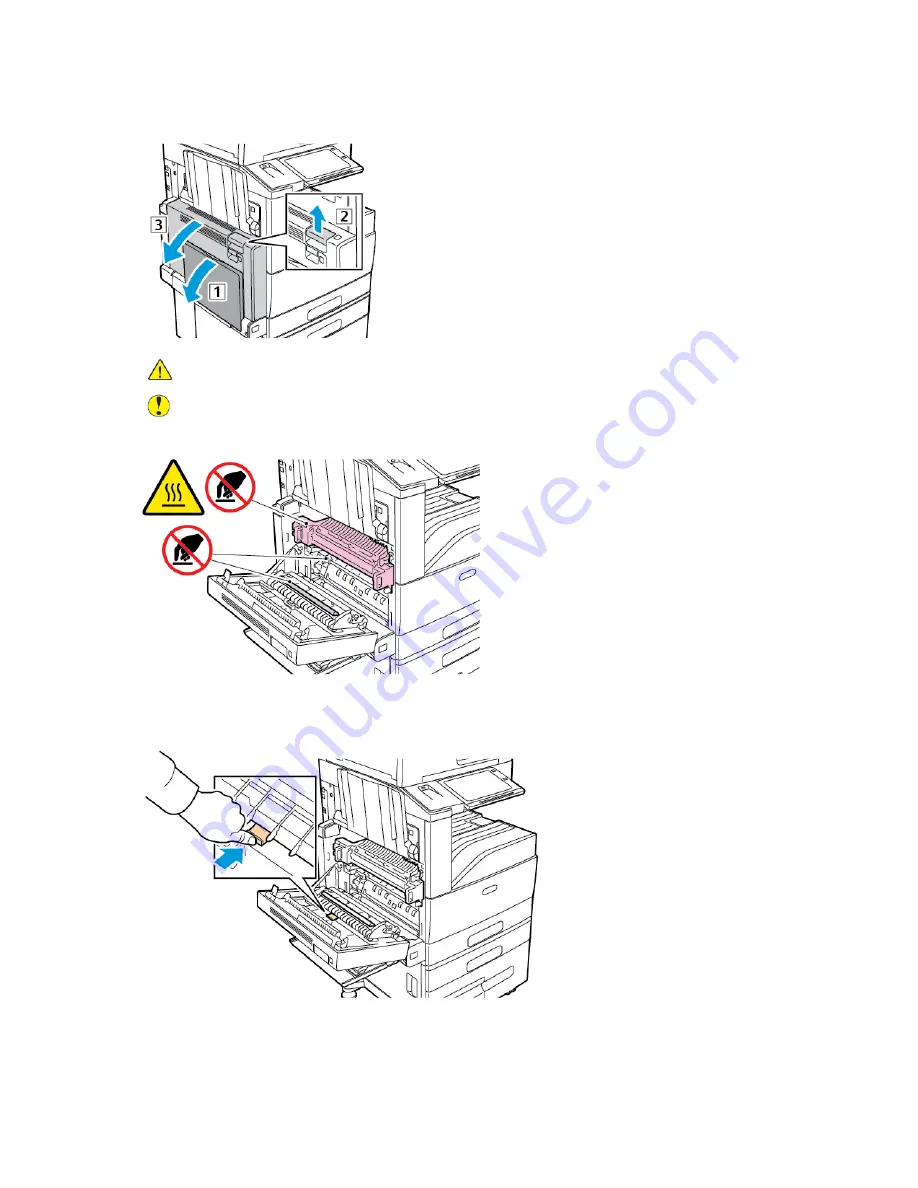
2. To open Door A, open Tray 5, then lift the release lever and open Door A.

WARNING:

The area around the fuser can be hot. To avoid injury, use caution.

Caution:

Do not touch the transfer belt. Touching the belt can reduce image quality or

damage the transfer belt. Do not touch the transfer roller. Touching the roller can reduce

image quality.

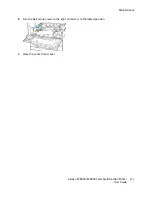
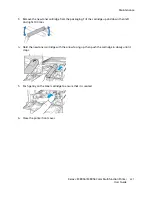
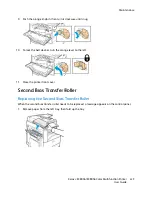
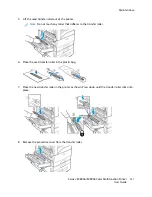
3. Remove the new transfer roller from the packaging. Retain the packaging.

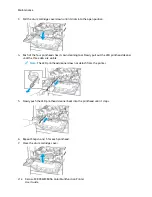
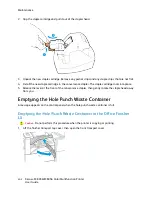
4. Push the orange lever in the direction shown.

230

Xerox

®

EC8036/EC8056 Color Multifunction Printer

User Guide

Maintenance

Содержание EC8036

Страница 1: ...Version 1 0 July 2021 702P08641 Xerox EC8036 EC8056 Color Multifunction Printer User Guide...

Страница 2: ...re registered trademarks of International Business Machines Corporation in the United States and or other countries McAfee ePolicy Orchestrator and McAfee ePO are trademarks or registered trademarks o...

Страница 3: ...ontact Information 20 2 Getting Started 21 Parts of the Printer 22 Front View 22 Duplex Automatic Document Feeder 23 Control Panel 24 Internal Parts 27 Rear View 28 Configurations and Options 29 Power...

Страница 4: ...ranging Apps on the Home screen 67 Deleting an App from the Home Screen 68 Removing Customization From the Home Screen 68 Customizing or Personalizing the Apps 69 Customizing or Personalizing the Feat...

Страница 5: ...ing 108 Scan To 119 Scan To Overview 119 Scanning to an Email Address 119 Scanning to a USB Flash Drive 120 Scanning to a Shared Folder on a Networked Computer 121 Scanning to the Logged In User 123 A...

Страница 6: ...ced Printing Options 168 Using Custom Paper Sizes 171 Defining Custom Paper Sizes 171 Printing on Custom Size Paper 172 Print From 174 Printing From a USB Flash Drive 174 Printing from Saved Jobs 174...

Страница 7: ...Ordering Supplies 219 Toner Cartridges 219 Waste Toner Container 222 Drum Cartridges 224 Transfer Belt Cleaner 227 Second Bias Transfer Roller 229 Staple Cartridges and Staple Refills 232 Emptying th...

Страница 8: ...Embedded Web Server 315 Online Support Assistant 316 Information Pages 316 More Information 317 A Specifications 319 Printer Configurations and Options 320 Standard Features 320 Options and Upgrades 3...

Страница 9: ...Y STAR 335 Power Consumption and Activation Time 335 Default Power Saver Settings 336 Regulatory Information for 2 4 GHz Wireless Network Adapter 336 Ozone Release 336 Copy Regulations 337 United Stat...

Страница 10: ...10 Xerox EC8036 EC8056 Color Multifunction Printer User Guide Table of Contents...

Страница 11: ...ety 13 Operational Safety 15 Maintenance Safety 17 Printer Symbols 18 Environmental Health and Safety Contact Information 20 Your printer and the recommended supplies have been designed and tested to...

Страница 12: ...ation and certification and compliance with electromagnetic regulations and established environmental standards The safety and environment testing and performance of this product have been verified us...

Страница 13: ...tivate If any of these conditions occur do the following 1 Power off the printer immediately 2 Disconnect the power cord from the electrical outlet 3 Call an authorized service representative P Po ow...

Страница 14: ...st be easily accessible The power cord is attached to the printer as a plug in device on the back of the printer If it is necessary to disconnect all electrical power from the printer disconnect the p...

Страница 15: ...operation The amount of ozone produced is dependent on copy volume Ozone is heavier than air and is not produced in amounts large enough to harm anyone Install the printer in a well ventilated room Fo...

Страница 16: ...ntainer Keep all consumables away from the reach of children Never throw toner toner cartridges drum cartridges or waste cartridges into an open flame When handling cartridges for example toner cartri...

Страница 17: ...Xerox supplies recycling programs go to www xerox com recycling WARNING Do not use aerosol cleaners Aerosol cleaners can be explosive or flammable when used on electromechanical equipment When install...

Страница 18: ...aution Caution Indicates a mandatory action to take in order to avoid damage to the property Caution To avoid damage to the property be careful not to spill toner when handling the waste cartridge Do...

Страница 19: ...use folded creased curled or wrinkled paper Do not use inkjet paper Do not use transparencies or overhead projector sheets Do not reload paper previously printed on or used Do not copy money revenue s...

Страница 20: ...in relation to this Xerox product and supplies contact in the United States and Canada 1 800 ASK XEROX 1 800 275 9376 For product safety information in the United States and Canada go to www xerox co...

Страница 21: ...r User Guide 21 2 Getting Started This chapter contains Parts of the Printer 22 Power Options 38 Accessing the Printer 40 Introduction to Xerox Apps 43 Information Pages 44 The Embedded Web Server 46...

Страница 22: ...Tray 4 USB Port 5 Document Cover 6 Document Glass 7 Power Wake Button 8 Control Panel 9 Center Output Tray 10 Center Bottom Tray 11 Main Power Switch behind Front Door 12 Trays 1 4 13 Locking Casters...

Страница 23: ...en nt t F Fe ee ed de er r 1 Confirmation Indicator 2 Top Cover 3 Document Guides 4 Document Feeder Tray 5 Document Output Tray 6 Constant Velocity Transport CVT Glass 7 Document Glass Xerox EC8036 EC...

Страница 24: ...nly when ink on the paper is dry Do not load original documents above the MAX fill line D Do oc cu um me en nt t G Glla as ss s G Gu uiid de elliin ne es s Lift the document feeder cover and place the...

Страница 25: ...Button This button provides access to the Home menu for access to printer features such as copy scan and fax 4 Power Wake This button serves several power related functions When the printer is powered...

Страница 26: ...Notification Area Notifications are displayed above the Apps area To view the full notification touch the notification area After you have reviewed the information touch X 7 Interrupt Button This butt...

Страница 27: ...fer Roller 2 Fuser Assembly 3 Drum Cartridge Release Lever 4 Toner Cartridges 5 Main Power Switch 6 Transfer Belt Cleaner 7 Waste Container 8 Drum Cartridges 9 Drum Cartridge Cover Xerox EC8036 EC8056...

Страница 28: ...ata Port for service only 9 Ethernet Connection 10 Foreign Device Interface optional 11 Fax Connections optional 12 Door D Release Lever 13 Door A Release Lever 14 Door B Release Lever 15 Door C Relea...

Страница 29: ...ns s 1 Tray 6 High Capacity Feeder 2 Work Surface 3 Convenience Stapler 4 RFID Kit 5 Trays 1 and 2 6 Trays 2 4 of the 3 Tray Module 7 Trays 3 and 4 of the High Capacity Tandem Tray Module Xerox EC803...

Страница 30: ...p pt tiio on ns s Integrated Office Finisher 1 Staple Cartridge 2 Finisher Front Door 3 Finisher Top Cover 4 Center Tray 5 Integrated Office Finisher 30 Xerox EC8036 EC8056 Color Multifunction Printer...

Страница 31: ...ght Tray Attachment 6 Booklet Maker optional 7 Booklet Maker Side Cover optional 8 Booklet Maker Staple Cartridge optional 9 Finisher Top Cover 10 Right Tray 11 Creaser Unit optional 12 Staple Cartrid...

Страница 32: ...r 1 Horizontal Transport Unit 2 Finisher Front Cover 3 Right Top Tray 4 Right Middle Tray 5 Staple Cartridge 6 Booklet Maker Tray 7 Booklet Staple Unit 8 Booklet Maker Unit 32 Xerox EC8036 EC8056 Colo...

Страница 33: ...Business Ready Finisher with Optional C Z Folder 1 Folder Front Cover 2 Folder Bin Release Button 3 Folder Bin Xerox EC8036 EC8056 Color Multifunction Printer User Guide 33 Getting Started...

Страница 34: ...port the paper in use If you are configuring the trays for the first time configure them for the paper size that you need If you change the paper size reconfigure the tray for the new paper size For d...

Страница 35: ...3 Place the tabs at the bottom of the spacer plate into the slots in the bottom of Tray 6 that correspond with the paper size 4 Slide down the top of the spacer plate to engage the peg on the back of...

Страница 36: ...e gate into place release the pin W Wiir re elle es ss s N Ne et tw wo or rk k A Ad da ap pt te er r The wireless network adapter is a USB device that transfers data between the printer and a wireless...

Страница 37: ...ple users on a wireless LAN to print to and scan from Xerox printers The wireless network adapter also supports printers that include network scan and fax features Xerox EC8036 EC8056 Color Multifunct...

Страница 38: ...ower Wake button To enter Sleep mode press the Power Wake button Note When in Sleep mode the touch screen and scanner are powered off and unresponsive during a print job execution To wake the printer...

Страница 39: ...ngle press of the Power Wake button then press and hold the button for 5 seconds A Please Wait message appears as the printer powers down After 10 seconds the touch screen goes dark and the Power Wake...

Страница 40: ...es a login and password If the optional integrated RFID reader is installed for authentication users place a pre programmed card over the RFID reader at the control panel Xerox Secure Access Unified I...

Страница 41: ...r accounts and enable the accounting feature After Accounting is enabled log in to the printer to access restricted apps Before printing documents from a computer provide your account details in the p...

Страница 42: ...4 If prompted enter the password then touch Done Note To access each app that is password protected repeat steps 3 and 4 42 Xerox EC8036 EC8056 Color Multifunction Printer User Guide Getting Started...

Страница 43: ...he Embedded Web Server For details about displaying configuring and customizing the Apps refer to the System Administrator Guide at www support xerox com A range of Apps are available for download and...

Страница 44: ...provides a list of common print quality problems and tips to help solve them Supplies Usage Page The Supplies Usage Page provides coverage information and part numbers for reordering supplies Graphic...

Страница 45: ...4 To return to the Home screen press the Home button Xerox EC8036 EC8056 Color Multifunction Printer User Guide 45 Getting Started...

Страница 46: ...ready files to the printer for printing You can select options for print jobs using this page Only print ready files can be submitted for example PDF PS PCL and XPS file formats Scan The Scan page ena...

Страница 47: ...P Pr riin nt te er r To install the print driver for a network connected printer it is often necessary to know the IP address of your printer Also the IP address is used to access the settings of your...

Страница 48: ...ersions configurations and compliance information To download a copy of the Configuration Report from the Embedded Web Server 1 At your computer open a Web browser In the address field type the IP add...

Страница 49: ...apid heating of a cold room can cause condensation inside the printer directly interfering with image transfer 2 Place the printer on a level solid non vibrating surface with adequate strength to hold...

Страница 50: ...ed by default on the Xerox device Note The Wi Fi Direct feature is available only on printers with the optional Wireless Network Adapter installed After you install the Wireless Network Adapter the Wi...

Страница 51: ...an one printer in the area with Wi Fi Direct enabled select the required printer from the list 4 Select the print settings required for the job 5 Submit the job for printing A message appears on the m...

Страница 52: ...t the required settings for individual mobile devices refer the documentation supplied by the manufacturer of your mobile device For details about configuring NFC on your printer refer to the System A...

Страница 53: ...een touch the selection button then select Add Printer 3 Touch the NFC option 4 Hold the mobile device over the NFC icon on the control panel The mobile device and the printer communicate with each ot...

Страница 54: ...ur device contact your Xerox representative 1 At your computer open a Web browser In the address field type the IP address of the printer then press Enter or Return Note If you do not know the IP addr...

Страница 55: ...evice name or location for Device Name Device Location or Geographic Location click Edit Note Providing a device name can help users identify the device 9 Click Save For additional information about A...

Страница 56: ...vice registration The Google Cloud Print Printer confirmation page opens in a new browser tab Note If prompted log in to your Google account If you do not click the link within 15 minutes begin the re...

Страница 57: ...zard starts the first time that you power on the printer The wizard prompts you with a series of questions to help configure basic printer settings The System Administrator can configure the following...

Страница 58: ...us UNIX platforms through the network interface I In ns st ta alllliin ng g t th he e P Pr riin nt t D Dr riiv ve er rs s f fo or r a a W Wiin nd do ow ws s N Ne et tw wo or rk k P Pr riin nt te er r...

Страница 59: ...a name for your printer 11 To install the print driver click Next 12 If needed set the printer as the default printer Note Before you select Share Printer contact your system administrator 13 To send...

Страница 60: ...dmg or pkg double click the appropriate file name 4 When prompted click Continue 5 To accept the license agreement click I Agree 6 To accept the current installation location click Install or select...

Страница 61: ...s folder or from the dock open System Preferences 2 Click Printers Scanners The list of printers appears on the left of the window 3 In the list of printers click the Plus icon 4 Click IP 5 From the P...

Страница 62: ...tion for your printer including online technical support Online Support Assistant and print driver downloads www support xerox com Information Pages Print from the control panel For details refer to I...

Страница 63: ...mbedded Web Server home page The serial number is printed on a label that is affixed to the printer To view the label open the left side door For details on how to print the Configuration Report refer...

Страница 64: ...64 Xerox EC8036 EC8056 Color Multifunction Printer User Guide Getting Started...

Страница 65: ...Guide 65 3 Customize and Personalize This chapter contains Customize and Personalize Overview 66 Customizing or Personalizing the Home Screen 67 Customizing or Personalizing the Apps 69 Creating and...

Страница 66: ...or frequent workflows Once created 1 Touch Apps appear on the Home screen To start a job touch the app Personalization options ensure that the features and functions displayed meet individual user ne...

Страница 67: ...app that you want to appear on the control panel 6 To hide an installed app a For the required app touch X b Touch Hide 7 Touch Done 8 Verify that only the required apps appear on the Home screen R Re...

Страница 68: ...m m t th he e H Ho om me e S Sc cr re ee en n To remove customization from the Home screen Note To use this feature log in as a system administrator For details refer to the System Administrator Guide...

Страница 69: ...that the feature is hidden the Eye icon appears with a line across it To show a feature for the required feature touch the Eye icon To signify that a feature is visible the Eye icon appears with no li...

Страница 70: ...iz za at tiio on n U Us siin ng g t th he e C Co on nt tr ro oll P Pa an ne ell To remove the current app customization settings Note To use this feature log in as a system administrator For details r...

Страница 71: ...uired 4 Select the job settings 5 Scroll to the bottom then touch Create 1 Touch App 6 Touch Save as 1 Touch App 7 Touch the Enter App Name entry field then use the keypad to enter a name Touch Next 8...

Страница 72: ...en at any time 6 Touch Done U Us siin ng g a a 1 1 T To ou uc ch h A Ap pp p To use a 1 Touch App 1 At the printer control panel press the Home button 2 Load the original documents in the automatic do...

Страница 73: ...me button 2 Touch Log In Type the User Name using the keypad then touch Next Type the Password using the keypad then touch Done 3 Scroll to the bottom then touch Customize 4 Touch Remove All Customiza...

Страница 74: ...74 Xerox EC8036 EC8056 Color Multifunction Printer User Guide Customize and Personalize...

Страница 75: ...tandard but are hidden when you use your device for the first time You can show hide or reorder Apps on the Home screen using the settings available in the Embedded Web Server For details about displa...

Страница 76: ...a X Xe er ro ox x A Ap pp p G Ga alllle er ry y A Ac cc co ou un nt t With an App Gallery account you have direct access to all the available Apps for your device An App Gallery account allows you to...

Страница 77: ...pp Gallery All future Xerox App Gallery upgrades are manual and initiated by the user To log in to your App Gallery Account 1 At the printer control panel press the Home button 2 Touch Xerox App Galle...

Страница 78: ...ng g a an n A Ap pp p f fr ro om m t th he e A Ap pp p G Ga alllle er ry y 1 At the printer control panel press the Home button 2 Touch Xerox App Gallery 3 To enter your User Name use the touch screen...

Страница 79: ...Information Pages Your printer has a set of information pages that you can print These pages include configuration and font information demonstration pages and more Notifications Use the Notification...

Страница 80: ...del number and software version I In nf fo or rm ma at tiio on n P Pa ag ge es s Your printer has a set of information pages that you can print These pages include configuration and font information d...

Страница 81: ...To view details about a specific toner cartridge including the part number for reordering touch Cyan Magenta Yellow or Black 3 To view more details touch Other Supplies Scroll through the list then se...

Страница 82: ...mpressions made by the printer Impressions for 2 Sided sheets are identified as a separate line from1 Sided sheets Images Sent Counters This option provides the number of images sent using the Fax Ema...

Страница 83: ...list of active and saved print jobs For more details refer to Managing Jobs using the Embedded Web Server I In nt te er rr ru up pt tiin ng g P Pr riin nt tiin ng g 1 At the control panel touch the In...

Страница 84: ...Jobs 3 From the jobs list touch the held job name The resources required for the job appear on the control panel 4 Do one of the following steps To print the job replenish the resources required The j...

Страница 85: ...ck Xerox Features 3 For Job Type select Saved Job a Type a job name or select a name from the list b Type a folder name or select a name from the list c To add a passcode click Private type the passco...

Страница 86: ...ick OK then click Print For Macintosh click Print Releasing a Secure Print job 1 At the printer control panel press the Home button 2 Touch Jobs 3 To view Secure Print jobs touch Personal Secure Jobs...

Страница 87: ...click Printer Properties Depending on your application the title of the button varies For Macintosh in the Print window click Preview then select Xerox Features 3 For Job Type select Sample Set 4 Sel...

Страница 88: ...screen click Home S Su ub bm miit tt tiin ng g J Jo ob bs s f fo or r P Pr riin nt tiin ng g u us siin ng g t th he e E Em mb be ed dd de ed d W We eb b S Se er rv ve er r 1 At your computer open a W...

Страница 89: ...omputer open a Web browser In the address field type the IP address of the printer then press Enter or Return 2 In the Embedded Web Server click Home 3 Click Jobs 4 Click the Saved Jobs tab 5 For the...

Страница 90: ...hat you use for regular jobs and retrieve them for later use For details on configuring and customizing the Apps refer to the System Administrator Guide at www support xerox com If Authentication or A...

Страница 91: ...riginal documents Note When the original documents are detected the automatic document feeder confirmation indicator LED illuminates 2 At the printer control panel press the Home button 3 Touch Copy 4...

Страница 92: ...nter control panel press the Home button 2 Touch Copy 3 Touch Output Color 4 For Output Color touch an option Auto Detect The device detects the color content in the original document If the original...

Страница 93: ...he Saturation 1 At the printer control panel press the Home button 2 Touch Copy 3 Touch Saturation 4 To adjust the saturation move the slider 5 Touch OK E Er ra as siin ng g t th he e E Ed dg ge es s...

Страница 94: ...gth of the area to scan To specify the original width or length touch the appropriate field To enter the size use the numeric keypad or use the arrows Mixed Size Originals You can scan standard size o...

Страница 95: ...ouch Book Copying 4 Select one of the following options Off This option is the default setting Both Pages This option scans both pages of an open book onto two sheets of paper Left Right Page Only Thi...

Страница 96: ...on 2 Touch Copy 3 Touch Special Pages Covers Note If Paper Supply is set to Auto Paper Select the Paper Conflict screen appears Select the required paper tray then touch OK 4 For Covers Options select...

Страница 97: ...the Insert After Page entry box To enter a page number use the numeric keypad Touch Enter 6 To specify the paper tray to use for the insert a Touch Paper Supply b Touch the required paper tray c Touch...

Страница 98: ...l panel press the Home button 2 Touch Copy 3 Touch Special Pages Exceptions Note If Paper Supply is set to Auto Paper Select the Paper Conflict screen appears Select the required paper tray then touch...

Страница 99: ...ion e To position the page number touch an arrow The sample page shows the location of the page number f Touch OK 5 To insert a comment a Touch Comment b Touch On c For Stored Comments touch an option...

Страница 100: ...To remove all entered annotations touch Delete All 10 Touch OK C Ch ha an ng giin ng g t th he e P Pa ag ge e L La ay yo ou ut t You can use Page Layout to place a defined number of pages on one or bo...

Страница 101: ...r delete a segment a To print a sample of the previous segment scanned touch the segments option then touch Sample Last segment b To delete the previous segment scanned touch the segments option then...

Страница 102: ...e To save the current copy settings 1 At the printer control panel press the Home button 2 Touch Copy 3 Change the settings required 4 Touch Save Current Settings 5 To create a new saved setting touch...

Страница 103: ...e App features and available settings refer to Apps Features C Co op py yiin ng g a an n I ID D C Ca ar rd d To copy an ID card 1 Lift the document feeder then place the original document in the upper...

Страница 104: ...he email For details about configuring and customizing the Apps refer to the System Administrator Guide at www support xerox com For information about all the App features and available settings refer...

Страница 105: ...Remove all staples and paper clips from the pages Insert the original documents face up in the duplex automatic document feeder with the top of the page entering the feeder first Adjust the paper guid...

Страница 106: ...ngs as needed To change the subject touch Subject enter a new subject then touch OK To save the scanned document as a specific filename touch the attachment filename enter a new name then touch OK To...

Страница 107: ...ents 2 At the printer control panel press the Home button 3 Touch Email 4 To clear previous App settings touch Reset 5 Touch Manual Entry To enter an email address use the touch screen keypad 6 To add...

Страница 108: ...n workflows enable you to scan documents to one or more file destinations File destinations include an FTP site a website and a network server You can add fax destinations to workflows too Scan to Mai...

Страница 109: ...e paper guides so that they fit against the original documents Note When the original documents are detected the automatic document feeder confirmation indicator LED illuminates 2 At the printer contr...

Страница 110: ...details refer to the System Administrator Guide at www support xerox com If you are using the document glass to combine pages into a single scan file enable the Build Job feature To enable the featur...

Страница 111: ...istrator Guide at www support xerox com Note On the Pick a Workflow screen the DEFAULT workflow is associated with the default file repository Creating a New Workflow 1 At your computer open a Web bro...

Страница 112: ...ing SMB services To scan to a shared network folder create a shared folder with read and write access privileges Sharing a Folder on a Windows Computer 1 Open Windows Explorer 2 Right click the folder...

Страница 113: ...ages You do not need a password to scan images to the public mailbox folder or to retrieve the scanned images All users can view scanned documents in the public mailbox folder You can create a passwor...

Страница 114: ...a Workflow screen select a private mailbox folder Note If the Pick a Workflow screen is not automatically displayed to display it touch Change Workflow 5 On the Mailbox Password screen enter the passw...

Страница 115: ...inistrator Guide at www support xerox com 4 In the Scan to Mailbox section click Create Folder 5 Click the Folder Name field then type a name for the folder 6 In the Folder Password field type a passw...

Страница 116: ...xternal server The home directory is distinct for each authenticated user The directory path is established through LDAP The Scan to Home feature is available as the Home workflow in the Workflow Scan...

Страница 117: ...e Home screen press the Home button S Sc ca an nn niin ng g t to o a a U US SB B F Flla as sh h D Dr riiv ve e You can scan a document and store the scanned file on a USB Flash drive The Scan to USB f...

Страница 118: ...ther page touch Scan Next Segment To finish touch Submit WARNING Do not remove the USB Flash drive while the printer is processing the scan job If you remove the Flash drive before the transfer is com...

Страница 119: ...s to one or more file destinations using customized workflows refer to Workflow Scanning For details about configuring and customizing apps refer to the System Administrator Guide at www support xerox...

Страница 120: ...e Searchable feature 9 Adjust scanning options as needed To change the email subject line touch Subject Enter a new subject line using the touch screen keypad then touch Enter To change the email body...

Страница 121: ...he document glass then touch Scan Segment To finish touch Submit The printer scans your images to the root folder of the USB Flash drive 13 If you are scanning from the document glass when prompted to...

Страница 122: ...B folders refer to the System Administrator Guide at www support xerox com To scan to a folder associated with a contact in the address book touch Device Address Book Select the required contact then...

Страница 123: ...your LDAP network user name and password then touch Done 7 To add another Scan To destination touch Add Destination then select the required destination 8 To save the scanned document as a specific fi...

Страница 124: ...act for Scan To Destination click the Add Destination button Enter the nickname that you want to appear in the Address Book 5 Under Protocol select an option then enter the destination address For FTP...

Страница 125: ...Ps such as FIOS and DSL are not supported Before you use the Fax App configure the Fax Settings to ensure that they are compatible with your local connection and regulations The Fax Settings include o...

Страница 126: ...riginal documents are detected the automatic document feeder confirmation indicator LED illuminates 2 At the printer control panel press the Home button 3 Touch Fax 4 To clear previous app settings to...

Страница 127: ...t to the current time For details refer to the System Administrator Guide at www support xerox com To specify the time to send your fax 1 Load your original documents 2 At the printer control panel pr...

Страница 128: ...Touch OK 8 Touch OK P Pr riin nt tiin ng g a a S Se ec cu ur re e F Fa ax x When the Fax Secure Receive option is enabled all faxes that the device receives are held in the Job list until you enter a...

Страница 129: ...tored for non secure polling Storing a Fax for Secure Polling 1 Load your original documents 2 At the printer control panel press the Home button then touch Fax 3 If the entry screen is displayed touc...

Страница 130: ...set a specific time to poll the remote device touch Delay Polling Touch Delay Polling To set the hour touch the Hour field then use the numeric keypad or touch the arrows To set the minutes touch the...

Страница 131: ...ch Print The documents in the mailbox print 8 To delete the contents of the mailbox after the device finishes printing touch Empty Mailbox To confirm touch Empty Mailbox 9 To exit touch X Storing a Fa...

Страница 132: ...ddress Book can contain up to 5000 contacts that you can access when you enter recipients or destinations using apps To add or edit contacts in the Device Address Book from the control panel Note Befo...

Страница 133: ...ore recipients repeat this procedure 6 To add existing contacts from a phonebook a Click the Add From Phonebook icon b Select the required phonebook from the list c Select names from the list or searc...

Страница 134: ...r information as needed then click OK 6 To add more recipients repeat this procedure 7 To include a cover sheet click the Cover Sheet tab 8 From the Cover Sheet list select Print a Cover Sheet then en...

Страница 135: ...support xerox com For information about all the App features and available settings refer to Apps Features S Se en nd diin ng g a a S Se er rv ve er r F Fa ax x If a fax server is connected to the ne...

Страница 136: ...ments Note When the original documents are detected the automatic document feeder confirmation indicator LED illuminates 2 At the printer control panel press the Home button 3 Touch Server Fax 4 To cl...

Страница 137: ...ay can range from 15 minutes through 24 hours Note Before you use this feature set the printer to the current time To specify the time to send your server fax 1 Load your original documents 2 At the p...

Страница 138: ...ge for the email For details on configuring and customizing the Apps refer to the System Administrator Guide at www support xerox com For information about all the App features and available settings...

Страница 139: ...riginal documents are detected the automatic document feeder confirmation indicator LED illuminates 2 At the printer control panel press the Home button 3 Touch Internet Fax 4 To clear previous app se...

Страница 140: ...touch OK To scan more documents using the document glass or to change settings for different sections of the job touch Build Job If scanning from 2 sided original documents touch 2 Sided Scanning then...

Страница 141: ...the printer 2 At the USB Drive Detected screen touch Print from USB Note If the Print from USB feature does not appear enable the feature or contact your system administrator For details refer to the...

Страница 142: ...Print from mailbox allows you to print a file that is stored in a folder on the printer hard drive To print from a mailbox 1 At the control panel press the Home button then touch Print From 2 Select...

Страница 143: ...8056 Color Multifunction Printer User Guide 143 5 Printing This chapter contains Printing Overview 144 Selecting Printing Options 145 Print Jobs 154 Printing Features 159 Using Custom Paper Sizes 171...

Страница 144: ...s press CTRL P or for Macintosh press CMD P 4 Select your printer 5 To access the print driver settings for Windows select Printer Properties Print Options or Preferences For Macintosh select Xerox Fe...

Страница 145: ...in the bottom left corner of the Printing Preferences window Information about Printing Preferences appears in the Help window From this window you can select by topic or use the search field In the s...

Страница 146: ...Preferences before sending the job to the printer 1 With the document open in your software application access the print settings For most software applications click File Print or press CTRL P for Wi...

Страница 147: ...Finisher Right Middle Tray This option selects the output tray that is in the middle of the Business Ready Booklet Maker Finisher Right Bottom Tray This option selects the output tray that is on the b...

Страница 148: ...Save As 5 Type a name for the saved setting or preset then choose preset options if available Choose an icon for the preset To enable the preset as 1 Touch select 1 Touch Preset To share the preset i...

Страница 149: ...the left side of the printer Right Tray This option selects the output tray on top of the Office Finisher Right Top Tray This option selects the output tray on top of the Business Ready Finisher Right...

Страница 150: ...om The available files are Xeroxv5Pkg AIXpowerpc x xx xxx xxxx rpm for the IBM PowerPC family Xeroxv5Pkg HPUXia64 x xx xxx xxxx depot gz to support HP Itanium workstations Xeroxv5Pkg Linuxi686 x xx xx...

Страница 151: ...kstation If you are unsure of the location of the folder use the Find command to locate the PPD files 3 Follow the instructions that are included with the PPD file Adding the Printer 1 Verify that the...

Страница 152: ...le e P Pr riin nt tiin ng g O Op pt tiio on ns s This printer can print from iOS and Android mobile devices P Pr riin nt tiin ng g w wiit th h W Wii F Fii D Diir re ec ct t You can connect to your pri...

Страница 153: ...r to Wi Fi or Wi Fi Direct purchase and install the Xerox Wireless Network Adapter For more information refer to the Xerox Dual Band Wireless Kit Hardware Install and Setup instructions that are inclu...

Страница 154: ...mes after the set timeout period To pause the print job touch Hold To resume the print job touch Release To delete the print job touch Delete At the prompt touch Delete To move the job to the top of t...

Страница 155: ...Jo ob b Saved Jobs are documents that are sent to the printer and stored there for future use All users can print or delete a Saved Job At the control panel from the Print From menu you can view and...

Страница 156: ...until you enter your passcode at the printer control panel After a Secure Print job is printed it is deleted automatically Printing using Secure Print 1 In your software application access the print...

Страница 157: ...at the printer control panel Sample Set is a type of saved job with these features A Sample Set job appears in a folder named after the user ID associated with the print job A Sample Set job does not...

Страница 158: ...e description shows the job as Held for Future Printing and shows the number of remaining copies of the job 4 Select an option To print the remaining copies of the job touch Release To delete the rema...

Страница 159: ...he printer prompts you to remove any other paper from the tray and load the paper that is required for your job Note Load the Bypass Tray with the correct size and type of paper for the print job S Sc...

Страница 160: ...override the application page orientation settings 1 Sided Print This option prints on one side of the media Use this option when printing on envelopes labels or other media that cannot be printed on...

Страница 161: ...r uses color to produce your document The Windows PostScript print driver and the Macintosh print drivers provide the widest range of color controls and corrections on the Image Options tab To locate...

Страница 162: ...when you increase the cyan levels the red levels decrease The Magenta to Green slider allows you to adjust the color balance between magenta and green For example when you increase the magenta levels...

Страница 163: ...You can select a value from zero to 1 point Gutter Creep Note To print a border around each page select Page Borders U Us siin ng g S Sp pe ec ciia all P Pa ag ge es s The Special Pages options contr...

Страница 164: ...can set the location characteristics and paper settings for the insert pages Inserts This option allows you to select where to place the insert Quantity Use this option to specify the number of pages...

Страница 165: ...combinations of 2 sided printing with certain paper types and sizes can produce unexpected results P Pr riin nt tiin ng g A An nn no ot ta at tiio on ns s f fo or r W Wiin nd do ow ws s An annotation...

Страница 166: ...ation on all pages of your document Print on Page 1 Only This option prints the annotation only on the first page of the document 7 To save the annotation click the Save Annotation icon 8 To load a pr...

Страница 167: ...ucent so you can see both the watermark and the document content Print in Foreground prints the watermark over the text and graphics in the document 7 Click Pages then select the pages to print the wa...

Страница 168: ...Job ID feature to change the job identification setting for your print job You can print the job identification on a separate banner page or on the pages of your document The following options are av...

Страница 169: ...before it is printed This feature is available only when Document Encryption is set to Manually Encrypt Documents in the printer properties of the printer For details refer to Setting Encryption Defau...

Страница 170: ...Documents This option encrypts all documents that you send to the printer Manually Encrypt Documents This option allows you to set encryption for specific jobs that you send to the printer Note Manual...

Страница 171: ...print driver click the Help button in the bottom left corner of the printer settings window Creating and Saving Custom Sizes for the Windows V3 Print Driver 1 In the print driver click the Printing O...

Страница 172: ...uring Tray Settings 1 Open the paper tray then load the custom size paper 2 Close the tray 3 At the control panel to define the new paper size touch Size then touch Custom 4 In the Custom Paper Size w...

Страница 173: ...le Print then select your printer 3 In the Print dialog box click Printer Properties 4 On the Printing Options tab from the Paper list select Other Size 5 To select a custom paper size select Fit to N...

Страница 174: ...rom the printing list To remove a single file touch the file then select Remove To confirm removal touch Remove To remove all the files touch a file then select Remove All To confirm removal touch Rem...

Страница 175: ...pdf ps pcl and xps files directly from the Embedded Web Server without need of another application or the print driver The files can be stored on a local computer hard drive mass storage device or net...

Страница 176: ...d account information 6 Click Submit Job Note To ensure that the job was sent to the queue wait for the job submission confirmation message to appear before you close this page 176 Xerox EC8036 EC8056...

Страница 177: ...EC8056 Color Multifunction Printer User Guide 177 6 Paper and Media This chapter contains Paper and Media Overview 178 Supported Paper 179 Paper Tray Settings 186 Loading Paper 188 Printing on Specia...

Страница 178: ...paper The optional Envelope Tray can replace Tray 1 Tray 6 is an optional high capacity paper tray holding A4 Letter JIS B5 or Executive size paper The printer can use various media types such as pla...

Страница 179: ...e es s Do not overfill the paper trays Do not load paper above the maximum fill line in the tray Adjust the paper guides to fit the paper size Fan paper before loading it in the paper tray If excessiv...

Страница 180: ...e likely to collect moisture Store paper flat either on pallets cartons shelves or in cabinets Avoid food or drinks in the area where paper is stored or handled Do not open sealed packages of paper un...

Страница 181: ...led Transparency 60 105 g m Labels Lightweight Cardstock Lightweight Glossy Cardstock 106 169 g m Cardstock Cardstock Reloaded Glossy Cardstock Glossy Cardstock Reloaded 170 256 g m Tray 5 Bond Custom...

Страница 182: ...a an nd da ar rd d P Pa ap pe er r S Siiz ze es s Tray Number European Standard Sizes North American Standard Sizes Trays 1 and 2 Trays 3 and 4 of the 3 Tray Module A5 148 x 210 mm 5 8 x 8 3 in A4 210...

Страница 183: ...62 x 229 mm 6 4x9 in C4 envelope 229 x 324 mm 9x12 8 in Postcard 89 x 140 mm 3 5 x 5 5in Postcard 102 x 152 mm 4 x 6 in 5 x 7 127 x 178 mm 5 x 7 in Statement 140x216 mm 5 5 x 8 5 in Executive 184 x 26...

Страница 184: ...83 mm 12 6 x 19 in Paper weights from 60 g m through 220 g m are supported for automatic 2 sided printing Note Do not use transparencies envelopes labels or reloaded paper for automatic 2 sided printi...

Страница 185: ...5 x 10 5 in Tray 5 Minimum 89 x 98 mm 3 5 x 3 9 in Maximum 320 x 483 mm 12 6 x 19 in Tray 6 Standard sizes only A4 210 x 297 mm 8 3 x 11 7 in Letter 216 x 279 mm 8 5 x 11 in JIS B5 182 x 257 mm 7 2 x...

Страница 186: ...paper from the Priority 1 tray first If that tray is empty the printer uses paper from the Priority 2 tray 4 Touch OK 5 To close Tray Settings touch X 6 To close Tools touch X Note To access the Pape...

Страница 187: ...ze To select a new paper type touch Type To select a new paper color touch Color 4 To confirm the settings touch Confirm To set the paper size type or color when a tray is set to Dedicated refer to Co...

Страница 188: ...dministrator can change the media settings for a Dedicated tray A warning message appears on the control panel when the paper in the tray is in short supply and when a tray is empty To load Trays 3 an...

Страница 189: ...ck on a level surface This procedure separates any sheets that are stuck together and reduces the possibility of jams Note To avoid jams and misfeeds do not remove paper from its packaging until you a...

Страница 190: ...the left For short edge feed insert letterhead and pre printed paper face down with the top edge to the left Load hole punched paper with the holes toward the rear of the printer Note Do not load pape...

Страница 191: ...10 To confirm the settings touch Confirm Note To change the paper settings when the tray is set to Dedicated mode refer to Configuring Tray Settings A Ad dj ju us st tiin ng g t th he e P Pa ap pe er...

Страница 192: ...top 3 To move out the paper length guide pinch the guide lever and slide the guide outward 4 To move out the paper width guide pinch the guide lever and slide the guide outward 5 Load the custom size...

Страница 193: ...in the tray is in short supply or when a tray is empty To change the paper size refer to Configuring Trays 3 and 4 of the Tandem Tray Module To load Tray 2 refer to Loading Paper in Trays 1 4 1 Pull T...

Страница 194: ...f media types You can use the tray for small quantity jobs that use special paper such as labels transparencies and envelopes The tray extension provides support for larger paper sizes Note Use Tray 5...

Страница 195: ...the tray 3 Flex the sheets back and forth and fan them then align the edges of the stack on a level surface This procedure separates any sheets that are stuck together and reduces the possibility of...

Страница 196: ...edge feed insert letterhead and pre printed paper face up with the top edge leading into the printer Load hole punched paper with the holes toward the rear of the printer Note Do not load paper above...

Страница 197: ...It is on the left side of the printer The tray feeds A4 210 x 297 mm Letter 8 5 x 11 in JIS B5 182 x 257 mm or Executive 7 25 x 10 5 in paper The tray capacity is 2000 sheets The control panel displa...

Страница 198: ...from its packaging until necessary 5 Load the paper against the right side of the tray Insert letterhead and pre printed paper face up with the top edge toward the front of the tray Load hole punched...

Страница 199: ...on of the envelopes If you do not get the desired results try another envelope brand Maintain constant temperatures and relative humidity Store unused envelopes in their packaging to avoid excess mois...

Страница 200: ...To select an envelope size touch Size To specify a custom envelope size touch Custom then specify the dimensions of the envelope For a custom envelope size touch Type then touch Envelope To select a...

Страница 201: ...e load envelopes with the flaps closed flap side down and the flaps on the left side of the tray For envelopes with the flap on a short edge load envelopes with the flaps closed flap side down and the...

Страница 202: ...onfirm the settings touch Confirm L La ab be ells s You can print labels from any tray G Gu uiid de elliin ne es s f fo or r P Pr riin nt tiin ng g L La ab be ells s Use labels designed for laser prin...

Страница 203: ...from the backing sheet It could damage the printer L Lo oa ad diin ng g L La ab be ells s iin n T Tr ra ay ys s 1 1 4 4 1 Pull out the tray until it stops 2 Remove any paper that is a different size o...

Страница 204: ...e and color Ensure that the paper type is set to Labels To select a new paper type touch Type To select a new paper size touch Size To select a new paper color touch Color Note If a prompt does not ap...

Страница 205: ...pen Tray 5 then for larger sizes pull out the extension tray If Tray 5 is already open remove any paper that is a different size or type 2 Move the width guides to the edges of the tray Xerox EC8036 E...

Страница 206: ...load paper above the maximum fill line Overfilling the tray can cause the printer to jam Do not print on label media after a label has been removed from a sheet To avoid jams and misfeeds do not remov...

Страница 207: ...are planning to use Do not leave glossy paper in the tray when you are finished printing Reinsert unused paper in the original wrapper and seal Rotate paper frequently Long periods of storage in extr...

Страница 208: ...cies Overloading the tray can cause the printer to jam For clear or non strip transparencies Load transparencies face up into Trays 1 4 Load transparencies face down into Tray 5 For striped transparen...

Страница 209: ...x EC8036 EC8056 Color Multifunction Printer User Guide 209 7 Maintenance This chapter contains General Precautions 210 Cleaning the Printer 211 Supplies 218 Managing the Printer 246 Moving the Printer...

Страница 210: ...the documentation supplied with your printer Caution When cleaning your printer do not use organic or strong chemical solvents or aerosol cleaners Do not pour fluids directly into any area Use suppli...

Страница 211: ...menus when cleaning the printer press the Power Wake button then touch Sleep 2 To remove fingerprints and smudges clean the touch screen and control panel with a soft lint free cloth 3 To return the p...

Страница 212: ...Wipe the surfaces of the document glass and CVT glass until they are clean and dry Note For best results use Xerox Glass Cleaner to remove marks and streaks 5 Wipe the white underside of the document...

Страница 213: ...ca an nn niin ng g L Le en ns s A As ss se em mb blly y The second side scanning lens assembly allows you to make 2 sided scans and copies with a single pass of the original The assembly is on the lef...

Страница 214: ...cloth moistened with water wipe the mirrored glass metal strip both sides of the white plastic strip and the rollers If dirt is difficult to remove moisten a soft cloth with a small amount of neutral...

Страница 215: ...I In nt te er riio or r C Clle ea an niin ng g t th he e P Pr riin nt th he ea ad d L Le en ns se es s The printer is constructed with four printhead lenses Clean all lenses as described in the follo...

Страница 216: ...e LED printhead cleaner until the three dots are visible Note The LED printhead cleaner does not detach from the printer 5 Slowly push the LED printhead cleaner back into the printhead until it stops...

Страница 217: ...8 Turn the belt tension lever to the right to return it to the locked position 9 Close the printer front cover Xerox EC8036 EC8056 Color Multifunction Printer User Guide 217 Maintenance...

Страница 218: ...ridge is installed then the toner remaining amount displayed can be inaccurate To ensure print quality the toner cartridge is designed to cease functioning at a predetermined point Caution Use of tone...

Страница 219: ...configure email alert notifications using the Embedded Web Server To check the supplies status and set up alerts using the Embedded Web Server refer to the System Administrator Guide at www support xe...

Страница 220: ...losion R Re ep plla ac ciin ng g t th he e T To on ne er r C Ca ar rt tr riid dg ge es s When it is time to replace a toner catridge the printer displays a message on the control panel Note Each toner...

Страница 221: ...nd right 10 times 4 Hold the new toner cartridge with the arrow facing up then push the cartridge in slowly until it stops 5 Push gently on the toner cartridge to ensure that it is seated 6 Close the...

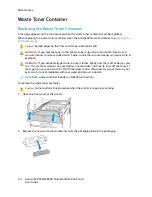
Страница 222: ...e the vacuum cleaner can cause a fire or explosion WARNING If you accidentally get toner on your clothes lightly dust them off as best as you can If some toner remains on your clothes use cool water n...

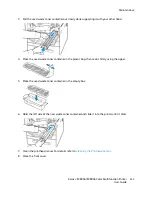
Страница 223: ...firmly using the zipper 5 Place the used waste toner container in the empty box 6 Hold the left side of the new waste toner container and slide it into the printer until it clicks 7 Clean the printhe...

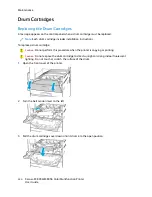
Страница 224: ...a drum cartridge Caution Do not perform this procedure when the printer is copying or printing Caution Do not expose the drum cartridge to direct sunlight or strong indoor fluorescent lighting Do not...

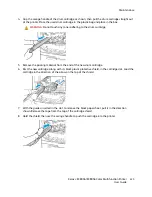
Страница 225: ...drum cartridge 6 Rest the new cartridge along with its black plastic protective shield in the cartridge slot Load the cartridge in the direction of the arrow on the top of the shield 7 With the guide...

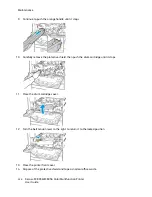
Страница 226: ...artridge until it stops 11 Close the drum cartridge cover 12 Turn the belt tension lever to the right to return it to the locked position 13 Close the printer front cover 14 Dispose of the protective...

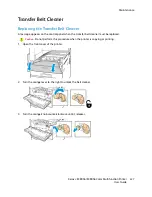
Страница 227: ...control panel when the transfer belt cleaner must be replaced Caution Do not perform this procedure when the printer is copying or printing 1 Open the front cover of the printer 2 Turn the orange lev...

Страница 228: ...aging Retain the packaging 6 Place the used transfer belt cleaner in the plastic bag 7 Remove the protective cover from the new transfer belt cleaner Caution Do not touch the surface of the transfer b...

Страница 229: ...s s T Tr ra an ns sf fe er r R Ro olllle er r R Re ep plla ac ciin ng g t th he e S Se ec co on nd d B Biia as s T Tr ra an ns sf fe er r R Ro olllle er r When the second bias transfer roller needs to...

Страница 230: ...ch the transfer belt Touching the belt can reduce image quality or damage the transfer belt Do not touch the transfer roller Touching the roller can reduce image quality 3 Remove the new transfer roll...

Страница 231: ...fer roller 6 Place the used transfer roller in the plastic bag 7 Place the new transfer roller in the printer as shown Press down until the transfer roller clicks into place 8 Remove the protective co...

Страница 232: ...n t th he e I In nt te eg gr ra at te ed d O Of ff fiic ce e F Fiin niis sh he er r Caution Do not perform this procedure when the printer is copying or printing 1 Open the finisher front door 2 To re...

Страница 233: ...e into the stapler until it clicks 7 Close the finisher front door R Re ep plla ac ciin ng g S St ta ap plle es s iin n t th he e O Of ff fiic ce e F Fiin niis sh he er r L LX X Replacing Staples in t...

Страница 234: ...t stops 3 Push the stapler assembly to the right as shown 4 To remove the staple cartridge grasp the orange handle then pull it firmly toward you 5 Pinch both sides of the staple pack and remove the s...

Страница 235: ...e orange handle then insert the cartridge into the stapler assembly until it clicks 8 Close the finisher front door Replacing Staples in the Booklet Maker of the Office Finisher LX WARNING Do not perf...

Страница 236: ...staple cartridge and insert it into the original position in the finisher Note If you have trouble inserting the cartridge ensure that the staples are positioned correctly in the cartridge Note The b...

Страница 237: ...ady Finisher Caution Do not perform this procedure when the printer is copying or printing 1 Open the front door of the Business Ready finisher 2 Hold the stapler assembly by the orange lever R1 and p...

Страница 238: ...asp the new staple cartridge by the orange handle then insert the cartridge into the stapler assembly until it clicks 7 Return the staple cartridge assembly to its original position Replacing Staples...

Страница 239: ...u until the staple cartridges appear on the top edge of the device 3 To remove a staple cartridge from the booklet maker push down on the staple cartridge handle as shown then pull the cartridge out a...

Страница 240: ...aple pack press the rear of the cartridge then lift out the staple pack as shown 7 Insert the front side of the new staple pack into the staple cartridge then push the rear side into the cartridge 8 T...

Страница 241: ...ker to its original position then close the finisher door R Re ep plla ac ciin ng g S St ta ap plle es s iin n t th he e C Co on nv ve en niie en nc ce e S St ta ap plle er r 1 Lift the lever at the r...

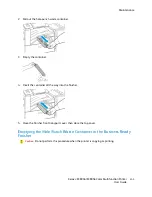
Страница 242: ...p pt ty yiin ng g t th he e H Ho olle e P Pu un nc ch h W Wa as st te e C Co on nt ta aiin ne er r A message appears on the control panel when the hole punch waste container is full E Em mp pt ty yiin...

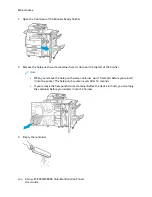
Страница 243: ...hen close the top cover E Em mp pt ty yiin ng g t th he e H Ho olle e P Pu un nc ch h W Wa as st te e C Co on nt ta aiin ne er r iin n t th he e B Bu us siin ne es ss s R Re ea ad dy y F Fiin niis sh...

Страница 244: ...ole punch waste container wait 10 seconds before you reinsert it into the printer The hole punch counter resets after 10 seconds If you remove the hole punch waste container before the device instruct...

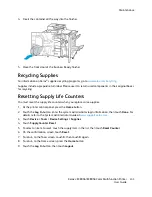
Страница 245: ...you replace some supplies 1 At the printer control panel press the Home button 2 Touch the Log In button enter the system administrator login information then touch Done For details refer to the Syst...

Страница 246: ...Guide for further information To view the billing information for your printer 1 At the printer control panel press the Home button 2 Touch Device Billing Usage 3 To view more details touch Usage Cou...

Страница 247: ...g the power cord from the electrical outlet then disconnect the power cord from the back of the printer To avoid spilling toner keep the printer level Note When you move the printer over a long distan...

Страница 248: ...248 Xerox EC8036 EC8056 Color Multifunction Printer User Guide Maintenance...

Страница 249: ...EC8036 EC8056 Color Multifunction Printer User Guide 249 8 Troubleshooting This chapter contains General Troubleshooting 250 Paper Jams 257 Print Copy and Scan Problems 304 Fax Problems 312 Getting He...

Страница 250: ...off the printer is to use the Power Wake button To operate the printer power on both switches 1 Power on the main power switch 2 At the control panel press the Power Wake button 3 To restart the print...

Страница 251: ...ess the Power Wake button For details refer to Powering On the Printer or Exiting Sleep Mode The power cord is not plugged into the outlet correctly Power off the printer then plug the power cord into...

Страница 252: ...the printer specifications Use a power source with the specifications listed in Electrical Specifications P Pr riin nt te er r D Do oe es s N No ot t P Pr riin nt t Probable Causes Solutions The print...

Страница 253: ...com P Pr riin nt tiin ng g T Ta ak ke es s T To oo o L Lo on ng g Probable Causes Solutions The printer is set to print on a paper type that requires slower printing Certain paper types like heavywei...

Страница 254: ...the prompt touch Delete Note The Print On Alternate Paper option is enabled using the Embedded Web Server 5 To return to the Home screen press the Home button Incorrect network settings To reset netwo...

Страница 255: ...rays is not installed correctly Open and close the tray from which you are printing There is an obstruction or debris inside the printer Power off the printer and remove the obstruction or debris If y...

Страница 256: ...The time zone date or time is set incorrectly Set the time zone date and time manually For details refer to the System Administrator Guide at www support xerox com S Sc ca an nn ne er r E Er rr ro or...

Страница 257: ...y to remove the jam after the printer has cooled If the error persists contact your Xerox representative Caution Do not attempt to clear any paper jams using tools or instruments This can permanently...

Страница 258: ...n moist creased or folded To separate the sheets before loading into the tray fan the paper Observe the paper tray fill line never overfill the tray Remove transparencies from the output tray immediat...

Страница 259: ...Do not touch the printed side of the paper when removing it The printed side of jammed pages could smudge and the toner could stick to your hands Avoid spilling any toner inside the printer WARNING I...

Страница 260: ...over 5 To move the original document out of the feeder turn the green wheel in the direction shown Carefully remove the jammed document 6 Close the inner cover then close the top cover of the document...

Страница 261: ...dy scanned The printer automatically skips the scanned pages and scans the remaining pages Caution Torn wrinkled or folded originals can cause jams and damage the printer To copy torn wrinkled or fold...

Страница 262: ...Policies For details refer to the System Administrator Guide at www support xerox com 7 To return to the Home screen press the Home button C Clle ea ar riin ng g J Ja am ms s a at t T Tr ra ay y 5 5...

Страница 263: ...Type To select a new paper color touch Color 6 To confirm the settings touch Confirm C Clle ea ar riin ng g J Ja am ms s a at t D Do oo or r A A 1 Remove paper from the left tray then close the tray...

Страница 264: ...y Caution Do not touch the transfer belt Touching the belt can reduce image quality or damage the transfer belt Do not touch the transfer roller Touching the roller can reduce image quality 5 Remove t...

Страница 265: ...he green lever A1 7 Remove the paper as shown Note If the paper is torn remove all torn pieces from the printer 8 If the paper is jammed at the bottom entry of the fuser remove it as shown Xerox EC803...

Страница 266: ...center output tray pull the paper in the direction shown Note Toner can adhere to the transfer roller The toner that does adhere to the transfer roller does not affect print quality 11 Close Door A t...

Страница 267: ...en Door B 2 Remove the jammed paper as shown Note If the paper is torn remove all torn pieces from the printer 3 Close door B then close Tray 5 C Clle ea ar riin ng g J Ja am ms s a at t D Do oo or r...

Страница 268: ...the paper is inaccessible see Clearing Jams at Door A 3 For paper jammed in the paper tray open the tray and remove the paper 4 Close Door C C Clle ea ar riin ng g J Ja am ms s a at t D Do oo or r D D...

Страница 269: ...void injury Caution Do not touch the transfer belt Touching the belt can reduce image quality or damage the transfer belt Do not touch the transfer roller Touching the roller can reduce image quality...

Страница 270: ...paper Do not load paper past fill line The edges of the paper are not even Remove the paper align the edges and then reload it The paper is moist from humidity Remove the paper from the tray and repl...

Страница 271: ...pe er r S Siiz ze e J Ja am ms s Probable Causes Solutions The paper is not correctly positioned in the tray Remove the misfed paper and reposition it properly in the tray Adjust the paper guides in...

Страница 272: ...t edge feed with the flaps closed flaps up and flaps on the leading edge toward the right For custom size envelopes define a custom size on the control panel Envelopes are loaded incorrectly in the en...

Страница 273: ...is loaded into the correct tray For details refer to Supported Paper Tray is loaded with mixed paper Load the tray with only one type and size of paper C Clle ea ar riin ng g F Fiin niis sh he er r J...

Страница 274: ...e Office Finisher Top Cover 1 Pull up the lever on the top cover 2 Open the top cover by rotating it to the left 3 Remove the jammed paper Note If the paper is torn remove all torn pieces from the fin...

Страница 275: ...l torn pieces from the finisher 3 Close the transport cover C Clle ea ar riin ng g J Ja am ms s iin n t th he e B Bu us siin ne es ss s R Re ea ad dy y F Fiin niis sh he er r Clearing Jams in the Cent...

Страница 276: ...e Finisher Transport 1 Open the finisher transport cover 2 Remove the jammed paper Note If the paper is torn remove all torn pieces from the finisher 3 Close the finisher transport cover 276 Xerox EC8...

Страница 277: ...per is visible at the output tray exit remove the paper by pulling it in the direction shown 2 Open the front door of the Business Ready finisher 3 Lift green handle 3a Xerox EC8036 EC8056 Color Multi...

Страница 278: ...e paper is torn remove all torn pieces from the finisher 5 Return green handle 3a to its original position 6 Close the front door of the Business Ready finisher 278 Xerox EC8036 EC8056 Color Multifunc...

Страница 279: ...the left 3 Carefully remove the paper Note If the paper is torn remove all torn pieces from the finisher If the paper is inaccessible or if the control panel prompts you to release the paper turn gre...

Страница 280: ...osition 5 Close the front door of the Business Ready finisher Clearing Jams at 3d in the Finisher 1 Open the front door of the finisher then locate green lever 3d 280 Xerox EC8036 EC8056 Color Multifu...

Страница 281: ...right 3 Carefully remove the paper Note If the paper is torn remove all torn pieces from the finisher 4 Return green lever 3d to its original position Xerox EC8036 EC8056 Color Multifunction Printer U...

Страница 282: ...Ready finisher Clearing Jams at 4 in the Finisher 1 Open the front door of the Business Ready finisher 2 Using the green handle pull out unit 4 until it stops 282 Xerox EC8036 EC8056 Color Multifunct...

Страница 283: ...irection as shown Note If the paper is torn remove all torn pieces from the finisher 4 Return unit 4 to its original position 5 Close the front door of the Business Ready finisher Xerox EC8036 EC8056...

Страница 284: ...finisher 2 To release the jammed paper turn green knob 4 in the direction shown 3 To remove the paper pull it in the direction shown Note If the paper is torn remove all torn pieces from the finisher...

Страница 285: ...C Clle ea ar riin ng g J Ja am ms s iin n t th he e C CZ Z F Fo olld de er r Clearing Jams at 2a in the CZ Folder 1 Open the front door of the CZ folder 2 Lift green handle 2a Xerox EC8036 EC8056 Colo...

Страница 286: ...te If the paper is torn remove all torn pieces from the folder 4 Return green handle 2a to its original position 5 Close the front door of the CZ folder 286 Xerox EC8036 EC8056 Color Multifunction Pri...

Страница 287: ...en the front door of the CZ folder 2 Move green lever 2b to the left 3 Carefully remove the paper Note If the paper is torn remove all torn pieces from the folder Xerox EC8036 EC8056 Color Multifuncti...

Страница 288: ...5 Close the front door of the CZ folder Clearing Jams at 2e in the CZ Folder 1 To access lever 2e open the front door of the CZ folder then open the Folder tray 2d 288 Xerox EC8036 EC8056 Color Multif...

Страница 289: ...right 3 Carefully remove the paper Note If the paper is torn remove all torn pieces from the folder 4 Return green lever 2e to its original position Xerox EC8036 EC8056 Color Multifunction Printer Us...

Страница 290: ...the CZ folder Clearing Jams at 2f in the CZ Folder 1 To access lever 2f open the front door of the CZ folder then open the Folder tray 2d 2 Move green lever 2f to the right 290 Xerox EC8036 EC8056 Co...

Страница 291: ...er is torn remove all torn pieces from the folder 4 Return green lever 2f to its original position 5 Close the Folder tray then close the front door of the CZ folder Xerox EC8036 EC8056 Color Multifun...

Страница 292: ...n the front door of the CZ folder 2 Move green lever 2g to the right 3 Carefully remove the paper Note If the paper is torn remove all torn pieces from the folder 292 Xerox EC8036 EC8056 Color Multifu...

Страница 293: ...se the front door of the CZ folder C Clle ea ar riin ng g S St ta ap plle e J Ja am ms s Clearing Staple Jams in the Integrated Office Finisher 1 Open the finisher front door Xerox EC8036 EC8056 Color...

Страница 294: ...4 Pull the staple cartridge clamp firmly in the direction shown to open it 5 Remove the jammed staples then push the clamp in the direction shown until it snaps into the locked position WARNING The p...

Страница 295: ...door Clearing Staple Jams in the Office Finisher LX WARNING Do not perform this procedure while the printer is printing 1 Open the front door of the Office Finisher 2 Reach into the finisher cabinet...

Страница 296: ...he finisher for any loose staples and remove them 6 Pull the staple cartridge clamp firmly in the direction shown to open it 7 Remove the jammed staples by pulling them in the direction shown WARNING...

Страница 297: ...to the stapler assembly Push it in until it clicks 10 Close the front door of the Office Finisher Clearing Booklet Staple Jams in the Office Finisher LX WARNING Do not perform this procedure while the...

Страница 298: ...r 3 Hold the tabs on both sides of the staple cartridge and pull the cartridge out of the finisher 4 Remove the jammed staples by pulling them in the direction shown WARNING The points of the jammed s...

Страница 299: ...dges Booklet stapling requires that both staple cartridges contain staples 6 Starting at Step 2 repeat the procedure for the other staple cartridge 7 Close the side cover of the Office Finisher Cleari...

Страница 300: ...the direction shown to open it 5 Remove the jammed staples WARNING The points of the jammed staples are sharp Remove the jammed staples carefully 6 To close the staple clamp push the clamp in the dir...

Страница 301: ...til it clicks 8 Return the staple cartridge assembly to its original position then close the finisher door Clearing Staple Jams in the Business Ready Finisher Booklet Maker 1 Open the front door of th...

Страница 302: ...down on the staple cartridge handle as shown then pull the cartridge out and up 4 Turn over the staple cartridge 5 To permit the staple cartridge handle to open out and away from the staple pack pres...

Страница 303: ...it snaps into the locked position 9 Return the staple cartridge to the booklet maker then return the booklet maker to its original position C Clle ea ar riin ng g H Ho olle e P Pu un nc ch h J Ja am...

Страница 304: ...nd Scan Problems table P Pr riin nt t Q Qu ua alliit ty y P Pr ro ob blle em ms s Your printer is designed to produce consistently high quality prints If you observe print quality problems use the inf...

Страница 305: ...ips Padded envelopes Plastic media Iron on transfer paper Ensure the paper type selected in your print driver matches the paper type on which you are printing If you have the same size paper loaded in...

Страница 306: ...d to produce consistently high quality prints If you observe print quality problems use the information in this section to troubleshoot the problem For more information go to www support xerox com Cau...

Страница 307: ...er or print server could be the cause To isolate the problem 1 Print a similar document from another application and look for the same print quality problems 2 If the document has the same print quali...

Страница 308: ...to see print details verify the following The printer is loaded with undamaged dry supported paper The toner levels of one or more of the toner cartridges is not too low 3 If the pages are printed wit...

Страница 309: ...ng Support Pages Repeating Defects Page Print 2 To identify the part responsible for the repeating spots or lines follow the instructions on the Repeating Defects page 3 To correct the problem replace...

Страница 310: ...ures on resolving print quality problems at the control panel press the Home button then touch Device Information Pages Troubleshooting Print Quality Page Print Toner Missing or Easy to Rub Off Toner...

Страница 311: ...glass When scanning the debris creates a spot on the image Clean all glass surfaces with a lint free cloth The reverse side of the original document is showing on the copy or scan Turn on Background...

Страница 312: ...ient is blurry The document is positioned incorrectly Position the document correctly The document glass is dirty Clean the document glass The text in the document is too light Adjust the resolution A...

Страница 313: ...able Causes Solutions The fax received by the recipient is blank There is a problem with the telephone connection or with the fax machine of the sender Verify that the printer can make clean copies If...

Страница 314: ...Fa ax x R Re ep po or rt ts s You can print the following fax reports from the printer control panel Activity Report Protocol Report Fax Address Book Report Options Report Pending Jobs Report To prin...

Страница 315: ...w details touch a fault or alert 6 To exit the Notifications screen touch X 7 To return to the Home screen press the Home button V Viie ew wiin ng g t th he e E Er rr ro or r H Hiis st to or ry y o on...

Страница 316: ...de configuration and font information demonstration pages and more To print an information page select an option then touch Print The following Information Pages are available Name Description Configu...

Страница 317: ...nk_C8030_C8035_C8045_ C8055_RML pdf European Union https www xerox com downloads europe r 2017_05_AltaLinkC8030 C8055_Media_ List_Antalis_Xerox_May_2017 pdf Technical support information for your prin...

Страница 318: ...iew the serial number on the control panel or on the Embedded Web Server home page The serial number is printed on a label that is affixed to the printer To view the label open the left side door For...

Страница 319: ...19 A Specifications This appendix contains Printer Configurations and Options 320 Physical Specifications 324 Environmental Specifications 328 Electrical Specifications 329 Performance Specifications...

Страница 320: ...Automatic Document Feeder Color touch screen control panel Trays 1 2 each with 520 sheet capacities Tray 5 Bypass Tray with 100 sheet capacity 3 Tray Module Trays 2 4 each with 520 sheet capacities H...

Страница 321: ...er Office Finisher LX Booklet Maker for Office Finisher LX Hole Punch for Office Finisher LX Business Ready Finisher with 2 3 or 2 4 hole punch Business Ready Booklet Maker Finisher with 2 3 or 2 4 ho...

Страница 322: ...56 g m Single stapling 50 sheets A4 8 5 x 11 in or 30 sheets of 80 g m Legal B4 A3 11 x 17 in Office Finisher LX Stacking 2000 sheets unstapled 1000 sheets single stapled or 250 sheets dual stapled 18...

Страница 323: ...11 x 17 in Stapling B5 A3 7 25 x 10 5 in to 11 x 17 in 60 300 g m Single position and multiple position stapling 50 sheets Hole Punch Optional 2 3 2 4 or Swedish 4 Hole Punch Stacking 1500 sheets unst...

Страница 324: ...a an nd d B Bo oo ok klle et t M Ma ak ke er r Width 1242 mm 48 8 in Depth 732 mm 28 8 in Height 1149 mm 45 2 in Weight 183 Kg 403 4 lb C Co on nf fiig gu ur ra at tiio on n w wiit th h B Bu us siin...

Страница 325: ...in ne es ss s R Re ea ad dy y F Fiin niis sh he er r B Bo oo ok klle et t M Ma ak ke er r C CZ Z F Fo olld de er r a an nd d H Hiig gh h C Ca ap pa ac ciit ty y F Fe ee ed de er r Width 1978 2 mm 77 9...

Страница 326: ...L LX X a an nd d B Bo oo ok klle et t M Ma ak ke er r C Clle ea ar ra an nc ce e R Re eq qu uiir re em me en nt ts s f fo or r C Co on nf fiig gu ur ra at tiio on n w wiit th h B Bu us siin ne es ss s...

Страница 327: ...an nd d C CZ Z F Fo olld de er r C Clle ea ar ra an nc ce e R Re eq qu uiir re em me en nt ts s f fo or r C Co on nf fiig gu ur ra at tiio on n w wiit th h B Bu us siin ne es ss s R Re ea ad dy y F F...

Страница 328: ...10 28 C 50 83 F R Re ella at tiiv ve e H Hu um miid diit ty y Operating 15 to 85 non condensing E Elle ev va at tiio on n For optimum performance use the printer at elevations below 2500m 8200ft 328 X...

Страница 329: ...Electrical Specifications Power Supply Voltage Frequency Current Required 110 127 VAC 10 50 Hz 3 Hz 60 Hz 3 Hz 15 A Xerox EC8036 EC8056 Color Multifunction Printer User Guide 329 Specifications...

Страница 330: ...r orientation For faster print speeds you can load paper long edge feed Paper size Letter 8 5 x 11 in and A4 210 x 297 mm sizes share the fastest print speed Paper weight Lightweight prints faster tha...

Страница 331: ...relation to this Xerox product and supplies contact in the United States and Canada 1 800 ASK XEROX 1 800 275 9376 For product safety information in the United States and Canada go to www xerox com ab...

Страница 332: ...332 Xerox EC8036 EC8056 Color Multifunction Printer User Guide Specifications...

Страница 333: ...8056 Color Multifunction Printer User Guide 333 B Regulatory Information This appendix contains Basic Regulations 334 Copy Regulations 337 Fax Regulations 340 Safety Certification 342 Material Safety...

Страница 334: ...radio TV technician for help Changes or modifications to this equipment not approved by Xerox can void the authority of the user to operate this equipment Note To ensure compliance with Part 15 of th...

Страница 335: ...p mode In these modes to enable reduced power consumption only essential functions remain active The device takes longer to produce the first print after it exits the Power Saver modes than it takes t...

Страница 336: ...ective 99 5 EC Operation of this device is subject to the following two conditions 1 this device may not cause harmful interference and 2 this device must accept any interference received including in...

Страница 337: ...s may be done provided the reproduction of the document is performed for lawful purposes Postage Stamps canceled or uncanceled For philatelic purposes Postage Stamps may be photographed provided the r...

Страница 338: ...accuracy In case of doubt consult your attorney For more information about these provisions contact the Copyright Office Library of Congress Washington D C 20559 Ask for Circular R21 C Ca an na ad da...

Страница 339: ...enience and assistance but it is not all inclusive and no liability is assumed for its completeness or accuracy In case of doubt consult your solicitor O Ot th he er r C Co ou un nt tr riie es s Copyi...

Страница 340: ...s adopted by the ACTA A compliant telephone cord and modular plug is provided with this product It connects to a compatible modular jack that is also compliant See installation instructions for detail...

Страница 341: ...he state public utility commission public service commission or corporation commission for information Your office could have specially wired alarm equipment connected to the telephone line Make sure...

Страница 342: ...ncies using the following safety standards Agency Standard Underwriters Laboratories Inc US Canada UL 60950 1 2nd Edition 2014 10 14 CAN CSA C22 2 No 60950 1 07 2nd Edition 2014 10 342 Xerox EC8036 EC...

Страница 343: ...ta information regarding your printer go to North America www xerox com safety data For the Customer Support Center phone numbers go to www xerox com worldcontacts Xerox EC8036 EC8056 Color Multifunct...

Страница 344: ...344 Xerox EC8036 EC8056 Color Multifunction Printer User Guide Regulatory Information...

Страница 345: ...Xerox EC8036 EC8056 Color Multifunction Printer User Guide 345 C Recycling and Disposal This appendix contains All Countries 346 North America 347 Battery Removal 348 Other Countries 349...

Страница 346: ...y consistent with global regulations applicable at the time that the product was placed on the market For recycling and disposal information contact your local authorities Perchlorate Material This pr...

Страница 347: ...XEROX to determine if this Xerox product is part of the program For more information about Xerox environmental programs visit www xerox com about xerox environment or for recycling and disposal inform...

Страница 348: ...Battery Removal Batteries should only be replaced by a manufacturer approved service facility 348 Xerox EC8036 EC8056 Color Multifunction Printer User Guide Recycling and Disposal...

Страница 349: ...Other Countries Please contact your local waste management authority to request disposal guidance Xerox EC8036 EC8056 Color Multifunction Printer User Guide 349 Recycling and Disposal...

Страница 350: ...350 Xerox EC8036 EC8056 Color Multifunction Printer User Guide Recycling and Disposal...

Страница 351: ...e on or in the printer To avoid personal injury use caution Warning Moving parts To avoid personal injury use caution Caution Indicates a mandatory action to take to avoid damage to the property Do no...

Страница 352: ...azard To avoid personal injury use caution in this area Do not remove the paper forcefully Hot Surface Before handling wait for the time indicated On Off Standby Do not use paper attached with staples...

Страница 353: ...paper that is used or printed previously Do not use postcards Do not use envelopes Do not copy money Add paper or media Paper jam Lock Unlock Paper clip Cooling Elapsed time Supply paper Xerox EC8036...

Страница 354: ...sparency Load letterhead face up Load letterhead face down Load labels face down USB Universal Serial Bus LAN Local Area Network Telephone Line Weight Home button This item can be recycled 354 Xerox E...

Страница 355: ...Xerox EC8036 EC8056 Color Multifunction Printer User Guide 355 E Apps Features This appendix contains...

Страница 356: ...n one or both sides of an original document For Copy jobs you can specify 1 Sided or 2 Sided output Paper Supply Use Paper Supply to specify the size type and color of the paper required or the Paper...

Страница 357: ...al size or enlarge it as much as 400 Use Proportional to maintain original proportions when resizing or use Independent to adjust the width and length of the image by different percentages Original Ty...

Страница 358: ...color Note This feature is not available when Output Color is set to Black and White or Grayscale Color Presets You can adjust the color of the copy using preset color effects For example you can adj...

Страница 359: ...he X and Y axes of each sheet of paper Auto Background Suppression Use the Auto Background Suppression setting to reduce the sensitivity of the printer to variations in light background colors Edge Er...

Страница 360: ...and print it as though it were a photo negative Printing a negative image is useful for documents that have a substantial amount of dark background or light text and images Special Pages Special Pages...

Страница 361: ...e pages per sheet saves paper and provides a way to review the layout of a document Sample Job Sample Job allows you to print a test copy of a job to inspect before printing multiple copies This featu...

Страница 362: ...egments After all the segments are scanned the job is processed and completed Save Current Settings To use a particular combination of copy settings for future copy jobs you can save the settings with...

Страница 363: ...trator can preset this option to populate automatically with your user account details Reply To Use the Reply To option to include an email address you want the recipient to reply to This option is us...

Страница 364: ...e saved image or to define a searchable image You can add a password to protect the image or choose to combine multiple images into a single file If File Already Exists Use the If File Already Exists...

Страница 365: ...n to choose more destinations for filing the scanned images Book Faxing You can use the Book Faxing feature to scan images from books magazines or other bound documents for faxing Reduce Split Use the...

Страница 366: ...bps is the recommended setting for lines that may have transmission interference Cover Sheet You can use the Cover Sheet option to add an introduction page to the beginning of your fax You can add a...

Страница 367: ...rinter and make it available for other fax machines to poll You can retrieve faxes stored on other fax machines To use this feature both the polling printer and the remote printer must have the Pollin...

Страница 368: ...368 Xerox EC8036 EC8056 Color Multifunction Printer User Guide Apps Features...

Страница 369: ......

Страница 370: ......

Отзывы: