


S E C T I O N T W O
2-4
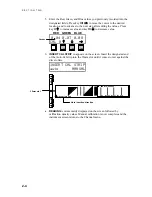
5. Enter the Red, Green, and Blue values you previously recorded into the
designated fields. Press key
llll
(
→
) to move the cursor to the desired
location, and to advance to the next step after editing the values. Press
key
ll
(
↑
) to increase value and key
lll
(
↓
) to decrease value.
0.04
CAL R
0.07 0.08
_
↑
↓
→
RED
GREEN BLUE
6.
INSERT CAL STRIP
re-appears on the screen. Insert the designated end
of the Auto-Cal strip into the 35mm slot until it comes to rest against the
drive rollers.
INSERT CAL STRIP
auto
MANUAL
10
1
0
X-RITE Auto-Cal Strip P/N 880-100 Patent Pending
INSERT THIS END
SERIAL #: XXX-XXX
CAL R= 0.04 G= 0.07 B= 0.08
•
READING
is momentarily displayed on the screen followed by
calibration density values. Manual calibration is now complete and the
instrument screen returns to the Channel menu.
Cursor
35mm slot
Note insertion direction
Содержание 891
Страница 1: ...891 892 A U T O M A T I C S T R I P R E A D I N G D E N S I T O M E T E R S Operation Manual...
Страница 2: ......
Страница 4: ......
Страница 10: ...I N T R O D U C T I O N vi...
Страница 34: ...S E C T I O N T H R E E 3 8...
Страница 46: ...S E C T I O N F O U R 4 12...
Страница 52: ...S E C T I O N F I V E 5 6...
Страница 58: ...S E C T I O N S I X 6 6...
Страница 60: ...S E C T I O N S E V E N 7 2...
Страница 66: ...S E C T I O N E I G H T 8 6...
Страница 68: ...A P P E N D I X A A 2...
Страница 73: ...D 1 A P P E N D I X D Parts List and Packaging Drawings Parts List...
Страница 74: ...A P P E N D I X D D 2 Packaging Drawing...
Страница 78: ...A P P E N D I X E E 4...
Страница 79: ......