background image

23

Heating Sensor Installation

1.  Only  use  the  System  sensor  provided  with  the

unit.

2. The  sensor  wires  can  be  extended  up  to  500  ft

using a shielded 2-conductor cable.

3. Do not run sensor wires in conduit with line voltage

wiring.

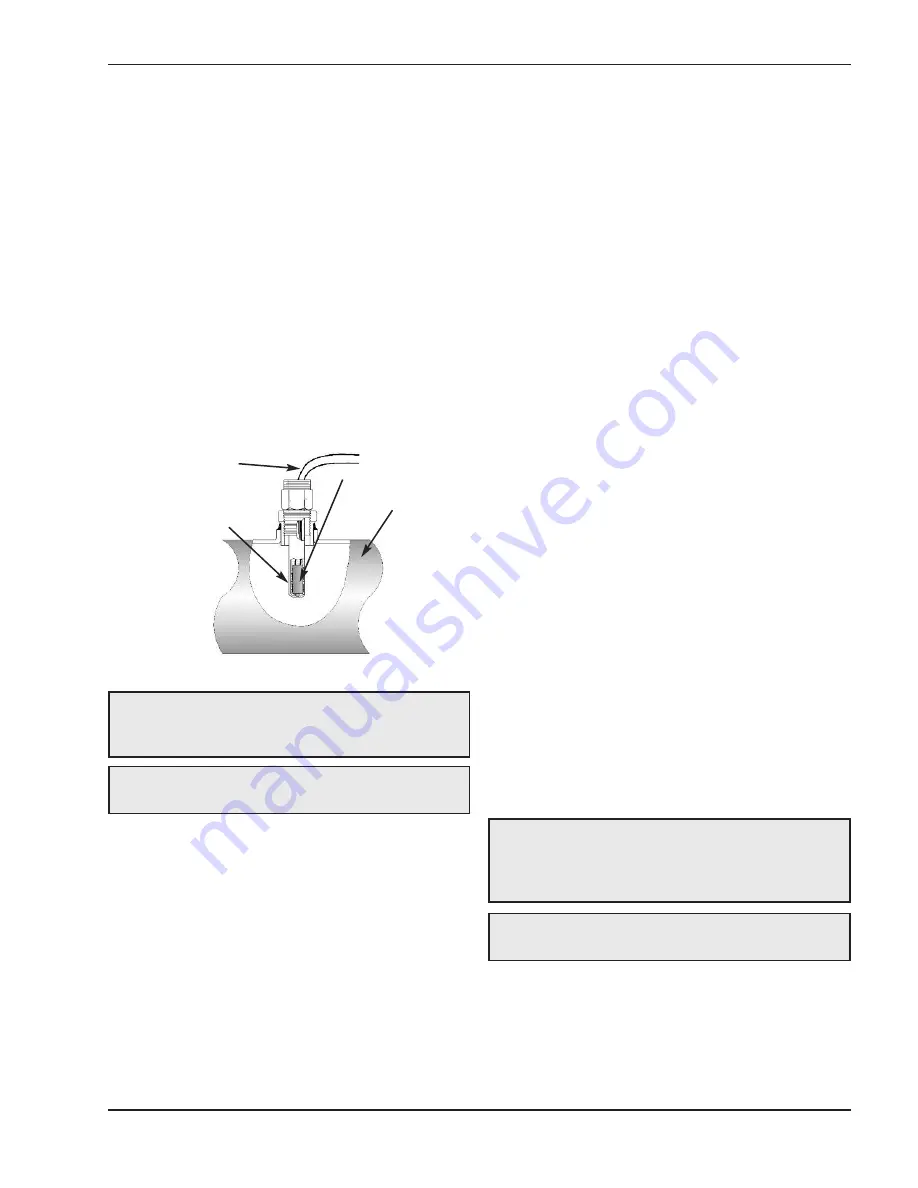
4. Install a 3/8” ID 1/2 NPT immersion well.

5. If installing the system sensor on the supply, insert

the sensor in a well with heat paste no more than

5 ft past the boiler loop outlet on the common sup-

ply  header,  but  before  any  major  takeoffs.  The

sensor must be located where it sees the output of

all the boiler stages. If a boiler is piped so that the

sensor does not see its output. the VERSA IC

® 

will

not sequence the boilers correctly.

Wiring the Outdoor Sensor

1.  There is no connection required if an outdoor sen-

sor is not used in this installation.

2. If  using  an  Outdoor  Sensor,  connect  the  sensor

wires  to  the  terminals  marked  OUTDOOR  SEN-

SOR  (see  wiring  diagram).  Caution  should  be

used  to  ensure  neither  of  these  terminals

becomes connected to ground.

3. Use a minimum 18 AWG wire for runs of up to 150

feet.

4.  Mount the outdoor sensor on an exterior surface of

the  building,  preferably  on  the  north  side  in  an

area that will not be affected by direct sunlight and

that will be exposed to varying weather conditions.

Wiring the Indirect Sensor

1.  There is no indirect sensor connection required if

an indirect water heater is not used in the installa-

tion.

2. When the Indirect DHW call for heat is active, the

PIM  communicates  this  to  the  VERSA.  The

VERSA  calculates  the  optimal  operation  and

sends the firing rate and pump output requests to

the PIM so it can activate the Indirect DHW pump

and Boiler pump if needed.  If an optional Indirect

DHW  sensor  is  connected  to  J2-1  and  J2-2  the

PIM will pass this signal to the VERSA. This allows

the VERSA to optimize the Indirect DHW demand

to maintain the Indirect DHW setpoint. The Indirect

DHW  thermostat  switch  closure  is  not  required

when using the Indirect DHW sensor.  If a VERSA

is not present the PIM shall activate the Indirect

DHW  pump  whenever  the  Indirect  DHW  call  is

active.  The  Boiler  pump  may  also  be  activated

based  on  the  Indirect  DHW  piping  configuration

setting.

3. Connect the indirect tank sensor to the terminals

marked  INDIRECT  DHW  SENSOR  (see  wiring

diagram). Caution should be used to ensure nei-

ther  of  these  terminals  becomes  connected  to

ground.  When  using  an  indirect  DHW  sensor  to

control  tank  temperature,  contact  closure  is

required  across  the  indirect  DHW  override  con-

nections. To ensure proper operation during “limp

along” mode set PIM operator dial to be equal to

DHW Target temperature condition from occurring.

See VERSA IC manual, catalog 5000.72.

Wiring the Optional 0–10 Volt

Building Control Signal

1. A signal from an energy management system may

NOTE:

Alternately, a thermostat contact closure can

be used in lieu of the sensor for indirect operation.

Connect the thermostat to the terminals marked IND

REMOTE THERMOSTAT.

NOTE:

If the System Sensor (S3) can not sense the

correct  water  temperature,  the  VERSA  IC

®

will  not

provide comfortable heat levels.

WARNING:

Use only the System and Outdoor Air

sensors included with the control.

CAUTION:

Sensor and control wiring must 

NOT

be

run in conduit or chases with line voltage.

Fig. 19: System Sensor (S3)

Heating

System

Sensor

Immersion Well

3/8” ID 1/2 NPT

Common

Supply Pipe

Sensor

Probe

Содержание 300A-850A

Страница 1: ...vapors and liquids or other combustible materials in the vicinity of this or any other appliance To do so may result in an explosion or fire WHAT TO DO IF YOU SMELL GAS Do not try to light any applia...

Страница 2: ...llowing Changes to pages 5 13 14 15 16 17 22 23 24 25 26 27 29 30 33 35 37 39 40 41 42 44 45 52 and 53 Additions Flushing Cleaning of System Piping and Cold Water Operation sections added starting on...

Страница 3: ...ing Connections 22 Venting 26 Venting Installation Tips 29 Venting Configurations 29 Condensate Management 34 Outdoor Installation 35 Controls 36 Operating Instructions 39 WIRING DIAGRAM 46 START UP 4...

Страница 4: ...CALIFORNIA PROPOSITION 65 This product contains chemicals known to the State of California to cause cancer birth defects or other reproductive harm WARNING Risk of electrical shock More than one disco...

Страница 5: ...k s standard war ranties Model Identification The model identification number and heater serial number are found on the heater rating plate located on the upper rear jacket panel The model number has...

Страница 6: ...ig 2 Component Locations Top Fig 3 Component Locations Rear Model No MBTUH Input Water conn NPT Gas conn NPT Vent Size inches Max Min N P Flue Intake 300A 300 60 1 1 2 3 4 3 4 4 4 400A 399 80 2 1 1 4...

Страница 7: ...water for use by individuals a thermostatically controlled mixing valve for reducing point of use water temperature is recommended to reduce the risk of scald injury Contact a licensed plumber or the...

Страница 8: ...ed parking garages must be located at least 18 in above the floor In addition the heater shall be installed such that the gas ignition system components are protected from water dripping spraying rain...

Страница 9: ...all local codes See Fig 5 Table F NOTE Use of this boiler in construction areas where fine particulate matter such as concrete or dry wall dust is present may result in damage to the boiler that is n...

Страница 10: ...ft 1 2m below or to side of opening 1 ft 30 cm above opening 3 ft 91 cm K Clearance to mechanical air supply inlet 3 ft 91 cm above if within 10 ft 3m horizontally 6 ft 1 83m L Clearance above paved...

Страница 11: ...to ducting combustion air to the unit the unit may be fully separated from room air by installing the TruSeal option This may be done either at the fac tory sales option D 21 or in the field sales op...

Страница 12: ...th the outdoors Canadian Installations opening s having a cross section area of not less than 1 in 2 per 7 000 BTUH 320 mm2 per kW up to and including 1 million BTUH plus 1 in 2 per 14 000 BTUH 160 mm...

Страница 13: ...auge pressure has been maintained throughout test 3 Check for leaks Repair if found Flushing Cleaning of System Piping Many of the chemicals used to perform this function will harm the heat exchanger...

Страница 14: ...rred method is an injection loop An injec tor pump approach has the added value of being able to adjust very quickly to changes in the system water coming back to the heater The integrated VERSA IC co...

Страница 15: ...D Hybrid sequencer sales option B 36 Proper place ment and method of installation are critical for proper operation of the system See Fig 7 The sensor must be installed in a drywell in conjunction wit...

Страница 16: ...y connected to a hot water storage tank For detailed information about applications and modes see VERSA IC manu al catalog 5000 72 Mode 1 Type H Units Only This mode selection is for hydronic heating...

Страница 17: ...ly sensor S6 and the Target Max setting when using the Indirect DHW sensor S5 The Boiler Pump 17 Fig 11 MODE 3 Single Boiler with Indirect on Boiler Loop Fig 12 WH Units Single Water Heater with Tank...

Страница 18: ...lieve test pressure in the gas supply line prior to re connecting the heater and its manual shut off valve to the gas supply line FAIL URE TO FOLLOW THIS PROCEDURE MAY DAMAGE THE GAS VALVE Over pressu...

Страница 19: ...s line pipe thread A pipe compound rated for use with natural and propane gases is recommended Apply sparingly only on male pipe ends leaving the two end threads bare CAUTION Support gas supply piping...

Страница 20: ...larger than hp or 5A must use a sepa rate power supply and run the power through an external field supplied pump contactor Use appropri ately sized wire as defined by NEC CSA and or local codes All p...

Страница 21: ...g 14 18 1 Verify that circuit breaker is properly sized by referring to heater rating plate A dedicated circuit breaker should be provided and sized for the heater and all pumps powered through the he...

Страница 22: ...LARM CONTROL SENSOR WIRING HIGH VOLTAGE POWER AND PUMP WIRING LOCATION RATING PLATE SUGGESTED ROUTING OF SENSOR CONTROL WIRING Fig 16 Rear Wiring Location Fig 18 XFyre Single Heater Control PLATFORM I...

Страница 23: ...ts to the PIM so it can activate the Indirect DHW pump and Boiler pump if needed If an optional Indirect DHW sensor is connected to J2 1 and J2 2 the PIM will pass this signal to the VERSA This allows...

Страница 24: ...does not create a short to ground Fig 20 XFyre Cascade System Wiring 24 Wiring the Cascade System Communication Bus 1 Designate the primary boiler as the master boiler boiler1 by leaving dip switch 2...

Страница 25: ...18 This connection must be pro vided through dry contacts closure NOTE This dry contacts closure can come from a room thermostat or a remote relay No power of any kind should be applied to either of...

Страница 26: ...ufacturer s installation instructions carefully Centrotherm polypropylene vent material is also approved to be used on XFyre products A vent adapter sales option D 33 must be used to ensure a proper s...

Страница 27: ...ions of the local building codes Support of Vent Stack The weight of the vent stack or chimney must not rest on the heater vent connection Support must be pro vided in compliance with applicable codes...

Страница 28: ...n The venting system must conform to local codes and or the current National Fuel Gas Code ANSI Z223 1 NFPA 54 The system setpoint must not exceed 180 F 28 damaging exterior finishes Use a 300 series...

Страница 29: ...s 300A 400A and 500A and 6 in 152mm for Models 700A and 850A The connection from the appliance vent to the stack must be as direct as possible and shall be the same di ameter as the vent outlet The ho...

Страница 30: ...serving any other appliances shall not be connected into any portion of mechanical draft systems operating under a positive pressure If an XFyre is installed to replace an exist ing unit the vent sys...

Страница 31: ...hrough the Wall Venting Refer to Table F and local codes Fig 28 Horizontal Through the Wall Direct Venting Refer to Table F and local codes a Seal any unused openings in the common venting system b Vi...

Страница 32: ...s not considered in the overall length of the venting system The vent must be installed to prevent flue gas leakage Care must be taken during assembly to ensure that all joints are sealed properly and...

Страница 33: ...the XFyre product Table Q Category IV Horizontal Vent Ducted Combustion Air CAUTION This venting system requires the installation of a condensate drain in the vent piping per the vent manufacturer s i...

Страница 34: ...d health of inhabitants TEST PORT FLUE VENT CONDENSATE TREATMENT CONDENSATE TRAP CONNECTION PVC PIPE 1 4 DROP PER FT VENT CONDENSATION TRAP FLOOR DRAIN OR SUMP PUMP 12 Fig 30 Guide for Condensate Pipi...

Страница 35: ...ent gas flue leaks Treatment systems should be checked at least once per year and the chips should be replenished as necessary When replacing the chips they should be no smaller than to avoid blockage...

Страница 36: ...out occurs To reset the lock out press and relase the RESET button located on the user interface Turning off the power to the heater WILL NOT reset the single try ignition module High Limit Manual Res...

Страница 37: ...t temperature of the unit during nor mal operation to prevent short cycling and nuisance trips 37 Flow Switch This standard dual purpose control shuts off the boil er in case of pump failure or low wa...

Страница 38: ...inside the switch housing Push the top of the plastic switch housing as shown in Fig 37 to reset a tripped pressure switch The LED will go out when the switch is reset Blocked Vent Switch The heater...

Страница 39: ...The user interface consists of several Menu options Press the MENU button to scroll through the different menus in the interface Press the ITEM button to scroll through available items within a select...

Страница 40: ...he blower heater cascade status pump operation and CFH information Some of the items displayed are mode specific and are only observable when its corre sponding mode is active Setup Menu To change set...

Страница 41: ...requires IND Sensor ON 6 F IND SUPPLY H MODE 2 3 OFF 50 F to PIM value Target boiler temperature for the DHW heat exchanger during indi rect DHW operation requires IND Sensor OFF 180 F DHW PRIORITY H...

Страница 42: ...been corrected and a 15 min waiting period has expired VENT WALL 22 F to 266 F N A Always model dependent Current Vent temperature LIMIT TEMP 22 F to 266 F N A Always Current Outlet Limit temperature...

Страница 43: ...o clear INLET HI All Records the highest boiler inlet temperature Press UP DOWN for 1 sec to clear INLET LO All Records the lowest boiler outlet temperature Press UP DOWN for 1 sec to clear DELTA T Al...

Страница 44: ...r temperature drops the tempera ture of the heating water will increase one degree With the VERSA both ends of the slope are adjustable It is factory set at 70 F water temperature Boil START at 70 F o...

Страница 45: ...leting heat loss calculations for the building Boiler Design Boil DESIGN The Boil DESIGN temperature is the water temperature required to heat the boiler zones when the outdoor air is as cold as the O...

Страница 46: ...46 WIRING DIAGRAM...

Страница 47: ...you cannot reach your gas supplier call the fire department Use only your hand to close the gas supply shut off valve outside the heater Never use tools If the knob will not turn by hand do not try to...

Страница 48: ...ield supplied on the 700A and 850A 4 Attach a 12 scale manometer to the downstream fitting on the gas manifold Measure point B in Fig 44 field supplied on the 700A and 850A 5 Attach a 12 scale manomet...

Страница 49: ...o the sight glass located at the bottom of the front panel to check igniter opera tion 3 The boiler ignites at 3000 RPM as indicated on the LCD display of the user interface 4 This boiler is equipped...

Страница 50: ...gnite after pre purge time delay 8 Check to see that the high limit control is set above the design temperature requirements of the system For multiple zones Check to make sure the flow is adjusted as...

Страница 51: ...inside front panel on boiler OPERATION Lighting Instructions 1 Before lighting make sure you have read all of the safety information in this manual 2 Set the thermostat to the lowest setting 3 Turn of...

Страница 52: ...ror Item Description and Troubleshooting OUTLET SEN Check the outlet water sensor and its wiring LIMIT SEN Check the high limit sensor and its wiring INLET SEN Check the inlet sensor and its wiring GA...

Страница 53: ...Fault Red LED 7 Flashes Check for proper water flow Check hi limit setting and outlet sensor Sensor Fault Red LED 8 Flashes See the VERSA IC Control for fault identification Check sensor and wiring N...

Страница 54: ...should be no resistance Fig 46 Direct Spark Igniter Water Sensor Outdoor Sensor Water Temperature F Resistance ohms 32 32550 41 25340 50 19870 59 15700 68 12490 77 10000 86 8059 95 6535 104 5330 113 4...

Страница 55: ...ensate drain is inspected and ensure that condensate is being directed to appropriate con densate management system or drain as required by local codes 3 Check that area is free from combustible mater...

Страница 56: ...nsor 4 Conduct a combustion test at high and low fire Carbon dioxide should be 8 5 to 9 0 at full fire for natural gas and between 9 5 to 10 0 for propane gas Carbon monoxide should be 150 ppm 5 Check...

Страница 57: ...to fol low the precautions listed for working with ceramic fibers 4 Spray the coils with clear water making sure to con fine the spray to the area being cleaned DO NOT get the back ceramic wall of th...

Страница 58: ...may however choose to use outside combustion air for one or more of these reasons 1 Installation is in an area containing contaminants listed below which will induce acidic condensation 2 You want to...

Страница 59: ...wall horizontally vented gas fueled equipment installed in every dwelling building or structure used in whole or in part for residential purposes including those owned or operated by the Commonwealth...

Страница 60: ...contamination of combustion air or use of chemical additives to water PARTS REPLACEMENT Under this Warranty Raypak will furnish a replacement for any failed part The failed part must first be returne...

Страница 61: ...e _____________ Stack Height _______ Low Water Cutoff _______________Test Category _________ sketch vent on reverse side Number of Tanks and Size Qty____ _______Gallons Vent Material _________________...

Страница 62: ...62...

Страница 63: ...63...

Страница 64: ...64 www raypak com Raypak Inc 2151 Eastman Avenue Oxnard CA 93030 805 278 5300 Fax 805 278 5468 Litho in U S A...

Отзывы: