background image

Planning the Installation 

25 mm (0.98") installation frame


01750058390 G 

ProCash 2050xe USB - Installation Guide 

49


Calculating the base height 

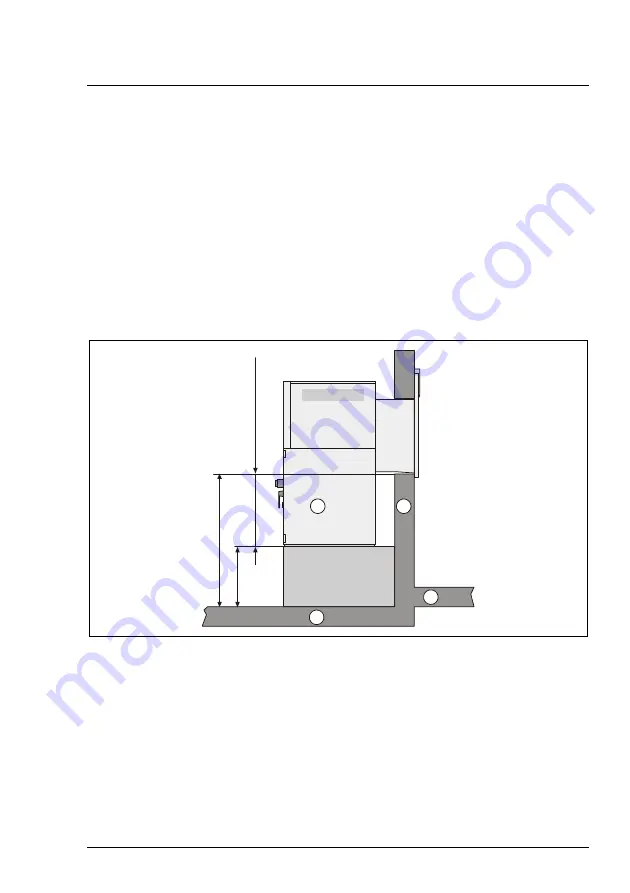
If you want to set the ProCash 2050xe USB on a base, calculate the base 
height using the following formula (see also the illustration in the section 
"Installation options 4-cassette dispenser" or "Installation options 5-cassette 
dispenser"): 

Installation option 

Formula 

4–cassette dispenser: 

X5

base

 = X1

wall

 – 648 mm (25.51") – 25 mm (0.98")


(installation frame) 

5–cassette dispenser: 

X5

base

 = X1

wall

 – 788 mm (31.02") – 25 mm (0.98")


(installation frame) 


2

1

4

3

648 / 788*

(25.51" / 31.02

"*)

X1

X5


1 Device 

4 Floor outside 

2  Wall 

X1 Height of wall opening (X1

wall

3  Floor inside 

X5 Height of base (X5

base


*  648 mm (25.51") for a device with 4-cassette dispenser 

  788 mm (31.05") for a device with 5-cassette dispenser 


Содержание ProCash 2050xe USB

Страница 1: ...Installation Guide ProCash 2050xe USB Self Service Systems ...

Страница 2: ...nual Please contact the following address giving the order number of this manual in your message Address WINCOR NIXDORF International GmbH Handbuchredaktion BD PSD 43 D 33094 Paderborn Germany Fax 49 0 52 51 693 62 09 E mail manuals hardware wincor nixdorf com any technical questions or problems Please contact your local representative ...

Страница 3: ...Edition June 2010 ProCash 2050xe USB Installation Guide ...

Страница 4: ...are reserved Any violations give rise to a claim for damages All rights including rights created by patent grants or registration of a utility model or design are reserved Delivery subject to availability right of technical modifications reserved All names of hardware and software products mentioned in this manual are trade names and or trademarks of their respective manufacturers This manual was ...

Страница 5: ...r light case 14 ProCash 2050xe USB with 6 cassette dispenser 15 Device without illuminated signage 15 Device with illuminated signage 16 Device with illuminated signage and lower light case 17 Device dimensions 60 mm 2 36 tunnel 18 ProCash 2050xe USB with 4 cassette dispenser 19 Device without illuminated signage 19 Device with illuminated signage 20 ProCash 2050xe USB with 5 cassette dispenser 21...

Страница 6: ...5 25 mm 0 98 installation frame 46 General information 46 Securing the installation frame 46 Dimensions of safe attachment points 47 Dimensions of cable areas 48 Calculating the base height 49 82 mm 3 23 installation frame 50 General information 50 Securing the installation frame 50 Dimensions of safe attachment points 51 Dimensions of cable areas 52 222 mm 8 74 installation frame 53 General infor...

Страница 7: ...4 Installation 87 Removing the packaging 87 Removing the shipping crate 88 General information 88 Removing the shipping crate 89 Mounting sets 90 Mounting set 01750006706 for installation frames or installation racks with UL safe 90 Mounting set 01750051579 for installation frames or installation racks with CEN III IV safe 91 Mounting set 01750078516 for UL CEN L safe on 25 mm 0 98 installation fr...

Страница 8: ... 72 116 General information 117 Mounting the device on the installation frame 120 Lifting the cash media dispenser CMD V4 up 120 Screwing the device on the installation frame 121 Pushing the cash media dispenser CMD V4 down 122 Installing the power and data cables in the device 122 Further procedure for CEN installation 123 General information 123 Installation with height adjustable installation r...

Страница 9: ...ction to the relay panel for external features 162 Shortening the cables 164 Adapting the cable length at the relay panel end 164 Adapting the cable length at the standard remote status indicator end 164 Adapting the cable length at the remote status indicator audio 167 Appendix 171 Check list for installation preparations for self service systems 171 General information 172 Preparations 172 Const...

Страница 10: ... and electrical safety 185 Certification for data transmission 185 FCC rules and Canadian Standard ICES 003 185 UL 291 Level 1 security Container 186 Environmental protection 186 Environmentally and recycling friendly product development 186 Saving energy 187 Disposing of used consumables 187 Labels on plastic case parts 187 Returning recycling and disposing of used units and consumables 187 ...

Страница 11: ...nese National Standards CSA Canadian Standards Association D DIN German Institute for Standardization DT Data Transmission E EC European Community EDM Encryption Decryption Module EEC European Economic Community EMA Intruder alarm system EMC Electromagnetic Compatibility EN European standard EPP Encrypted PIN Pad F FCC Federal Communications Commission G GmbH Limited liability company I ICES Inter...

Страница 12: ...evaluation by means of security modules like MM box or CIM 86 R RSI Remote Status Indicator S SELV Safety Extra Low Voltage T TN network Power supply network in accordance with EN 60950 U UL Underwriters Laboratories Inc UPS Uninterruptible Power Supply V VdS Association of Property Insurance Companies ...

Страница 13: ...d signage with a 5 cassette dispenser with illuminated signage and lower light case with a 6 cassette dispenser without illuminated signage with a 6 cassette dispenser with illuminated signage with a 6 cassette dispenser with illuminated signage and lower light case ProCash 2050xe USB with a 60 mm 2 36 tunnel with a 4 cassette dispenser without illuminated signage with a 4 cassette dispenser with ...

Страница 14: ...before doing any work on the device Make sure that no water liquids e g rain snow etc gets into the open device and the exposed components especially under adverse weather conditions since that could pose a danger to your life If you work on an open device be sure to take appropriate precautions covering the device properly for example to prevent liquids from getting into the device Installation n...

Страница 15: ...ays free access to the sockets used or to the electrical circuit breakers of the house installation In case of an emergency e g damaged cabinets controls or power cables liquids or foreign objects in the device take the following steps Deactivate the device immediately by Switching off the automatic circuit breaker or removing the fuse inset from the fuse holder in the distribution box of the buil...

Страница 16: ...nt to feed voltage from an external source into prepared cables to install additional electronics e g EMA connection relay panel for external features To clean and maintain the device only use cleaning agents approved by WINCOR NIXDORF International GmbH see chapter Appendix in the operating manual Repairs Repair work may only be carried out by authorized personnel Unauthorized opening of the devi...

Страница 17: ... force Do not allow the battery to come into contact with water or fire Replace only with the same or an equivalent type recommended by WINCOR NIXDORF International GmbH see chapter Appendix section Consumables in the operating manual Dispose of used batteries in compliance with national regulations and the manufacturer s specifications Start up i Before operating the device remove all parts insid...

Страница 18: ...Introduction 6 ProCash 2050xe USB Installation Guide 01750058390 G ...

Страница 19: ...be met see chapter Appendix section Environmental conditions Make sure that the values are neither higher nor lower than the specified values to prevent irreparable damage to the device WINCOR NIXDORF International GmbH is not liable for any damage to the device resulting from failure to meet these conditions Device dimensions 35 mm 1 38 tunnel i All dimensions are specified in millimeters inches ...

Страница 20: ...ssette dispenser Device without illuminated signage Safe width 600 mm 23 62 1500 59 06 13 5 0 53 634 24 96 500 19 69 600 23 62 848 33 39 1500 59 06 1890 74 41 885 34 84 614 24 17 668 26 3 667 26 26 658 25 91 677 26 65 1405 55 31 72 43 2 83 1 69 1208 47 56 1243 48 94 215 8 46 35 1 38 Standard lock 43 mm 1 69 Customer specific lock max 72 mm 2 83 ...

Страница 21: ...390 G ProCash 2050xe USB Installation Guide 9 Safe width 450 mm 17 72 215 8 46 738 29 06 614 24 17 668 26 3 667 26 26 658 25 91 677 26 65 1405 55 31 1098 43 23 1133 44 61 1500 59 06 1500 59 06 1890 74 41 885 34 84 110 4 33 600 23 62 13 5 0 53 634 24 96 450 17 72 500 19 69 ...

Страница 22: ...evice with illuminated signage 848 33 39 1500 59 06 1890 74 41 885 34 84 614 24 17 1616 63 62 72 43 2 83 1 69 1208 47 56 1243 48 94 50 1 97 35 1 38 668 26 3 667 26 26 658 25 91 677 26 65 215 8 46 484 19 06 1616 63 62 13 5 0 53 634 24 96 600 23 62 500 19 69 Standard lock 43 mm 1 69 Customer specific lock max 72 mm 2 83 ...

Страница 23: ... illuminated signage and lower light case 484 19 06 1616 63 62 848 33 39 429 16 89 668 26 3 667 26 26 658 25 91 677 26 65 1616 63 62 72 43 2 83 1 69 1208 47 56 1243 48 94 50 1 97 35 1 38 1500 59 06 1890 74 41 885 34 84 215 8 46 634 24 96 600 23 62 13 5 0 53 500 19 69 Standard lock 43 mm 1 69 Customer specific lock max 72 mm 2 83 ...

Страница 24: ...B with 5 cassette dispenser Device without illuminated signage 754 29 69 1545 60 83 35 1 83 848 33 39 72 43 2 83 1 69 1208 47 56 1243 48 94 808 31 81 667 26 26 798 31 42 677 26 65 1640 64 57 2030 79 92 1025 40 35 215 8 46 1640 64 57 634 24 96 500 19 69 600 23 62 13 5 0 53 Standard lock 43 mm 1 69 Customer specific lock max 72 mm 2 83 ...

Страница 25: ...vice with illuminated signage 13 5 0 53 634 24 96 600 23 62 500 19 69 848 33 39 1640 64 57 2030 79 92 1025 40 35 754 29 69 808 31 81 667 26 26 798 31 42 677 26 65 1756 69 13 72 43 2 83 1 69 1208 47 56 1243 48 94 215 8 46 50 1 97 35 1 38 484 19 06 1756 69 13 Standard lock 43 mm 1 69 Customer specific lock max 72 mm 2 83 ...

Страница 26: ...illuminated signage and lower light case 13 5 0 53 634 24 96 600 23 62 500 19 69 848 33 39 1640 64 57 2030 79 92 1025 40 35 569 22 4 808 31 81 667 26 26 798 31 42 677 26 65 1756 69 13 72 43 2 83 1 69 1208 47 56 1243 48 94 215 8 46 50 1 97 35 1 38 484 19 06 1756 69 13 Standard lock 43 mm 1 69 Customer specific lock max 72 mm 2 83 ...

Страница 27: ...B with 6 cassette dispenser Device without illuminated signage 13 5 0 53 634 24 96 500 19 69 600 23 62 1760 69 29 848 33 39 1760 69 29 2150 84 65 1145 45 08 874 34 41 928 36 54 667 26 26 918 36 14 677 26 65 1665 65 55 72 43 2 83 1 69 1208 47 56 1243 48 94 215 8 46 35 1 38 Standard lock 43 mm 1 69 Customer specific lock max 72 mm 2 83 ...

Страница 28: ...vice with illuminated signage 634 24 96 600 23 62 500 19 69 484 19 06 1876 73 86 848 33 39 1760 69 29 2150 84 65 1145 45 08 874 34 41 928 36 54 667 26 26 918 36 14 677 26 65 1876 73 86 72 43 2 83 1 69 1208 47 56 1243 48 94 215 8 46 50 1 97 35 1 38 13 5 0 53 Standard lock 43 mm 1 69 Customer specific lock max 72 mm 2 83 ...

Страница 29: ...illuminated signage and lower light case 13 5 0 53 634 24 96 600 23 62 500 19 69 484 19 06 1876 73 86 848 33 39 1760 69 29 2150 84 65 1145 45 08 689 27 13 928 36 54 667 26 26 918 36 14 677 26 65 1876 73 86 72 43 2 83 1 69 1208 47 56 1243 48 94 215 8 46 50 1 97 35 1 38 Standard lock 43 mm 1 69 Customer specific lock max 72 mm 2 83 ...

Страница 30: ...e Installation 18 ProCash 2050xe USB Installation Guide 01750058390 G Device dimensions 60 mm 2 36 tunnel i All dimensions are specified in millimeters inches The views of the device are not drawn to scale All device edges have a radius of 3 mm 0 12 ...

Страница 31: ...SB with 4 cassette dispenser Device without illuminated signage 1500 59 06 634 24 96 500 19 69 600 23 62 848 33 39 1500 59 06 1890 74 41 885 34 84 614 24 17 668 26 3 667 26 26 658 25 91 677 26 65 1416 55 75 72 43 2 83 1 69 1183 46 57 1243 48 94 215 8 46 60 2 36 13 5 0 53 Standard lock 43 mm 1 69 Customer specific lock max 72 mm 2 83 ...

Страница 32: ...evice with illuminated signage 13 5 0 53 634 24 96 600 23 62 500 19 69 484 19 06 1630 64 17 848 33 39 1500 59 06 1890 74 41 885 34 84 614 24 17 668 26 3 667 26 26 658 25 91 677 26 65 1630 64 17 72 43 2 83 1 69 1183 46 57 1243 48 94 215 8 46 75 2 95 60 2 36 Standard lock 43 mm 1 69 Customer specific lock max 72 mm 2 83 ...

Страница 33: ...B with 5 cassette dispenser Device without illuminated signage 1640 64 57 634 24 96 500 19 69 600 23 62 848 33 39 1640 64 57 2030 79 92 1025 40 35 754 29 69 808 31 81 667 26 26 798 31 42 677 26 65 1556 61 26 72 43 2 83 1 69 1183 46 57 1243 48 94 215 8 46 60 2 36 13 5 0 53 Standard lock 43 mm 1 69 Customer specific lock max 72 mm 2 83 ...

Страница 34: ...vice with illuminated signage 13 5 0 53 634 24 96 600 23 62 500 19 69 484 19 06 1770 69 69 848 33 39 1640 64 57 2030 79 92 1025 40 35 754 29 69 808 31 81 667 26 26 798 31 42 677 26 65 1770 69 69 72 43 2 83 1 69 1183 46 57 1243 48 94 215 8 46 75 2 95 60 2 36 Standard lock 43 mm 1 69 Customer specific lock max 72 mm 2 83 ...

Страница 35: ...h 2050xe USB with 6 cassette dispenser Device without illuminated signage 1145 45 08 1760 69 39 2150 84 65 215 8 46 1687 66 42 874 34 41 928 36 54 918 36 14 600 23 62 848 33 39 1183 46 57 60 2 36 677 26 65 667 26 26 72 43 2 83 1 69 634 24 96 500 19 69 13 5 0 53 Standard lock 43 mm 1 69 Customer specific lock max 72 mm 2 83 ...

Страница 36: ...0 G Device with illuminated signage 634 24 96 500 19 69 1145 45 08 1760 69 29 2150 84 65 215 8 46 1891 74 45 677 26 65 928 36 54 667 26 26 918 36 14 1891 74 41 874 34 41 848 33 39 60 2 36 75 2 95 1183 46 57 600 23 62 484 19 06 72 43 2 82 1 69 13 5 0 53 Standard lock 43 mm 1 69 Customer specific lock max 72 mm 2 83 ...

Страница 37: ...es Installation with 222 mm 8 74 installation frame yes no Installation with height adjustable installation rack no yes If you want to use a height adjustable installation rack and the floor height inside and outside is the same the ProCash 2050xe USB can also be installed on the 190 to 320 mm 7 48 to 12 6 installation rack Installation options for ProCash 2050xe USB with 5 cassette dispenser Same...

Страница 38: ...Installation options Planning the Installation 26 ProCash 2050xe USB Installation Guide 01750058390 G Device view 35 mm 1 38 tunnel Without illuminated signage ...

Страница 39: ...Planning the Installation Installation options 01750058390 G ProCash 2050xe USB Installation Guide 27 With illuminated signage ...

Страница 40: ...Installation options Planning the Installation 28 ProCash 2050xe USB Installation Guide 01750058390 G With illuminated signage and lower light case ...

Страница 41: ...Planning the Installation Installation options 01750058390 G ProCash 2050xe USB Installation Guide 29 Device view 60 mm 2 36 tunnel Without illuminated signage ...

Страница 42: ...Installation options Planning the Installation 30 ProCash 2050xe USB Installation Guide 01750058390 G With illuminated signage ...

Страница 43: ...ette dispenser i The specified measurements for the wall cutout device version with 4 or 5 cassette dispenser are the ergonomic measurements which are measured at the outside of the wall 1 Outside wall 2 Inside wall device side W Wall thickness for 35 mm 1 38 tunnel max 360 mm 14 17 Wall thickness for 60 mm 2 36 tunnel max 335 mm 13 19 ...

Страница 44: ...dispenser i The specified measurements for the wall cutout device version with 6 cassette dispenser are the ergonomic measurements which are measured at the outside of the wall 1 Outside wall 2 Inside wall device side W Wall thickness for 35 mm 1 38 tunnel max 360 mm 14 17 Wall thickness for 60 mm 2 36 tunnel max 335 mm 13 19 ...

Страница 45: ...r ventilation on the right side of the top part and in the door of the operating unit by means of built in fans Additionally there are vents on the left side piece Make sure that the distance between the vents and the wall is always at least 50 mm 1 97 see also section Space required for operation and maintenance 1 1 Vents ...

Страница 46: ...ge caused by building dust You may use the plastic packing of the system for this purpose Space required for operation and maintenance The following two illustrations show the necessary operation and maintenance space for devices with a 35 mm 1 38 tunnel and those with a 60 mm 2 36 tunnel Ventilation area Additional operation and maintenance space right or left Operation and maintenance space Addi...

Страница 47: ... for operation and maintenance 01750058390 G ProCash 2050xe USB Installation Guide 35 35 mm 1 38 tunnel 1 150 5 91 350 13 78 350 13 78 700 27 56 850 33 46 848 33 39 780 30 71 620 24 41 1155 45 47 405 15 94 980 38 58 50 1 97 50 1 97 13 5 0 53 ...

Страница 48: ...nance Planning the Installation 36 ProCash 2050xe USB Installation Guide 01750058390 G 60 mm 2 36 tunnel 150 5 91 350 13 78 350 13 78 700 27 56 875 34 45 848 33 39 780 30 71 620 24 41 1155 45 47 405 15 94 980 38 58 50 1 97 50 1 97 13 5 0 53 ...

Страница 49: ... installed through the wall with floors the same height on the inside and on the outside with a higher floor on the outside or with a higher floor on the inside Possible versions i The illustration below shows a higher floor level on the outside The descriptions also apply if the floor level is higher on the inside and if the floor is on the same level on the inside and outside The three different...

Страница 50: ... X1 Height of wall opening X1wall 3 Floor inside X2 Adjustable height X2height 4 Floor outside X3 Setting height of installation rack 5 Installation rack top part X3variable 6 Installation rack bottom part X4 Height of installation rack 7 222 mm 8 74 installation bottom part X4rack frame X5 Height of base X5base 8 25 mm 0 98 install frame Height of customer panel keypad W Wall thickness for 35 mm ...

Страница 51: ...or through the specified wall cutout and the floor height is the same inside and outside see section Wall cutout 4 cassette and 5 cassette dispenser Version III As an alternative the device can be installed using the 25 mm 0 98 installation frame on a fixed base supplied by the customer see section 25 mm 0 98 installation frame if floor heights are the same or different i Not any difference in flo...

Страница 52: ...e with a higher floor on the outside or with a higher floor on the inside Possible versions i The illustration below shows a higher floor level on the outside The descriptions also apply if the floor level is higher on the inside and if the floor is on the same level on the inside and outside The two different versions I with 82 mm 3 23 installation frame II with 25 mm 0 98 installation frame are ...

Страница 53: ...25 0 98 3 1 2 4 1 1 2 3 3 1 Device 6 25 mm 0 98 installation frame 2 Wall 7 Base provided by customer 3 Floor inside X1 Height of wall opening X1wall 4 Floor outside X2 Adjustable height X2height 5 82 mm 3 23 installation X5 Height of base X5base frame Height of customer panel keypad W Wall thickness for 35 mm 1 38 tunnel max 360 mm 14 17 Wall thickness for 60 mm 2 36 tunnel max 335 mm 13 19 ...

Страница 54: ...me inside and outside see section Wall cutout 4 cassette and 5 cassette dispenser Version II As an alternative the device can be installed using the 25 mm 0 98 installation frame on a fixed base supplied by the customer see section 25 mm 0 98 installation frame if floor heights are the same or different i Not any difference in floor level can be compensated by the installation version described Th...

Страница 55: ...B with the same floor height on the inside and the outside is with the 25 mm 0 98 installation frame 615 24 21 2150 84 65 W 4 710 27 95 933 36 73 988 38 9 1 2 3 908 35 75 5 1 Device 4 Floor outside 2 Wall 5 25 mm 0 98 installation frame 3 Floor inside Height of customer panel keypad W Wall thickness for 35 mm 1 38 tunnel max 360 mm 14 17 Wall thickness for 60 mm 2 36 tunnel max 335 mm 13 19 ...

Страница 56: ...r heating energy and or communication cables etc are not damaged when drilling the mounting holes If necessary appropriate arrangements must be made i When selecting the installation site noise emission should be taken into account Fans in operation or the noise produced during a transaction could disturb people in the immediate vicinity of the device and may therefore need to be diminished with s...

Страница 57: ...f the installation site or mounted on a suitable base Using the prescribed mounting materials the following values relating to resistance to removal of the safe from the installation frame or the installation rack are reached Resistance grade Minimum force required III 50 kN IV 100 kN The operator must provide a suitable base to protect it from removal by force We recommend reinforced concrete B25...

Страница 58: ... installation frame Then the device safe is screwed to the installation frame How the safe is secured on the installation frame depends on the safe construction type UL CEN L or CEN III CEN IV For CEN safes the safe construction types are distinguished in resistance grades The label showing the resistance level is located on the inside of the safe door Openings which are not used have to be closed...

Страница 59: ... per group of holes A to D The installation frame is secured with four threaded rods A C D B 4 179 7 05 147 5 79 687 27 05 842 33 15 539 21 22 594 23 39 6 2 3 2 1 1 3 5 1 Attachment points of safe 2 Attachment points of installation frame 3 Alternative attachment points of installation frame 4 Attachment point of tear off sensor 5 This side must always point to the side with the safe door 6 Custom...

Страница 60: ... 2 44 202 7 95 247 9 72 347 13 66 429 16 89 486 19 13 536 21 1 569 22 4 25 0 98 130 5 12 391 15 39 451 17 76 712 28 03 737 29 02 817 32 17 2 3 2 3 2 3 2 4 1 Cable lead ins in the installation frame 2 Area for cables 3 Cable feed openings underneath the installation frame 4 This side must always point to the side with the safe door 5 Customer panel side ...

Страница 61: ...options 4 cassette dispenser or Installation options 5 cassette dispenser Installation option Formula 4 cassette dispenser X5base X1wall 648 mm 25 51 25 mm 0 98 installation frame 5 cassette dispenser X5base X1wall 788 mm 31 02 25 mm 0 98 installation frame 2 1 4 3 648 788 25 51 31 02 X1 X5 1 Device 4 Floor outside 2 Wall X1 Height of wall opening X1wall 3 Floor inside X5 Height of base X5base 648...

Страница 62: ...cured to the floor at the attachment points see section Drilling diagram for 82 mm 3 23 installation frame The device safe is then screwed to the installation frame Openings which are not used have to be closed by putting in the filling pieces i For mounting material see section Mounting sets in the chapter Installation Securing the installation frame The installation frame has in general to be se...

Страница 63: ... per group of holes A to D The installation frame is secured with a total of eight threaded rods 179 7 05 147 5 79 687 27 05 842 33 15 539 21 22 594 23 39 5 2 3 3 2 1 4 1 A C D B 6 1 Attachment points of safe 2 Attachment points of installation frame 3 Attachment points of installation frame 4 Attachment point of tear off sensor 5 This side must always point to the side with the safe door 6 Custom...

Страница 64: ...9 6 26 309 12 17 462 18 19 564 22 2 714 28 11 787 30 98 805 31 69 484 19 06 515 20 28 55 2 17 151 5 94 265 10 43 453 17 83 135 5 31 282 11 1 552 21 73 530 20 87 539 21 22 568 22 36 5 1 Cable lead ins in the installation frame 2 Area for cables 3 Cable feed openings underneath the installation frame 4 This side must always point to the side with the safe door 5 Customer panel side ...

Страница 65: ...with the same floor height on both sides of the wall The installation frame can be either a standard installation frame or a CEN frame identified by the CEN sticker The installation frame is secured to the floor at the attachment points see section Drilling diagram for 222 mm 8 74 installation frame The device safe is then screwed to the installation frame Openings which are not used have to be cl...

Страница 66: ...owing the resistance level is located on the inside of the safe door For a UL safe and a safe with resistance grade III CEN III or L CEN L it is mandatory that the installation frame is secured at the points 2 with four threaded rods These alternative attachment points are at position 3 see illustration below For a safe with resistance grade IV CEN IV it is mandatory that the CEN frame is secured ...

Страница 67: ... IV safe per group of holes A to D The installation frame is secured with a total of four or eight threaded rods 179 7 05 147 5 79 687 27 05 842 33 15 539 21 22 594 23 39 6 5 2 3 3 2 1 4 1 A C D B 1 Attachment points of safe 2 Attachment points of installation frame 3 Additional attachment points for CEN IV safe or alternative attachment points of UL CEN L CEN III safe 4 Attachment point of tear o...

Страница 68: ... per group of holes A to D The installation frame is secured with a total of four threaded rods 55 2 17 147 5 79 389 15 31 444 17 48 5 4 1 556 21 89 732 28 82 6 1 B A D C 2 3 3 2 1 Attachment points of safe 2 Attachment points of installation frame 3 Alternative attachment points of UL safe 4 Attachment point of tear off sensor 5 This side must always point to the side with the safe door 6 Custome...

Страница 69: ...2 17 382 15 04 159 6 26 309 12 17 462 18 19 564 22 2 714 28 11 787 30 98 805 31 69 484 19 06 515 20 28 55 2 17 151 5 94 265 10 43 453 17 83 530 20 87 539 21 22 568 22 36 112 4 41 721 28 39 5 1 Cable lead ins in the installation frame 2 Area for cables 3 Cable feed openings underneath the installation frame 4 This side must always point to the side with the safe door 5 Customer panel side ...

Страница 70: ... 327 12 87 454 17 87 614 24 17 695 27 36 309 12 17 407 16 02 604 23 78 687 27 05 5 1 3 3 2 87 3 43 332 13 07 363 14 29 382 15 04 389 15 31 418 16 46 44 1 73 112 4 41 2 2 1 3 2 27 1 06 1 Cable lead ins in the installation frame 2 Area for cables 3 Cable feed openings underneath the installation frame 4 This side must always point to the side with the safe door 5 Customer panel side ...

Страница 71: ...cutouts and the inside and outside floor heights are different It consists of a top and a bottom part The installation rack can be either a standard rack or a CEN rack identified by the CEN sticker The installation rack is secured to the floor at the attachment points see section Drilling diagram for height adjustable installation racks The device safe is then screwed to the installation rack Open...

Страница 72: ... showing the resistance level is located on the inside of the safe door For a UL safe and a safe with resistance grade III CEN III or L CEN L it is mandatory that the installation rack is secured at the points 1 with four threaded rods These alternative attachment points are at position 2 see illustration below For a safe with resistance grade IV CEN IV it is mandatory that the CEN rack is secured...

Страница 73: ...afe or two threaded rods for CEN IV safe per group of holes A to D The installation rack is secured with a total of four or eight threaded rods A B C D 2 1 3 1 2 814 32 05 566 22 28 5 4 1 Attachment points of installation rack 2 Additional attachment points for CEN IV safe or alternative attachment points of UL CEN L CEN III safe 3 Attachment point of tear off sensor 4 This side must always point ...

Страница 74: ...roCash 2050xe USB Installation Guide 01750058390 G Top part 179 7 05 1 1 2 1 147 5 79 687 27 05 842 33 15 539 21 22 594 23 39 4 3 1 Attachment points of safe 2 Hole for tear off sensor 3 This side must always point to the side with the safe door 4 Customer panel side ...

Страница 75: ...stallation Guide 63 Dimensions of cable areas Bottom part 1 1 1 2 3 113 4 45 398 15 67 433 17 05 169 6 65 290 11 42 536 21 10 50 1 97 656 25 83 448 17 64 527 20 75 453 17 83 15 0 59 43 1 69 169 6 65 1 Area for cables 2 This side must always point to the side with the safe door 3 Customer panel side ...

Страница 76: ...tallation 64 ProCash 2050xe USB Installation Guide 01750058390 G Top part 20 0 79 484 19 06 530 20 87 550 21 65 82 3 23 2 3 1 1 Cable feed openings into installation rack 2 This side must always point to the side with the safe door 3 Customer panel side ...

Страница 77: ...t see also illustration in the section Installation options and or the following illustration X2height X1wall 648 mm 25 51 Compare the result with the values in the first column of the following table The required height of the installation rack bottom part X4rack is listed in the right column Adjustable height X2height Necessary height of the installation rack bottom part X4rack from 130 mm 5 12 ...

Страница 78: ... USB Installation Guide 01750058390 G X3 X4 3 4 1 2 648 25 51 X1 X2 1 Device X1 Height of wall opening X1wall 2 Wall X2 Adjustable height X2height 3 Floor inside X3 Adjustable height of installation rack 4 Floor outside X3variable X4 Height of installation rack bottom part X4rack ...

Страница 79: ...stalled see also illustration Mounting structure in the respective sections of the chapter Installation Ask your alarm technician about the size of the hole and the cartridge The maximum diameter for the hole to take the fixing is 22 mm 0 87 in UL CEN safe 20 mm 0 79 in the 25 mm 0 98 installation frame 22 mm 0 87 in the 82 mm 3 23 installation frame and in the 222 mm 8 74 installation frame 20 mm...

Страница 80: ...afe all around 107 4 21 471 5 18 56 150 5 91 188 7 4 278 10 94 578 22 76 668 26 3 482 18 98 Drilling depths Holes for installation frame at least 180 mm 7 09 with 125 mm 4 92 in concrete For the hole diameter please refer to the mounting instructions of the caulking cartridge Hole for tear off sensor at least 40 mm 1 57 in concrete Consult your alarm technician about the size of the hole and the c...

Страница 81: ...afe all around 240 9 45 472 18 58 150 5 91 197 7 76 277 10 91 602 23 7 682 26 85 484 19 06 Drilling depths Holes for installation frame at least 180 mm 7 09 with 125 mm 4 92 in concrete For the hole diameter please refer to the mounting instructions of the caulking cartridge Hole for tear off sensor at least 40 mm 1 57 in concrete Consult your alarm technician about the size of the hole and the ca...

Страница 82: ...than the safe all around 240 9 45 472 18 58 150 5 91 197 7 76 277 10 91 599 23 58 682 26 85 484 19 06 Drilling depths Holes for installation frame at least 180 mm 7 09 with 125 mm 4 92 in concrete For the hole diameter please refer to the mounting instructions of the caulking cartridge Hole for tear off sensor at least 40 mm 1 57 in concrete Consult your alarm technician about the size of the hole...

Страница 83: ... 150 5 91 322 12 68 334 13 15 110 4 33 277 10 91 492 19 37 572 22 52 197 7 76 150 5 91 Drilling depths Holes for installation frame at least 180 mm 7 09 with 125 mm 4 92 in concrete For the hole diameter please refer to the mounting instructions of the caulking cartridge Hole for tear off sensor at least 40 mm 1 57 in concrete Consult your alarm technician about the size of the hole and the cartri...

Страница 84: ...lation rack is 3 mm 0 12 smaller than the safe all around 144 5 67 194 7 65 406 15 98 456 17 95 150 5 91 224 5 8 84 274 5 10 81 591 23 27 641 25 24 472 18 58 Drilling depths Holes for installation frame at least 180 mm 7 09 with 125 mm 4 92 in concrete For the hole diameter please refer to the mounting instructions of the caulking cartridge Hole for tear off sensor at least 40 mm 1 57 in concrete ...

Страница 85: ...n be ordered if needed via the hardware configurator or must be provided by the customer Please refer to the corresponding illustrations in this guide for the positioning of the cables To lay the cables inside the installation frame or rack and in the safe filling pieces may be removed so that cable sets can be inserted in the cable feed openings see drawing These filling pieces must then be repla...

Страница 86: ...1 Cable feed opening i No power or data cables may be installed underneath the CMD V4 You will also find details of the position of cable routing for the device in the sections 25 mm 0 98 installation frame 82 mm 3 23 installation frame 222 mm 8 74 installation frame or Height adjustable installation rack ...

Страница 87: ...stomer for supplementary equipment such as a modem L N PE 2 3 4 1 1 Fuse or automatic circuit breaker 2 Connection for ProCash 2050xe USB incl optional heater 3 Modem connection 4 Connection of miscellaneous equipment Remote status indicator The optional remote status indicator comes with a 50 m 164 1 ft connecting cable During planning the position for installation and cable routing must be defin...

Страница 88: ...out logos the logos have to be provided by the customer The illustration shows the visible outer surface of the upper logo case 454 mm x 165 mm 17 87 x 6 5 and the lower light case optional order 515 mm x 100 mm 20 28 x 3 94 The actual logo dimensions of the logo light case are 465 mm x 171 mm 18 31 x 6 73 The actual logo dimensions of the lower light case are 523 mm x 107 mm 20 59 x 4 21 ...

Страница 89: ...k must be pushed as far as possible underneath the device from the side of the safe door The entire transportation route like the installation site must be checked for load capacity and if necessary strengthened as appropriate before the installation date Observe the ambient condition requirements for transportation and storage see chapter Appendix section Technical data Due to the shipping crate ...

Страница 90: ... G Transport measurements for ProCash 2050xe USB ProCash 2050xe USB with 4 cassette dispenser Safe width 600 mm 23 62 848 33 39 72 43 2 83 1 69 1208 47 56 1448 57 01 796 31 34 145 5 71 1645 64 76 580 22 83 690 27 17 145 5 71 1 1 1 Shipping crate Standard lock 43 mm 1 69 Customer specific lock max 72 mm 2 83 ...

Страница 91: ...Transport path requirements 01750058390 G ProCash 2050xe USB Installation Guide 79 Safe width 450 mm 17 72 738 29 06 110 4 33 1098 43 23 1448 57 01 796 31 34 145 5 71 1645 64 76 606 23 86 670 26 38 145 5 71 1 1 1 Shipping crate ...

Страница 92: ... USB Installation Guide 01750058390 G ProCash 2050xe USB with 5 cassette dispenser 848 33 39 72 43 2 83 1 69 1208 47 56 1 1588 62 52 936 36 85 145 5 71 1785 70 28 580 22 83 690 27 17 145 5 71 1 1 Shipping crate Standard lock 43 mm 1 69 Customer specific lock max 72 mm 2 83 ...

Страница 93: ...oCash 2050xe USB Installation Guide 81 ProCash 2050xe USB with 6 cassette dispenser 1905 75 580 22 83 690 27 17 145 5 71 848 33 39 72 43 2 83 1 69 1208 47 56 1708 67 24 1056 41 57 145 5 71 1 1 1 Shipping crate Standard lock 43 mm 1 69 Customer specific lock max 72 mm 2 83 ...

Страница 94: ...The following illustration should help you determine if the space is sufficient It shows the device on a standard lift truck With the help of the grid 100 mm x 100 mm 3 94 x 3 94 you can draw the actual dimensions of the door and the hallway to find out if there is enough space for transportation Refer to the next page for an example Safe width 600 mm 23 62 1580 62 2 1350 53 15 520 20 47 690 27 17...

Страница 95: ...Planning the Installation Transport path requirements 01750058390 G ProCash 2050xe USB Installation Guide 83 Safe width 450 mm 17 72 1580 62 20 1350 53 15 520 20 47 710 27 95 ...

Страница 96: ...rements Planning the Installation 84 ProCash 2050xe USB Installation Guide 01750058390 G Example with minimum transport path measurements Safe width 600 mm 23 62 710 27 95 1900 74 8 1580 62 2 1350 53 15 520 20 47 690 27 17 ...

Страница 97: ...Planning the Installation Transport path requirements 01750058390 G ProCash 2050xe USB Installation Guide 85 Safe width 450 mm 17 72 730 28 74 1900 74 8 1580 62 2 1350 53 15 520 20 42 710 27 95 ...

Страница 98: ...Transport path requirements Planning the Installation 86 ProCash 2050xe USB Installation Guide 01750058390 G ...

Страница 99: ...event irreparable damage to the device WINCOR NIXDORF International GmbH is not liable for any damage to the device resulting from failure to meet these conditions i All dimensions are specified in millimeters inches The figures are not drawn to scale Contact the person in charge of planning the installation to verify that all preparatory work has been done completely and correctly and that none o...

Страница 100: ...on Guide 01750058390 G Removing the shipping crate General information For transportation the device is equipped with a shipping crate This must be removed before installation i To move the device only push against the sides of the safe as shown in the following illustration ...

Страница 101: ...moving the shipping crate Proceed as follows to remove the shipping crate Remove the screws of the shipping crate from underneath Lift the device Remove the shipping crate of the ProCash 2050xe USB 1 Dispose of the shipping crate which is no longer needed according to the regulations of your country ...

Страница 102: ...i If the mounting set is not provided use equivalent fastening material The procedure for mounting the installation frame or the installation rack described in the sections of the installation versions assumes that the provided mounting set is used If you are using different fastening materials please follow the instructions included with those items Item Quantity required UL safe Caulking cartrid...

Страница 103: ...s that the provided mounting set is used If you are using different fastening materials please follow the instructions included with those items Item Quantity required CEN III CEN IV Caulking cartridge A caulking gun is not included in the delivery package 1 2 Threaded rod M16 x 300 DIN 976 property class 10 9 4 8 Hexagon nut M16 DIN 934 10 9 4 8 Washer A 17 DIN 125 St 4 8 For a CEN IV safe two mo...

Страница 104: ...asher A 17 ISO 7089 St 4 Mounting set 01750051578 for CEN III CEN IV safe on 25 mm 0 98 installation frame Item Quantity required Pan head screw M16 x 45 ISO 4762 property class 10 9 4 Washer A 17 ISO 7089 St 4 Mounting set 01750051060 for safe on 82 mm 3 23 and 222 mm 8 74 installation frames or height adjustable installation racks Item Quantity required Pan head screw M16 x 60 ISO 4762 property ...

Страница 105: ...e and outside is the same the ProCash 2050xe USB can also be installed on the 190 to 320 mm 7 48 to 12 6 installation rack Installation options for ProCash 2050xe USB with 5 cassette dispenser Same floor height Unequal floor height Installation with 25 mm 0 98 installation frame on a base see p 94 yes yes Installation with 82 mm 3 23 installation frame see p 104 yes no Installation options for Pro...

Страница 106: ...illed for mounting the installation frame see illustration below i If a tear off sensor is to be installed as agreed with the financial institution or the alarm technician also mark the holes for the tear off sensor see illustration below Securing the installation frame The installation frame needs to be anchored in the floor at four attachment points regardless of the safe construction type UL CE...

Страница 107: ...ternative attachment points of 8 Center of installation frame installation frame 9 Center of wall cutout 4 Attachment point of tear off 10 This side must always point sensor to the side with the safe door 5 Cable lead ins into the 11 Customer panel side installation frame 12 Wall 6 Area for cables W Wall thickness for 35 mm 1 38 tunnel max 360 mm 14 17 Wall thickness for 60 mm 2 36 tunnel max 335 ...

Страница 108: ...ations below it must be approved by the insurer To ensure that the safe does not become detached the threaded rods of the installation frame must be fastened in the concrete foundation The drilled holes in the concrete foundation must have a depth of at least 125 mm 4 92 for the installation frame see illustrations below For the hole diameter please refer to the mounting instructions of the caulki...

Страница 109: ...creed 2 Mounting set for safe 6 Concrete 3 Tear off sensor 7 Mounting set for installation frame 4 Installation frame 8 Top surface of finished floor The overall drilling depth depends on the structural conditions The threaded rods must be anchored at least 125 mm 4 92 in the load bearing concrete Excess lengths must be shortened correspondingly or if necessary in case of deeper floor anchorages b...

Страница 110: ...on the structural conditions The threaded rods must be anchored at least 125 mm 4 92 in the load bearing concrete Excess lengths must be shortened correspondingly or if necessary in case of deeper floor anchorages be replaced by equivalent threaded rods Clean the bore holes as specified in the mounting instructions of the caulking cartridge Secure the threaded rods in the concrete foundation as sp...

Страница 111: ...f the remote status indicator optional and the power cord through the cable lead ins and if necessary through the cable feed openings behind the safe door side 10 of the installation frame as in the example shown here Make sure that the connecting cables are laid loosely and are not crushed by the installation frame Screw the installation frame to the base for material see section Mounting sets If...

Страница 112: ...ter Basic Operation in the operating manual To facilitate access to the attachment points of the safe you can swing the cash media dispenser CMD V4 up Lifting the cash media dispenser CMD V4 up 2 Put the two track stops 1 to be found in the safe in place as shown in the illustration Remove the reject retract cassette and the cash out cassettes 3 see chapter Cash Media Dispenser CMD V4 in the opera...

Страница 113: ... Check the firm fit of the CMD V4 by moving it slightly back and forth When mounting the locking axle ensure that no cables are damaged in the process Check the CMD V4 for a secure fit The locking axle must be firmly in place Screwing the device on the installation frame Align the device on the installation frame see attachment points 1 and 2 in the illustration Screw the safe to the installation ...

Страница 114: ... that the connecting cables on the rear side of the CMD V4 controller are not damaged and that they are not moved around Mount both securing screws Remove the two track locks and push the CMD V4 back into the device Replace the cassettes Installing the power and data cables in the device Remove the filling piece of the safe Feed the data cables and the power cable into the safe if applicable by th...

Страница 115: ...lation is included with the installation frame Fax the filled out and signed Confirmation of Installation form to the fax number provided on the form i If there is no fax machine available the form has to be faxed to this number at a later point in time Give the Confirmation of Installation to the operator of the device i The operator needs the Confirmation of Installation for submitting it to the...

Страница 116: ... 50 mm 1 97 53 mm 2 09 in relation to the installation frame Align the installation frame and mark the holes to be drilled for mounting the installation frame see illustration below i If a tear off sensor is to be installed as agreed with the financial institution or the alarm technician also mark the holes for the tear off sensor see illustration below Securing the installation frame The installa...

Страница 117: ...frame 3 Attachment points of 8 Center of installation frame installation frame 9 Center of wall cutout 4 Attachment point of tear off 10 This side must always point sensor to the side with the safe door 5 Cable lead ins into the 11 Customer panel side installation frame 12 Wall 6 Area for cables W Wall thickness for 35 mm 1 38 tunnel max 360 mm 14 17 Wall thickness for 60 mm 2 36 tunnel max 335 mm...

Страница 118: ...tration below it must be approved by the insurer To ensure that the safe does not become detached the threaded rods of the installation frame must be fastened in the concrete foundation The drilled holes in the concrete foundation must have a depth of at least 125 mm 4 92 for the installation frame see illustration below For the hole diameter please refer to the mounting instructions of the caulki...

Страница 119: ...l drilling depth depends on the structural conditions The threaded rods must be anchored at least 125 mm 4 92 in the load bearing concrete Excess lengths must be shortened correspondingly or if necessary in case of deeper floor anchorages be replaced by equivalent threaded rods Clean the bore holes as specified in the mounting instructions of the caulking cartridge Secure the threaded rods in the ...

Страница 120: ...ines the connecting cable of the remote status indicator optional and the power cord through the cable lead ins and if necessary through the cable feed openings behind the safe door side 10 of the installation frame as in the example shown here Make sure that the connecting cables are laid loosely and are not crushed by the installation frame Screw the installation frame to the base for material s...

Страница 121: ...ter Basic Operation in the operating manual To facilitate access to the attachment points of the safe you can swing the cash media dispenser CMD V4 up Lifting the cash media dispenser CMD V4 up 2 Put the two track stops 1 to be found in the safe in place as shown in the illustration Remove the reject retract cassette and the cash out cassettes 3 see chapter Cash Media Dispenser CMD V4 in the opera...

Страница 122: ... Check the firm fit of the CMD V4 by moving it slightly back and forth When mounting the locking axle ensure that no cables are damaged in the process Check the CMD V4 for a secure fit The locking axle must be firmly in place Screwing the device on the installation frame Align the device on the installation frame see attachment points 1 and 2 in the illustration Screw the safe to the installation ...

Страница 123: ... that the connecting cables on the rear side of the CMD V4 controller are not damaged and that they are not moved around Mount both securing screws Remove the two track locks and push the CMD V4 back into the device Replace the cassettes Installing the power and data cables in the device Remove the filling piece of the safe Feed the data cables and the power cable into the safe if applicable by th...

Страница 124: ...lation is included with the installation frame Fax the filled out and signed Confirmation of Installation form to the fax number provided on the form i If there is no fax machine available the form has to be faxed to this number at a later point in time Give the Confirmation of Installation to the operator of the device i The operator needs the Confirmation of Installation for submitting it to the...

Страница 125: ... when positioning the device and the installation frame see chapter Planning the Installation section Space required for operation and maintenance Make sure that the clearance between the vents and the wall is at least 50 mm 1 97 53 mm 2 09 in relation to the installation frame Align the installation frame and mark the holes to be drilled for mounting the installation frame see illustration below ...

Страница 126: ...III or L CEN L it is mandatory that the installation frame is secured at the points 2 with four threaded rods These alternative attachment points are at position 3 see illustration below For a safe with resistance grade IV CEN IV it is mandatory that the CEN frame is secured at the points 2 and 3 with eight threaded rods see illustration below i If the mounting set is not provided use equivalent f...

Страница 127: ...al attachment points of installation frame CEN IV safe or alternative 8 Center of installation frame attachment points of UL 9 Center of wall cutout CEN L CEN III safe 10 This side must always point 4 Attachment point of tear off to the side with the safe door sensor 11 Customer panel side 5 Cable lead ins into install frame 12 Wall W Wall thickness for 35 mm 1 38 tunnel max 360 mm 14 17 Wall thic...

Страница 128: ... installation frame 3 Alternative attachment points of 8 Center of installation frame UL safe 9 Center of wall cutout 4 Attachment point of tear off 10 This side must always point sensor to the side with the safe door 5 Cable lead ins into install frame 11 Customer panel side 6 Area for cables 12 Wall W Wall thickness for 35 mm 1 38 tunnel max 360 mm 14 17 Wall thickness for 60 mm 2 36 tunnel max ...

Страница 129: ... below see illustration below it must be approved by the insurer To ensure that the safe does not become detached the threaded rods of the installation frame must be fastened in the concrete foundation The drilled holes in the concrete foundation must have a depth of at least 125 mm 4 92 for the installation frame see illustration below For the hole diameter please refer to the mounting instructio...

Страница 130: ...for safe 2 Tear off sensor 6 Mounting set for installation frame 3 Screed 7 Top surface of finished floor 4 Concrete 8 Installation frame The overall drilling depth depends on the structural conditions The threaded rods must be anchored at least 125 mm 4 92 in the load bearing concrete Excess lengths must be shortened correspondingly or if necessary in case of deeper floor anchorages be replaced b...

Страница 131: ...5b and possibly 5a from the cable lead ins see positions 5a and 5b in the following illustration 10 5 b 5 a If the connecting cables on the site are not located on the safe door side Insert the data lines the connecting cable of the remote status indicator optional and the power cord through the cable lead ins and if necessary through the cable feed openings behind the safe door side 10 of the ins...

Страница 132: ...ter Basic Operation in the operating manual To facilitate access to the attachment points of the safe you can swing the cash media dispenser CMD V4 up Lifting the cash media dispenser CMD V4 up 2 Put the two track stops 1 to be found in the safe in place as shown in the illustration Remove the reject retract cassette and the cash out cassettes 3 see chapter Cash Media Dispenser CMD V4 in the opera...

Страница 133: ...k Check the firm fit of the CMD V4 by moving it slightly back and forth When mounting the locking axle ensure that no cables are damaged in the process Check the CMD V4 for a secure fit The locking axle must be firmly in place Screwing the device on the installation frame Align the device on the installation frame see attachment points 1 and 2 in the illustration Screw the safe to the installation...

Страница 134: ...e that the connecting cables on the rear side of the CMD V4 controller are not damaged and that they are not moved around Mount both securing screws Remove the two track locks and push the CMD V4 back into the device Replace the cassettes Installing the power and data cables in the device Remove the filling piece of the safe Feed the data cables and the power cable into the safe if applicable by t...

Страница 135: ...lation is included with the installation frame Fax the filled out and signed Confirmation of Installation form to the fax number provided on the form i If there is no fax machine available the form has to be faxed to this number at a later point in time Give the Confirmation of Installation to the operator of the device i The operator needs the Confirmation of Installation for submitting it to the...

Страница 136: ...ight adjustable installation rack i Observe the necessary maintenance space when deciding on a location see chapter Planning the Installation section Space required for operation and maintenance Make sure that the clearance between the vents and the wall is at least 50 mm 1 97 67 mm 2 64 in relation to the bottom part of the installation rack ...

Страница 137: ...stallation Guide 125 Preparing the installation rack Overview X3 X4 1 2 3 4 648 25 51 X1 X2 1 Device x1 Height of wall opening X1wall 2 Wall X2 Adjustable height X2height 3 Floor inside X3 Adjustable height of installation rack 4 Floor outside X3variable X4 Height of installation rack bottom part X4rack ...

Страница 138: ... the section Overview X2height X1wall 648 mm 25 51 Compare the result with the figures in the left column of the table below The required rack height X4rack is listed in the right column Adjustable height X2height Necessary height of the installation rack bottom part X4rack from 130 mm 5 12 to 190 mm 7 48 93 mm 3 66 from 190 mm 7 48 to 320 mm 12 6 152 mm 5 98 from 320 mm 12 6 to 530 mm 20 87 UL CE...

Страница 139: ...nguished in resistance grades The label showing the resistance grade is located on the inside of the safe door For a UL safe and a safe with resistance grade III CEN III or L CEN L it is mandatory that the installation rack is secured at the points 1 with four threaded rods These alternative attachment points are at position 2 see illustration below For a safe with resistance grade IV CEN IV it is...

Страница 140: ...l attachment points of 6 Center of wall cutout CEN IV safe or 7 This side must always point alternative attachment points of to the side with the safe door UL CEN L CEN III safe 8 Customer panel side 3 Attachment point of 9 Wall tear off sensor W Wall thickness for 35 mm 1 38 tunnel max 360 mm 14 17 Wall thickness for 60 mm 2 36 tunnel max 335 mm 13 19 P Position of the installation frame for 35 m...

Страница 141: ...e installation rack as a template i If a tear off sensor is to be installed as agreed with the financial institution or the alarm technician also mark the holes for the tear off sensor 2 Remove the bottom part of the installation rack Drill the required four or eight holes 1 and the hole for the tear off sensor if necessary 2 Clean the bore holes as specified in the mounting instructions of the ca...

Страница 142: ...r To ensure that the safe does not become detached the threaded rods of the installation rack must be fastened in the concrete foundation The drilled holes in the concrete foundation must have a depth of at least 125 mm 4 92 for the installation rack see illustration below For the hole diameter please refer to the mounting instructions of the caulking cartridge The drilled hole in the concrete fou...

Страница 143: ...or safe 2 Tear off sensor 6 Mounting set for installation rack 3 Screed 7 Top surface of finished floor 4 Concrete 8 Installation rack The overall drilling depth depends on the structural conditions The threaded rods must be anchored at least 125 mm 4 92 in the load bearing concrete Excess lengths must be shortened correspondingly or if necessary in case of deeper floor anchorages be replaced by e...

Страница 144: ...l see section Mounting sets Insert the fixing 2 for the tear off sensor if required The threaded rods must protrude at a minimum 28 mm 1 1 and at a maximum 50 mm 1 97 4x UL 4x CEN III 8x CEN IV Align the bottom part of the installation rack over the threaded rods Use the hexagon nuts and washers 1 to screw the bottom part of the installation rack to the floor for material see section Mounting sets...

Страница 145: ...and washers Installing the top part of the installation rack Calculation of rack height Calculate the setting height of the installation rack using the following formula see also the section Overview X3variable X2height X4rack 15 mm 0 59 wall thickness top part of the installation rack Place the top part of the installation rack on the floor as shown in the following illustration Screw the four he...

Страница 146: ... of the installation rack around and place it on the bottom part Turn the nuts on the four threaded rods of the top part to adjust the height of the installation rack The distance from top edge of the top part to the lower edge of the hole in the wall has to be 648 mm 25 51 Make sure that the top part of the installation rack is horizontal ...

Страница 147: ... 01750058390 G ProCash 2050xe USB Installation Guide 135 Use spacers and nuts to retain the height that you have set To do this place the spacers and nuts on the threaded rods in the bottom part of the installation rack Tighten the four nuts see illustration below 4x ...

Страница 148: ...on rack see position 1 in the next illustration 7 1 If the connecting cables on the site are not located on the safe door side Insert the data lines the connecting cable of the remote status indicator optional and the power cord through the cable lead ins and if necessary through the cable openings behind the safe door side 7 of the installation rack as in the example shown here Make sure that the...

Страница 149: ...uring transportation see enclosed information sheet Pull out the CMD V4 see chapter Basic Operation in the operating manual To facilitate access to the attachment points of the safe you can swing the cash media dispenser CMD V4 up Lifting the cash media dispenser CMD V4 up 2 Put the two track stops 1 to be found in the safe in place as shown in the illustration Remove the reject retract cassette a...

Страница 150: ...n the safe in until the grooves are in line with the side panels of the CMD V4 rack Check the firm fit of the CMD V4 by moving it slightly back and forth When mounting the locking axle ensure that no cables are damaged in the process Check the CMD V4 for a secure fit The locking axle must be firmly in place Screwing the device on the installation rack Align the device on the installation rack see ...

Страница 151: ...hat the connecting cables on the rear side of the CMD V4 controller are not damaged and that they are not moved around Mount both securing screws Remove the two track locks and push the CMD V4 back into the device Replace the cassettes Installing the power and data cables in the device Remove the filling piece of the safe Feed the data cables and the power cable into the safe if applicable by the ...

Страница 152: ...lation is included with the installation rack Fax the filled out and signed Confirmation of Installation form to the fax number provided on the form i If there is no fax machine available the form has to be faxed to this number at a later point in time Give the Confirmation of Installation to the operator of the device i The operator needs the Confirmation of Installation for submitting it to the ...

Страница 153: ...h a 35 mm 1 38 tunnel and a 60 mm 2 36 tunnel How the tunnel is installed is described below for a 35 mm 1 38 tunnel The required material is contained in a separate packing unit i For the sake of clarity the illustrations on the following pages demonstrating the individual steps do not show the wall i Installation is to the greatest extent the same for a tunnel frame with and without illumination...

Страница 154: ...ion Guide 01750058390 G Pulling out pushing in the customer panel Open the operating unit door see chapter Basic Operation in the operating manual Push the two release levers of the customer panel down 1 Pull the customer panel forward out of the device as far as possible 2 ...

Страница 155: ...n the knurled securing screw on the left inside the customer panel until the screw sits in the lower groove of the track 3 4 Thus the customer panel will not close accidentally Pushing it in Loosen the securing screw until it no longer sits in the lower groove of the track Then push the customer panel into the device until the release levers click into place ...

Страница 156: ...e customer panel and secure it to prevent it from closing accidentally see section Pulling out pushing in the customer panel Push the sealing frame over the customer panel 1 into the wall opening until it touches the outer wall all around Attach the sealing frame to the device at the five attachment points 2 right left top 2x and bottom ...

Страница 157: ...nnel frame 01750058390 G ProCash 2050xe USB Installation Guide 145 Seal the sealing frame with silicone along the sides and along the top edge 3 i Do not seal the sealing frame on the bottom Silicone is not included in the shipment ...

Страница 158: ...lates in place on the right and left side of the customer panel 1 Attach each adjusting plate with a screw 2 Loosen the securing screw of the customer panel until it no longer sits in the lower groove of the track see section Pulling out pushing in the customer panel Then push the customer panel into the device until the release levers click into place ...

Страница 159: ... frame see arrow Installation in a glass facade Turn the two adjusting bolts on each adjusting plate see arrow until they are about 2 to 3 mm 0 079 to 0 12 away from the sealing frame Unlock the operating unit pull it out as far as possible and secure the customer panel with a screw so that it cannot accidentally close bang shut see section Pulling out pushing in the customer panel Secure each adj...

Страница 160: ...01750058390 G Securing the tunnel frame Push the tunnel frame onto the operating unit see arrow 3 Only tunnel frame with illuminated signage and lower light case First push the tunnel frame on the operating unit at the bottom 1 and then at the top 2 Be careful not to crush the cable 3 ...

Страница 161: ...unnel frame 01750058390 G ProCash 2050xe USB Installation Guide 149 Tighten the four nuts at the top of the tunnel frame 1 Attach the tunnel frame to the adjusting plates on the left 2 and on the right 3 using two nuts on each side ...

Страница 162: ...e tunnel frame Installation 150 ProCash 2050xe USB Installation Guide 01750058390 G Connecting the logo light only on tunnel frames with illuminated signage Disconnect the cable from the retaining aluminum bracket 1 ...

Страница 163: ...e illumination unit forward slightly by the lower edge 3 Hold the illumination unit with one hand and push the connector onto the socket 4 and the ground connector onto the tab 5 Press the illumination unit back into the retaining clips Lay the cables in such a way that they will not be damaged when the customer panel is pulled out or pushed in ...

Страница 164: ...el frame see arrow Lay the cables in such a way that they will not be damaged when the customer panel is pulled out or pushed in Loosen the securing screw until it no longer sits in the lower groove of the track see section Pulling out pushing in the customer panel Then push the customer panel into the device until the release levers click into place Close the device ...

Страница 165: ...lation Start up 01750058390 G ProCash 2050xe USB Installation Guide 153 Start up The service technician will connect the power and data cables i No power or data cables may be installed underneath the CMD V4 ...

Страница 166: ...Start up Installation 154 ProCash 2050xe USB Installation Guide 01750058390 G ...

Страница 167: ...1 3 2 Pos Item Quantity required 1 Remote Status Indicator Standard 01750047663 with 50 m 164 1 ft connecting cable dimensions 101 2 x 45 7 x 27 mm 3 98 x 1 8 x 1 06 W x H x D 1 2 Phillips screws SPAX 2 5 x 20 countersunk head 2 3 Fixings Ø 4 mm 0 16 2 i The enclosed mounting material is used to secure the indicator to masonry or wooden paneling ...

Страница 168: ...the tabs behind them disengage Remove the front cover 3 forwards When drilling the mounting holes take note of the constructional situation energy media line etc Position the lower section and mark the points where it is to be secured In masonry only Drill the necessary bores drill depth 20 mm 0 79 drill diameter 4 mm 0 16 and insert the enclosed fixings in the holes Secure the lower section to th...

Страница 169: ...atures Open the device see the device s operating manual Route the connecting cable through the cable feed openings or the lead ins into the device see the section for the appropriate installation version in the chapter Installation Lay the connecting cable in the device to the relay panel for external features so that it cannot be damaged when components are pulled out Shorten the connecting cabl...

Страница 170: ...58 ProCash 2050xe USB Installation Guide 01750058390 G Connect the individual wires to the relay panel for external features as follows 11121314 Pin Name 11 Wire RED 11 RED LIGHT 12 Wire WHITE 12 YELLOW LIGHT 13 Wire GREEN 13 GREEN LIGHT 14 Wire BLACK 14 GND Close the device ...

Страница 171: ...livery package 1 3 2 Pos Item Quantity required 1 Remote Status Indicator Audio 01750069332 with 50 m 164 1 ft connecting cable dimensions 118 x 96 5 x 40 5 mm 4 65 x 3 8 x 1 59 W x H x D 1 2 Phillips screws SPAX 4 x 40 half round screws 2 3 Fixings Ø 6 mm 0 24 2 i The enclosed mounting material is used to secure the indicator to masonry or wooden paneling ...

Страница 172: ... the packaging Loosen screw 1 Move the back panel 2 to one side at the bottom and pull the panel downwards out of the front cover When drilling the mounting holes take note of the constructional situation energy media line etc Position the back panel and mark the points where it is to be secured i Allow sufficient space to install the connecting cable on the right approx 20 mm 0 79 ...

Страница 173: ...the enclosed fixings in the holes Secure the lower part to the wall with the screws supplied and mount the front cover on the back panel as described above under removal 2 1 i An adhesive label with the number 1 is applied in the factory Remove the required label 1 and apply it to the space provided 2 on the audio remote status indicator Lay the connecting cable of the audio Remote Status Indicato...

Страница 174: ...gs or the lead ins into the device see the section for the appropriate installation version in the chapter Installation Lay the connecting cable in the device so that it cannot be damaged when components are pulled out Shorten the connecting cable if so required to the appropriate length see section Shortening the cable ends Marking on wires i The wires are marked with an adhesive label at the end...

Страница 175: ...50058390 G ProCash 2050xe USB Installation Guide 163 Connect the individual wires to the relay panel for external features as follows 11121314 Pin Name 11 Wire RED 11 RED LIGHT 12 Wire WHITE 12 YELLOW LIGHT 13 Wire GREEN 13 GREEN LIGHT 14 Wire BLACK 14 GND Close the device ...

Страница 176: ...ip 60 mm 2 36 of the cable insulation and 7 mm 0 28 of the individual wire insulation The individual wire ends must be twisted Connect the cable as described in the section Installation Adapting the cable length at the standard remote status indicator end 2 3 1 Use a screwdriver to press carefully through openings 1 and 2 until the tabs behind them disengage Remove the front cover 3 forwards 1 Rel...

Страница 177: ... the cable end as shown in the following diagram 60 23 62 4 5 0 18 You must strip 60 mm 2 36 of the cable insulation and 4 5 mm 0 18 of the individual wire insulation The individual wire ends must be twisted Lead the connecting cable through the opening in the lower section and secure it with the strain relief Marking on wires i The wires are marked with an adhesive label at the end as follows RED...

Страница 178: ...2050xe USB Installation Guide 01750058390 G Connect the individual wires as follows Pin Name 1 Wire RED RED LIGHT 2 Wire WHITE YELLOW LIGHT 3 Wire GREEN GREEN LIGHT 4 Wire BLACK GND Press the front cover onto the lower section Ensure that no wires are damaged in the process ...

Страница 179: ...roCash 2050xe USB Installation Guide 167 Adapting the cable length at the remote status indicator audio Loosen screw 1 Move the back panel 2 to one side at the bottom and pull the panel downwards out of the front cover 2 Remove the two screws 1 and move the board 2 to one side ...

Страница 180: ...move the connecting cable with the spacer from cable guide 2 Remove the spacer from the connecting cable see arrow Shorten the connecting cable to the desired length Push the spacer back on the cable Shorten the cable end as shown in the following diagram 25 0 98 4 5 0 18 You must strip approx 25 mm 0 98 of the cable insulation and 4 5 mm 0 18 of the individual wire insulation The individual wire ...

Страница 181: ...hesive label at the end as follows RED RED LIGHT WHITE YELLOW LIGHT GREEN GREEN LIGHT BLACK GND Connect the individual wires as follows 1 Pin Name 1 Wire RED RED LIGHT 2 Wire WHITE YELLOW LIGHT 3 Wire GREEN GREEN LIGHT 4 Wire BLACK GND Press the connecting cable with the spacer into the cable guide 2 Mount the board and the back panel as described above under removal ...

Страница 182: ...Shortening the cables Installing the Remote Status Indicator 170 ProCash 2050xe USB Installation Guide 01750058390 G ...

Страница 183: ...omer number or system s serial number This check list has been created for all self service systems Most questions can be answered yes or no Some empty space is provided in the section Notes concerning installation preparation for your convenience if you want to note any questions or drafts After checking off all items copy this list send it to your head of operations and make arrangements for an ...

Страница 184: ...nstallation area Are there cavities in the installation area cable duct raised floor Is the operation and maintenance space sufficient Is the equipment screened from external light sunlight Is a video surveillance system to be installed Is a door opener system to be installed Preparations Construction work yes no OK Is the securing of cash dispensers in the raw concrete ensured CEN standard Is the...

Страница 185: ... connection prepared Have the camera connection and the door opener been provided Organizational preparations yes no OK Is the generation prepared on the host Has the MM module or CIM86 been ordered and is it available Have the encryption decryption or EPP keys been prepared Is the paper and money ready for start up Have you discussed the diameter of the hole that is to be drilled and the fixing t...

Страница 186: ... or obstacles in front of the building If so how many Are there steps or obstacles inside the building If so how many Are there mats or grates at the entrance Flooring materials on the path of transport please check off Screed concrete Carpet Raised floor Marble floor Tiles Others Please enter the width of the most narrow door Please enter the width of the most narrow hallway Checked by customer C...

Страница 187: ...Appendix Check list for installation preparations for self service systems 01750058390 G ProCash 2050xe USB Installation Guide 175 Notes concerning installation preparation ...

Страница 188: ...Check list for installation preparations for self service systems Appendix 176 ProCash 2050xe USB Installation Guide 01750058390 G ...

Страница 189: ...ation conditions Electrical characteristics of the supply network Line voltage range 110 120 V 220 240 V Rated frequency 50 60 Hz 50 60 Hz Network type TN network with PE conductor TN network with PE conductor Permissible tolerance for voltage range 10 to 6 10 to 6 Permissible tolerance for rated frequency 1 1 ...

Страница 190: ... 7 A 3 2 A 0 9 A 1 7 A Apparent power consumption 175 VA 340 VA 190 VA 320 VA Active power 165 W 295 W 160 W 285 W Power factor 0 96 0 91 0 84 0 84 Leakage current max 1 2 mA 1 2 mA 1 2 mA 1 2 mA with UPS Rated current consumption 2 7 A 4 2 A 1 3 A 2 1 A Apparent power consumption 290 VA 455 VA 280 VA 410 VA Active power 265 W 395 W 245 W 370 W Power factor Leakage current max 3 5 mA 3 5 mA 3 5 mA...

Страница 191: ...VA Active power 700 W 650 W Protection class Ι Ι Type of device connection wall outlet Country specific safety plug Country specific safety plug CEE plug in acc with IEC 309 CEE plug in acc with IEC 309 Fuse protection 10 A slow blow fuse or 16 A circuit breaker 10 A slow blow fuse or 16 A circuit breaker Degree of protection in acc with EN 60529 Outdoors IP 54 IP 54 Indoors IP 20 IP 20 If a UPS i...

Страница 192: ... 848 33 39 mm 848 33 39 mm Depth with 35 mm 1 38 tunnel 1208 47 56 mm 1208 47 56 mm 1208 47 56 mm Depth with 60 mm 2 36 tunnel 1183 46 58 mm 1183 46 58 mm 1183 46 58 mm Operation and maintenance space 2 1 22 6 m2 ft2 2 1 22 6 m2 ft2 2 1 22 6 m2 ft2 Device weight UL safe 450 mm 17 72 613 1351 4 kg lb UL safe 600 mm 23 62 740 1631 4 kg lb 805 1774 7 kg lb CEN L safe 590 1300 7 kg lb CEN III safe 915...

Страница 193: ...7 5 2 54 kN m lbf in CEN L safe 12 9 1 87 kN m lbf in CEN III safe 19 9 2 89 kN m lbf in CEN III CNPP safe 22 0 3 19 kN m lbf in CEN IV safe 19 9 2 89 kN m lbf in 22 1 3 2 kN m lbf in Fan capacity 60 2118 6 m h ft h 60 2118 6 m h ft h 60 2118 6 m h ft h i Detailed information concerning the dimensions is provided in the chapter Planning the Installation section Device dimensions ...

Страница 194: ... 25 to 60 13 to 140 15 to 85 Storage 1K2 5 to 40 41 to 104 5 to 85 The temperature value of 35 C 95 F deviates from the value of the standard 40 C 104 F Climate control unit required for temperatures 5 C 41 F In the limit range the device may only be operated for a short period of time Mechanical environmental conditions in acc with EN 60721 Class Remarks Operation 3M2 Building with minimal extern...

Страница 195: ...g cycle i When selecting the installation site noise emission should be taken into account Fans in operation or the noise produced during a transaction could disturb people in the immediate vicinity of the device and may therefore need to be diminished with soundproofing e g soundproof walls etc They must comply with the environmental conditions that apply to the specific device see above and the ...

Страница 196: ...A C22 2 60950 UL 60950 EN 50371 EMC standards EN 55022 B EN 55024 FCC CFR 47 part 15 subpart B class A ICES 003 CSA 108 8 Conformity The CE mark of conformity attached to the product or its package indicates that the product complies with the requirements of the following EC directives EMC Directive 2004 108 EC Low Voltage Directive 2006 95 EC The corresponding statement of compliance has been iss...

Страница 197: ...the data transmission module if available is attached to the DT card or to the housing of the system unit FCC rules and Canadian Standard ICES 003 NOTE This equipment has been tested and found to comply with the limits for a Class A digital device pursuant to Part 15 of the FCC rules and Canadian Standard ICES 003 These limits are designed to provide reasonable protection against harmful interfere...

Страница 198: ...ng and the anchoring devices cannot be secured to the building structure the unit shall be attached to a steel plate at least 4 feet by 8 feet by inch thick 1 22 m by 2 44 m by 12 7 mm thick or an equivalent structure so as to restrict the removal of the teller machine from the building The release mechanism of the attachment devices shall only be accessible when the door of the security container...

Страница 199: ...ntenance materials according to national regulations where relevant complying with vendor specifications Labels on plastic case parts Please do not stick any labels on plastic case parts since that would make recycling more difficult Returning recycling and disposing of used units and consumables Details regarding the return and recycling of used units and consumables can be obtained from your loc...

Страница 200: ...Environmental protection Appendix 188 ProCash 2050xe USB Installation Guide 01750058390 G ...

Страница 201: ...01750058390 G ProCash 2050xe USB Installation Guide Notes ...

Страница 202: ...Published by WINCOR NIXDORF International GmbH D 33094 Paderborn Order No 01750058390 G 2 GB ...

Отзывы: