background image

Playing the Styles.............Continued

3. Accompaniment Control

This digital piano provides a wide variety of automatic functions that make itself very easy to
play. The functions are found in the Accompaniment Control section.

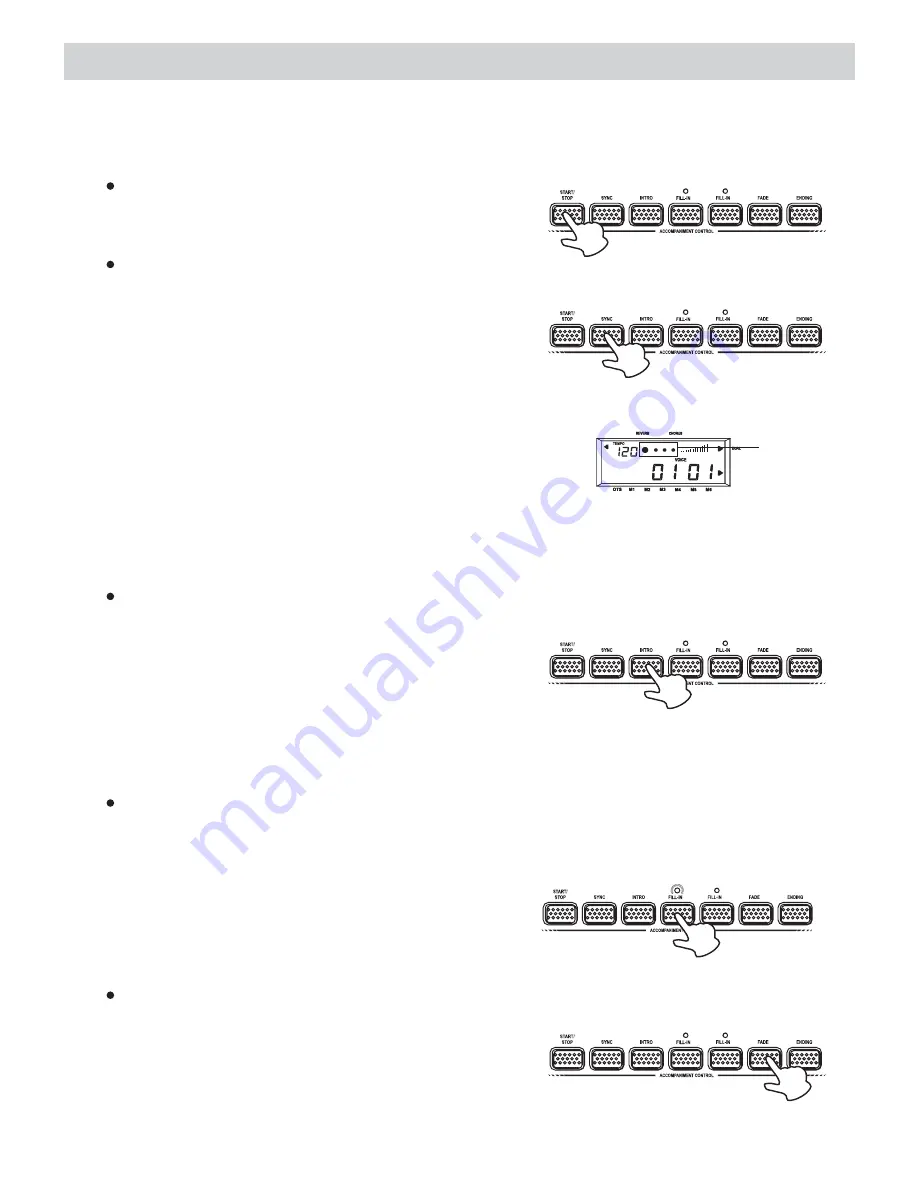
START/STOP
Press the

button to start/stop

the style.

START/STOP

A

B

SYNC
1. The SYNC function allows you to synchronize

the start of your Style with a note or chord
pressed on the keyboard without using the

button. When you press the

button, the display shows the beat

pattern indicators and the FILL-IN A indicator
to indicate the synchro is in standby mode.

START/STOP
SYNC

A

B

2. If you are in Normal mode, you can start the

style by playing any key on the keyboard.
If you are in Fingered, S.Finger or Split mode,
you have to play the chord that is corresponding
to the style pattern you selected.

HARMONY

OCTAVE DOWN

TOUCH

HARMONY

OCTAVE DOWN

TOUCH

Beat pattern
indicators

3. To stop the style, press either the

button or the

button.

START/STOP

SYNC

INTRO
Before starting the Style, press the
button to place the piano on intro-start standby.
The LED of the current Style pattern starts to
flash to indicate that the INTRO has been
preset. Now press the

button to

play a note or chord on the lower part of the piano.
The Style starts with an introductory pattern
then it proceeds with the selected auto-
accompaniment.

INTRO

START/STOP

A

B

FILL in A/B
FILL-IN A is the normal situation of the styles, all the 99 styles in the piano are playing in
this situation. FILL-IN B is the situation that adds variations to FILL-IN A.

When you press the

or the

during playback, the current

pattern is interrupted by an appropriate
Fill-in, then it proceeds with the same
pattern, depending on which button you
press.

FILL-IN A

FILL-IN B

A

B

FADE

While playing your style, you can fade the
overall volume down simply by pressing the

button. After pressing the button, the

Style continues to play but the volume
decreases gradually until no volume is heard.

FADE

A

B

16

Содержание Sonata 88

Страница 1: ......

Страница 2: ...pply excessive force to the switches and buttons When the piano is not in use or during a thunderstorm disconnect the power supply Avoid adjusting the volume level to the maximum or to the levels that...

Страница 3: ...stant select piano voice 1 Select a style 2 The chord recognition modes 3 Accompaniment control Selecting the One Touch Setting Playback the recorded song Record a new song Muting the sections Change...

Страница 4: ...er the following parts are available 1 Piano body 2 Music stand 3 Right leg component 4 Left leg component 5 Center supporting board 6 Foot pedal unit 7 Hand screw 4 pcs 8 Screws 8 pcs 9 Screw caps 8...

Страница 5: ...ed screws which may damage the piano body or causing the lost of stability Parts required in this step 7 Hand screws x 4 8 Screws x 8 9 Screw caps x 8 A Put the foot pedal unit 6 in between the left a...

Страница 6: ...sembly finished in Part A on the previous page C Put the piano body 1 on the top of the assembly finished in part B use 4 pieces of hand screws to stable afterward D After the initial set up stick the...

Страница 7: ...e Top View 6 7 8 4 2 3 5 Rear View Front View 1 9 10 Control Panel Pedal Jack MIDI IN OUT Jack AUX OUT Jack AC Power Jack Headphones Jack Soft Pedal Sustain Pedal Music Stand Piano Keyboard 1 2 3 4 5...

Страница 8: ...ER SPLIT TEMPO METRONOME VOLUME CHORD VOICE 1 VOICE 2 LOWER STYLE REVERB CHORUS DUAL HARMONY OCTAVE DOWN TOUCH OTS MEMORY JAM TRACK INDICATOR NUMERIC KEYPAD VOICE SELECT STYLE SELECT OTS TEMPO PAN PIT...

Страница 9: ...t of stereo headphones can be connected to the headphones jack located on the left underside of the piano body When a pair of headphones is connected to the jack the internal speakers will switch off...

Страница 10: ...OUT Jack MIDI stand for Musical Instrument Digital Interface MIDI is a world wide standard that makes it possible for various electronic musical instruments and other devices MIDI IN MIDI OUT Data tra...

Страница 11: ...and will skip to the next song During the playback you can use the numeric keypad or the and keys to select the songs To stop the playback press the button START STOP Note During the demo song playbac...

Страница 12: ...accompaniment and play a key on the right to hear the harmony effect HARMONY NORMAL FINGERED SPLIT ONE FINGER HARMONY OCTAVE DOWN TOUCH NORMAL FINGERED SPLIT ONE FINGER HARMONY OCTAVE DOWN TOUCH 3 Whe...

Страница 13: ...start to flash now you can use the same method as selecting reverb type to select reverb level 0 7 REVERB HARMONY OCTAVE DOWN TOUCH HARMONY OCTAVE DOWN TOUCH HARMONY OCTAVE DOWN TOUCH HARMONY OCTAVE...

Страница 14: ...pointing to TOUCH on the display disappears at this time the touch response is off TOUCH HARMONY OCTAVE DOWN TOUCH HARMONY OCTAVE DOWN TOUCH Octave Down Control When you are playing in Normal mode yo...

Страница 15: ...he Lower section SPLIT POINT SPLIT POINT 3 To exit the Split mode press the button as many times as necessary until the arrowhead points to NORMAL MODE Play in Split mode with a Dual option on the Upp...

Страница 16: ...NORMAL FINGERED SPLIT S FINGER HARMONY OCTAVE DOWN TOUCH A B The following shows C Cm C7 and Cm7 as the examples of the S Finger Chord playing method C Cm C7 Cm7 Major M Minor m Seventh 7 Minor Seven...

Страница 17: ...dicators 3 To stop the style press either the button or the button START STOP SYNC INTRO Before starting the Style press the button to place the piano on intro start standby The LED of the current Sty...

Страница 18: ...nome type 0 2 9 by pressing the button START STOP METRONOME Beat Indicator Metronome Type 3 When the Metronome is playing you can adjust the speed by pressing the buttons TEMPO 4 To stop the Metronome...

Страница 19: ...ns which you can then recall by simply pressing a button MEMORY How to store a memorized setting You are able to store the following values into your user define settings 1 Voice values Voice Variatio...

Страница 20: ...ptured by the sequencer 6 To stop the recording press the button and the LED will turn off At this point you will have a recorded sequence consist of a melody line with accompaniment You can record th...

Страница 21: ...e Muting the sections You can use the MIXER control buttons to turn off a section simply press both INCREASE VOLUME and DECREASE VOLUME buttons simultaneously to mute te section required To restore th...

Страница 22: ...tons simultaneously INCREASE DECREASE PAN The Pitch function allows you to fine tune the instrument Press the or buttons repeatedly to raise max 50 or lower min 50 the tuning until you reach the value...

Страница 23: ...press the button the display shows the factory set MIDI Transmission channel MIDI TRANSMIT If you press the button the display shows the factory set MIDI Reception channel MIDI RECEIVE Use the button...

Страница 24: ...ht up No keyboard sound but LCD display lighten up The START STOP button is pressed to start a style the Beat indicators appear in the display but no sound There is no sound output from the external a...

Страница 25: ...Thirteen 7b13 Seventh sharp ninth 7 9 Major Seventh augmented M7aug Seventh augmented 7 aug Suspended Fourth sus4 One plus two plus five 1 2 5 1 3 5 1 3 5 6 1 3 5 7 1 2 3 4 5 7 1 2 3 5 1 2 3 5 7 1 2 3...

Страница 26: ...TRS 2 CHOIR AAH SYNVOX FR HORN 127 APPLAUSE 128 GUNSHOT 129 PIPA 130 YUE QIN 131 ZHONGRUAN 132 GUZHENG 133 YANGQIN 134 ERHU 135 GAOHU 136 HI SUONA 137 LUSHEN 138 QUDI 139 BANGDI 140 XIAO 141 STD DRUM...

Страница 27: ...E RECOMMENDED 0 1 2 3 4 5 6 7 ROOM 1 ROOM 2 ROOM 3 HALL 1 HALL 2 PLATE DELAY PANNING 0 1 2 3 4 5 6 7 CHORUS 1 CHORUS 2 CHORUS 3 CHORUS 4 FEEDBACK FLANGER SHORT DELAY FEEDBACK DELAY 00 24 00 54 14 00 2...

Страница 28: ......

Отзывы: