background image

E V E N T S   P A N E L

page  30

D-12 / July 2006

button and flashing of all source and destination
displays, to remind the operator that these would
be the intended settings when the change is made.
Pressing the PREVIEW button a second time will
cancel the preview. It should be noted that no
audio signals are changed in any way by the
preview feature.

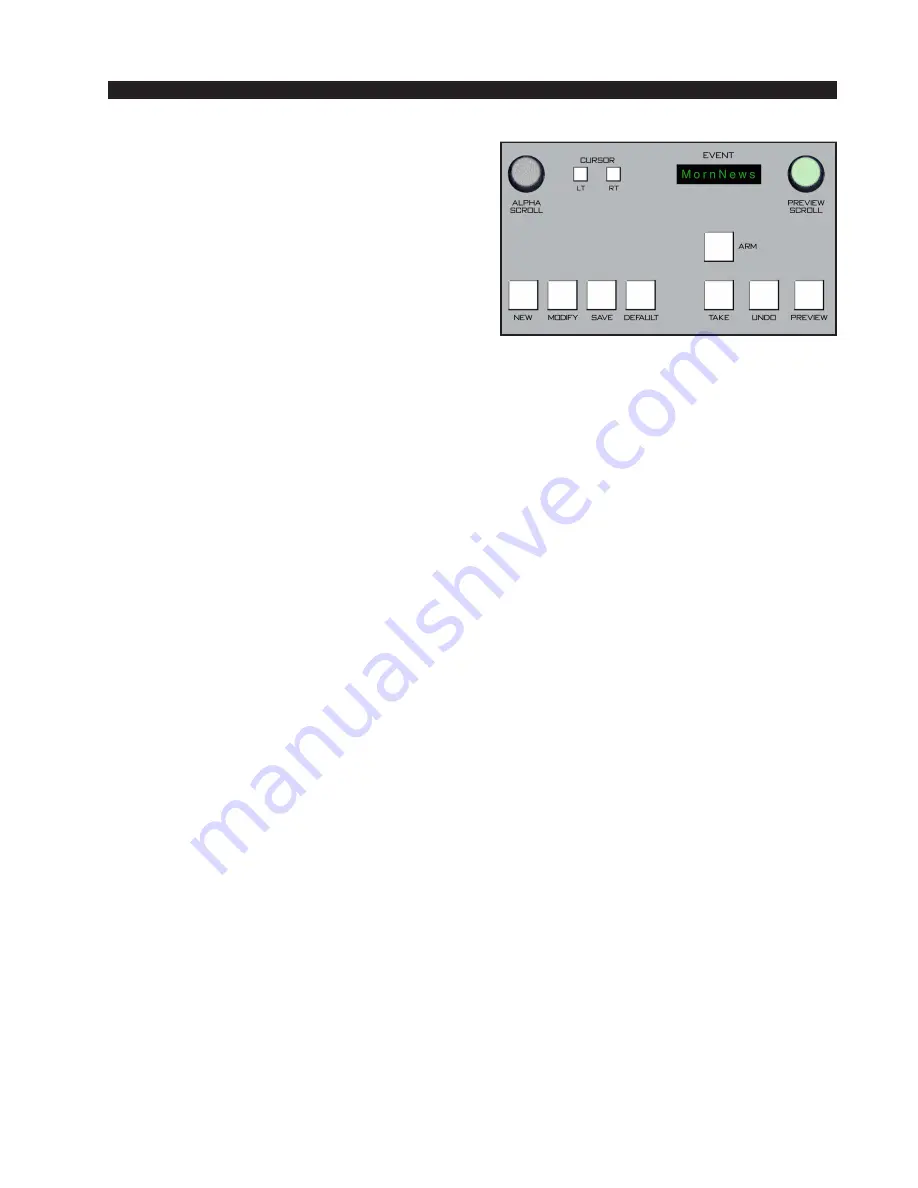
Event Default Button

This control allows rapid access to a default or

home control surface setting. Push it, and the TAKE button in the Preview
section will flash. Hit the TAKE button and the default setting will be
executed.

Establishing the Default Setting

This setting would normally be set only once. For example, it may be

desirable to have all controls set to zero, or everything programmed to
typical nominal settings. To establish the default setting, adjust all the
control surface controls to their desired settings, press the MODIFY button
and then the DEFAULT button. The default setting is stored.

Naming an Event

When events are saved, they receive a default event designation

number. This way events can be saved quickly without having to name
them. However, an event may be custom named when saved, or at a later
time. To rename the displayed event, press the ALPHA SCROLL knob.
The CURSOR LT and CURSOR RT buttons will light and the cursor,
indicated by a flashing character, will be at the beginning of the name. Also,
the SAVE button will begin to flash. At any time you can use CURSOR LT
and CURSOR RT to move to a character you want to change. Once the
cursor is at the desired character, rotate the ALPHA SCROLL encoder until
the desired new character is displayed. Once all desired characters have
been changed, simply press SAVE to save your changes. The event is stored
with the desired name. At any time you can cancel the name edit by pressing
the ALPHA SCROLL knob. Also, if you stop making name changes but fail
to press the SAVE button, the name edit process will automatically cancel
after a delay of several seconds.

Control Modes

The D-12 control surface is operated in one of three modes. In Admin-

istrator mode access is allowed to all surface functions. In User mode a
limited set of user functions is allowed. The set of functions allowed in User
mode is set independently for each console using the Bridge XPoint
software (see the Bridge Router manual for details). The third mode, Guest,
blocks out MXM level, MXM assign, Event takes, and visibility changes
from being controlled by the surface.

Содержание D-12

Страница 1: ...D 12 D 16 D 32 Digital Control Surfaces TECHNICAL GUIDE 600 Industrial Drive New Bern North Carolina USA 28562...

Страница 2: ...t channel there are no limitations for IFB And because it s a live television console it has extensive communication capability If there is a mix you can talk to it It even has twelve programmable tal...

Страница 3: ...UT FRAME 27 5 x 82 00 CUTOUT DIMENSIONS The D 12 D 16 D 32 digital audio control surfaces are designed for simple drop in installation in a countertop Mainframes are available in a variety of sizes fr...

Страница 4: ...der for 3 seconds After 3 sec the user scrolls through the available functions until the desired function isdisplayed andselectsitbypressingtheProgrammable switch The Programmable switch will light if...

Страница 5: ...E mix pre fader pre on and post gain EQ and DYN AFL puts the input channel s post fader post ON signal into the AFL mix NOTE If both AFL and PFL are on they are summed by default to the PFL output Thi...

Страница 6: ...witch to assign the source displayed in the lower source window to this input channel strip REVERT press this switch to go back to the previously selected source Acts as an A B source selector that to...

Страница 7: ...fader knobs engraved with 5 1 Bus Assign LED s Each input strip has four sets of LED indicators which display the state of the channels bus assignments An illuminated LED indicates GROUPS shows which...

Страница 8: ...dB on a calibrated scale beside the bargraph If the channel is stereo the bargraph shows the sum of the left and right signals The bargraph is colored with green indicating lower levels and red indic...

Страница 9: ...Channel Status LCD display underneath the AUX SEND information Once again this 8 character name is as defined in the Wheatstone Bridge Router Channel Status VariousindicatorsontheChannelStatusLCDdispl...

Страница 10: ...ow Mid Band Level HIMID F High Mid Band Freq High Mid Band Frequency HIMID Q High Mid Band BW High Mid Band Q HIMID L High Mid Band High Mid Band Level HIGH F High Band Freq High Band Frequency HIGH Q...

Страница 11: ...AUX SENDsweassumetheSENDbuttonislit andwewill freely discuss controls in both the AUX SENDS and MASTERS sections of the panel without qualifying which panel section the control being discussed is loc...

Страница 12: ...e XYE D12 panel and pressing the associated TAKE button AUX SEND 1 can be mono or stereo Press the AUX SEND 1 button then press the appropriate MODE button on the SUR D12 panel If AUX SEND 1 is in STE...

Страница 13: ...pre or post fade and pre or post ON Settings are made individually to each of the 8 MXMs but are global in the sense that once they are made the settings apply equally to all MXM sources Once you have...

Страница 14: ...GRP D12 or MSTR D12 panel will change to reflect the new bus assignment Input channels may be assigned to any group master DCA or MXM in any combination The situation is similar for groups except that...

Страница 15: ...nd output masters Dy namics controls are accessible by selecting an input or master fader SET button Dynamics may be switched in out directly from the input fader and master fader DYN switches without...

Страница 16: ...an effective high frequency bias up to as much as 6dB differential which helps to mitigate the detrimental limiting effect of the resulting audio seeming bottom heavy normal to most compressors While...

Страница 17: ...pressor s output level back up to nominal system signal level up to 20dB of output gain is available to allow this Gate The Dynamics section also contains a noise gate useful for reduc ing sounds belo...

Страница 18: ...nthe IS D12 panel The input channel s EQ button will light and its LCD display will show EQ High Pass Filter This is a 24dB octave variable high pass fil ter with Butterworth characteristics tunable b...

Страница 19: ...in and out by way of the IN switch Equalizer This consists of four bands of parametric control used for modify ing the sonic qualities of a signal Each band has 14dB of BOOST CUTcapabilities knob dou...

Страница 20: ...Audio Delay Audio delay is shown in the CHANNEL DELAY display Delay is accomplished for inputs submixes master mixes aux sends and mix minuses by means of activating their correspond ing SET button an...

Страница 21: ...cut Dobbying the trim knob will reset it to 0dB SOLOswitchesallowformonitoringofeach component The 5 1 trims are gain offsets independently applied to the current gain setting of each compo nent the 5...

Страница 22: ...rogrambypressingitsSETbutton Assignittothe5 1 destination by means of the ASSIGN switchbank on the MXM D12 panel The 5 1 SURROUND section will indicate the currentsettingsoftheencoderLT RT FRONT REAR...

Страница 23: ...E row of six interlocked switches only one selected at a time Affects which channels of the source signal are passed to the rest of the input signal path 5 1 surround sets the input fader to be a surr...

Страница 24: ...MXM s are always MONO SUB GROUPS or STEREO MASTER SET PRESSED 5 1 master is permanently set to 5 1 mode Press STEREO MONO LEFT or RIGHT to put the subgroup or master in stereo mono left only or right...

Страница 25: ...ttings only COPY ALL copies all settings from the source fader except Source Preset Choose the desired channel to be copied by pressing its SET button IS D12 panel The SET button will then flash in co...

Страница 26: ...sets the order in whichyoupressthebuttonsmatters Forexample ifyouselected inorder channels 1 2 4 and 3 for COPY and then selected in order channels 5 7 6 and 8 for PASTE the end result would be that...

Страница 27: ...EO ID TONES button and adjust the level by pressing the LEVEL button The test tone destination is chosen by pressing the SET button at the desired destination location and then the ASSIGN button in th...

Страница 28: ...isplay the current count Time of Day Clock The MASTER LCD screen includes the display of a time of day clock To set the time on this clock you run a Wheatstone utility program WSTimeSet exe on a netwo...

Страница 29: ...ton again will do nothing Modifying the Currently Selected Event It is presumed an event has already been executed on the control surface Modifications to that event can be accomplished by simply adju...

Страница 30: ...them However an event may be custom named when saved or at a later time To rename the displayed event press the ALPHA SCROLL knob The CURSOR LT and CURSOR RT buttons will light and the cursor indicate...

Страница 31: ...E when displaying the current mode the displaywillswitchto Okay andyouwillnotneedtoenterthepassword If you stop partway through the procedure the mode selection process will time out after about 15 se...

Страница 32: ...rs orMXMmasters ispressed itsmostcurrentdestinationwill be shown in the DESTINATION display A mix is capable of being sent to one or many outputs To see all the destinations that the mix feeds rotate...

Страница 33: ...t to the switched meters whenever a PFL switch is lit Likewise input faders put into the AFL mix are summed and output on the AFL mix signal mono or stereo which is sent to the switched meters when an...

Страница 34: ...nwiththe CONFIDENCE FEED ALL LED function This input is cross connected to an auto generated mixer signal with the CONFIDENCE FEED LED CFLED1 forexample functionattached thesignalnamewillbeDxCF1 for c...

Страница 35: ...pot show the selected source MONITOR SOURCE display shows the cur rently programmed source Use rotary encoder and TAKE to select a new source Monitor sources can be selected several ways FourPRE PROGR...

Страница 36: ...ne is normally set in the configuration software to MUTE the control room output to prevent the occurrence of feedback CR SET BUTTON lets the operator select the source to be listened to in the contro...

Страница 37: ...nes will usually provide a part of the signal that is going out over the air If that signal is the one being monitored with the studio speakers feedback will occur To prevent this the studio mic fader...

Страница 38: ...be lit by a remote device connected to a Logic card input port See the Bridge Router manual for details Talkback Mic The operator s talkback mic plugs into the panel mounted XLR connector located on t...

Страница 39: ...the corresponding switch Each individual TB button is programmed as follows 1 Press and hold the TAKE button this button will light to enter programming mode 2 Press the TB button you want to program...

Страница 40: ...ude PAN BAL MODE EQ Dynamics Test Tone assign and Routing The group may be in Surround Mode if configured as a surround group Stereo LEFT RIGHT orMONOmodes Thegroup MODE settings affects the group out...

Страница 41: ...the MSTR display group Groups can also be assigned to MXM masters but this assignment is not indicated on the GRP D12 panel but only on the MXM D12 panel DCA Group Displays Each sub group channel can...

Страница 42: ...dentical controls at the other three destina tions on the MSTR D12 panel Mix Destination 5 1 Surround Input channels are assigned to the 5 1 Surround master by means of BUS ASSIGN button 5 1 MASTERASS...

Страница 43: ...lay will show NoDest AsyourotatetheDESTINATIONknobinthe XYE D12 panel the names of allowable destinations will appear in the DESTINATION display If 5 1 is not currently routed to the displayed output...

Страница 44: ...tch turns the channel signal ON pressing it again turns the channel signal OFF The switch LED lights to indicate the channel is ON DCA Master Displays Each channel can be assigned to any combination o...

Страница 45: ...n the input sub group or master panel will be illuminated as well as the assign buttons DCA ON The ON switch turns the DCA master ON faders assigned to the master will also be turned ON FADER A long t...

Страница 46: ...posite PAGE on all input faders i e A becomes B B becomes A Useful for instant LIVE to BREAK setups Display Monitor Controls These switches change what information is dis played on the CHAN SET INFO L...

Страница 47: ...M A S T E R P A N E L page 47 D 12 July 2006 RESERVED FOR FUTURE USE...

Отзывы: