


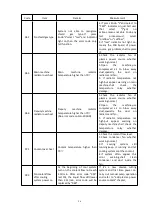

42
Step 1: Select the plasma gas and shield gas by press knob 1 & 2, wait after gas blow
finish, and no gas blowing from torch head;
Step 2: Press knob 7, select preflow (preflow indicator on), adjust the plasma gas
and shield gas pressure according to the value in the cutting table, let the
digital tube display the required pressure values.
Step 3:Press knob 7, select the cutflow (cutflow indicator on), adjust the plasma gas
and shield gas pressure according to the value in the cutting table, let the
digital tube display the required pressure values.
Step 4: Press knob 7, select “RUN”, pressure setting finish.
Note: When the set current higher than 30A, the plasma cutflow pressure has to higher than 50, or
error code will appear: “044, plasma gas pressure too low”.
④ Knob 8, when“STATUS”indicator on, the 3 digital tubes display the status, plasma gas,
shield gas, coolant flow and coolant temperature, one by one, same order as every time
operation.
⑤ Plasma gas/shield gas selection: choose the required gas technology by setting Knob 1
and knob 2. SQK-A1and SQK-B1 manual gas console system has fixed the optional gas
technology, choose other gas mix mode is invalid. When customer choose invalid gas sets,
after 5s, the gas console will automatically select the gas sets same with last time use.
⑥ When user select the shield gas as”TEST”, the 3 digital tube will display alarm”062”
,
error indicator on, and then the gas console enter gas leak testing process. For detailed
information of gas leakage please refer to “Maintenance” chapter.
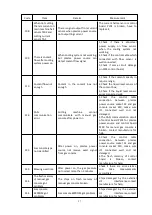
5)
Error warning
There are 3 classes error warnings in the entire system: self eliminating error, low priority
error and high priority error.
① Self eliminating error
When self eliminating error appear, the machine changes the work process to wait or stop
status. Knob 8 run to “ERROR” automatically,and error indicator flicker(light on 0.3s and light
off 0.3s).Error code will be displayed on digital tube, the corresponding ERROR type indicator
under Knob 8 will flicker(light on 0.3s and light off 0.3s). After some errors eliminated, Knob 8
run to “AMPS”automatically, the digital tube displays the set current, the corresponding
ERROR type indicator under Knob 8 will off, the complete machine will work as normal
process. After other errors eliminated, the complete machine enter stand by status, ERROR
indicator flickers(light on 1s and light off 1s), the error code will be displayed on digital tube,
the error type indicator flicker(light on 1s and light off 1s), this status will keep 300s.After
Содержание FLG-200HD
Страница 9: ...5 Figure 2 1 System connection diagram ...
Страница 43: ...39 Figure 5 2 SQK A1 front panel function Figure 5 3 SQK B1 front panel function ...
Страница 74: ...70 4 System wiring diagram Figure 7 1 System wiring diagram ...
Страница 77: ...73 2 Main circuit wiring diagram 2 Figure 7 4 FLG 200HD Main circuit wiring diagram 2 ...
Страница 79: ...75 4 Main circuit wiring diagram 2 Figure 7 6 FLG 300HD FLG 400HD Main circuit wiring diagram 2 ...
Страница 80: ...76 5 Main circuit wiring diagram 3 Figure 7 7 FLG 300HD FLG 400HD Main circuit wiring diagram 3 ...
Страница 81: ...77 6 HF striking diagram Figure 7 8 HF striking diagram ...