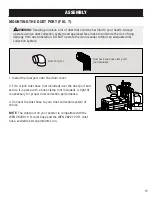


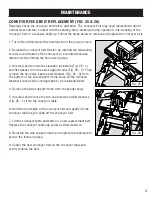


MAINTENANCE
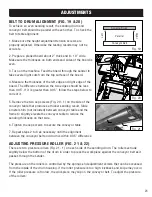
CONVEYOR FEED BELT REPLACEMENT (FIG. 25 & 26)
Regularly check the conveyor belt before operation. The conveyor belt may need replacement due to
normal wear and tear, contact with the sanding drum abrasive during operation, mis-tracking of the
conveyor belt, or excessive build-up. Follow the steps below to remove and replace the conveyor belt.
1. Turn off and disconnect the machine from the power source.
2. Release the conveyor belt tension by rotating the tensioning
screws on both sides of the conveyor in a counterclockwise
direction while holding the hex nuts in place.
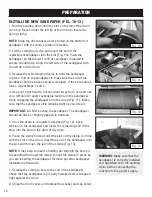
3. Unscrew and remove the elevation lock knob (Fig. 25 - 1)
and flat washer from the side support frame (Fig. 25 - 2). Then
remove the hex bolts, spaces and washers (Fig. 25 - 3) from
the bottom of the side support frame. Keep all the removed
fasteners in the same configuration to be reinstalled later.
4. Remove the side support frame from the sander body.
5. Unscrew and remove the two cap screws and flat washers
(Fig. 26 - 1) from the conveyor table.
6. Hold the both sides of the conveyor belt and gently lift the
conveyor table as you slide off the conveyor belt.
7. Lift the conveyor table and slide on a new replacement belt.
Replace the conveyor table cap screw and flat washers.
8. Reinstall the side support frame and replace the fasteners to
secure the frame in place.
9. Center the new conveyor belt on the conveyor table and
evenly tension the belt.
1
2
3
1
1
Fig. 25
Fig. 26
27
Содержание 65911
Страница 35: ...35 NOTES ...
Страница 36: ...THANKS FOR REMEMBERING ...