


ADJUSTMENTS
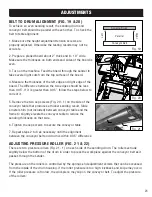
BELT TO DRUM ALIGNMENT (FIG. 19 & 20)
To achieve an even sanding result, the sanding drum and
conveyor belt should be parallel with each other. To check the
belt to table alignment:
1. Make sure the height adjustment tension screws are
properly adjusted. Otherwise the testing results may not be
accurate.
2. Prepare a planed board about 2” thick and 8 - 10” wide.
Make sure the thickness on both ends and sides of the board is
even.
3. Turn on the machine. Feed the board through the sander to
take several light cuts from the top surface of the board.
4. Measure the thickness of the left edge and right edge of the
board. The difference between the two edges should be less
than 0.05”. If it is greater than 0.05”, follow the steps below to
correct it.
5. Remove the two cap screws (Fig. 20 - 1) on the side of the
conveyor table that produces a thicker sanding result. Slide
a metal shim (not included) between conveyor table and the
frame to slightly elevate the conveyor table to reduce the
sanding thickness on that side.
6. Tighten the cap screws to secure the conveyor table.
7. Repeat steps 2 to 6 as necessary until the alignment
between the conveyor belt and drum is within 0.05” difference.
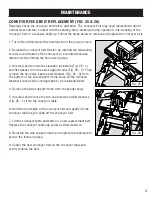
ADJUSTING PRESSURE ROLLER (FIG. 21 & 22)
There are two pressure rollers (Fig. 21 - 1) on each side of the sanding drum. The rollers extrude
slightly below the bottom of the drum in order to press the workpiece against the conveyor belt as it
passes through the sander.
The pressure on the rollers is controlled by the springs and adjustment screws that can be accessed
from the inside of the drum housing. If the roller pressure is too high, kickback and snipe may occur.
If the roller pressure is too low, the workpiece may slip on the conveyor belt. To adjust the pressure
of the rollers:
Sanding Drum
Conveyor Belt
Parallel
Left
Right
1
1
Fig. 19
23
1
1
Fig. 21
Fig. 20
Содержание 65911
Страница 35: ...35 NOTES ...
Страница 36: ...THANKS FOR REMEMBERING ...