


ASSEMBLY
WARNING:
To avoid injury from accidental startups, do not plug in the drum sander until all
assembly and preparation procedures have been completed.
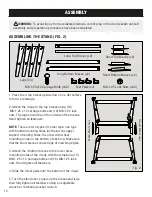
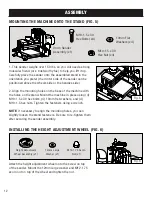
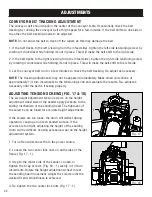
ASSEMBLING THE STAND (FIG. 2)
1. Place the 4 top braces upside down on a flat surface
to form a rectangle.
2. Attach the 4 legs to the top braces using (16)
M8-1.25 x 12 carriage bolts and (16) M8-1.25 lock
nuts. The legs should be on the outside of the braces.
Hand tighten all fasteners.
NOTE:
There are two types of corner legs: one type
with handle-mounting holes just below the upper
support mounting holes, the other with wheel-
mounting holes on the bottom of each leg. Make sure
that the short braces connect legs of matching styles.
3. Attach the 4 bottom braces to the lower brace
mounting holes of the 4 legs with the remaining (16)
M8-1.25 x 12 carriage bolts and (16) M8-1.25 lock
nuts. Hand tighten all fasteners.
4. Slide the 4 feet pads onto the bottom of the 4 legs.
5. Turn the stand over, square up the braces and legs,
then fully tighten all fasteners using an adjustable
wrench or ratcheting socket wrench.
Legs (x4)
Long Top Braces (x2)
Long Bottom Braces (x2)
M8-1.25 Lock Nuts (x32)
Feet Pads (x4)
Short Top Braces (x2)
Short Bottom Braces (x2)
M8-1.25x12 Carriage Bolts (x32)
Handle Mount Legs
Wheel Mount Legs
Fig. 2
10
Содержание 65911
Страница 35: ...35 NOTES ...
Страница 36: ...THANKS FOR REMEMBERING ...