WELL WRC7020N User’s Manual
197
25
Dynamic DNS
When you want your internal server to be accessed by using
DNS name rather than using the dynamic IP address, you can
use the DDNS service. The DDNS server allows to alias a
dynamic IP address to a static hostname.
This chapter provides you an overview of the Dynamic DNS
feature of the modem and configuration details related to it.
Overview
If some host has a dynamic IP address that keeps changing
frequently, it is difficult to keep updating the IP record that is
associated with the domain name of this host in the zone files.
This will result in non-accessibility of this host on the Internet.
Dynamic DNS service allows to keep mapping of a dynamic IP
address of such host to a static hostname. Dynamic DNS
services are provided by many websites. The host needs to
register with some website and get a domain name. When the
IP address of the host changes, it just needs to send a message
to the website that's providing dynamic DNS service to this host.
For this to work, an automated update client needs to be
implemented. These update clients send update messages to
the servers whenever there is some change in the IP address of
that host. Then, the server updates the entries for that host and
replies back with some return code.
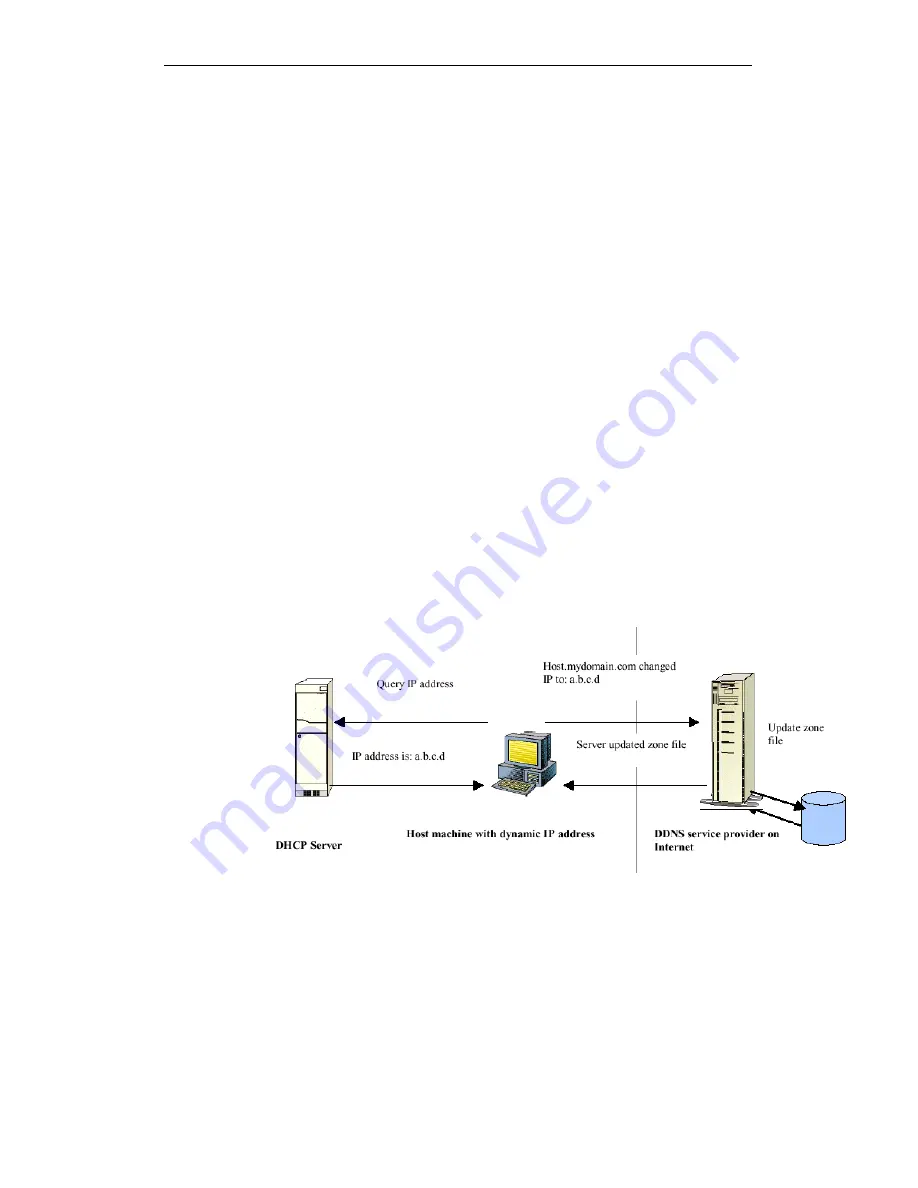
Above Figure explains one such scenario in which a host gets a
dynamic IP address for itself from a DHCP server. As the host
has registered with one of the dynamic DNS service providers
on the Internet, it sends an update message to the service
provider with host name and changed IP address. The service
provider updates the new IP address of the host in the zone
files that have entry for that host name and replies back with
some return code. The return code communicates the success
or failure of the update message. This process is repeated
every time the host's IP address changes.
Содержание WRC7020N
Страница 1: ...WELL WRC7020N User s Manual 1 WELL WRC7020N User s Manual...
Страница 11: ...WELL WRC7020N User s Manual 11 1 2 3 4 Off No LAN link Blink Valid Ethernet packet being transferred...
Страница 15: ...WELL WRC7020N User s Manual 15 2 Single RIGHT click on Local Area connection then click Properties...
Страница 16: ...WELL WRC7020N User s Manual 16 3 Double click on Internet Protocol TCP IP...
Страница 20: ...WELL WRC7020N User s Manual 20 3 Single RIGHT click on Local Area connection then click Properties...
Страница 24: ...WELL WRC7020N User s Manual 24 2 In the Control Panel Home click on Change adapter settings to continue...
Страница 25: ...WELL WRC7020N User s Manual 25 3 Single RIGHT click on Local Area Connection then click Properties...
Страница 26: ...WELL WRC7020N User s Manual 26 4 Double click on Internet Protocol Version 4 TCP IPv4...
Страница 31: ...WELL WRC7020N User s Manual 31 4 Click Wireless Configuration...
Страница 43: ...WELL WRC7020N User s Manual 43 3 Click on the ratio of Gateway and then click on Next...
Страница 46: ...WELL WRC7020N User s Manual 46...
Страница 49: ...WELL WRC7020N User s Manual 49 2 Double click Network Connections...
Страница 90: ...WELL WRC7020N User s Manual 90 Figure 9 Wireless Network page...
Страница 119: ...WELL WRC7020N User s Manual 119 15 Connect successfully Click on OK button to confirm and return...
Страница 128: ...WELL WRC7020N User s Manual 128 7 Click on Turn on network discovery and file sharing...
Страница 129: ...WELL WRC7020N User s Manual 129 8 Click on No make the network that I am connected to a private network...
Страница 130: ...WELL WRC7020N User s Manual 130 9 AP s icon will show up Double click on it...
Страница 131: ...WELL WRC7020N User s Manual 131 10 Users could also Click Add a wireless device if the icon is not there Click next...
Страница 132: ...WELL WRC7020N User s Manual 132 11 Enter AP s Self PIN Number and click next...
Страница 133: ...WELL WRC7020N User s Manual 133 12 Choose a name that people who connect to your network will recognize...
Страница 134: ...WELL WRC7020N User s Manual 134 13 Enter the Passphrase and then click Next...
Страница 155: ...WELL WRC7020N User s Manual 155 1 From the left hand Network Settings WAN Interface menu The following page is displayed...
Страница 159: ...WELL WRC7020N User s Manual 159 5 Change setting successfully Click on Reboot Now button to confirm...
Страница 161: ...WELL WRC7020N User s Manual 161 4 Change setting successfully Click on Reboot Now button to confirm...
Страница 163: ...WELL WRC7020N User s Manual 163 5 Change setting successfully Click on Reboot Now button to confirm...
Страница 165: ...WELL WRC7020N User s Manual 165 5 Change setting successfully Click on Reboot Now button to confirm...
Страница 167: ...WELL WRC7020N User s Manual 167 5 Change setting successfully Click on Reboot Now button to confirm...
Страница 170: ...WELL WRC7020N User s Manual 170 5 Change setting successfully Click on Reboot Now button to confirm...
Страница 191: ...WELL WRC7020N User s Manual 191...
Страница 202: ...WELL WRC7020N User s Manual 202 6 Change setting successfully Click on Reboot Now button to confirm...
Страница 206: ...WELL WRC7020N User s Manual 206 6 Change setting successfully Click on Reboot Now button to confirm...
Страница 210: ...WELL WRC7020N User s Manual 210 5 Firmware update has been update complete The following page is displayed...
Страница 217: ...WELL WRC7020N User s Manual 217...
Страница 226: ......


