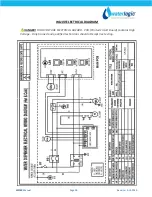
background image


WL100

 Manual                                                                     Page 25                                                                      Revision: 1‐14‐2019 

5.2 

 10‐3048 

Faucet Nipple – Blue with Screen 

Recommend stocking 2 each for every 10 units 
purchased


 PL‐1013 

Yes 


 20‐1040 

Drip Tray Grill Charcoal 

Recommend stocking 5 each for every 10 units 
purchased


 PL‐1362‐L00‐CL 

Yes 


 20‐0065 

Drip Tray Grill – Blue 

Recommend stocking 5 each for every 10 units 
purchased


 PL‐1362 

Yes 


 20‐1035 

Drip Tray Body – Charcoal No Logo 

Recommend stocking 5 each for every 10 units 
purchased


 PL‐1361‐L00‐CL 

Yes 


 20‐0070 

Drip Tray Body – Blue No Logo 

Recommend stocking 5 each for every 10 units 
purchased


 PL‐1361 

Yes 

Remainder of Parts


 20‐1045 

Top Cover Flat ‐  Charcoal Textured 

 PL‐1366‐L00‐CL 

Yes 

 20‐0005 

Top Cover Flat – Blue  

 PL‐1366 

Yes 

 12‐5675 

Side Panel – 

Counter Top only


 ST‐8148‐A 

Yes 

10 

 12‐6900 

High Voltage Cover 

Counter Top Only 

 ST‐8301 

Yes 

11 

 12‐1200 

Power Transformer 120V / 60Hz 

 EL‐5021 

Yes 

12 

 12‐3165 

Upper Shelf 

Counter Top Only 

 ST‐8150‐B 

Yes 

13 

 20‐1010 

2.8” Filter Clip for In‐Line Filter 

PU‐4161 

Содержание WL100

Страница 1: ...0 Stonegate Circle Omaha NE 68164 800 288 1891 www waterlogicdealers com Tech Portal Website techportal waterlogic com Waterlogic International LTD Global Headquarters Grenfell Road Maidenhead Berkshi...

Страница 2: ...o are experienced in the installation function and repair of Waterlogic equipment This publication is written for use by these qualified individuals Waterlogic encourages users to learn about products...

Страница 3: ...Overload High Limit Safety 15 Hot Tank Descaling 17 Adjusting Cold Water Set Point 19 Programming Disabling Energy Saving Sleep Mode 20 Programming Changing Hot Water Mode to Ambient 21 Replacement C...

Страница 4: ...tructions for future use DANGER This product can cause death or severe injury if incorrectly operated installed or maintained The installation maintenance sanitizing and any repair must be performed b...

Страница 5: ...y potential microbiological contaminates CAUTION INDOOR USE ONLY Intended for Household Use Never expose to direct sunlight heat sources or ambient air temperature above 37 C 100 F or below 2 C 35 F I...

Страница 6: ...tect from cross contamination Large Dispense Area 21 6 cm 8 5 inch dispense height to accommodate most cup and bottle sizes Child Safeguard The WL100 Water Treatment System requires user to select and...

Страница 7: ...r Quality Association WQA to NSF ANSI 61 Section 9 Energy Star Certified The WL100 Water Treatment System has been tested and certified to the Energy Star a US Environmental Protection Agency EPA prog...

Страница 8: ...old Tank Size 2 Liter 0 5 Gallons Hot Water Temperature 85 C 185 F Factory Set Point Hot Water Manual Reset Overload 105 C 221 F Hot Tank Size 1 6 Liter 0 4 Gallons Recommended Service Pressure 40 60...

Страница 9: ...not fit between countertops and cabinets Check installation to ensure adequate clearance SHIPPING SPECIFICATIONS ITEM WL100 Counter Top WL100 Tower Width Depth Height 38 cm x 45 cm x 46 5 cm 15 x 17 7...

Страница 10: ...trol Panel for the Waterlogic WL100 Water Treatment System For Cold Water Press the Blue Cold Water Select Button For Hot Water Press the two Red Hot Water Select Buttons at the same time This is a Sa...

Страница 11: ...c for evaluation The form is available at www waterlogic us Supporting documentation must include but is not limited to proof of purchase installation date failure date and supporting installation and...

Страница 12: ...NGER HIGH VOLTAGE ELECTRICAL HAZARD Unplug before inspection and service 2 Ensure there is adequate minimum of 5 cm 2 inches clearance around the unit and clean the Condenser Grill and Compressor fan...

Страница 13: ...is a small hole in the side of the tank outlet tube that allows air and water to pass into the vent chamber as it is heated Water in the vent chamber is suctioned back through the outlet tube vent hol...

Страница 14: ...WL100 Manual Page 14 Revision 1 14 2019 HEATER CIRCUIT...

Страница 15: ...r coils on the rear of the unit you will see the Hot Tank located on the right hand side 5 From the Front of the Water Treatment System reach up behind the Hot Tank and take hold of the protective met...

Страница 16: ...the Protective Metal Box so it snaps back into its original position on the Hot Tank 8 Replace the Lower Front Panel 9 Plug in the Power Cord 10 Turn on the Red Compressor Heater Switch I ON position...

Страница 17: ...aterial Safety Data Sheet for specific requirements of each product CAUTION STAINLESS STEEL TANK DESCALING The Hot Tank is made from stainless steel Ensure descaling solution is compatible with stainl...

Страница 18: ...Filters WARNING HOT WATER Unit produces Hot Water up to 87o C 189o F Water above 52o C 125o F can cause severe burns or scalding Hot water should be dispensed carefully into insulated container to avo...

Страница 19: ...w under the decal at the rear of the unit Remove the red portion of the Cold Tank Temperature label to access the adjustment screw The factory set point is 41 F and is indicated by the dot on sheet me...

Страница 20: ...pense has not been used for 3 hours Selecting any button wakes up the WL100 Water Treatment System and turns the Heater circuit back on The Hot Tank will typically take less than 10 minutes to heat th...

Страница 21: ...d to Ambient Cold settings On the Energy Saver PCB move the Jumper on JP9 from Pins 1 and 2 to Pins 2 and 3 Unplug Power Cord and remove Top Cover to access Energy Saver PCB Hot and Cold Factory Setti...

Страница 22: ...r additional repair parts Hot Tank Service Hot Tanks with controls must be replaced at least every 3 5 years depending on usage Descaling Hot Tank may be required on a regular basis depending upon fil...

Страница 23: ...WL100 Manual Page 23 Revision 1 14 2019 WL100 COUNTER TOP DRAWINGS AND PARTS LIST Yellow Consumables Green Recommended spare parts Wetted Parts...

Страница 24: ...2 each for every 10 units purchased EL 0159 L00 00 Yes 1 3 12 1303 Hot Tank Thermostat 85 C 185 F Recommend stocking 2 each for every 10 units purchased HT 3013A Yes 3 12 5665 Solenoid Valve with Ter...

Страница 25: ...rcoal No Logo Recommend stocking 5 each for every 10 units purchased PL 1361 L00 CL Yes 20 0070 Drip Tray Body Blue No Logo Recommend stocking 5 each for every 10 units purchased PL 1361 Yes Remainder...

Страница 26: ...ert Panel when purchasing also request Hot Water Caution Label LP 7169 12 0001 to adhere to front of this Panel PL 1365 Yes 18 1 12 0001 Hot Water Caution Label Adhere to Front Upper Drip Tray Insert...

Страница 27: ...ter Bracket Counter Top Only ST 8152 B Yes 26 12 3150 Unit Rubber Feet Counter Top Only PL 1251 CN Yes 27 12 3170 Bottom Panel Counter Top Only ST 8151 A Yes 28 10 3067 Bulkhead Union x John Guest P N...

Страница 28: ...8253 No 35 NA JG LLD PE Tube Blue O D 1 4 John Guest P N PE 08 BI 1000F B PU 4031 Purchase from John Guest 36 NA 5 16 X Reducing Elbow John Guest P N PI211008S PU 4007 Purchase from John Guest 37 10 3...

Страница 29: ...WL100 Manual Page 29 Revision 1 14 2019 WL100 TOWER DRAWING AND PARTS LIST Yellow Consumables Green Recommended spare parts Wetted Parts...

Страница 30: ...g 2 each for every 10 units purchased ST 8290 Yes 1 2 EL 0159 Overload with Manual Reset 97 C 207 F Recommend stocking 2 each for every 10 units purchased EL 0159 L00 00 Yes 1 3 12 1303 Hot Tank Therm...

Страница 31: ...ommend stocking 5 each for every 10 units purchased PL 1361 L00 CL Yes 20 0070 Drip Tray Body Blue No Logo Recommend stocking 5 each for every 10 units purchased PL 1361 Yes Remainder of Parts 10 20 1...

Страница 32: ...ST 8249 A Yes 18 12 8058 Side Panel Plastic Handle Tower Only PL 1123 Yes 19 20 0025 Front Lower Panel Tower Only PL 1364 Yes 20 20 1055 Front Lower Insert Panel Charcoal Tower Only PL 1363 L00 CL Ye...

Страница 33: ...Only CO 9027 Special Order 28 19 1015 Gasket for Power Socket ST 8052 Yes 29 TBD Socket for Plug Connection EL 0061 L00 00 Yes 30 10 3014 Fuse Holder and Fuse 120V 15A with One Wire EL 5053 Yes 30 1 1...

Страница 34: ...I 1000F B PU 4031 Purchase from John Guest 39 NA 1 4 Equal Elbow Connector John Guest P N P10308S PU 4008 Purchase from John Guest 40 Purchase from John Guest 5 16 X Reducing Elbow John Guest P N PI21...

Страница 35: ...WL100 Manual Page 35 Revision 1 14 2019 WL100 WATER FLOW DIAGRAM Incoming Water...

Страница 36: ...ual Page 36 Revision 1 14 2019 WL100 ELECTRICAL DIAGRAM DANGER HIGH VOLTAGE ELECTRICAL HAZARD PCB Printed Circuit Board contains High Voltage Only trained and qualified technicians should attempt live...

Страница 37: ...rain with paper clips erasers napkins tea bags gum and various other intended items Waterlogic recommends you establish a minimum of weekly visits to the machine for cleaning of the drip tray drain Ma...

Страница 38: ...ainer and drain basin will be required to catch the water from the faucet WARNING Use Personal Protective Equipment Gloves and Eye Protection Required The first 8 or 11 Liters 2 or 3 gallons of water...

Страница 39: ...he cold circuit Chlorine test strips can be used to evaluate the water 12 Once the sanitizer odor taste has been flushed out of the cold side of the machine the sanitization process for the Cold Circu...

Страница 40: ...e the Heater approximately 10 minutes to heat the water from ambient 24 C 75 F to the factory set point of 85 C 185 F Dispense a cup of hot water to ensure the temperature odor taste is acceptable WAR...

Страница 41: ...ncoming tap water Following this precaution prevents exposing personnel and equipment drains catch basin etc from scalding hot water Disable Cold and Hot Tanks 1 Turn off the Red Heater and Compressor...

Страница 42: ...ont Panel 8 Unclip the White Red and Black wire connectors from PCB to allow Front Cover to be removed 9 Remove Front Panel 10 Disconnect tubing to allow water to drain from the WL100 Water Treatment...

Страница 43: ...ater will not energize and heat the incoming tap water Following this precaution prevents exposing personnel and equipment drains catch basin etc to scalding hot water Red Compressor Heater Switch mus...

Страница 44: ...e Solenoids 7 Disconnect tank line outlet lines from Hot and Cold Solenoids to drain into basin or bucket 8 Turn outlet fittings outward to avoid water spilling onto the Compressor 9 Reconnect Tubing...

Страница 45: ...on CAUTION USE A WATER PRESSURE REGULATOR Waterlogic will not be responsible for injury or damage caused by excessive water pressure Operating pressure must be 40 psi to 60 psi Be aware any of potenti...

Страница 46: ...must be in the O OFF position while the Hot Tank is empty Damage could occur within one minute and the overload high limit will require manual reset if Heater is turned on with an empty Hot Tank 6 Mo...

Страница 47: ...ing 1 Red Heater and Compressor Power Switch won t light and the Red LED on the Front won t light Possible Reason Solution Circuit Breaker Check the Circuit Breaker Fuse is Blown Replace Fuse Defectiv...

Страница 48: ...CP PN 20 0040 Bad Energy Saver PCB Replace Energy Saver PCB Part Number EN 6131 WLCP PN 20 0075 Defective Red Heater Compressor Switch Replace Red Heater Compressor Switch 3 Compressor Runs But Does N...

Страница 49: ...ater and Compressor Switch on I ON Compressor Starting Circuit Turn Red Heater and Compressor Switch off O OFF Remove the Compressor cap on side of the Compressor Disconnect the black and red terminal...

Страница 50: ...of Faucet Vent Hole 6 Restricted Flow of Hot Water 7 Hot Water Drip out of Faucet 8 Dispenses Hot and Cold Water at the same time 9 No cold water available 10 Water does not dispense from unit 11 Col...

Страница 51: ...button Does the Solenoid open without water pressure to the unit Listen for Solenoid to activate not to mistaken for the button click Adjust water pressure to 40 60 psi The correct input water pressu...

Страница 52: ...ust water pressure to 40 60 psi The correct input water pressure is critical to the performance of the unit to allow Solenoids to open Stem of the switch is broken on the PCB Printed Circuit Board Rem...

Страница 53: ...sure gauge Additional method of verification is to turn off water to unit and press the dispense button Does the Solenoid open without water pressure to the unit Listen for Solenoid to activate not to...

Страница 54: ...it Inspect and replace tubing as necessary Faucet nipple screen mesh has obstruction s Unscrew faucet nipple from faucet and remove any obstruction s from screen mesh Exhausted Filter Replace the Filt...

Страница 55: ...in its base This ensures the reservoir is always full by allowing more water in than out There is a small hole in the side of the tank outlet tube that allows air and water to pass into the vent chamb...

Страница 56: ...without water pressure to the unit Listen for Solenoid to activate not to mistaken for the button click Adjust water pressure to 40 60 psi The correct input water pressure is critical to the performa...

Страница 57: ...n click Adjust water pressure to 40 60 psi The correct input water pressure is critical to the performance of the unit to allow Solenoids to open Closed Water Supply Valve Open the Water Supply Valve...

Страница 58: ...nput water pressure is critical to the performance of the unit to allow Solenoids to open Closed Water Supply Valve Open the Water Supply Valve The unit is not properly plugged into electrical outlet...

Страница 59: ...ater pressure at the inlet bulkhead with a water pressure gauge Additional method of verification is to turn off water to unit and press the dispense button Does the Solenoid open without water pressu...

Страница 60: ...has an outlet restrictor to ensure the tanks remain full of water and water is controlled as it is released to the faucet The inlet Solenoid controls flow into the tanks The tanks will depressurize on...

Страница 61: ...ng solution is compatible with stainless and always flush the unit completely Dispose in an environmentally safe manner Materials Needed Personal Protective Equipment Rubber or Nitrile Safety Gloves a...

Страница 62: ...Filters WARNING HOT WATER Unit produces Hot Water up to 87o C 189o F Water above 52o C 125o F can cause severe burns or scalding Hot water should be dispensed carefully into insulated container to avo...

Страница 63: ...s run out of cold water Cold Tank capacity is 2 liters Gallon Wait for Cold Tank to chill water to temperature prior to dispensing more cold water A greater capacity of Waterlogic Water Systems is ava...

Страница 64: ...able to make Cold Ambient water refer to Disabling Sleep Mode instructions included further below in this Troubleshooting Section The WL100 Water Treatment System does NOT have Extra Hot capability an...

Страница 65: ...ro OHM s on the meter Replace components as necessary Loose or improperly connected wire s to the heating element Hot Tank Visually inspect wire leads gong to the Hot Tank confirm proper connections t...

Страница 66: ...pense has not been used for 3 hours Selecting any button wakes up the WL100 Water Treatment System and turns the Heater circuit back on The Hot Tank will typically take less than 10 minutes to heat th...

Страница 67: ...oils on the rear of the unit you will see the Hot Tank located on the right hand side 5 From the front of the WL100 Water Treatment System reach up behind the Hot Tank and take hold of the Protective...

Страница 68: ...op flap of the Protective Metal Box so it snaps back into its original position on the Hot Tank 8 Replace the Lower Front Panel 9 Plug in the Power Cord 10 Turn on the Red Compressor Heater Switch I O...

Страница 69: ...d to Ambient Cold settings On the Energy Saver PCB move the Jumper on JP9 from Pins 1 and 2 to Pins 2 and 3 Unplug Power Cord and remove Top Cover to access Energy Saver PCB Hot and Cold Factory Setti...

Отзывы: