


Before Use
46
EN
Electrode welding (Fig. E, F)
• Insert the DINSE plug 10 of the welding
cable with the electrode holder 11 into the
negative terminal 4 or positive terminal
5 of the welding cable connection.
• Turn the DINSE plug firmly clockwise.
Before starting work, select the appropriate
sheath electrodes:
When welding with DC, the welding cable with
electrode holder is connected to the negative
terminal (-) and the welding cable with earth
clamp to the positive terminal (+).
An exception here are basic electrodes: They
are better to weld with the electrode connected
to the positive terminal. Please refer to
the information provided by the electrode
manufacturer.
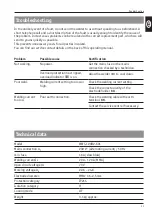
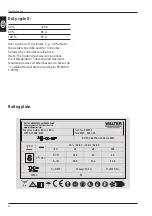
Electrodes / Ø mm
Welding Current (A)
1.6
40/-55
2.0
55/-80
2.5
80/-100
Before welding
Please refer to the safety instructions in
the chapters "Additional safety
instructions for welding" and
"Additional safety instructions for the
workplace".
• Secure the workplace so that you or others are
not at risk.
• Check your personal protective gear.
• Keep the required tools (tongs, clamps, etc.)
within reach.
• Remove grease, dirt, rust and paint from the
workpiece at the welding point and from the
point where you want to attach the earth
terminal.
• Connect the welding cable with earth
terminal 15 to the other terminal, that is the
negative or positive terminal as described in
steps 1 and 2.
• Hold the clamping lever 12 on the electrode
holder 14 and slide the uncovered part of
the electrode into the electrode clamp 13 .
• Turn the operating switch 2 to On "(I)".
• Hold the welding shield 24 in front of your
face and rub the tip of the electrode on the
weld seam as if you were lighting a match.
This is the best method to prime the arc.
• • Do not bang the electrode on the workpiece
as this could damage the electrode sheath,
making it more difficult to prime the arc.
• • It may happen that the electrode is not
pulled back quick enough, causing the
electrode to stick to the workpiece. In this
case, pull it off with a violent jerk to the side.
• Watch the arc through the lens in the head
shield and keep the arc length approximately
1 -1.5 times the diameter of the electrode.
• • Hold the electrode at an angle
approximately 70 - 80° to the workpiece. If
the angle is to large, the slag can penetrate
the joint; if the angle is to small, the arc
flutters and spray molten metal. In both
cases, a weak, porous joint is produced.
• • The constant arc length is very important as
it has an influence on the welding current and
welding voltage. Incorrect current intensity
produces a poor quality, weak joint.
• At the end of the joint, .pull the electrode
gently away from joint to avoid produce a
porous end.
• Turn off the welder even during short breaks.
• Remove the slag from the joint after cooling
using the chipping hammer with wire brush
9 .
Содержание WWS-120B2-K01
Страница 3: ...1 2 3 4 5 6 7 8...
Страница 4: ...9 10 11 12 13 14 15 16 17 18 19 20 21 22 23 24 25...
Страница 5: ...A C B 11 16 22 21 20 16 24 19 23 18 17 24 25 10 15 4 5 13 12 14 E F D...
Страница 32: ...32...
Страница 54: ...Exploded view 54 EN Exploded view 6 7 8 9 14 13 10 11 15 12 4 16 19 20 21 22 23 24 29 28 27 26 25 1 18 5 2 17...
Страница 80: ...Dessin clat 80 FR Dessin clat 6 7 8 9 14 13 10 11 15 12 4 16 19 20 21 22 23 24 29 28 27 26 25 1 18 5 2 17...
Страница 104: ...V kres d l 104 CZ V kres d l 6 7 8 9 14 13 10 11 15 12 4 16 19 20 21 22 23 24 29 28 27 26 25 1 18 5 2 17...
Страница 128: ...Razstavljena risba 128 SI Razstavljena risba 6 7 8 9 14 13 10 11 15 12 4 16 19 20 21 22 23 24 29 28 27 26 25 1 18 5 2 17...
Страница 131: ...131...


