background image

36

Index

Contents

36

Index

Contents

Interactive pen display

BUTTON FUNCTIONS

The following options are available for pen or Radial Menu settings.  Not all options are available for all 
controls or pen display models. 

FUNCTION NAME

DESCRIPTION

C

LICKS

C

LICK

Simulates a primary mouse button click.  Be sure at least one button performs this 
function so you can always navigate and click.

R

IGHT

 C

LICK

Simulates a right mouse button click, which displays a context menu.

M

IDDLE

 C

LICK

Simulates a middle mouse button click.

D

OUBLE

 C

LICK

Simulates a double-click.  For easier double-clicking, use this function instead of 
tapping twice with the pen tip.

C

LICK

 L

OCK

Simulates holding down the primary mouse button.  Press the pen button once to 
initiate click lock.  Press the button again to release click lock.  Click lock is useful 
for dragging objects or selecting blocks of text.

4

TH

 C

LICK

Simulates a 4th mouse button click.

5

TH

 C

LICK

Simulates a 5th mouse button click.

K

EYSTROKE

...

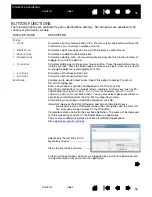
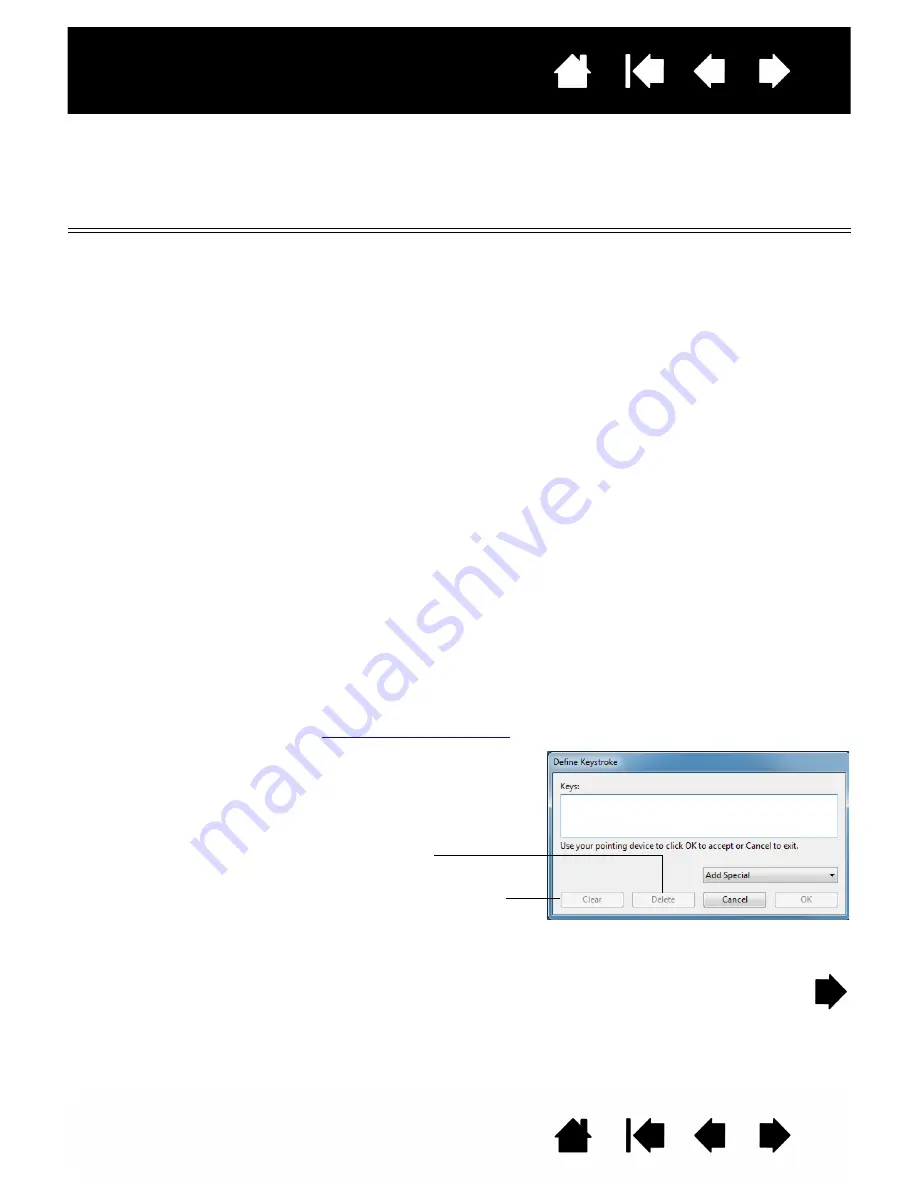
Enables you to simulate keystrokes  Select this option to display the D

EFINE


K

EYSTROKE

 dialog box.

Enter a keystroke or keystroke combination in the K

EYS

 entry box.  

Keystroke combinations can include letters, numbers, function keys (such as F3) 
and modifier keys (such as S

HIFT

, A

LT

, or C

TRL

 for Windows, or 

SHIFT

OPTION

COMMAND

, and 

CONTROL

 for Macintosh).  You can also select special keystrokes or 

keystroke combinations from the A

DD

 S

PECIAL

 drop-down menu.

After defining a keystroke or keystroke sequence, click OK.

Important: Because the E

NTER

 (Windows) and 

RETURN

 (Macintosh) keys 

can be selected as a defined keystroke, they cannot be used to select OK.  
You must use your pen to click on the OK button.

If prompted, enter a name for the keystroke definition.  The name will be displayed 
with the respective control or in the Radial Menu, as applicable.

You can create different keystroke functions for different applications.  
See 

application-specific settings

.

To learn which keystroke shortcuts are supported by a particular application, see 
the documentation that came with the application.

Deletes only the last entry in the 
keystroke entry box.

Clears the keystroke entry box.

Содержание DTU-2235B

Страница 1: ...Model 1 Index Contents 1 Index Contents Interactive pen display Installation Using the pen Customizing the pen Using the pen display Customizing the pen display Using the Radial Menu Application speci...

Страница 2: ...ers of the manual is simultaneous with the introduction into the market of the applicable Wacom product DuoSwitch is a trademark and Wacom is a registered trademark of Wacom Co Ltd Adobe and Reader ar...

Страница 3: ...ing pitch and phase VGA only 31 Customizing the pen 32 Adjusting tip feel and double click 32 Adjusting eraser feel 33 Advanced tip and eraser pressure settings 34 Customizing pen buttons 35 Button fu...

Страница 4: ...s and accessories 70 Radio and television interference 71 FCC notice 71 Industry Canada Canada only 72 CE declaration 72 Precautions 73 Physical location 73 Environment 73 Usage 74 Handling 74 Warrant...

Страница 5: ...The following information is not included with this product information about your specific computer hardware or operating system or information about your application software Your best source for t...

Страница 6: ...ols to move through the manual Go to front page Go to table of contents Go to index Go back to previous view Page back or page forward Go to topic Topic continued Adobe Reader provides additional tool...

Страница 7: ...To learn more see customizing Pen display features Adjusting display incline Pen features The following information is not included with this product information about your specific computer hardware...

Страница 8: ...ressed LED will not light unless the USB cable is plugged into an active USB port Power switch Turns unit on or off Power LED Lights blue when power has been supplied to pen display and a video signal...

Страница 9: ...y attachment of a security cable Pen storage compartment Store by inserting one end of the pen into either side of the compartment Then gently press other end of pen into the compartment Remove by pre...

Страница 10: ...nt lever and swing stand out to desired incline Release lever to lock the stand in place To close the stand pull up on the adjustment lever and gently move stand back into closed position until the la...

Страница 11: ...essure information is reported as you press down on the eraser By default the eraser function is set to ERASE Some pens may be configured with a pen tether connection point DuoSwitch side switch Be su...

Страница 12: ...tion before connecting the pen display If you have another display that is compatible with your video card you can use that display to verify the video card is operating correctly Although you can con...

Страница 13: ...the connection diagram 6 Turn on the pen display The power LED will light orange For DVI operation connect the supplied DVI D to DVI I video cable between the DVI I IN connector located on the pen dis...

Страница 14: ...or VGA video card DVI I IN Computer C DC input To AC outlet Power adapter D Caution Make sure your video card has a DVI or VGA connector and that you correctly set the DVI VGA switch for the video co...

Страница 15: ...you have more than one monitor click IDENTIFY MONITORS to determine which display corresponds to the pen display Select the number corresponding to the pen display B Click ADVANCED SETTINGS C Select...

Страница 16: ...ation For troubleshooting tips see troubleshooting Notes Each interactive pen display LCD panel is produced under very stringent quality standards Production techniques cannot guarantee an absolutely...

Страница 17: ...d as a pen tablet USB cable installation Software installation USB CABLE INSTALLATION Plug the square end of the USB cable into the USB port of the interactive pen display Plug the other end into an a...

Страница 18: ...positioning and enables you to position the screen cursor without having to drag your pen across the display screen surface Be sure to check the Read Me file for updated information If you have troub...

Страница 19: ...good posture at all times Minimize awkward postures and repetitive movements that cause discomfort Change your position if you feel any discomfort due to your work position Note regarding RSI Wacom ma...

Страница 20: ...he pen in any way that feels most comfortable For information on changing the pen settings see customizing POSITIONING To position the screen cursor move the pen slightly above the pen display screen...

Страница 21: ...For Windows 7 and Vista from the ORGANIZE pull down menu choose FOLDER AND SEARCH OPTIONS From the GENERAL tab select SINGLE CLICK TO OPEN AN ITEM POINT TO SELECT For Windows XP from the TOOLS pull do...

Страница 22: ...are working with the pen display and additional monitors on the same system the screen cursor movement on the standard monitors will depend on your system configuration If a second monitor is connecte...

Страница 23: ...profile ON SCREEN DISPLAY OSD SETTINGS The OSD function enables you to optimize a variety of display settings at the touch of a button Make adjustments using the OSD controls located on the upper left...

Страница 24: ...eases or decreases image contrast Changes in contrast may affect color accuracy BRIGHTNESS Increases or decreases the image brightness BACKLIGHT Increases or decreases the backlight brightness level C...

Страница 25: ...e or horizontal distortion lines PITCH VGA only Changes the display data frequency to match that of your graphics card Use when you experience an unstable or flickering image or vertical distortion li...

Страница 26: ...g parameters When these power saving functions are in effect the screen display is darker than usual Depending on the specifications and settings of your computer and video card the power light may on...

Страница 27: ...ustomizing the Radial Menu Working with Display Toggle Application specific settings OPENING THE CONTROL PANEL To open the Wacom Tablet control panel use the pen on the pen display Windows Click on th...

Страница 28: ...ings are for advanced users Tool Tips are available for most control panel items Simply position the screen cursor over an item and let it rest there in a few moments the Tool Tip will pop up Addition...

Страница 29: ...r Settings can only be viewed or changed for an attached pen display or tablet A pen display or tablet cannot be deleted from the control panel list unless it is attached to the computer See also inst...

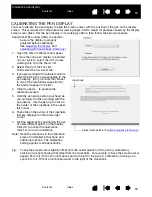
Страница 30: ...of the resolutions supported by the unit will appear in the list 4 Click CALIBRATE to activate the calibration screen 5 Hold the pen and position your head as you normally do when working with the pen...

Страница 31: ...th your pen display See the product specifications for details 1 In the Wacom Tablet control panel select the CALIBRATE tab 2 If you are working with multiple displays be sure the option corresponding...

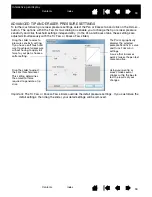
Страница 32: ...down on the pen display screen with your pen tip to test the current tip feel setting Use the CURRENT PRESSURE bar to determine how hard you must press on the pen to reach maximum pressure Displays th...

Страница 33: ...m when using the eraser Customizes the amount of pressure needed to erase Displays the eraser FEEL DETAILS dialog box where you can further customize the eraser sensitivity With your screen cursor pos...

Страница 34: ...rs override the detail pressure settings If you customize the detail settings then drag the slider your detail settings will be removed Drag the slider to adjust the click threshold level This setting...

Страница 35: ...ble click here to change the function assigned to the pen tip At least one pen button should be set to the CLICK function The tip must be set to CLICK in order to draw in most graphics applications Yo...

Страница 36: ...KE Enables you to simulate keystrokes Select this option to display the DEFINE KEYSTROKE dialog box Enter a keystroke or keystroke combination in the KEYS entry box Keystroke combinations can include...

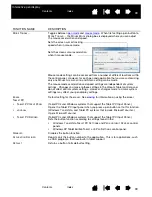
Страница 37: ...en dragging with the pen tip across the pen display screen active area Choose one or more modifier key options Select the CLICK box if you want a mouse click to occur whenever you press the pen button...

Страница 38: ...the button and continue painting with the same size brush until the button is released PRECISION MODE Changes the mapping around the current pen tip position such that you must move the pen twice as...

Страница 39: ...in the Windows 7 and Vista TABLET PC SETTINGS and PEN AND INPUT DEVICES control panels Windows XP Tablet Edition TABLET AND PEN SETTINGS control panel DISABLED Disables the button function APPLICATIO...

Страница 40: ...s to choose from Select an available option by clicking on it within the Radial Menu The menu closes after you make a selection To close the Radial Menu without making a selection click on the X locat...

Страница 41: ...TO OTHER DISPLAYS is selected and you press the pen button the screen cursor is toggled from your pen display to another active pen display or monitor If additional displays are attached to the syste...

Страница 42: ...N will have the same settings in all applications When application specific settings are added to the APPLICATION list the ALL icon changes to ALL OTHER and an application icon is displayed for the ne...

Страница 43: ...d application specific settings applications that have not been customized in this manner will use the TOOL settings for ALL OTHER Tip First customize settings for one application When you feel comfor...

Страница 44: ...Then in the APPLICATION list select the application you want to remove from the list 2 Click on the APPLICATION list s button In the dialog box that appears click DELETE to confirm your selection The...

Страница 45: ...the solution offered 3 Open the Wacom pen display Read Me file for any information updates You can also check the product FAQs Frequently Asked Questions on the Wacom web site for your region 4 If yo...

Страница 46: ...he card in order to verify that the video card is operating correctly 3 Verify that the tablet portion of your pen display and pen are working Press the pen tip against the display and verify that the...

Страница 47: ...this case you may want to change that button s function before testing 1 While observing the POINTING DEVICE INFO column bring your pen within 5 mm 0 2 inch of the display screen A value for PROXIMITY...

Страница 48: ...power save message appears briefly on your display screen Your computer may be in a power management mode Touch the pen tip to the display screen move the mouse or depress any key on your keyboard Tur...

Страница 49: ...duct specifications for frequency range details The image appears multiple times on the display Do not extend the video cable or use an input selector switch box When a still image is displayed for a...

Страница 50: ...display See the product specifications for details Turn off the pen display then turn it back on Open the OSD menu and select the AUTO ADJUST option If necessary manually adjust the brightness pitch a...

Страница 51: ...r for that particular device The pen display power LED is off Make sure the pen display power switch is turned on Check that the AC power adapter is plugged into both the pen display and an active pow...

Страница 52: ...to the OFF position in order to turn off double click assist You have to press hard with the pen when clicking or writing Open the Wacom Tablet control panel and go to the PEN tab Move the TIP FEEL sl...

Страница 53: ...display Make sure the Wacom driver has loaded properly by opening the Wacom Tablet control panel If the driver did not load you will see an error message If an error message appears reboot your compu...

Страница 54: ...corrupted or want to make certain that all settings are at their factory defaults Use the Wacom Tablet Preference File Utility to work with your preferences Close any open applications Click the STAR...

Страница 55: ...ts Use the Wacom Tablet Utility to work with your preferences Close any open applications Open the main APPLICATIONS folder Then open the WACOM TABLET folder and run the WACOM TABLET UTILITY It is a g...

Страница 56: ...on 2 From the GO menu choose your HOME Open the LIBRARY and PREFERENCES folders Remove the following preferences COM APPLE INK FRAMEWORK PLIST COM APPLE INK INKPAD PLIST COM APPLE INK INKPAD SKETCH 3...

Страница 57: ...solve the problem and you think your Wacom product is not working properly contact the Wacom support staff for the area where your product was purchased See the Wacom pen display Read Me file located...

Страница 58: ...en available from the Internet USA Canada Central and South America Europe Middle East and Africa Japan Asia Pacific English China Korea Taiwan Worldwide Web http www wacom com productsupport Software...

Страница 59: ...e display screen surface Regular cleaning will help prolong the life of your LCD screen surface and pen Keep the pen display and pen in a clean dry place and avoid extremes in temperature Room tempera...

Страница 60: ...ent or lay it flat on your desk To maintain the sensitivity of your pen do not store the tool in a container where it will rest on its tip Clasp the old nib with a Wacom nib extraction tool pair of tw...

Страница 61: ...le stand and attach the pen display to a different mounting platform 1 Turn off your computer and power off the pen display Then disconnect all cables from between the unit and your computer 2 Protect...

Страница 62: ...indows XP or XP x64 select ADD OR REMOVE PROGRAMS In the ADD OR REMOVE PROGRAMS window choose WACOM TABLET and click on the REMOVE button 3 Follow the prompts to remove the software driver If prompted...

Страница 63: ...e applications that you may be running To back up your preferences click on the BACKUP button under MY PREFERENCES To restore preferences that you had previously backed up click on the RESTORE button...

Страница 64: ...using the additional pen display s or tablet s The eraser function will continue to work correctly using the first unit that was added to the control panel To remove one of multiple tablets from the d...

Страница 65: ...or navigation editing and other functions To customize your gestures select the FLICKS tab in the PEN AND INPUT DEVICES control panel Digital Ink in Microsoft Office 2007 Use your Wacom pen to full ad...

Страница 66: ...ar If the icon is not visible right click on the taskbar select TOOLBARS and TABLET PC INPUT PANEL To customize the Input Panel 1 First open the Input Panel and then click on TOOLS in the menu bar 2 S...

Страница 67: ...DPMS Compatibility Windows 7 Vista XP 32 and 64 bit Macintosh OS X v10 4 1 or later Cover plate Tempered AG etching glass with AR film backside Cables DVI I to DVI D DVI I to VGA USB USB hub Integrat...

Страница 68: ...user modes Display area 476 64 x 268 11 mm 18 78 x 10 56 in Pixel pitch 0 24825 x 0 24825 mm 0 00978 x 0 00978 in Viewing angles CR10 1 horizontal vertical 170 160 typical Display colors 16 7 million...

Страница 69: ...e of display area to be 4 0 mm 0 158 in Reading height 5 mm 0 2 in Maximum report rate 133 points sec Pressure levels 512 levels Communication interface USB Input voltage 100 to 240 VAC 50 60 Hz Outpu...

Страница 70: ...eu You can also contact your local dealer distributor or technical support using the appropriate number for your region To purchase parts and accessories in Australia Singapore Taiwan and Korea pleas...

Страница 71: ...s and can radiate radio frequency energy and if not installed and used in accordance with the instructions may cause harmful interference to radio communications However there is no guarantee that int...

Страница 72: ...4 3 2008 IEC61000 4 4 2004 Corr 1 2006 Corr 2 2007 IEC61000 4 5 2005 IEC61000 4 6 2008 IEC61000 4 8 2001 IEC61000 4 11 2004 Based on the results of these tests Wacom declares that the above mentioned...

Страница 73: ...e controlled environments The product was tested by Wacom for the usage in a normal office environment only and there was no particular inspection with regards to its compatibility in medical and mili...

Страница 74: ...sk of electrical shock when the casing is open This will also void your warranty and Wacom shall have no responsibility to repair or replace the product Warning If the LCD screen has been damaged DO N...

Страница 75: ...ashing liquid diluted with water Caution Do not expose the pen display to high voltage electrostatic discharges or to a build up of an electrostatic charge on the LCD screen This may result in a tempo...

Страница 76: ...r repair or if it has been handled or stored other than in accordance with Wacom s storage instructions Any descriptions drawings specifications samples models bulletins or similar material used in co...

Страница 77: ...bove apply to such sales Wacom Technical Support in Asia Pacific except Japan and China Detailed Asia Pacific Limited Warranty policy and product registration may be found online at http www wacom asi...

Страница 78: ...ide access to the software The customer may not copy change transfer or edit the software without prior written agreement from WACOM The only exceptions to this are necessary procedures for creating a...

Страница 79: ...en and signed contract Should one of the provisions of these licence conditions be or become void the validity of the other provisions shall not be affected in full or in part Should a provision be in...

Страница 80: ...s for the International Sale of Goods is explicitly excluded Krefeld is the sole place of jurisdiction for all claims arising from this contractual relationship and all disputes between the parties re...

Страница 81: ...s a double click Eraser aware application A software application that has built in support for the pen eraser These applications take advantage of the eraser in different ways depending on what makes...

Страница 82: ...cted Radial Menu A hierarchical menu in radial format Each level of the menu consists of eight menu slices which may contain various features and options to choose from You can customize the buttons o...

Страница 83: ...feel adjusting 33 pressure setting advanced 34 Ergonomics 19 Factory presets 23 FCC notice 71 Features pen 11 pen display 8 Front view pen display 8 Functions button 36 General problems troubleshootin...

Страница 84: ...ge 74 Preferences managing 63 Pressure sensitivity working with 22 Product information 70 Radial Menu customizing 40 using 40 Rear view pen display 9 Requirements system 12 Settings application specif...

Страница 85: ...t http tablet wacom co jp Telephone 81 3 5309 1513 Fax 81 3 5309 1514 WACOM CHINA CORPORATION WACOM KOREA CO LTD Unit 2807 28th Floor SK Tower 25th Floor DMC iaan Sangam 2nd Complex 1653 No 6 Jia Jian...

Отзывы: