T
T
ravel gearbox oil level, checking
The travel gearbox is positioned under the machine. Be observant
for sign of leakage during the daily inspection.
Ch
h
e
e
c
c
k th
h
e
e
tr
r
av
v
el
l
ge
e
a
a
rbo
o
x
x
oi
i
l
l
le
e
v
v
el
l
ev
v
er
r
y 25
5
0
0
hour
r
s.
NO
O
T
T
E
E
!
Read the safety when servicing instructions before starting any
work.
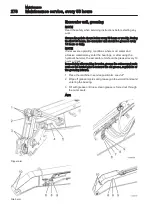
1 Remove oil level plug (A) and check that the oil is up to the
lower edge of the hole.
2 If the level is too low, fill new oil through the hole for the oil
level plug (A) until the level is up to the lower edge of the hole.
3 Reinstall the oil level plug after the oil level check.
T
T
a
a
ke care of
f
fi
i
lte
e
r
r
s/o
o
il
l
s/l
l
i
i
q
q
u
u
i
i
ds in
n
an
n
en
n
vir
r
on
n
m
m
ent
t
a
a
l
l
l
l
y
y
safe
e
wa
a
y
y
, see
e
pa
a
ge
e
24
4
9.
.
Ax
x
les
s
, che
e
c
c
king
g
oi
i
l lev
v
el
l
NO
O
T
T
E
E
!
Read the safety when servicing instructions before starting any
work.
Ax
x
le
e
s
s
, che
e
c
c
kin
n
g
g
oi
i
l
l
le
e
v
v
el
l
Ch
h
e
e
c
c
k th
h
e
e
oil le
e
vel on
n
bo
o
th
h
ax
x
le
e
s
s
every 25
5
0
0
ho
o
u
u
rs.
1 Park the machine on a level and stable surface, activate the
travel brake and block the wheels.
2 Clean the oil level plugs before removing them.
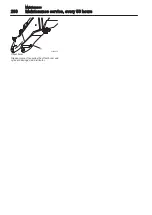
3 Remove the plugs (A) and (B) and check that the oil level is
up to the lower edge of the hole, fill up if necessary.
4 Reinstall the oil level plugs with tightening torque 50 Nm (37
lbf ft).
Ax
x
le
e
hu
u
b
b
s
s
, che
e
c
c
kin
n
g
g
oi
i
l
l
le
e
v
v
el
l
Ch
h
e
e
c
c
k th
h
e
e
oil le
e
vel on
n
ax
x
le
e
hu
u
b
b
s ev
v
ery 25
5
0
0
ho
o
u
u
rs.
1 Park the machine on a level and stable surface.
2 Lift up the machine by using the stabiliser legs or blade.
NOT
T
E
E
!
!
If the machine is not equipped with stabilizers, lift up the
wheels using the digging equipment.
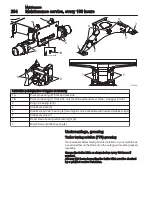
3 Secure the machine with appropriate jack stands (1) (load
capacity min. 8000 kg, 17650 lb for each) under the axles!
4 Place the oil drain/filler plug (1:a) to topmost position (12
o'clock) as shown on the illustration and carefully remove the
plug.
5 Turn the wheel until the drain hole (1:b) is at 9 o'clock position
as shown on the illustration.
V1086230
A
B
A Oil level plug
B Drain plug
A
B
V1107834
A Front axle, oil level plug
B Rear axle, oil level plug
V1152958
1
Axle on jack stands (1)
29
9
2
2
Ma
a
i
i
n
n
t
t
e
e
n
n
a
a
n
n
c
c
e
Ma
a
i
i
n
n
t
t
e
e
n
n
a
a
n
n
c
c
e ser
r
v
v
ic
c
e,
,
ev
v
er
r
y
y
25
5
0
0
ho
o
u
u
r
r
s
s
Содержание 322001
Страница 7: ...5 5 ...
Страница 146: ...Right mirrors 1 14 44 4 Op pe er ra at ti in ng g in ns str ru uc cti io on ns s ...
Страница 172: ...1 170 Operating instructions Exhaust aftertreatment system ...
Страница 357: ...S Specifications Dimensions 355 ...
Страница 380: ...E EW160E 5 m Monoblock boom 3200 kg Counterweight Blade rear only V1110444 378 Specifications Lifting capacities ...
Страница 381: ...E EW160E 5 m Monoblock boom 3600 kg Counterweight Blade rear only V1110445 Specifications Lifting capacities 379 ...
Страница 386: ...E EW160E 5 1 m Two piece boom 3200 kg Counterweight Blade rear only V1110450 384 Specifications Lifting capacities ...
Страница 387: ...E EW160E 5 1 m Two piece boom 3600 kg Counterweight Blade rear only V1110451 Specifications Lifting capacities 385 ...
Страница 410: ......
Страница 413: ......
Страница 414: ...4 412 Alphabetical index Ref No 20052711 C Volvo Eskilstuna English ...


