background image

Wo r k i n g   w i t h   t h e   C B R   B i t s

26

9.4  Important notes on welding on the bits:


„

Start welding on the bits on the spot where the damage is deepest.


„

Do not make the intervals between the bits too large.


„

To avoid shunts when bits are welded on tightly, weld the bits on at an angle and then twist them up.


„

Where damage is deeper, leave the outer bits at an angle.


„

Align bits so that it is possible to slide in the pull rod.


„

In circular and curved areas, align the bits so that a straight pull rod can be inserted despite the curvature.

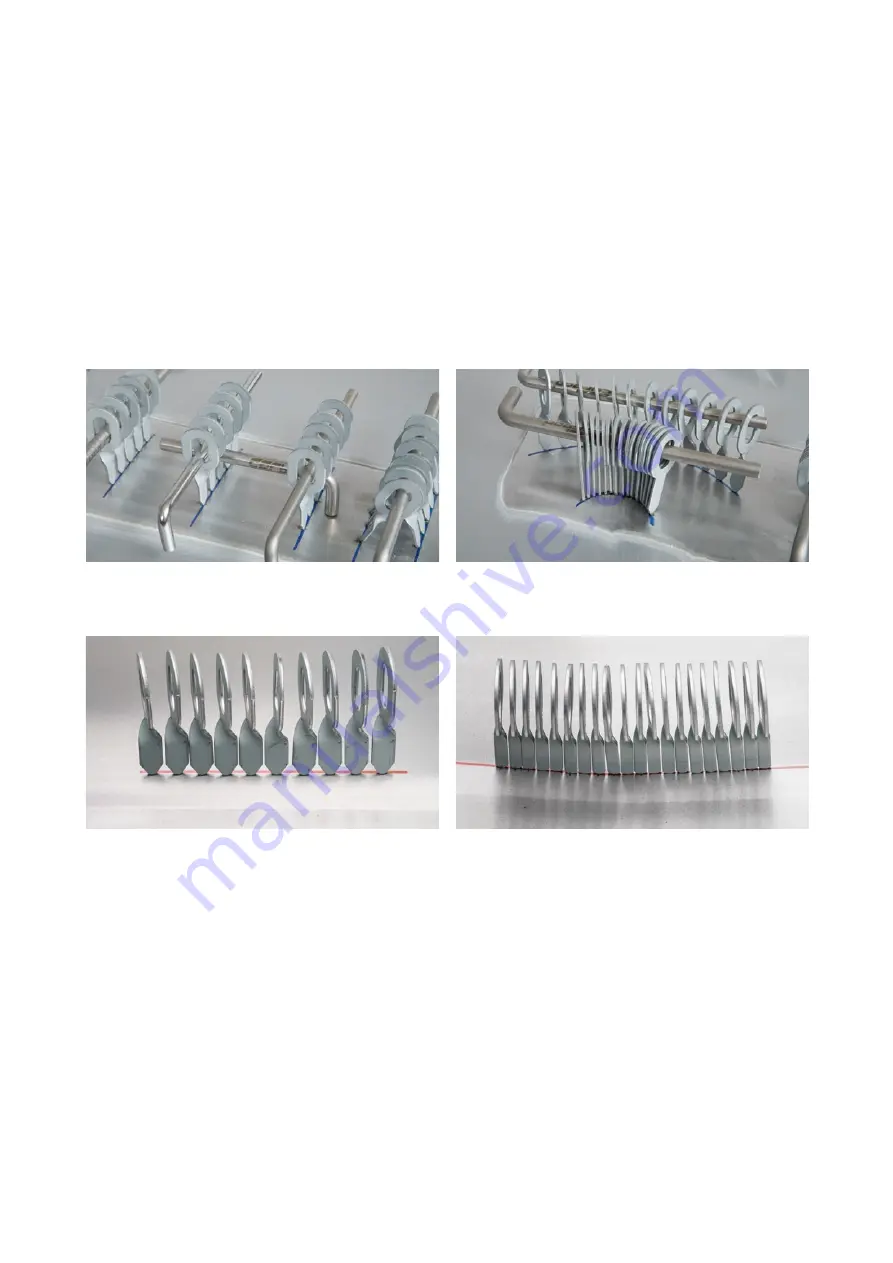
Arrangement of bits for two edges with wide distances

With a length of 10 cm there are 10 rotated bits.

For the same length we bring twice the amount: 
20 PowerBits

Arrangement of bits for circular and curved areas


In the area where the edge is stable, it is important to apply longitudinal welding to the edge. If you use the straight bits, 
this would result in a cross weld, which in turn would cause the edge to twist.

The contour of the rotated bits thus results in a weld of 10 bits over a length of 10 cm, as shown in the example above. 
However, because of the new geometry of our PowerBits, using these results in twice the number of bits being applied to 
the same length, thus creating a much higher pulling force without forming any holes.

Содержание VAS 6321 A

Страница 1: ...Usage Information VAS 6321 A...

Страница 2: ...me Keep the instructions for later use and pass this usage information on to other further users The dissemination or reproduction of these instructions or the re use or communication of its contents...

Страница 3: ...ccessories available for them This may result in deviations between this usage information and your product no claims can therefore be derived from the information illustrations and descriptions The d...

Страница 4: ...3 9 2 Welding on the bits with program 2 24 9 3 Useful and interesting facts about bits 25 9 4 Important notes on welding on the bits 26 9 5 The CBR pull rods 27 9 6 When to use which pull rods pull r...

Страница 5: ...n electrode 52 20 Thermal shrinking with aluminum sheets 53 20 1 Shrinking aluminum sheets 53 21 CBR aluminum hammers 54 21 1 The CBR aluminum hammers and plastic wedges 54 22 Creative approaches to d...

Страница 6: ...of qualified personnel is recommended when carrying out work with the VAS 6321 A Any persons working with the system must in any case have been made aware of the possible risks and must have read and...

Страница 7: ...t e g zinc lacquers sealing material anti drumming material etc To avoid poisoning it is essential to observe appropriate precautions such as good ventilation in the workplace or the wearing of respir...

Страница 8: ...e pulling and striking tools for possible damage damaged tools may no longer be used 2 2 Guarantee Please refer to our General Terms and Conditions for the scope of guarantee for our VAS 6321 A The gu...

Страница 9: ...ip 3 pole 6h 200 250V 2P This is connected to a 230V 50 60Hz DIN 60309 coupling socket 3 pole 6h 230V 2P with grounding located inside the VAS 6321 A trolley If operation of the PowerInverter outside...

Страница 10: ...hieved by experienced craftsmen who have received instruction and training in effecting repairs using resistance welding techniques a variety of straightening devices and glue technology Combining opt...

Страница 11: ...Ty pical damage 11 5 Typical damage Attachment parts as well as welded and bonded parts...

Страница 12: ...for EasyTool 4 Dent removal hammers Drawer for small parts set EasyTool connection cable Automatic MultiTool Connection cable 380 V Ground cable with clamp 5 System trolley 6 Manual MultiTool 9 BitCu...

Страница 13: ...sion for StrongTool with L foot 14 LeverTool Second pulling unit for LineTool 16 Stainless steel pulling electrode Aluminum pulling electrode 18 19 Carbon electrode Bit holding electrode Narrow Copper...

Страница 14: ...neTool 160 with pulling unit and double pull hooks two single and two double feet 7 VAS 6321 A 13 PowerInverter with MultiTool automatic and connection cable ground cable with ground clamp and connect...

Страница 15: ...21 A 1 and VAS 6321 A 7 16 VAS 6321 A 2 Enhancement extension for CBR StrongTool VAS 6312 A 4 17 CBR U B17 Stainless steel pulling electrode for aluminum sheets 18 CBR U B16 Aluminum pulling electrode...

Страница 16: ...CB R pu lli ng tools at a g lanc e 16 16 14 1 Second pulling unit with double hooks for LineTool CBR EasyTool CBR LeverTool 7 CBR pulling tools at a glance...

Страница 17: ...CB R pu lli ng tools at a glance 17 17 7 CBR LineTool 160 15 CBR StrongTool Enhancement extension for CBR StrongTool with L feet 13 CBR LineTool 100...

Страница 18: ...he PS and automatically set after the program is selected The predefined settings can be changed step by step and independently of each other with the buttons 11 14 or adapted to the respective condit...

Страница 19: ...ding process is triggered on contact with the bare surface or in manual mode welding process is triggered at the press of a button on the MultiTool Note that use of the PS in Manual mode requires the...

Страница 20: ...nsure the optimum safety conditions when carrying out any work on the body panels make sure that all zinc coatings are removed without leaving any residue 8 4 Welding on the ground clamp Plug the Mult...

Страница 21: ...round clamp directly to the ground bare edge Important If the edge is ground off on one side the fixed and not the moving part of the ground clamp should have contact with the panel otherwise faulty w...

Страница 22: ...e welding tip will be welded on Now carefully screw down the screw sleeve until the sleeve rests firmly on the bare panel Please note The welded on ground connections are only suitable for work where...

Страница 23: ...the sheet metal They are ideal for stable areas such as sills elbows and stable edges The rotated CBR Bits The rotated CBR Bits MB 3 are used for repairing light to medium damage to edges and contours...

Страница 24: ...cess for this you need the optional MultiTool with button and connection cable part number C1 06 Plug the MultiTool with connection cable into the corresponding socket AUTO or MANUAL on the VAS 6321 A...

Страница 25: ...t welding time prevents thermal overload and thus melting of the body panels High power allows strong spot welding of the bits to the body panel Because there is only low exposure to heat during weldi...

Страница 26: ...ent of bits for two edges with wide distances With a length of 10 cm there are 10 rotated bits For the same length we bring twice the amount 20 PowerBits Arrangement of bits for circular and curved ar...

Страница 27: ...available in two diameters 7 mm and 8 mm and in four different lengths For rigid deformations such as sills elbows etc choose the thicker 8 mm diameter pull rods The 7 mm diameter pull rods and in thi...

Страница 28: ...imension always start with position 1 for uncut bits ensure that the stop snaps back into place after twisting Insert straight bits flat rotated bits on edge and hold against stop Push the operating l...

Страница 29: ...bits should be recut after being welded on 4 5 times see section BitCutter If high force needs to be applied when straightening always use new or freshly recut bits Always recut bits together if poss...

Страница 30: ...ke it easy to use without tiring the user In addition it makes precise sensitive and fast reshaping of damage to the vehicle body possible Special features of the CBR StrongTool The pull levers engage...

Страница 31: ...ls the optionally available VAS 6321 A 2 enhancement extension is extremely helpful when using the StrongTool In this case too make sure that the support point is exactly in the center of the feet Dou...

Страница 32: ...4 32 11 2 CBR StrongTool enhancement set VAS 6321 A 2 Extension blade and small and large L feet The various individual parts allow many possible combinations thus in practice a suitable solution can...

Страница 33: ...ing with the StrongTool Important When working with the straight feet and supporting them on an edge it is essential to ensure that the support point is exactly in the center of the feet If the suppor...

Страница 34: ...user to repair large areas of damage especially on doors hoods side panels and body parts that are not alloyed to a higher strength The CBR LineTool is available in two lengths 1600 mm in the basic ve...

Страница 35: ...e option to pull at several points at the same time The individual elements of the double feet can be rotated as desired to provide perfect support on the body Here too different feet allow a wide ran...

Страница 36: ...ly in the center of the feet If the support point is outside the center of the feet they could break under high pulling forces due to the bending moment The feet may only ever be put under vertical pr...

Страница 37: ...nes correctly the LineTool hangs in the desired working position You can now effortlessly hook the pull hook into the pull rod The suction cups make it easier to work and secure the LineTool against u...

Страница 38: ...R Li n eTool VAS 632 1 A 6 an d VA S 63 2 1 A 7 38 The LineTool 160 with the pulling unit in combination with the glue technology The LineTool 100 with two additional pulling units in the hard sill ar...

Страница 39: ...reshaped surfaces Quick removal of damage from sideswipes Easy repair of hail damage and parking dents Shrinking of smaller irregularities in sheet metal Paintless dent removal in conjunction with th...

Страница 40: ...ep is to assess the site of the damage select the appropriate foot and attach it to the CBR EasyTool Then carry out the basic setting of the CBR EasyTool To do this first adjust the handles to the use...

Страница 41: ...ricate them with our High Tef Spray TEF 01 Using this setup the VAS 6321 A 13 also requires a secure ground connection to the vehicle body to achieve a good result Connect the cable to the VAS 6321 A...

Страница 42: ...he surface lightly and quickly Start by making 3 to 4 welds without pulling until some material builds up at the welding tip the weld will hold better and there will be less wear on the welding tip Do...

Страница 43: ...ce of the body panel upwards To detach the welding tip twist the handle of the spindle in the unloaded position Select the correct feet depending on the damage There is a total of ten different attach...

Страница 44: ...ve tool for repairing damage caused by sideswipes It is recommended that one foot should be fixed at a distance of 2 3 cm in the direction to be worked The other foot should be close to the welding ti...

Страница 45: ...ge does not allow the use of the StrongTool or LineTool The LeverTool can be used with both single and double feet When repairing larger and more difficult damage this tool can be used in addition to...

Страница 46: ...neTool the LeverTool cannot be locked into place under tension When using the StrongTool and LineTool for dent removal work the LeverTool is often an ideal extra tool for fast removal of eliminating a...

Страница 47: ...ller The CBR hand puller and the CBR slide hammer have proved to be useful additions to the VAS 6321 A These tools are mostly used when it is not possible to use the EasyTool Adjustment program 3 EASY...

Страница 48: ...s in sheet metal while simultaneously easing them out with the aluminum hammer Shrinking of small dents and dings in sheet metal Use of the CBR sliding puller Removal of small rigid dents when the dam...

Страница 49: ...oval and pulling work can be performed with the same tool which both saves time and keeps the impact of heat on the sheet metal very low Important Select program 4 With or without pulse depending on t...

Страница 50: ...on the PS Please note The MultiTool can get very hot during intensive shrinking we recommend the optionally available special MultiTool for shrinking C1 17 in this case Plug the copper electrode ball...

Страница 51: ...al Cool the heated sheet metal with a damp sponge Please note Do not make any changes e g by regrinding to the copper electrodes as their shape is specially calculated occasional cleaning with sandpap...

Страница 52: ...ool by pressing the fixing button at the front end of the MultiTool all the way in and pushing the electrode in as far as it will go Select program 4 Automatic on the PS and then touch the electrode t...

Страница 53: ...stem must be disconnected from the power source in accordance with the vehicle manufacturer s specifications before using the VAS 6321 A 13 Please note Machining and shrinking of aluminum sheets requi...

Страница 54: ...aces Application The hammers are mainly used to remove stresses in the surface and to stabilize edges Either the transverse or the longitudinal fin can be attached to stabilize edges depending on the...

Страница 55: ...ension is to remove the tension at the right time On the following pictures you can see different procedures A very efficient tool for this purpose is the L dent removal bracket with part no CSH 65 01...

Страница 56: ...Creative approach es to di f f e re nt re pai r me thods 56 22 Creative approaches to different repair methods...

Страница 57: ...Creat ive a pproach es to di ffe re nt re pa i r methods 57...

Страница 58: ...he damaged areas the glue is removed from the painted surface without leaving any residue 23 2 Glue technology with the EasyTool Unscrew the welding pull tip from the EasyTool and mount the pull bolt...

Страница 59: ...older on the left side of the VAS 6321 A trolley there is a punched out hexagon Plug the welding shrinking tip into the punched hole and loosen the nut behind it using a 17 mm open end wrench Twist of...

Страница 60: ...used in a similar way to the repair with welded on bits Special plastic pads are used for bonding with the surface The procedure for adhesion is the same as for repairing with bits With the StrongTool...

Страница 61: ...et Peel off the glue the pads are reusable Place pad on the surface press down and allow to cool To remove the pads allow some cleaner to act briefly in the edg To remove the pads apply a little clean...

Страница 62: ...CB R glu e tech nology VA S 632 1 A 9 62 24 2 Glue technology with the LineTool 24 3 Glue technology with the StrongTool 24 4 Glue technology with the LeverTool...

Страница 63: ...pull tabs of the GlueTech Plus is very effective It is possible to control the shrinking force very finely The procedure for applying the glue and placing the pull tab is identical to the CBR glue te...

Страница 64: ...cables on the cable holders provided Protect the PS against penetration by liquids and foreign bodies Final decommissioning We expressly point out that with termination of use disposal must be carrie...

Страница 65: ...state that the machine On d clare que la machine Die Maschine vom Tipo type type Typ Codice code code Code S N Tensione die ingresso Supply voltage Tension d alimentation Versorgungsspannung Potenza...

Страница 66: ...Notes 66 28 Notes...

Страница 67: ...Notes 67...

Страница 68: ...swagen Aktiengesellschaft Konzern Abteilung Brieffach 1848 2 38436 Wolfsburg Deutschland 2021 CARBON VAS 004 EN 6 2021 CARBON GmbH Haldenh fe 3 D 78253 Eigeltingen Heudorf Phone 49 7465 466 Fax 49 746...

Отзывы: