background image


Page 14


5. Single Master and Multi Master Modes  

There are two ways to make copies using the autoloader:  

Single Master Mode:


This mode  requires  that  a  single  master  disc  is  loaded  onto  the  hard  drive  prior  to  initiating  the 
duplication process. This mode is ideal if your job involves one or very few master disc(s).  

Multi Master Mode (Batch Mode):


This mode does not require you to manually pre-load your master onto the HDD. Simply place the 
master disc(s) on top of the corresponding stack of blank discs needed for that particular job. This 
mode is ideal if you have numerous master discs and fewer copies for each master disc.  

The Multi Master mode uses the Reserve partition to temporarily store the  content of the current 
master disc for duplication purpose. Once the task is complete and a new master disc has been 
detected, the reserve partition's content (of previous master disc) will be replaced with the content 
of the new master disc. 

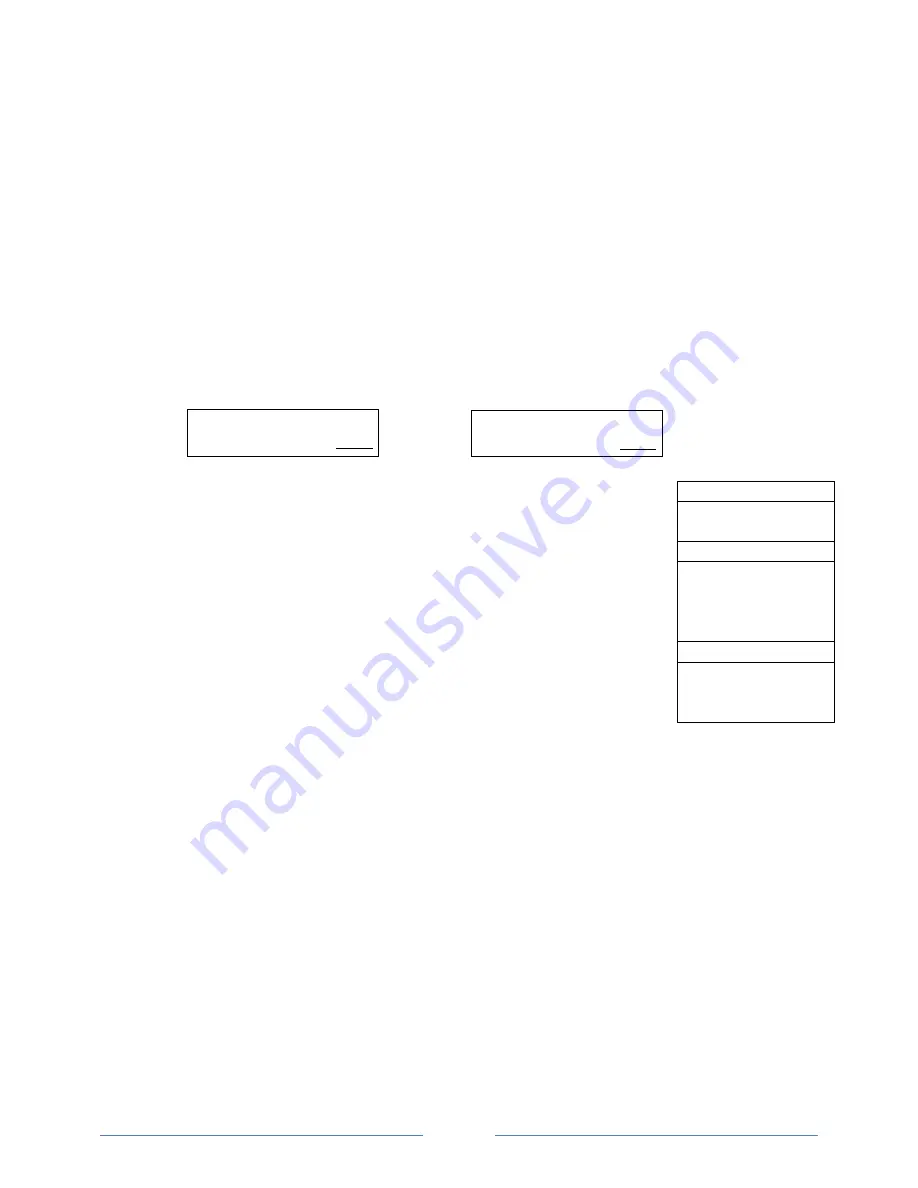
You can tell immediately which mode you are in by looking at any of the Copy or Test menus:  


The (SM) indicates Single Master Mode, and the (MM) indicates Multi Master Mode. 

For example, if you need to make:  

  20 copies of job A  

  40 copies of job B  

  30 copies of job C  

 
Under Multi Master Mode, you would need to follow the below steps: 

1.  Make sure all of the spindles are empty.  
2.  Place 30 blank discs for job C on to the first input spindle.  
3.  Place the master disc for job C on top of the stacked blank discs for job C.  
4.  Place 40 blank discs for job B on top of the master disc for job C.  
5.  Place the master disc for job B on top of the stacked blank discs for job B.  
6.  Place 20 blank discs for job A on top of the master disc for job B.  
7.  Place the master disc for job A on top of the stacked blank discs for Job A.  

 
After you have completed these steps, the Input Spindle should be loaded in the 
order shown in Figure 1-8: 
  
When you start the copy operation, the robotic arm will pick up discs from the Input Spindle and place them 
into  the  drives.  If  any  of  the  discs  in  the  drives  contains  data, (in  this  case,  that  would  be  the  first  disc, 
Master A), the autoloader will copy the entire content of this disc (Master A) onto the internal hard drive 
while simultaneously copying to all of the blank discs in the remaining writer drives.  

Once the copy process is completed, Master disc A and the successfully copied discs will be removed from 
the drives and dropped on to the Output Spindle. At the same time, the system will pick up the next discs 
from the input bin and place them in the corresponding writer drives. Then the copying process will start 
over again from the hard drive.   

If a new master is detected (in this case, it would be the Master B), the autoloader will complete the previous 
job, unload the copied discs, and fill the drive trays with blank discs for the next job. 

The robotic arm will continue to load media into the drives as the duplicated discs are placed in the Output 
Spindles. Once a drive (any drive) detects another Master disc, the same process is repeated for the new 
Master disc.  

Master A 
20 Blank discs for  
Master A 

Master B 
 
40  Blank  discs  for 
Master B 

Master C 
 
30  Blank  discs  for 
Master C 

Figure 1-8 
The Order of Discs 
in MM mode


Duplicator      2.00 
1. Copy         (SM) 

Duplicator      2.00 
1. Copy         (MM) 

Содержание ROBOTIC AUTOLOADER 3.5

Страница 1: ...User s Manual v3 5...

Страница 2: ...REOF OF A COPYRIGHT DISC IS STRICTLY PROHIBITED WE DISCOURAGE THE USE OF ANY SUCH ACTION THAT GIVES RISE TO CRIMINAL INTENT AND PROSECUTION THE SELLER OF THIS PRODUCT IS NOT RESPONSIBLE FOR ANY POTENT...

Страница 3: ...r Mode 17 1 2 Making Copies in Multi Master Mode 19 2 Test 22 3 Compare 22 4 Test Copy 23 5 Copy Compare 23 6 Select Burn Speed 24 7 Select Source 25 8 Master Mode 25 9 Erase 25 10 Hard Drive Setup 26...

Страница 4: ...re 35 13 Loader Utilities 36 13 1 Drive Alignment 36 13 2 Spindle Alignment 37 13 3 Disc Separator 37 13 4 Z form Maneuver 38 13 5 Robot Speed Mode Optional 38 13 6 Fast Boot up 38 13 7 Sticky Media D...

Страница 5: ...u Ray DVD disc to another double layer Blu Ray DVD recordable media but you cannot duplicate a single layer Blu Ray DVD disc to double layer Blu Ray DVD recordable media or vice versa Temperature Warn...

Страница 6: ...y treatment If you have experienced this kind of problem please do the following to remove the adhesive static between the discs Separate the blank discs before you place them into the autoloader s sp...

Страница 7: ...and not slanted at an angle to ensure the picking arm can securely grab the disc with all 3 vacuum suction heads Be sure to not load too many discs onto the spindle as well as this may cause errors in...

Страница 8: ...the blank discs you wish to copy and or print on Spindle 2 see figure 1 2 on page 3 for proper media stacking The robotic arm will pick blank discs from Spindle 2 then place the successfully copied pr...

Страница 9: ...s actual quantity varies depending on the media thickness Prior to starting a job make sure Spindle 1 is empty Stack the blank discs you wish to copy on Spindle 2 and 3 see Figure 1 2 on page 3 for pr...

Страница 10: ...for failed NG discs Stack the blank media you wish to copy on Spindle 1 and 2 see Figure 1 2 on page 3 for proper media stacking The robotic arm will pick blank discs from Spindle 1 first then place...

Страница 11: ...re 1 2 on page 3 for proper media stacking The robotic arm picks blank discs from Spindle 2 first and places the successful copied discs onto Spindle 1 Once Spindle 2 is empty it picks blank discs fro...

Страница 12: ...NT Enter Execute the function Also referred to as OK in the Menus ESC Escape Go back to the previous function Copy Copy Quick key to make a copy Pressing this key automatically performs the Copy job T...

Страница 13: ...nently erased 3 Compare page 22 Use the Compare function to perform a bit by bit comparison between the content of your master disc s in the Hard Drive and the contents of all discs it copied This ens...

Страница 14: ...ad error while reading the master disc all the duplication will be aborted and all the recordable media in the writers will be ruined However if you believe that your master disc has a small insignifi...

Страница 15: ...to bypass the capacity limitations of the media to burn further out onto the edge of the media This can result in slightly higher storage capacity however it has also been known to have compatibility...

Страница 16: ...ode menu option to adjust the robots movement speed for the disc loading and unloading process Safe Mode will provide better reliability and is recommended for overnight production Turbo Mode will pro...

Страница 17: ...which should be placed on top of the first Input Spindle instead of a preloaded master image on the HDD to all of the blank discs which follow it The benefit of this operation is to decrease the time...

Страница 18: ...C 5 Place the master disc for job B on top of the stacked blank discs for job B 6 Place 20 blank discs for job A on top of the master disc for job B 7 Place the master disc for job A on top of the sta...

Страница 19: ...ect you need to enter input a four digit number If you need to specify a number that is less than four digits fill the leading spaces with zeros any leading zeros will be skipped Examples of four digi...

Страница 20: ...w this example Press the Down button repeatedly until F is displayed You can also hold the Down button down and the autoloader will scroll through the alphabet Press the ENT Enter button once to move...

Страница 21: ...er Mode continue on to the next section If you are making copies in Multi Master Mode jump ahead to Making Copies in Multi Master Mode on page 19 1 1 Making Copies in Single Master Mode This process w...

Страница 22: ...this case the loader has taken a disc from the input spindle and is placing it into Drive 1 The loader will continue to remove discs from the input spindle and place those into drives until either all...

Страница 23: ...you will see a screen similar to below Drive 1 indicates the below results are for the 1 st drive OK 1 indicates there is 1 successful copy made by this drive NG 0 indicates there are 0 bad copies cre...

Страница 24: ...d in Single Master and Multi Master Modes on page 14 In general the order of the discs on the spindle will be from top to bottom The master disc for the first job The blank discs for the first job The...

Страница 25: ...ts you with the Input Bin Empty message Press the ENT Enter button to continue and you will see the Access Job Log screen You can press the ENT Enter button one more time to see the job log that indic...

Страница 26: ...are identical to original master disc s Note The bit by bit comparison will only apply on all Blu Ray Discs DVDs and Data CDs A readability check will be applied for other formats like Audio CDs CD G...

Страница 27: ...the Input Spindle and Press the ENT Enter button to continue If you have no more discs to compare press the ESC Escape button to terminate the operation 4 Test Copy With the Test Copy menu option the...

Страница 28: ...R RW Discs speed HDD to DVD Copy Hard Drive DVD Content to DVD R RW Discs HDD to BD Copy Hard Drive Blu Ray Content to BD R RE Discs Depending upon the type of duplication and your autoloader restric...

Страница 29: ...will return you back to the main menu 9 Erase Use the Erase menu to erase your Rewritable discs Use the Up or Down button to find the Erase menu Press the ENT Enter button on Erase to enter the menu a...

Страница 30: ...place the discs to be erased in the Input Spindle and Press the ENT Enter button to continue If you have no more discs to erase press the ESC Escape button to terminate the operation 10 Hard Drive Set...

Страница 31: ...te Existing Partition Load Auto Generate Edit Partition Name OK or This will Overwrite FUN VEF OK or System will automatically create a partition name NEW 0001 Enter a new partition name as described...

Страница 32: ...Up or Down button to navigate to the 5 Partition Info menu Press the ENT Enter button to enter the Partition Info menu and use the Up or Down button to find the partition that you want information abo...

Страница 33: ...r that menu Use the Up or Down button to select between the languages and press the ENT Enter button to select that option 11 2 Read Error Skip Normally when the autoloader encounters a read error whi...

Страница 34: ...format duplicating them at too high a speed can cause frequent errors like glitches and skips Use this setting to adjust the maximum duplication speed for Audio Video CD and CD G format to ensure reli...

Страница 35: ...screen saver will be displayed when your autoloader has been idle for a specific period of time Use the Up or Down buttons to select the Screen Saver menu and press the ENT Enter button to enter that...

Страница 36: ...er of the audio tracks that uniquely identifies the song in that audio track This ISRC code is commonly found in commercial Audio CDs and rarely seen on the home made Audio CDs By enabling this featur...

Страница 37: ...nu You can select numbers between 1 to 999 by pressing the Up or Down button To specify the number of maximum failures per job you need to enter input a three digit number If you need to specify a num...

Страница 38: ...21 twenty one The three digit value would be 021 To input the desired quantity do the following Make sure the cursor is located at the first position First blinking position Press the Down button repe...

Страница 39: ...will reset all of the options back to the manufacturer s default settings You should only perform this function if your autoloader is acting abnormally Use the Up or Down button to select the Load De...

Страница 40: ...ck a disc from the first input spindle move it to approx inch above the drive tray and hold it there You will see the Drive Alignment screen Check the alignment of the drive trays and press the ENT En...

Страница 41: ...y to lower the robotic arm to the mid point and check the alignment Once you are done press the ENT Enter button This will send you to the Alignment Next menu Warning This function is ONLY for checkin...

Страница 42: ...Robot Speed Mode Not available on all systems Use the Robot Speed Mode menu option to adjust the robots movement speed for the disc loading and unloading process Safe Mode will provide better reliabil...

Страница 43: ...ton to select that option 13 8 Robot Capacity For 100 200 Disc Capacity Models ONLY When a third spindle is installed the total disc capacity is increased by 100 discs creating a 200 disc capacity sys...

Страница 44: ...cense that allows you to create up to 32 users However if you desire to create more than 32 users please contact Tech Support Service regarding our special 64 user license pack To access the Manage Ac...

Страница 45: ...d automatically return you to the Manage Accounts menu 14 3 Edit User Info The Edit User Info menu allows you to change the existing user s account name and password During this process you will be as...

Страница 46: ...e the Up or Down button to scroll through the list of users Press the ENT Enter button to select the user to delete The autoloader will ask you to confirm the deletion Press the ENT Enter button to de...

Страница 47: ...below This information screen shows what is happening In this case the loader has taken a disc from the input spindle and is placing it into Drive 1 The loader will perform the loading process which...

Страница 48: ...T Enter button one more time to see the drive log that indicates the number of passes and fails for every drive tray or simply press the ESC Escape button to go back to the main menu If you choose to...

Страница 49: ...D player ROM to test the copied media Sometimes your BD DVD CD Player ROM may not be compatible with recordable BD DVD CD disc The failure rate is high Lower the write speed and try again See Select B...

Страница 50: ...vacuum picking arm and the spindle where the disc can be placed securely onto the spindle This error indicates that an obstruction missing component or mechanical failure has prevented the vacuum pick...

Страница 51: ...in after 3 continuous attempts R80 Disc Remaining On Robotic Arm Not Loaded On To The Drive Tray If error code 80 is shown it represents that a disc attempting to be placed on a drive tray remained at...

Страница 52: ...4 Short Philips Screws to fasten the bracket into place 2 on the side and 2 on top Note there are 3 pre drilled holes on Top of the base the 2 small screws will go into the outer holes leaving the cen...

Страница 53: ...tp www vinpowerdigital com TechnicalSupport FAQ FAQ asp If you cannot solve your problem our technical support staff will assist you if your unit is still covered under warranty In order to efficientl...

Отзывы: