background image

4.3. CONNECTING TO EXTERNAL DEVICES 

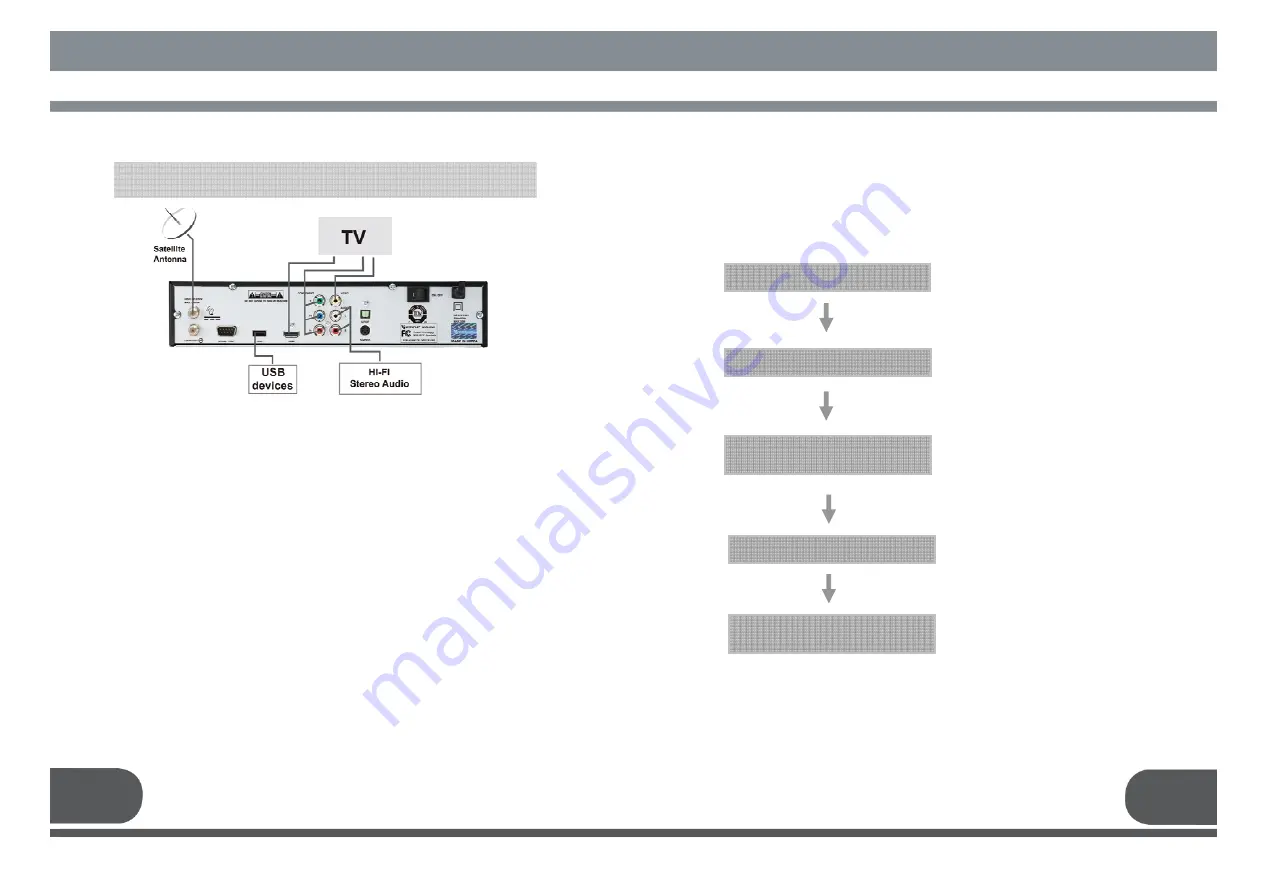
1) CONNECTING TO THE TV 

  After installing your antenna system, connect the coaxial cable. 

  To connect the receiver with your television, you can follow methods; 

Through RF cable, RCA cable, COMPONENT cable and S-Video cable. 

Connect the RF cable to the terminal marked “OUT TO TV” at the rear panel of the 

receiver and its other end to the TV RF input socket.


2) CONNECTING EXTERNAL Hi-Fi AUDIO SYSTEM 

To connect any external Audio Hi-Fi system, the receiver is provided with two RCA 

connectors at the back of the receiver, marked with “L” and “R” respectively to 

connect the left and right audio. 

3) CONNECTING TO THE OTHER SATELLITE RECEIVER 

Connect the satellite antenna cable to the “DISH IN” socket on the receiver. With 

other connector, connect the “LOOP OUT” socket on the receiver to the “DISH IN” 

socket of the other receiver.


4.1. LOCATION OF THE RECEIVER 

Your receiver should be placed under proper ventilation. 

Do not place the unit in enclosed cabinets that will restrict the flow of air, resulting 

overheating. 

The location should be safeguarded from direct sunlight, excess moisture, rough 

handling or household pets. 

Avoid stacking other electronic components on top of the receiver. 

The location should be safely accessible by the cable. 

   
4.2. CONNECTING TO THE ANTENNA 

After installing your Antenna system, connect the coaxial cable from LNB of your 

antenna to “DISH IN" terminal marked at the rear of the receiver.


All cable connectors should be finger tightened; do not use any kind of wrench on 

cable over connectors. 

The cable should be 75

 impedance coaxial twisted at the end with an “F” type 

connector. 

4. HOW TO CONNECT YOUR RECEIVER

Please DO NOT plug in the main power supply cord until you complete all the 
connections.

SYSTEM SET

-

 UP 

11

12

HOW TO CONNECT YOUR RECEIVER 

5. SYSTEM SET- UP

5.1. Automatic Channel Search 
 

You can automatically detect and save all TV and radio 
channels as follows : 

 Connect the receiver to all peripheral 

devices. 


 Turn on the power of the receiver and 

other devices. 


 Select Main Menu / Installation / 

Antenna Setup using CH (

·

& OK 

keys. 

 Insert all information of your antenna. 


System Connection


Power On


Main Menu / Installation / 

Antenna Setup


Automatic Configuration Setting

 Select the satellite which you want to 

search using VOL (

◀.▶

)

 keys. 


 Press OK key, and the receiver will 

automatically search for all TV/Radio 
channels from a satellite. 


Main Menu / Installation / Auto 

Scan 

Содержание VSMAXHD

Страница 1: ......

Страница 2: ...HANNEL GUIDE 7 9 AUDIO 7 10 ZOOM FUNCTION 7 11 MULTI PICTURE 7 12 SLEEP TIMER 7 13 FIND CHANNEL 7 14 ADDITIONAL SETTING 7 15 HOW TO USE USB 8 HOW TO RECORD PLAYBACK 8 1 QUICK RECORD 8 2 PLAYBACK 9 TRO...

Страница 3: ...3 4 IMPORTANT SAFETY INSTRUCTION DECLEARATION OF CONFORMITY...

Страница 4: ...eater Never stack other electronic equipment on top of the receiver Place the receiver at least 30mm from the wall ATTACHMENTS Do not use any attachment that is not recommended by the manufacturer as...

Страница 5: ...TURES Fully MPEG 2 DVB S2 Compliant Input frequency 950 2150 MHz Supports EPG PIG Supports SCPC MCPC from C Ku band 1 LNB Input Tuner with Loop Through IF Signal Tuner Symbol Rate 1 45MS s Fast bootin...

Страница 6: ...serial cable This port can be used for upgrading software 4 USB HOST PORT This is used to connect your USB Device to your receiver Either front side USB port or rear side must be selected in the menu...

Страница 7: ...ure rough handling or household pets Avoid stacking other electronic components on top of the receiver The location should be safely accessible by the cable 4 2 CONNECTING TO THE ANTENNA After install...

Страница 8: ...n Channel Scan Antenna Configuration Setting Select Menu Installation Channel Scan Insert all information of your antenna Manual Channel Search Select the transponder from the transponder list you wan...

Страница 9: ...r Setting menu and the following screen will be displayed 1 USER SETTING This menu helps you to set up System Select User Setting menu in Main Menu and will be asked to enter your PIN Code 1 B TIME SE...

Страница 10: ...r your PIN code You can find the following Edit Channels screen by entering it 2 A 1 Channel Lock Select the LOCK icon using the left right keys Select the channel that you want to lock or unlock from...

Страница 11: ...oose TV channel list or Radio channal list in an alternative way by pressing the key on the RCU By pressing FAV key on the RCU you can choose your favorite channel group out of 8 favorite groups Selec...

Страница 12: ...he USB flash drive to USB port in a receiver Go to System Information then select Receiver Upgrade Select USB and press OK button Select the firmware upgrade file and press OK When file transfer is co...

Страница 13: ...e existing transponder Refer to the Channel Scan described in section 4 B LNB Power LNB Type LNB Freq 22KHz DiSEqC 1 0 Motor Depending on the user s antenna LNB you can supply either LNB power by sett...

Страница 14: ...put the frequency of the transponder you want to find manually Inputs the symbol rate of the transponder you want to find Select the polarization of the transponder you want to find In the case of hor...

Страница 15: ...ou to delete all data in USB device Note If you do not practice this remove menu before removing your USB device the device might not be recognized next time 5 B DVR You can play the recorded file in...

Страница 16: ...s OK key and the following screen will be displayed You can get information of channel number channel name and whether the program is scrambled or locked To watch a specific channel first select it by...

Страница 17: ...keys and push the Save button by using up down keys and OK key You can seek the channel with the channel s name Select by using the Down button after pressing F4 on the live screen You can move the k...

Страница 18: ...1 QUICK RECORD Note If recording time is less than 30 seconds the event will not be saved This is to avoid the unexpected start of recording 8 1 1 Quick Record Push the key And the current channel wil...

Страница 19: ...u Problem Solution About the Receiver On Screen Error Messages Does not display LED on the front panel or the receiver has no power No pictures on the screen No sound Remote Control does not operate P...

Страница 20: ...KHz Amplitude 0 7 0 2V Version 1 0 1 2 Compatible USALS compatible Transport Stream Profiles and levels Compressed data input Input Rate Video Formats Video Output Video Resolution VIDEO DECODER MPEG...

Страница 21: ...39 40 11 PROGRAMING THE REMOTE CONTROL PROGRAMING THE REMOTE CONTROL...

Страница 22: ...41 42...

Страница 23: ...43 12 WARRANTY CARD WARRANTY CARD 44...

Отзывы: