background image

26

27

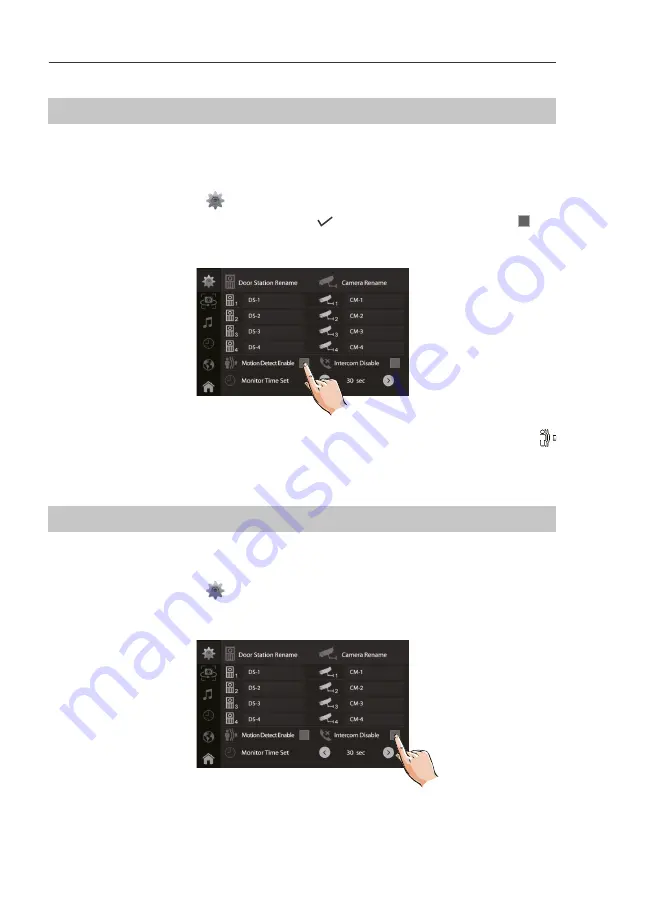
Enabling/Disabling motion detect function

Enabling/Disabling intercom function

You can make it possible (ENABLE) or not (DISABLE) to activate motion d

  e

  tect function from 

this monitor.

1.On main menu page, touch

settings icon ->

[More...]

.

2.Click 

Motion Detect Enable 

setting item,when “ 

 “ symbol is displayed in the frame 

 , the 

setting is activated.Click the item again to cancel.

You can enable or disable intercom function from this monitor.

1.On main menu page, touch

settings icon ->

[More...]

.

2.If select 

Intercom Disable

 item,the intercom function is forbidden.

*If this setting item has not been selected, the motion detect function is forbidden, and the 

Montion detect

 icon 


will not  display on main menu page.

*In default setting, intercom function is enable for the monitor.

SETUP INSTRUCTIONS

SETUP INSTRUCTIONS

The  default language can  be customized.But  you cac

nh

  ange it to  the  language  you need  at 

any time. Follow the steps:

• On main menu page, touch

settings icon ->

[Language]

.

• Touch desired language and select 

 to save the setting. 

The restore to default function allows the user to recover the settings to factory setting.

•  On main menu page, touch

settings icon ->

[About]

.

•  Touch 

 icon, a message of "Restore To Default?" will be asked.

•  Touch  

  icon to start the restore. T

ouch 

 icon to cancel.

*If the target language is not found in the window, touch  

 / 

 icon to scroll next page.

* Touch 

[Logo] 

icon to enter 

About

 page in shortcut.

* If restoring to default is completed,a sound beep will be sent out.

Changing the language

Restoring to default setting

Language

English

Turkish

Greek

Hebrew

Spanish

French

About


Local Address                       

 00.00

Video Standard                     


AUTO

System Verson                      

00.01.00

Display Driver                       

 1.0

Font                       

                1.0

UI                       

                    1.0

Logo icon

Содержание duo M1021

Страница 1: ...duo 2 wire system video door intercom M1021 W 20170627 USER S MANUAL 7 VIDEO HANDS FREE COLOR TFT MONITOR...

Страница 2: ...itor is equipped with a graphical on screen menu which lets you to control all the features available it also displays the date and time When the right module is connected you can control lighting par...

Страница 3: ...Transferring call 18 Setting divert number 19 Viewing calling records 19 SMS function 20 Openning staircase light 21 Motion detect function 22 Setup instructions 23 Setting date and time 23 Setting r...

Страница 4: ...3 Message indicator Light up when the monitor has missed call 4 Unlock button Press to release the door 5 Talk Mon button Press to communicate hands free with visitor Press to view the outdoor condit...

Страница 5: ...IONS Terminal description Mounting screw x 2 included The unit Mounting box size 86x86mm Mounting bracket 2 wire cable 1 2 3 4 5 6 ON DIP L2 L1 DIP Switches SW SW RING GND NC 1 2 3 4 5 6 ON DIP L1 L2...

Страница 6: ...h it to light up the staircase light via B5 MOTION DETECT Touch it to enter motion detect options MONITOR Touch it to view outdoor condition SMS Touch it to write messages or review the received sent...

Страница 7: ...images videos and adjust screen volume are available More details please refer to the following descriptions It s available to select cameras to monitor while being called Max 16 cameras can be selec...

Страница 8: ...tions calling is forbidden Conclude current talking to answer the new call in The talking will stop immediately call tone sounds in normal The video image from the door station is displayed on the scr...

Страница 9: ...re are some examples Touch icon to zoom the center position Note 1 The zoom pantilt function should make e ective with sh eye door station 2 The edge of pantilt image will not be displayed When an ima...

Страница 10: ...Volume can be adjusted at any time Adjusting range 0 mute 1 9 Adjust the contrast of the screen the range is 0 9 Touch or to change the level Adjust the brightness of the screen the range is 0 9 Touc...

Страница 11: ...ng on the addressing method Internal non addressed intercom systems for up to 4 internal units and multi user systems In order to make such a connection you need to set the same address on all your mo...

Страница 12: ...ages can be viewed but audio cannot be heard If there is a visitor at the entrance touch icon on screen to begin communication with door station You can install up to 13 indoor units at one house only...

Страница 13: ...ages image scale bright color contrast Door release Volume control Manual recording Videos and images are possible to be recorded both automatic recording and manual record ing are available 00 10 DS...

Страница 14: ...formed during automatic recording Viewing images videos The recorded images videos can be playback on monitor Follow the steps On main menu page touch Media Graphics Playback icon most recent recordin...

Страница 15: ...s or folders exceed the limit of micro SD card they cannot be copied The images on the micro SD card cannot be copied into the built in memory If copied is fail try to format the SD card on the monito...

Страница 16: ...he system will prompt visitor to leave a voice message immediately Leave a Message If No Answer If you select this mode door station calls indr oo monitor rst if nobody answers the call within 30 seco...

Страница 17: ...form immediately if selected and the status bar on main menu page will show icon Touch icon on the screen to exit BASIC OPERATIONS You can review who is visiting at some time 1 Touch one of the visiti...

Страница 18: ...he steps to activate this function 00 10 DS 1 00 10 DS 1 Call Scenario Normal Do Not Disturb Leave a Message Immediately Leave a Message If No Answer Divert Simultaneously Divert If No Answer 2 Divert...

Страница 19: ...Numbers Tel 1 Tel 2 Tel 3 Inform Divert Phone Viewing calling records All calls from door station or other monitors will be recorded and can be reviewed afterwards On main menu page touch Call Record...

Страница 20: ...ed on monitor and you can write messages between monitors 1 Reviewing received messages On main menu page touch SMS Inbox icon the most recent received messages will be displayed Select one of the mes...

Страница 21: ...he last character Press to send the SMS Exit current page 02 abc Enter key Space key Insert a space Move the cursor Opening staircase light BASIC OPERATIONS Note The staircase light should be connecte...

Страница 22: ...Detection o close all motion detections of door station Detection on activate the motion detect function the door station motion detection should be activated individually Detection once respond motio...

Страница 23: ...e settings The ring call tone can be set individually to distinguish di erent calling sources Total 20 tones can be selected 1 On main menu page touch settings icon Sounds 2 Touch the setting target o...

Страница 24: ...the screen 1 On main menu page touch settings icon Sounds 2 Click Touch Key Sound On setting item when symbol is displayed in the frame the setting is activated Click the item again to cancel Note 1...

Страница 25: ...tem 3 Touch icon to adjust the levels Settings will perform immediately Current renamed door station Current name is displayed here Switch the keypad between alphabet and numbers Keypad type abc Alpha...

Страница 26: ...displayed in the frame the setting is activated Click the item again to cancel You can enable or disable intercom function from this monitor 1 On main menu page touch settings icon More 2 If select I...

Страница 27: ...ouch settings icon About Touch icon a message of Restore To Default will be asked Touch icon to start the restore Touch icon to cancel If the target language is not found in the window touch icon to s...

Страница 28: ...Format SD Card INSTALLER SETUP 123 _ OK Help Menu OK Address Setting Menu Code Setting Item Code Setting Item 2412 Reset to Default Setting 8018 8020 Video Display Standard 2499 Format Memory 8040 80...

Страница 29: ...as nlave monitors will ring at the same time and just the master monitor can display the image while the slave monitors will not But the settings can be changed you can set the master monitor and all...

Страница 30: ...6 ON DIP 1 2 3 4 5 6 ON DIP When monitor is not at the end of bus line When monitor is at the end of bus line Bit 6 switch setting Setting user code In the building system you can con gure up to 32 ap...

Страница 31: ...efer to the section of Setting Slave Monitor 1 On Address setting page select Manual Input Address setting mode then touch icon a keypad will be displayed 2 Input the code by touching the digital numb...

Страница 32: ...esolutions 800 3 R G B x 480 pixels Video signal 1Vp p 75 CCIR standard Mounting Surface wall mount Color White Black Wiring 2 wires non polarity Dimension 132 H 226 W 18 D mm Memory card micro SD max...

Страница 33: ...g instructions the product has been used or left in improper conditions excessive humidity too high or low temperature sunlight etc maintenance and operational condition which are di erent from the on...

Страница 34: ...Firma Handlowa Wena Al Jerozolimskie 311 05 816 Regu y near Warsaw Poland tel 48 228 370 286 48 228 174 008 e mail biuro vidos pl www vidos pl...

Отзывы: