background image

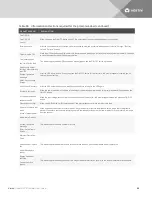
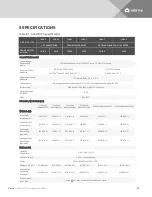
UNIT SIZE, TYPE

10 BAY

16 BAY

12 BAY

16 BAY

10 BAY

16 BAY

NO TRANSFORMER

TRANSFORMER-BASED

NO TRANSFORMER DUAL INVERTER

FRAME RATING,
KVA/KW

15/13.5

20/18

15/13.5

20/18

15/13.5

20/18

Input Data

Nominal Input
Voltage,
VAC

200/208/220/230/240; Single-Phase

200/100, 220/110, 230/115, 240/120, 254/127, 208/120,

173/100, 190/110, 200/115, 220/127; Two-Phase

380/400/415; Three-Phase

Input Voltage Range

The input voltage range based on the output loading, refer to Table 8.2 on the facing page

Power Factor, Cos

Single-Phase Input, > 0.99;

Three-phase Input, > 0.95

Single-Phase Input, > 0.99

Input Frequency,
Nominal

50/60Hz

Input Current
Distortion, THDi

< 5%

Input Frequency
Range

40 to 70Hz, auto-sensing

Battery Module

Lead-Acid Batteries
Per String

12

Battery Cells Per
String

72

Battery Capacity

36W @ 15min-rate to 1.67V per cell @25

°C (77°F)

Backup Time, Full
Load

5 (for non-redundant system which has equal number of battery strings and power modules)

Maximum Charge
Current
(Full, Load)

Power module internal charger: 1.8A

Charger module: 10A

Nominal Voltage

144 VDC

Recharge Timer

< 5 Hr. to 90% capacity (PM internal charger with 1:1 ratio of PM to Battery Strings)

Output Data

Output Voltage,
VAC

200/208/220/230/240

Single-Phase

100/100/173/200

110/110/190/220

115/115/199/230

120/120/208/240

Single-Phase

200/100, 220/110, 230/115, 240/120, 254/127, 208/120,

173/100, 190/110, 200/115, 220/127; Two-Phase

Voltage Regulation

±3%

Voltage Stability
(100% Step Load)

±7%

Voltage Recovery
Time

≤ 60 ms

Voltage Distortion

≤ 3%, linear load

≤ 5%, non-linear load

≤ 7%, non-linear load

≤ 5%, non-linear load

Output Frequency

50/60 Hz

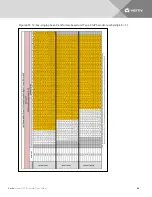
Table 8.1  Liebert APS specifications (continued)

Vertiv

| Liebert® APS™ Installer/User Guide |

82

Содержание Liebert APS series

Страница 1: ...Liebert APS 5 20 kVA Modular UPS Installer User Guide...

Страница 2: ...any installation or operational issues with your product check the pertinent section of this manual to see if the issue can be resolved by following outlined procedures For additional assistance visi...

Страница 3: ...emoving the UPS from the Pallet 23 3 5 Installing the UPS 24 3 5 1 Tower Installation 25 3 5 2 Rack Installation 26 3 6 Installing Modules 29 3 6 1 Installing Power Battery and Charger Modules 29 3 6...

Страница 4: ...s 57 5 2 Audible Alarms 58 5 2 1 Control Buttons 58 5 3 LCD Screen and Menu Buttons 59 5 3 1 Start up Screen 59 5 3 2 Main Screen 59 5 3 3 Default Screen Screen Saver 65 5 3 4 Screen Views 65 5 3 5 En...

Страница 5: ...3 AS2 or ASB 89 8 3 Estimated Battery Run Times Model number Digits 1 to 3 AS3 or ASC 93 8 4 Estimated Battery Run Times Model number Digits 1 to 3 AS4 or ASD 97 8 5 Estimated Battery Run Times Model...

Страница 6: ...Vertiv Liebert APS Installer User Guide 6...

Страница 7: ...use equipment damage injury and death A battery can present a risk of electrical shock and high short circuit current The following precautions must be observed before replacing the battery pack Wear...

Страница 8: ...ee from moisture flammable liquids gases and corrosive substances Do not continue to use the Liebert APS if the front panel indications are not in accordance with these operating instructions or the p...

Страница 9: ...r disposal provisions to reduce the environmental impact of waste electrical and electronic equipment WEEE For information regarding the disposing of this equipment visit www VertivCo com or contact V...

Страница 10: ...Vertiv Liebert APS Installer User Guide 10 This page intentionally left blank...

Страница 11: ...attery modules you can expand your current system capacity extend your back up runtime or provide redundancy The user interface lets you configure the operation according to application requirements I...

Страница 12: ...Power input and output terminals 3 Bays for battery modules 10 Output breaker 4 Bays for power charger or battery modules 11 External batter cabinet connector 5 Input breaker under cover 12 POD ports...

Страница 13: ...switch 3 User interface module 11 Output breaker 4 System control module under cover 12 External batter cabinet connector 5 Bays for battery modules 13 POD ports 6 Bays for power charger or battery m...

Страница 14: ...nnector 3 User interface module 12 Input breaker 4 System control module under cover 13 Power input and output terminals 5 Fans 14 Output breaker 6 Manual bypass breaker 15 POD ports 7 Bays for batter...

Страница 15: ...nector 3 User interface module 12 Input breaker 4 System control module under cover 13 Power input and output terminals 5 Fans 14 Output breaker 6 Manual bypass breaker 15 POD ports 7 Bays for battery...

Страница 16: ...ontacts Liebert IntelliSlot communication ports USB port 2 3 Major Components This section provides a general description of each component and its functions Please review this section carefully as it...

Страница 17: ...r Interface Module The user interface module shown in Figure 2 6 on the next page is the primary source of communication between the UPS and the user The user interface module lets you View the UPS st...

Страница 18: ...w fault LED is Off For any other condition refer to Troubleshooting on page 69 Figure 2 7 Example of system control and system monitor module ITEM DESCRIPTION ITEM DESCRIPTION 1 Status LED green 4 Sec...

Страница 19: ...ttery module in the event of a battery failure The battery strings are connected in parallel to provide back up time and or redundancy NOTE Two battery modules must be installed in the same row to mak...

Страница 20: ...or connected equipment Figure 2 10 Charger module ITEM DESCRIPTION 1 Locking Lever 2 Status LED green 3 Fault LED yellow 2 3 7 External Battery Cabinet EBC The external battery cabinet shown in Figur...

Страница 21: ...ure 2 12 below The UPS is composed of AC input EMI filter power module s battery module s user interface control interface system control module output and bypass contactor manual bypass output transf...

Страница 22: ...terrupted during the failure or restoration of the AC utility mains source 2 5 3 Auto Restart Mode After a power outage and complete battery discharge and once AC utility is restored the UPS automatic...

Страница 23: ...the Liebert APS when deciding where to install the unit Verify that the floor can support the weight of a fully loaded unit with any accessories and external cabinets The UPS is air cooled by internal...

Страница 24: ...in Figure 3 2 below and roll the UPS slowly down the ramp until it is on a level surface Figure 3 2 Connect the ramp and roll UPS off the pallet 3 5 Installing the UPS The Liebert APS may be installe...

Страница 25: ...in Figure 3 3 below a Use an open end wrench to turn the lower nut to raise or lower the leveling foot b After the unit is level tighten the upper nut against the frame to prevent the height from cha...

Страница 26: ...ts to the floor with the mounting bolts in the drilled holes For greater stability use a higher grade bolt Figure 3 4 Dimension location of drilled holes for stationary mounting 3 5 2 Rack Installatio...

Страница 27: ...re 3 5 below Figure 3 5 Install cage nuts and tray ITEM DESCRIPTION 1 Cage nut 2 Screw 16 places 3 Tray 3 Install the guide rails ramp in the mounting slot at the front of the tray as shown in Figure...

Страница 28: ...installing through the front of the rack 6 Using 8 panel screws 4 in each bracket secure the UPS frame to the rack posts NOTE You may need to adjust the leveling feet to align the holes 7 Use 4 screw...

Страница 29: ...same row to complete the battery string 2 Refering to Figure 3 9 below slowly push the module until about 1 3 of the module is in the bay 3 Lift the module up then continue pushing until about 5 cm 2...

Страница 30: ...shown in Lock lever and module securing bracket on page 30 6 Replace the plastic bezels Figure 3 10 Lock lever and module securing bracket ITEM DESCRIPTION 1 Install module securing bracket 2 Pull out...

Страница 31: ...odule at the same time will cause the UPS to shut down and remove power from the load Replace these modules one at a time 1 Remove the display bezel and the user interface LCD module from the frame as...

Страница 32: ...tempting to install wiring to this unit This UPS cables should be connected by a properly trained and qualified electrician Refer to the unit model number in Table 3 1 below to determine the instructi...

Страница 33: ...XIMUM SYSTEM RATED LOAD INPUT VOLTAGE 220VAC INPUT VOLTAGE 230VAC INPUT VOLTAGE 240VAC MAXIMUM CURRENT IN UPS MODE RECOMMENDED INPUT PROTECTION CIRCUIT BREAKER MAXIMUM CURRENT IN UPS MODE RECOMMENDED...

Страница 34: ...ly secure the conduit of the input output cables through the cable bridges on the rear panel of the UPS see Figure 3 14 below Figure 3 14 Secure cables on cable bridges ITEM DESCRIPTION 1 Cable bridge...

Страница 35: ...NOMINAL FREQUENCY INPUT TERMINAL BLOCK OUTPUT TERMINAL BLOCK 1 2 3 4 PE 2 PE 200 60 L1 L1 L1 L2 GND L1 L2 GND 208 60 L1 L1 L1 L2 GND L1 L2 GND 220 60 L1 L1 L1 L2 GND L1 L2 GND Table 3 4 Key to Figure...

Страница 36: ...recommend that the AC input supply be protected with a circuit breaker capable of withstanding this initial inrush the MCB is derated according to the D curve or TYPE 4 This UPS is fitted with EMI fi...

Страница 37: ...R MAXIMUM CURRENT IN UPS MODE RECOMMENDED INPUT PROTECTION CIRCUIT BREAKER MAXIMUM CURRENT IN UPS MODE RECOMMENDED INPUT PROTECTION CIRCUIT BREAKER 5kVA 25A 50A 24A 50A 23A 50A 10kVA 49A 63A 47A 63A 4...

Страница 38: ...Figure 3 17 Setting bypass voltage jumper default 208VAC Figure 3 18 Setting bypass voltage jumper 200 220 230 240VAC Vertiv Liebert APS Installer User Guide 38...

Страница 39: ...tions Figure 3 19 Configuring the neutral earth jumper Connecting the Cables NOTE Input and output cables must be run in separate conduit before cable connection 1 Remove the knockouts at the junction...

Страница 40: ...6 on page 37 for configuring the output cable For standard voltages make the connections shown in Table 3 8 on the facing page SYSTEM VOLTAGE SYSTEM NOMINAL FREQUENCY INPUT TERMINAL BLOCK 1 2 PE 200...

Страница 41: ...former based UPS 7 5 7 5 15 15 Table 3 9 Maximum load capacity of the output winding 3 7 3 Connecting Cables on a Transformer free UPS with Dual Inverter Frames A junction box is factory installed on...

Страница 42: ...al Inverter frames 50 60 Hz continued MAXIMUM SYSTEM RATED LOAD INPUT VOLTAGE 220 110VAC INPUT VOLTAGE 230 115VAC INPUT VOLTAGE 220 127VAC MAXIMUM CURRENT IN UPS MODE RECOMMENDED INPUT PROTECTION CIRC...

Страница 43: ...minal of the power input and output terminals 3 Using a 13 mm 1 2 in torque wrench tighten the screws to 4 52 Nm 40 in lb 4 Respectively secure the conduit of the input output cables through the cable...

Страница 44: ...ure 3 25 on the facing page or Figure 3 26 on page 46 Depending on whether or not the UPS has a transformer Choose the connection point with the easiest access and that applies the least amount of str...

Страница 45: ...e set correctly according to Table 3 12 on page 47 7 Close the EBC DC circuit breaker and replace the bezels back onto the EBC WARNING Risk of hazardous voltage between UPS frames Can cause damage to...

Страница 46: ...26 Connecting external battery cabinet transformer based UPS ITEM DESCRIPTION ITEM DESCRIPTION 1 Liebert APS 3 Communication cable 2 Battery cabinet 4 Battery cable Vertiv Liebert APS Installer User...

Страница 47: ...AL BATTERY CABINET NUMBER DIP SWITCH SETTING 1 2 EBC 1 Down Down EBC 2 UP Down EBC 3 Down UP EBC 4 UP UP On the DIP switch Down is On and Up is Off Table 3 12 EBC DIP switch settings 3 9 Connecting In...

Страница 48: ...ms verify that the DC power and communication cables are connected properly and that all connections are tight 3 Measure and record the AC input voltage and frequency These are required to properly co...

Страница 49: ...ble switch on the rear of the unit protected by a clear plastic cover and turn it On 3 Locate the Battery Start push button on either of the two control modules then press and hold this button for 5 s...

Страница 50: ...Vertiv Liebert APS Installer User Guide 50 This page intentionally left blank...

Страница 51: ...the USB port may be used at the same time Figure 4 1 Liebert IntelliSlot communication port location ITEM DESCRIPTION 1 IntelliSlot ports 4 1 1 Liebert IntelliSlot Unity Cards IS UNITY LIFE is standar...

Страница 52: ...ing battery cabinets 4 2 Dry contact Ports Figure 2 1 on page 12 shows the location of the dry contact ports Figure 4 2 Pin layout of the dry contacts POSITION NAME DESCRIPTION 1 Battery Mode Output d...

Страница 53: ...Settings to set the delay time for the UPS shutdown after the dry contact is closed Enabling the feature on the LCD enables both shutdown methods 4 3 REPO Remote Emergency Power Off WARNING Risk of e...

Страница 54: ...stalled between Pins 9 and 10 to disable the Main Control Switch which prevents the UPS from being started accidentally during shipment and installation This jumper must be removed before the unit can...

Страница 55: ...ure Liebert MultiLink can configured to shut down the UPS and can also be used without the USB cable when the Liebert IntelliSlot UNITY DP SNMP Card is installed in the UPS An optional Liebert MultiLi...

Страница 56: ...port LCD port is used for power supply and communication of the user interface module Other network ports and the USB port are reserved for use only by customer service personnel Figure 4 6 LCD port I...

Страница 57: ...ence button 2 Output LED 7 Menu buttons 3 LCD screen 8 Battery LED 4 On Off button 9 AC LED 5 Fault LED 10 Inverter LED 5 1 Mimic LEDs The mimic power flow LEDs indicate current operating state of the...

Страница 58: ...en The UPS internal manual bypass is supplying output power On red The UPS has output overload Off The UPS does not have output power Fault LED On yellow The UPS has an alarm or alarms On red The UPS...

Страница 59: ...rmation of the UPS You also can perform relevant function parameter settings and control operations BUTTON F1 F2 F3 F4 F5 Function 1 Function 2 Table 5 4 Function descriptions of menu button 5 3 1 Sta...

Страница 60: ...ton Menu Window and Data Window The menu window shows the menu name and navigates to menu items Each menu item displays a set of data in the data window You can browse the relevant parameters of the U...

Страница 61: ...kW Output active power Load Level Output loading indicated in percentage of the UPS system rated load Crest Factor Output current peak value factor UPS Info UPS ID UPS ID LCD Module If the module is o...

Страница 62: ...tocol Because the slot 2 and the serial port on the rear panel cannot work at the same time you must select one of them to work If INTERFACE2 is selected the slot 2 can communicate if RS232 is selecte...

Страница 63: ...ry values Battery settings Low battery Warning Sets the battery low voltage alarm time Automatic Battery Test Interval Sets the interval for the automatic battery test Intervals of 8 12 16 20 26 weeks...

Страница 64: ...service personnel to set the UPS address to facilitate maintenance Tag Number Allows customer service personnel to set the UPS tag to facilitate maintenance Company Name Allows customer service person...

Страница 65: ...of the F2 F3 and F4 buttons from the primary functions to the secondary functions described in Table 5 4 on page 59 The battery screen displays Battery voltage Battery current Battery time remaining...

Страница 66: ...on to prompt a password window to pop up After you enter the correct password the function of the F2 F3 and F4 buttons switch from the primary functions to the secondary functions described in Table 5...

Страница 67: ...umber 2 Press F4 the second digit becomes editable press F3 to enter the correct number 3 Enter the remaining password digits this method then press F5 when complete 5 3 6 Editing Parameter Settings 1...

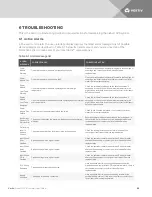
Страница 68: ...here are no power modules this prompt appears when you press the ON OFF button AC input not qualified cannot start UPS When the input voltage cannot meet the startup condition of the inverter this pro...

Страница 69: ...failed Check to see if the fan is blocked If not contact your local Liebert Services representative Insufficient Capacity To Start Inverter The load value exceeds the maximum load capacity of all ope...

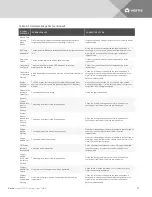
Страница 70: ...into one row of bays in the system Ensure that there are a pair of battery modules in the same row of the frame or contact your local Liebert Services representative Load Exceeds Battery Module Capaci...

Страница 71: ...ribution System Control Module Lock Lever in Remove Position The locking lever is not in the locked position Check the locking lever to ensure it is fully inserted If so contact your local Liebert Ser...

Страница 72: ...odule Table 6 2 Descriptions of module LEDs 6 3 Module Replacement Follow these instructions when replacing or adding a system control system monitor power battery or charger module Contact your Verti...

Страница 73: ...conds 6 3 2 Removing System Control and System Monitor Modules NOTICE Risk of unintended shutdown Can cause equipment damage Do not remove both the control and the monitor modules at the same time Rem...

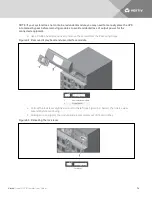
Страница 74: ...screws from the 2 securing holes Figure 6 2 Remove display bezel and user interface module ITEM DESCRIPTION 1 User interface module 2 Display bezel 4 Pull out the lock lever slightly and pull to the l...

Страница 75: ...Module installed 1 Remove the display bezel on top of the frame see Figure 6 4 below 2 Lift up the user interface module and put it on top of the UPS frame 3 Disconnect the network cable from the user...

Страница 76: ...Vertiv Liebert APS Installer User Guide 76 This page intentionally left blank...

Страница 77: ...es are operating properly Verify redundancy if applicable 7 3 Cleaning Fan Filters The intake fans contain filters that must be replaced or cleaned periodically depending on the surrounding environmen...

Страница 78: ...m the frame 2 Remove the filter assembly from the bezel see Figure 7 2 below and clean the filters as described in Cleaning Fan Filters on page 77 3 Replace the filter in the bezel and and place the b...

Страница 79: ...at the bottom of the frame 2 Remove the screws and take out the filter shown in Figure 7 3 below and clean the filters as described in Cleaning Fan Filters on page 77 3 Replace the filter and bezels...

Страница 80: ...Vertiv Liebert APS Installer User Guide 80 This page intentionally left blank...

Страница 81: ...95 17x34x38 440x850x970 17x32x42 440x800x1060 17x34x49 440x850x1240 17x32x27 440x800x695 17x34x38 440x850x970 Weight lb kg Unit Weight empty frame 280 127 320 145 1 510 231 3 540 244 9 280 127 320 145...

Страница 82: ...Battery Cells Per String 72 Battery Capacity 36W 15min rate to 1 67V per cell 25 C 77 F Backup Time Full Load 5 for non redundant system which has equal number of battery strings and power modules Ma...

Страница 83: ...1 30 70 60 5 3 1 74 3 1 30 60 5 3 1 Dual Inverter Configured to 100 110 or 115 VAC per Phase 100 84 3 1 90 100 80 3 1 84 3 1 70 90 72 3 1 80 3 1 40 70 60 3 1 72 3 1 40 60 3 1 Single Inverter Transfor...

Страница 84: ...titude 10 000 ft 3000m Battery Module Lead Acid Batteries Per String 12 Backup Time Full Load Minutes See Estimated Battery Run Times Model number Digits 1 3 AS1 or ASA on page 85 through Estimated Ba...

Страница 85: ...8 1 Estimated Battery Run Times Model number Digits 1 3 AS1 or ASA Figure 8 1 10 bay single phase no transformer unit Type N UPS model number digit 6 N Vertiv Liebert APS Installer User Guide 85...

Страница 86: ...Figure 8 2 10 bay single phase no transformer unit Type R UPS model number digit 6 R Vertiv Liebert APS Installer User Guide 86...

Страница 87: ...Figure 8 3 10 bay single phase no transformer unit Type B UPS model number digit 6 B Vertiv Liebert APS Installer User Guide 87...

Страница 88: ...Figure 8 4 10 bay single phase no transformer unit Type F UPS model number digit 6 F Vertiv Liebert APS Installer User Guide 88...

Страница 89: ...8 2 Estimated Battery Run Times Model number Digits 1 to 3 AS2 or ASB Figure 8 5 16 bay single phase no transformer unit Type N UPS model number digit 6 N Vertiv Liebert APS Installer User Guide 89...

Страница 90: ...Figure 8 6 16 bay single phase no transformer unit Type R UPS model number digit 6 R Vertiv Liebert APS Installer User Guide 90...

Страница 91: ...Figure 8 7 16 bay single phase no transformer unit Type B UPS model number digit 6 B Vertiv Liebert APS Installer User Guide 91...

Страница 92: ...Figure 8 8 16 bay single phase no transformer unit Type F UPS model number digit 6 F Vertiv Liebert APS Installer User Guide 92...

Страница 93: ...8 3 Estimated Battery Run Times Model number Digits 1 to 3 AS3 or ASC Figure 8 9 12 bay single phase transformer based unit Type N UPS model number digit 6 N Vertiv Liebert APS Installer User Guide 93...

Страница 94: ...Figure 8 10 12 bay single phase transformer based unit Type R UPS model number digit 6 R Vertiv Liebert APS Installer User Guide 94...

Страница 95: ...Figure 8 11 12 bay single phase transformer based unit Type B UPS model number digit 6 B Vertiv Liebert APS Installer User Guide 95...

Страница 96: ...Figure 8 12 12 bay single phase transformer based unit Type F UPS model number digit 6 F Vertiv Liebert APS Installer User Guide 96...

Страница 97: ...4 Estimated Battery Run Times Model number Digits 1 to 3 AS4 or ASD Figure 8 13 16 bay single phase transformer based unit Type N UPS model number digit 6 N Vertiv Liebert APS Installer User Guide 97...

Страница 98: ...Figure 8 14 16 bay single phase transformer based unit Type R UPS model number digit 6 R Vertiv Liebert APS Installer User Guide 98...

Страница 99: ...Figure 8 15 16 bay single phase transformer based unit Type B UPS model number digit 6 B Vertiv Liebert APS Installer User Guide 99...

Страница 100: ...Figure 8 16 16 bay single phase transformer based unit Type F UPS model number digit 6 F Vertiv Liebert APS Installer User Guide 100...

Страница 101: ...8 5 Estimated Battery Run Times Model number Digits 1 3 AS5 or ASE Figure 8 17 10 bay 2 phase no transformer unit Type N UPS model number digit 6 N Vertiv Liebert APS Installer User Guide 101...

Страница 102: ...Figure 8 18 10 bay 2 phase no transformer unit Type R UPS model number digit 6 R Vertiv Liebert APS Installer User Guide 102...

Страница 103: ...Figure 8 19 10 bay 2 phase no transformer unit Type B UPS model number digit 6 B Vertiv Liebert APS Installer User Guide 103...

Страница 104: ...Figure 8 20 10 bay 2 phase no transformer unit Type F UPS model number digit 6 F Vertiv Liebert APS Installer User Guide 104...

Страница 105: ...8 6 Estimated Battery Run Times Model number Digits 1 3 AS6 or ASF Figure 8 21 16 bay 2 phase no transformer unit Type N UPS model number digit 6 N Vertiv Liebert APS Installer User Guide 105...

Страница 106: ...Figure 8 22 16 bay 2 phase no transformer unit Type R UPS model number digit 6 R Vertiv Liebert APS Installer User Guide 106...

Страница 107: ...Figure 8 23 16 bay 2 phase no transformer unit Type B UPS model number digit 6 B Vertiv Liebert APS Installer User Guide 107...

Страница 108: ...Figure 8 24 16 bay 2 phase no transformer unit Type F UPS model number digit 6 F Vertiv Liebert APS Installer User Guide 108...

Страница 109: ......

Страница 110: ...logos referred to are trade names trademarks or registered trademarks of their respective owners While every precaution has been taken to ensure accuracyand completeness herein Vertiv Co assumes no r...

Отзывы: