SSI30 Wood Insert
63D4004
7
pRE-INSTAllATION INSTRuCTIONS
CA
u
TION
AFTER REAdINg ThESE INSTRuCTIONS,
IF YOu hAvE ANY dOubT AbOuT
YOuR AbIlITY TO COMplETE YOuR
INSTAllATION IN A pROFESSIONAl
MANNER, YOu ShOuld ObTAIN ThE
SERvICES OF AN INSTAllER vERSEd
IN All ASpECTS OF CORRECT ANd
SAFE INSTAllATION. dO NOT uSE
TEMpORARY, MAkEShIFT COMpROMISES
duRINg INSTAllATION.
CA
u
TION
ThIS hEATER IS EXTREMElY hOT
WhIlE IN OpERATION.
SERIOuS buRNS CAN RESulT FROM
CONTACT.
kEEp ChIldREN, pETS, ClOThINg
ANd FuRNITuRE AWAY
d
AN
g
ER
RISk OF ElECTRIC ShOCk.
dISCONNECT pOWER bEFORE
SERvICINg uNIT.
plANNINg YOuR INSTAllATION
1. Check with local building official for local code require-
ments.
2. The fireplace must not be altered for the purpose of
accommodating the installation of this insert, except for
removal of any of the following: flue damper, smoke shelf
or baffle, ember catches, fire grate, viewing screen/cur-
tain and/or doors.
Do not remove the metal warning label attached to the
back of your insert.
3. Have your chimney and fireplace cleaned and inspected
for serviceability before installing appliance. A profes-
sional chimney sweep can provide this service. They
can also offer advice or install chimney liners and your
insert.
a. Masonry fireplaces and chimney must be inspected
for cracks, loose bricks or mortar. The chimney and
fireplace must be cleaned before installing insert.
Dirty chimneys can affect performance and cause
fires.
b. Factory built fireplaces should be inspected for
cracks, leaky joints, corrosion, warping, and any
sign of structural or mechanical weakness. Correct
any faults before installing insert. Check clearances
of chimney to combustible surface as you inspect
joints.
4. Plan your chimney connection system that makes the
most sense for your particular situation. Make a list
of the component you will need. There are two basic
categories of fireplaces—manufactured and masonry.
Chimneys can be steel or masonry. Liners are avail-
able to size the chimney to the insert and provide best
performance and safety.
The actual connection from the unit to the chimney is
made with adapters. One end will fit the 6” round flue
collar and the other end will fit the chimney liner. Offset
adapters are used in low clearance cases where the
flue of the fireplace is recessed quite a bit, or the back
of the fireplace is tapered to a smaller dimension than
the insert.
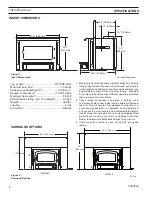
Use the dimensions guide on
Page 6
to help you under-
stand if you will need an offset adapter.
5. Here are a few chimneys and connection types to give
you an overview:
NOTE:
Flue size is important! The cross sectional area
of the chimney should not be larger than 3 times the
cross sectional area of the insert.
a. Masonry chimney with sealed throat and partial liner
extended above the fireplace damper—This is not
a recommended system. It requires the insert be
removed to clean the chimney. The mass and over-
all size of many masonry chimneys can cause start
up problems and creosote that can lead to chimney
fires. Be sure to check the size of the flue.
b. Fully lined masonry chimney—This uses a flexible
or ridge liner that is directly connected to the insert
using a flexible, rigid or offset adapter. A good instal-
lation provides good performance and allows you
to clean the chimney without removing the insert, in
many cases.
c. Factory built chimney with full liner—Directly con-
nected to the insert using flexible, rigid or offset
adapters.
6. Review mantel, hearth and clearance to combustibles
information on
Page 8
. Add to your list any protective
shielding, hearth or surround components you will need
to complete the installation.
7. Order all the installation components from your dealer.
Once you have them, you are ready to begin.


