SSI30 Wood Insert
18
63D4004
OpERATION & MAINTENANCE
2. Allow the insert to cure before burning for long periods
at high temperatures.
3. Flat spots on the painted surfaces are normal.
4. Shiny spots on the paint surface before burning is
normal.
5. Call your dealer if you have any questions.
buIldINg A FIRE
1. Open inlet air control fully.
2. Place a small amount of crumpled paper in the insert.
3. Cover the paper with a generous amount of kindling
wood in a teepee fashion and a few small pieces of
wood.
4. Ignite the paper and close door. If fire dies down sub-
stantially, open door slightly.
5. Add larger pieces of wood as the fire progresses being
careful not to overload. Do not fill firebox beyond fire-
brick area. An ideal coal bed of 1" (25 mm) to 2" (50
mm) should be established to achieve optimum perfor-
mance.
6. This unit is designed to function most effectively when
air is allowed to circulate to all areas of the firebox.
An
ideal means of achieving this is to rake a slight (1"
to 2" wide) trough in the center of the coal bed from
front to back prior to loading the fuel.
CAuTION: TO REduCE ThE RISk OF glASS
bREAkAgE, AvOId lOCATINg WOOd FuEl ClOSE
TO, OR TOuChINg ThE dOOR glASS.
7. Once fuel has been loaded, close door and open air
inlet control fully until fire is well established (approx.
10 minutes) being careful not to over fire.
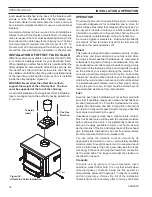
8. Re-adjust air inlet control to desired burn rate. If exces-
sive smoke fills firebox, open air inlet control slightly until
flames resume and wood is sufficiently ignited. A basic
rule of thumb is “closed – low,” “half way-medium,” and
“fully open – high.”
9. When refueling, adjust air control to the fully open posi-
tion. When fire brightens, slowly and carefully open the
door. This procedure will prevent gases from igniting
causing smoke and flame spillage.
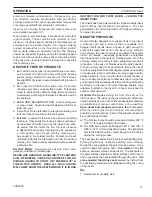
ST1087
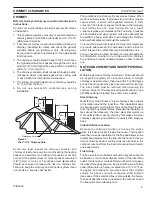
remove baffle
ST1087
Figure 26 -
Remove Baffle
10.Add fuel being careful not to overload.
11. Close doors.
REMOvE bAFFlE
To remove the tubes you will start by removing the cotter
pin on the left end of each tube, then slide the tube to the
right until the tube can be pulled down and left and removed
from the insert. Note that each tube is marked with either
M, for middle F, for front or R for rear, be sure you replace
the tubes in there right location to insure you insert burns
at it best efficiency. 3 new cotter pins have been shipped
with the insert.
After all 3 tubes have been removed you can remove the 2
piece c-cast baffle, be very careful not to damage the baffle,
carefully lift up on the rear piece and move it as far back
as possible letting it set on top of the steel non-removable
baffle. Next lift up on the front piece and move it to the
right and allow the left side to angle down into the firebox
until it can be removed thru the door opening. You can now
remove the rear piece the same way. NOTE: See
Figures
11 and 12
on Page 12 for more information.
REMOvINg FIREbRICk
To remove firebrick, lift up from bottom and rotate outward.
Page 12, Figure 13
ClEANINg YOuR ChIMNEY
The Savannah SSI30 insert has a removable baffle which
allows the chimney to be cleaned without removing the
insert from the fireplace.
Make sure the insert is cool before proceeding
To remove the rear of the baffle, reach in through the door
and lift up on the rear half of the baffle and, very carefully
with your fingers, walk the rear half of the baffle up and
onto of the front half of the baffle. Make sure you slide it
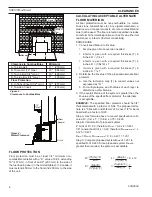
Low
High
ST1086
air control
Figure 25 -
Air Control Layout
ST1086

