background image

Page 38 of 65 

3. Under "E-mail" select the e-mail provider that you normally use to send e-mail. (i.e. America Online, Hotmail, 
Yahoo! Mail) 

Note:

 If you do not see America Online, Hotmail, or Yahoo! Mail listed under the “E-mail” section, 

you’ll need to install the latest version of America Online (if using America Online [http://www.aol.com]) or MSN 
Messenger (if using Hotmail [http://messenger.msn.com])  or Yahoo! Messenger (if using Yahoo! Mail 
[http://messenger.yahoo.com]). Once the latest versions of the e-mail provider you use is installed, you’ll see the 
options available. 
 
4. After you have selected your e-mail provider, click the "OK" button and then close the Control Panel. 
 
5. Sign on to America Online or connect to the Internet and log in to your web-based e-mail account. 
 
6. Minimize America Online or web browser window (if using Hotmail or Yahoo! Mail). 
 
7. By default, your pictures are saved in the 'Photographs' or 'Videos' folders in the Veo Observer Studio. To find 
the pictures/videos for e-mailing, go to the 'C:\Program Files\Veo Observer Studio\Gallery' folder. 
 
If you saved a picture (JPG), it will be located in the \Photographs folder. If you saved a Standard Video (AVI), it 
will be located in the \Videos folder. If you saved a Video Mail (WMV), it will be located in the 'My Documents' 
folder on your desktop. 
 
8. After going to the corresponding folder for your picture/video, right-click on the picture/video you want to e-
mail and then select Send To->Mail Recipient. 
 
9. This will automatically attach the picture/video to your e-mail. Note that most e-mail providers have a 
maximum file size limitation for sending attachments, so if your picture/video file size is too large, you may not 
be able to send the picture/video. If this is the case, try using a smaller picture size or recording a shorter video. 
 
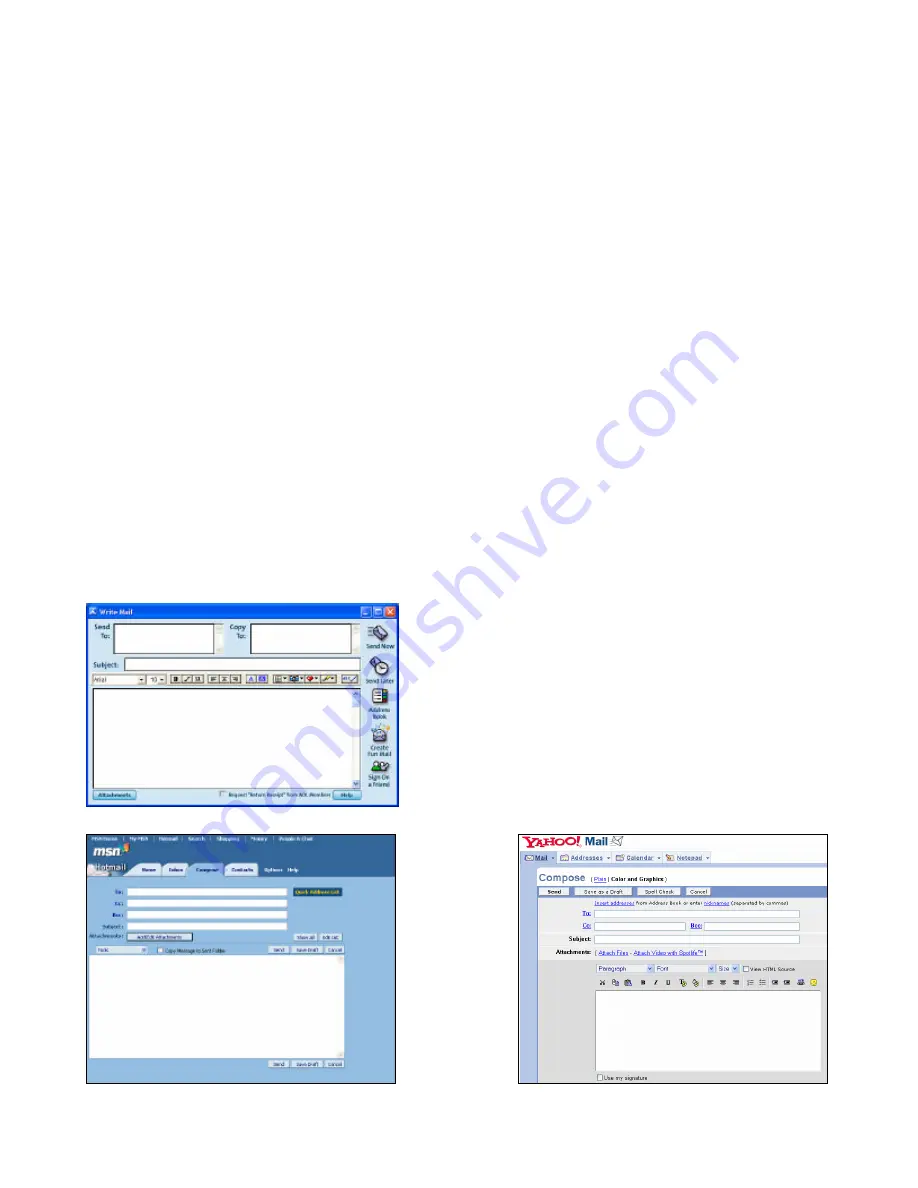
10. In America Online, click the "Send Now" button or in Hotmail or Yahoo! Mail, click the "Send" button to send 
your e-mail. 


America Online – Sending E-mail 


Hotmail – Sending E-mail 


Yahoo! Mail – Sending E-mail 

Содержание Wireless Observer

Страница 1: ...Page 1 of 65 Rev 01 14 2003...

Страница 2: ...PC Application 24 6 1 Camera Manager 24 6 2 Logging into a Camera 26 6 3 Camera View Controls 27 6 4 Using the Gallery 30 6 5 Movie Maker Making or Editing a Movie 30 6 6 Homepage Designer Designing...

Страница 3: ...dix F Motion Sensor Setup 56 Appendix G Frequently Asked Questions Troubleshooting and Technical Support 58 Appendix H Estimating Bandwidth Consumption 61 Appendix I Technical Specifications 62 Glossa...

Страница 4: ...ready to be accessed by any PC on the network running Internet Explorer 5 0 or higher The built in pan and tilt live streaming audio and snapshot video capture functions can all be controlled directl...

Страница 5: ...package contents to ensure that all items have been included If any of the listed items are missing please contact your reseller from where you purchased the camera for assistance The package includes...

Страница 6: ...ions External microphone and motion sensor sold separately IP Address Display Power Button Turn the camera on or off When the power button is held down while the camera is on for 6 seconds the camera...

Страница 7: ...ting the power adapter Chapter 2 CAUTION Make sure to only use the power adapter supplied with your Veo Observer Network Camera Using a non approved power adapter may damage the camera Step 1 Plug the...

Страница 8: ...access its home page and begin using the camera This is accomplished by one of two easy methods Method B offers a shortcut but you need to know a little more about your network to use it Note If the...

Страница 9: ...evices is known as the network address Most home networks use either 192 168 0 or 192 168 1 for their network address If you know your network address you can simply combine it with the 3 digits shown...

Страница 10: ...in any direction on the platform Step 6 Place the camera on the mounting bracket platform and rotate the camera to be facing in the desired direction Step 7 Secure the camera to the mounting bracket u...

Страница 11: ...nistrator Administrators have full access to all the camera s features and settings Administrator accounts should be reserved for those who need to change the camera s configuration Note Be sure not t...

Страница 12: ...ing signed ActiveX controls Please restore the default security settings For help configuring your Internet Explorer security settings see Appendix E Internet Explorer Security Settings 3 The camera s...

Страница 13: ...in viewing page will open and the live video will start Note The username and password are case sensitive Note If another user is currently logged into the camera you may see a message letting you kno...

Страница 14: ...he image Sound on off Enables or disables audio monitoring Snapshot Clicking on Snapshot will open a menu with three functions Snapshot Save and Cancel Click Snapshot to capture the current image Clic...

Страница 15: ...d Entries Default Camera Name A name you assign to the camera to help identify it The name is displayed on the main page Up to 12 ASCII characters None Location Enter the camera location such as front...

Страница 16: ...Password box for confirmation Step 4 Select the user level as either Admin User or Guest Step 5 Click Add to add the new user To remove an existing user select the username on the right side and clic...

Страница 17: ...consulting your ISP From your mail server s domain name you can determine its IP address by pinging the domain name and observing the reply To ping your mail server click Start Run ping mail ispname...

Страница 18: ...ut by the camera Reducing the streaming size will significantly improve video performance frame rate when bandwidth is limited Lighting Conditions Improves video performance by configuring the camera...

Страница 19: ...s Click Install to begin the software installation 2 The installation procedure starts and you ll see the Welcome dialog box Click Next to continue Welcome Screen Chapter 4 Note If the Veo Observer In...

Страница 20: ...irectory from the list 5 Proceed through the rest of the steps to finish the Veo Observer Setup Utility software installation and then click Finish 6 The next screen will install the Veo Observer Stud...

Страница 21: ...ocal area network where the camera to be set up is located Note The camera s MAC address can be found on a sticker attached to the bottom of the camera Note Before you assign a static address to a cam...

Страница 22: ...you set up your camera and cannot be changed Setting Description Notes IP address PC s address on the network Only the last three digits should be different for devices on the same LAN Subnet Mask Su...

Страница 23: ...te the camera firmware Step 6 A browse dialog appears prompting you for the location of the new firmware file Firmware files have a bin file extension Navigate to the folder where you placed the downl...

Страница 24: ...ra s connection information into the camera manager Once you ve entered the information you ll never need to type it in again 6 1 Camera Manager The Camera Manager keeps a list of Observer cameras alo...

Страница 25: ...Once you have entered the correct settings click OK The Add Camera dialog box closes and the camera s label appears in the Camera Manager list Click OK to close the Camera Manager You are now ready t...

Страница 26: ...ection status dialog box appears as shown below As soon as the login process is complete the camera will begin to stream live video and all the camera controls become active Depending on the speed of...

Страница 27: ...ame rate setting Actual frame rate is dependent on bandwidth and network traffic The rate displayed is averaged over several seconds and is updated every few seconds Note The image size buttons do NOT...

Страница 28: ...r situations Overlay If your PC s video graphics adapter supports hardware overlay you can enable overlay for improved video performance Use Defaults Restore all default settings OK Save changes and e...

Страница 29: ...video will appear in one of the other three video windows Enable Audio Click on a camera s video window to select it A yellow outline will appear around the window You may now enable audio for that ca...

Страница 30: ...imated character files Photographs Contains still pictures Graphics Contains background graphics Videos Contains video files Music Contains audio clips Projects Contains all your previously saved proj...

Страница 31: ...ple the effects by placing your cursor above each individual effect Choose the opening effect how one scene changes to another 6 Double click on the remaining scenes in the Movie Maker then repeat ste...

Страница 32: ...om the left panel then select the background for your homepage Click Continue 4 Edit your homepage See Applying Text Images Videos and Animated Characters on Page 34 for more information To add a new...

Страница 33: ...k Then a Drag a page from the bottom panel into the Storyboard Container to link to one of your existing pages OR b Click URL type in the address of the webpage on the Internet then click OK Note When...

Страница 34: ...lick Save As 13 Choose Add a New Page To add and edit a new page or Edit Next Page To edit the next page or Publish Now To publish the homepage to your Internet Service Provider Publishing the webpage...

Страница 35: ...eo Insert a new video clip Insert Image Insert a new image Alternatively you can drag and drop images videos from the Gallery Display Panel into the Main Screen Animation Path Define the path of the i...

Страница 36: ...a path the sound effect will be disabled Defining the Path of an Animated Character also works with a still picture a Select the image or animated character that you want to move b Click Animation Pa...

Страница 37: ...E mail application is properly set up with the right POP account name password SMTP mail host account and other requirements For further assistance contact your Internet Service Provider ISP or syste...

Страница 38: ...aphs or Videos folders in the Veo Observer Studio To find the pictures videos for e mailing go to the C Program Files Veo Observer Studio Gallery folder If you saved a picture JPG it will be located i...

Страница 39: ...s provided you will either be static which means it never changes or dynamic meaning it can change periodically Dynamic addresses present an additional challenge when trying to locate your network fro...

Страница 40: ...he Internet via a gateway For most home networks a NAT type router serves as the gateway For business LANs the gateway may be a PC running gateway software In order for any device on your network to g...

Страница 41: ...9 111 81 into your browser s address bar You can do the same thing with a URL such as http MyNetCam DynDNS org 81 The steps to set up remote access are as follows 1 Configure each camera to use a sepa...

Страница 42: ...rvice and set up the domain name of your choice to begin using it Please refer to the home page of the service for detailed instructions A DDNS service works by uploading your WAN IP address to its se...

Страница 43: ...to reset the camera Appendix A Note You will need to reconfigure your camera settings after resetting the camera The Veo Observer will revert back to the factory default username admin and password p...

Страница 44: ...mera s built in microphone The use of an external microphone is recommended in noisy areas or if the camera is located far away from the audio source To use the external microphone follow the steps be...

Страница 45: ...n Start Run and type in command and then press ENTER 2 In the MS DOS window type in ipconfig and then press ENTER 3 This will display your network card s IP Address Subnet Mask and Default Gateway Mor...

Страница 46: ...d 4 Lost 0 0 loss Approximate round trip times in milli seconds Minimum 0ms Maximum 0ms Average 0ms If there is NO response on this address you ll see Pinging 123 123 123 123 with 32 bytes of data Req...

Страница 47: ...ere traffic on the trigger port tells the Firewall to open the incoming ports The Veo Observer requires that Port 80 and 1600 are opened to the Internet There are two ways to configure Port Forwarding...

Страница 48: ...to function as an Internet service host For example the camera can be configured as a virtual server allowing others outside of your network so that others can view your camera Setting the camera as a...

Страница 49: ...ick Apply The Veo Observer should now be configured to work with your network and be accessible to the Internet NETGEAR Cable DSL Router Gateway RP614 The NETGEAR Cable DSL Router Gateway RP614 setup...

Страница 50: ...Attached Devices Write down the IP address assigned to the camera 10 Click OK Veo Observer as a Virtual Server 1 Click on Port Forwarding 2 Click on Add Custom Service 3 Enter a name for the camera u...

Страница 51: ...roadband Router SMC7004VBR The SMC Barricade Broadband Router SMC7004VBR setup program is web based which means that it is accessed through your web browser To use the Setup Wizard 1 To access the Bar...

Страница 52: ...up program is Web based which means that it is accessed through your web browser To use the Setup Wizard 1 Ensure that you have at least one computer connected to the router 2 Launch your web browser...

Страница 53: ...ast Cable DSL Router BEFSR41 The Linksys EtherFast Cable DSL Router BEFSR41 setup program is Web based which means that it is accessed through your web browser To use the Setup Wizard 1 Ensure that yo...

Страница 54: ...Line 1 Customized Applications VeoCamWeb Ext Port 80 to 80 Protocol TCP IP Address 192 168 1 101 Enable Checked in Line 2 Customized Applications VeoCamVid Ext Port 1600 to 1600 Protocol TCP IP Addres...

Страница 55: ...aScripts All these things are enabled by the default Internet Explorer Security settings You can restore the default settings in Internet Explorer by clicking Tools Internet Options Security Default L...

Страница 56: ...the sensor housing 3 Align the two threaded holes in the metal sensor mounting bracket with the holes in the sensor housing 4 Use the two screws included with the sensor bracket to attach the sensor...

Страница 57: ...the orange tab above hole 1 locking the wire in place 5 Repeat steps 3 4 for the white wire hole 2 and the black wire hole 4 The sensor is ready for use with the camera Reconnect the power supply to...

Страница 58: ...and port number using the Observer Setup Utility 2 Use the Login button in the Observer Setup Utility The camera welcome page does not appear when I try to browse the camera Internet connection to cam...

Страница 59: ...bserver CD ROM into your computer Browse to the ActiveX for Web Client folder on the CD ROM and then double click on the Veo ActiveX exe program to install the camera ActiveX Once installed try access...

Страница 60: ...our webpage at http www veo com observer support asp for additional FAQ s and troubleshooting tips You may also click the button in the Veo Observer Studio PC Application to go directly to the Observ...

Страница 61: ...es Your results may vary Image Streaming Size Average range of Data Sizes 160 x 120 32 48 kilobits 320 x 240 64 96 kilobits 640 x 480 320 480 kilobits For example streaming 4 fps of 160 x 120 video re...

Страница 62: ...n hardware Frame rate 160 x 120 10 fps 320 x 240 10 fps 640 x 480 5 fps Image Sensitivity 1 lux Aperture F2 0 Construction 5 element all glass Lens Type Fixed Focus Pan Tilt Range 120 pan 60 60 tilt 3...

Страница 63: ...y each device on a TCP IP network Each camera must have a unique IP address ISP Internet Service Provider Provides your WAN IP address for Internet access LAN Local Area Network A group of computers p...

Страница 64: ...red or refurbished parts or components Who the warranty protects This warranty is valid for the original consumer purchaser only What the warranty does not cover Any Veo product on which the serial nu...

Страница 65: ...EO S LIABILITY IS LIMITED TO THE COST OF REPAIR OR REPLACEMENT OF THE PRODUCT VEO SHALL NOT BE LIABLE FOR DAMAGE TO OTHER PROPERTY CAUSED BY ANY DEFECTS IN THE PRODUCT DAMAGES BASED UPON INCONVENIENCE...

Отзывы: