manualshive.com logo in svg
background image

CAMSETW2

 1  VELLEMAN 

CAMSETW2 – 4-CHANNEL B/W WIRELESS SECURITY SYSTEM 


1. Introduction 

 
Thank you for buying the 

CAMSETW2

! Please read the manual thoroughly before bringing this device into service. 

Make sure that the device was not damaged in transit. If the device is damaged, you should contact your dealer. 

Verify if you have received all components: 

• 

a camera (transmitter) with its 12V AC adapter 

• 

a 5" B/W monitor (receiver) with its 12.5V AC adapter 

• 

a mounting bracket (to be used for the transmitter only) 

• 

a manual 


2. Safety Warnings 


• 

Keep the device away from rain or moisture. 

• 

Do not insert any object into the device through a ventilation hole or other opening. 

• 

Do not open the housing of any of the 2 units. Have a qualified person maintain or repair the system. 

• 

Keep the system (adapters and wiring as well) out of reach of babies and children. 

• 

The antennas on transmitter and receiver have a rotation range of 270°. Do not force them when you feel you've 
reached the end of the range, as you may permanently damage the system in doing so. 

• 

Disconnect the adapters from the sockets when the system is not in use. 

• 

Make sure the device and adapters are sufficiently ventilated. 

• 

Keep the transmitter out of direct sunlight. 

• 

Keep the system away from heat sources to prevent overheating. 

• 

Use only the provided adapters. If they need to be replaced, contact your dealer. 

• 

The adapters are not interchangeable: use the 12V AC adapter only for the camera and the 13.5V AC adapter only 
for the monitor. 

• 

Only connect the adapters to the mains (220-240Vac). 

• 

User modifications to the system automatically void the warranty. 

• 

Keep in mind that other 2.4GHz devices could receive signals from your system. Conversations in a room near the 
transmitter may be broadcast. Turn the transmitter off for privacy purposes when you don't need it. 


3. Connections and Controls 


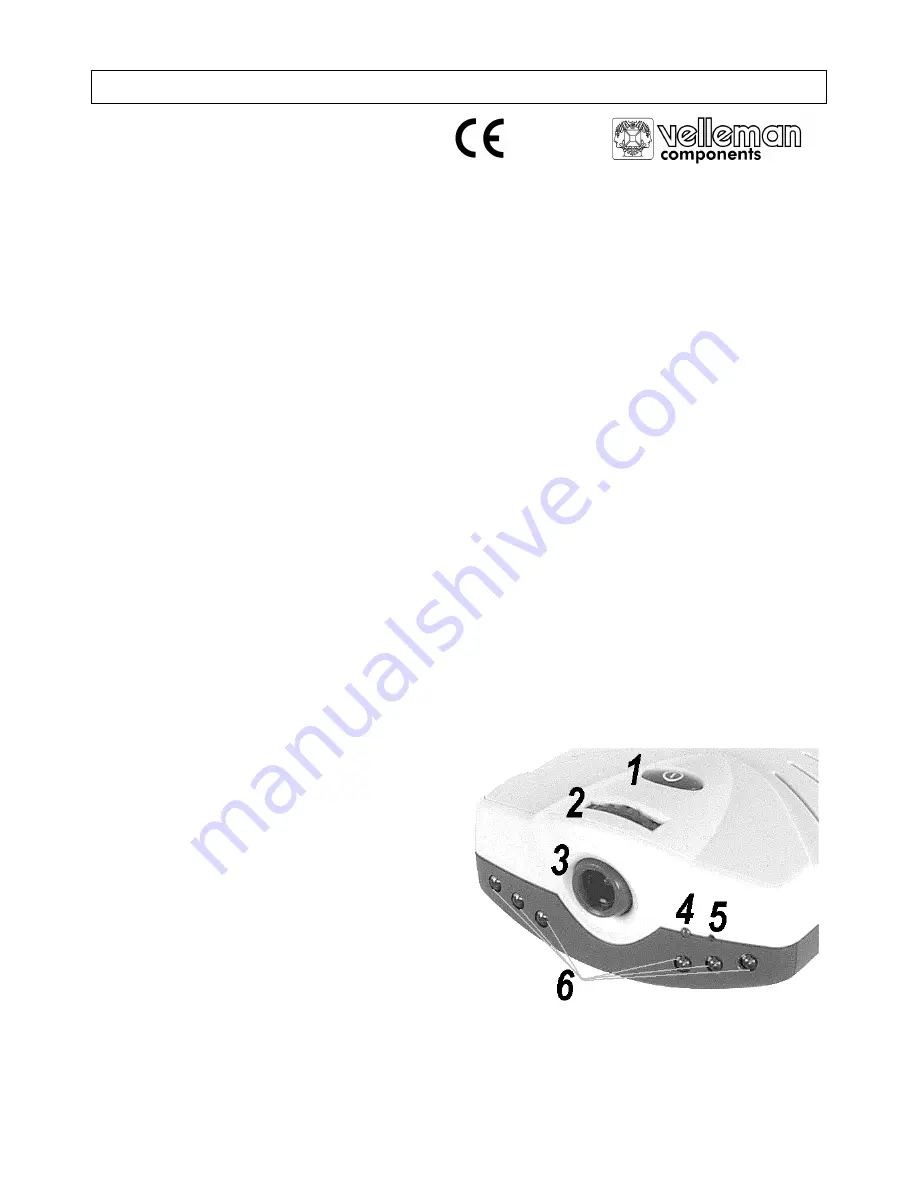
a. Camera (transmitter) 

 
1.  power switch (on/off) 
2.  lens adjustment for focus control 
3. camera lens 

4.  power LED: lights up when the camera is operational. 
5. microphone 
6.  night vision LEDs: allow the transmitter to see a 

distance of up to 3ft in the dark (in which case the 
image on the receiver may be a bit 'snowy') 

 
At the back of the camera, there's a connection for the 12V adapter and a channel selection switch. 
The camera is equipped with a 360° rotating base for easy installation. 

Содержание CAMSETW2

Страница 1: ...s from the sockets when the system is not in use Make sure the device and adapters are sufficiently ventilated Keep the transmitter out of direct sunlight Keep the system away from heat sources to pre...

Страница 2: ...quality On the one hand this feature is provided because for some frequencies the receiver may suffer from sound or vision interference caused by other signal producing devices It allows you to select...

Страница 3: ...ce source and turn it off or remove it from the path between transmitter and receiver Change the channel settings Signal interference due to other signal producing device s Relocate transmitter and or...

Страница 4: ...org ervoor dat de toestellen en adapters voldoende kunnen verluchten Plaats de zender niet in direct zonlicht Installeer het systeem niet in de buurt van warmtebronnen om oververhitting te voorkomen G...

Страница 5: ...kunnen worden gestoord door andere toestellen die signalen produceren Het laat u toe een kanaal zonder storing te kiezen Anderzijds laat deze mogelijkheid u toe een draadloos beveiligingssysteem op t...

Страница 6: ...torende toestel op en zet het af of verwijder het uit de baan tussen zender en ontvanger Verander de kanaalinstellingen Storing van het signaal door andere toestellen die signalen produceren Verplaats...

Страница 7: ...et les adaptateurs sont suffisamment ventil s Gardez l metteur l abri de lumi re solaire directe Installez le syst me bien l cart de sources de chaleur afin d viter la surchauffe Utilisez uniquement l...

Страница 8: ...les 4 canaux et s lectionnez celui qui vous donne la meilleure image et le meilleur son D un c t cette possibilit est pr vue parce que pour certaines fr quences l image et le son peuvent tre brouill s...

Страница 9: ...rs de canal ne sont pas mis sur le m me canal Mettez les s lecteurs de l metteur et du r cepteur sur le m me canal D tectez l appareil brouillant et teignez le ou enlevez le du trajet entre metteur et...

Страница 10: ...red si no usa el sistema Aseg rese de que se ventilen el aparato y los adaptadores suficientemente Mantenga el emisor alejado de la luz del sol directa Instale el sistema alejado de fuentes de calor...

Страница 11: ...y seleccione el canal que le da la mejor imagen y el mejor sonido Por una parte esta posibilidad est prevista porque para algunas frecuencias es posible que otros aparatos produzcan se ales causando...

Страница 12: ...de canal en el mismo canal Coloque los selectores del emisor y del receptor en el mismo canal Detecte el aparato que causa las interferencias y desact velo o qu telo del camino entre el emisor y el r...

Страница 13: ...Steckernetzteile aus der Netzsteckdose Sorgen Sie daf r dass die Ger te und Adapter gen gend bel ftet werden k nnen Sch tzen Sie das Ger t vor direktem Sonnenlicht Stellen Sie das Ger t nicht in unmit...

Страница 14: ...ibt es diese M glichkeit weil f r einige Frequenzen das Bild und den Ton durch andere Ger te die Signale erzeugen gest rt werden k nnen Es erlaubt Ihnen einen Kanal ohne St rung auszuw hlen Anderersei...

Страница 15: ...St rquelle und schalten Sie sie aus oder entfernen Sie sie zwischen Sender und Empf nger ndern Sie die Kanaleinstellungen Andere Ger te die Signale erzeugen st ren das Signal Setzen Sie den Sender un...

Отзывы: