background image

JT550 Series Inverter Manua

l

Chapter 7 Maintenance and Troubleshooting

- 103 -

F7.05

Startup DC braking current

0%~100%

0%

F7.06

Startup DC braking time

0.0s~100.0s

0.0s

Startup DC braking is generally used during restart of the inverter after the rotating motor stops.Startup

DC braking is valid only for direct start (F7.00 = 0). In this case, the inverter performs DC braking at the set

startup DC braking current. After the startup DC braking time, the inverter starts to run. If the startup DC

braking time is 0, the inverter starts directly without DC braking.

F7.07

Acceleration/Deceleration mode

Range:0~2

Default:0

It is used to set the frequency change mode during the inverter start and stop process.

0: Linear acceleration/deceleration
1: S-curve acceleration/deceleration A

2: S-curve acceleration/deceleration B

F7.08

Time proportion of S-curve start

segment

Range:0.0%~

100.0%-F7.09

Default:30.0%

F7.09

Time proportion of S-curve end

segment

Range:0.0%~

100.0%-F7.08

Default:30.0%

These two parameters respectively define the time proportions of the start segment and the end

segment of S-curve acceleration/deceleration. They must satisfy the requirement: F7.08 + F7.09

100.0%.

F7.10

Stop mode

Range:0~1

Default:0

0: Decelerate to stop
After the stop command is enabled, the inverter decreases the output frequency according to the

deceleration time and stops when the frequency decreases to zero.

1: Coast to stop
After the stop command is enabled, the inverter immediately stops the output. The motor will coast to

stop based on the mechanical inertia.

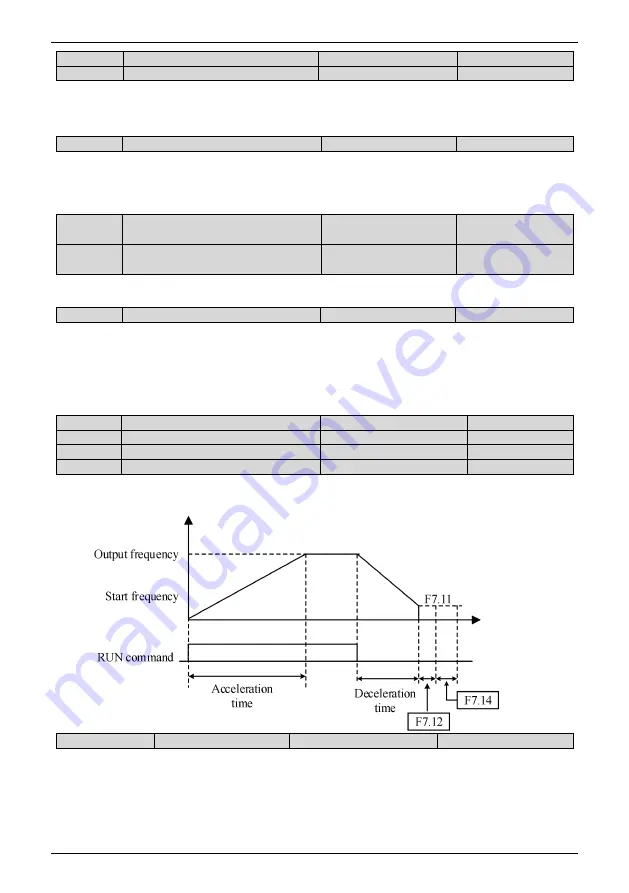
F7.11

Initial frequency of stop DC braking

Range:0.00Hz~max. freq

Default:0.00Hz

F7.12

Waiting time of stop DC braking

Range:0.0s~100.0s

Default:0.0s

F7.13

Stop DC braking current

Range:0%~100%

Default:0%

F7.14

Stop DC braking time

Range:0.0%~100.0%

Default:0.0s

The inverter starts DC injection braking when the running frequency decreases to the value set in this

parameter in the process of deceleration to stop.

F7.15

Brake use ratio

Range:0%~100%

Default:100%

It is valid only for the inverter with internal braking unit and used to adjust the duty ratio of the

braking unit. The larger the value of this parameter is, the better the braking result will be. However, too

larger value causes great fluctuation of the inverter bus voltage during the braking process.

Содержание JT550 Series

Страница 1: ...noise and low electromagnetic interference requirements to cope with challenging grid temperature humidity and dust conditions thus greatly improving product reliability This operation manual present...

Страница 2: ...Drive is dependent on the working environment and correct handling of the product in the initial installation stage Delivery and installation Select appropriate tools for delivery and installation to...

Страница 3: ...provide product training and if in doubt seek advice Maintenance and component replacement Only well trained and qualified professionals are allowed to perform maintenance inspection and component re...

Страница 4: ...nsion Card 22 3 6 Wiring Method 23 Chapter 4 Keyboard and Display 36 4 1 Operation and Display Interface 36 4 2 Keyboard Indicators Description 37 4 3 Keyboard Button Description 37 4 4 Viewing and Mo...

Страница 5: ...l Name 1 2 Product Nameplate MODEL JT550 T3 011G 015PB INPUT 3PH AC 380V 26A 50Hz 60Hz OUTPUT1 3PH AC 0 380V 25A 0 300Hz OUTPUT2 3PH AC 0 380V 32A 0 300Hz SN 10174100209000002 Model Rated input Rated...

Страница 6: ...15G 018PB 35 32 15 JT550 T3 018G 022PB 38 5 37 18 5 JT550 T3 022G 030PB 46 5 45 22 JT550 T3 030G 037P 62 60 30 JT550 T3 037G 045P 76 75 37 JT550 T3 045G 055P 92 91 45 JT550 T3 055G 075P 113 112 55 JT5...

Страница 7: ...JT550 Series Inverter Manual Chapter 2 Mechanical Installation 7 1 4 Product Description Figure 1 3 Components of Plastic Case Model Figure 1 4 Components of the Metallic Case Model...

Страница 8: ...30 0 V F curve Straight line V F curve Multi point V F curve Square V F curve Ramp mode Straight line ramp S curve ramp Four groups of acceleration deceleration time with the range of 0 0 6500 0s DC...

Страница 9: ...eference Auxiliary frequency setting channel Supports up to 10 auxiliary frequency sources and allows fine tuning of the auxiliary frequency and main auxiliary calculation Input terminals 5 digital in...

Страница 10: ...de Lower than 1000 m derated if higher than 1000 m Ambient temperature 10 C to 40 C derated if the ambient temperature is between 40 C and 50 C Humidity Less than 95 RH without condensing Vibration Le...

Страница 11: ...175 182 7 JT550 T3 011G 015PB JT550 T3 015G 018PB 190 273 5 291 5 197 175 182 6 JT550 T3 018G 022PB JT550 T3 022G 030PB JT550 T3 030G 037P 220 392 405 253 180 187 7 JT550 T3 037G 045P JT550 T3 045G 0...

Страница 12: ...G 055P 249 340 850 810 180 280 12 JT550 T3 055G 075P JT550 T3 075G 090P 265 416 880 840 190 350 10 JT550 T3 090G 110P JT550 T3 110G 132P 327 461 980 935 220 380 12 JT550 T3 132G 160P JT550 T3 160G 185...

Страница 13: ...n 13 1 7 Keyboard Appearance and Dimensions Figure 1 9 Appearance and Dimensions of the Keyboard mm 1 8 Appearance and Hole Size of the Keyboard Tray 2 R12 115mm 67mm 121 2 74 2 15 8 115 67 101 9 R12...

Страница 14: ...rd and Tray 60 14 3 21 1 32 7 77 2 5 2 39 1 116 Figure 1 11 Appearance and Dimensions of the Double Display Keyboard 121 9 2 R5 2 R12 R12 5 66 135 129 5mm 66mm 74 2 141 2 15 8 Figure 1 12 Appearance a...

Страница 15: ...articles 2 2 Installation Space and Directions 2 2 1 Single Inverter Installation the installation and insulation space for an inverter has to be left out based on its different power ratings 2 2 2 Mu...

Страница 16: ...ding to the figure above when installing two inverters vertically next to each other Attention Matters for Heat Dissipation of Mechanically Mounting 1 The inverter should be installed vertically for h...

Страница 17: ...of the Cover Plate 1 2 Figure 2 2 Remove the Cover Plate Plastic Case 1 4 Figure 2 3 Remove the Cover Plate Metallic Case 1 Press inward to disconnect the hook from the hook slot 2 Lift the cover to...

Страница 18: ...refer to the selection manual of peripheral equipment for more details of peripheral devices and options Three phase AC power supply Moulded Case Circuit Breaker MCCB or earth leakage circuit breaker...

Страница 19: ...ity of the inverter AC Input Reactor Improve the power factor of the input side Eliminate the higher harmonics generation on the input side effectively and prevent other devices from being damaged due...

Страница 20: ...0 JT550 T3 132G 160P 350 300 120 120 1 0 JT550 T3 160G 185P 400 300 150 150 1 0 JT550 T3 200G 220P 500 410 185 185 1 0 JT550 T3 220G 250P 630 475 2 120 2 120 1 0 JT550 T3 250G 280P 630 475 2 120 2 12...

Страница 21: ...In Standard JT550 S2 0R7GB 80W 150 JT550 S2 1R5GB 100W 100 JT550 S2 2R2GB 100W 70 JT550 T3 0R7G 1R5PB 150W 300 JT550 T3 1R5G 2R2PB 150W 220 JT550 T3 2R2G 4R0PB 250W 200 JT550 T3 4R0G 5R5PB 300W 130 JT...

Страница 22: ...igital inputs support leakage and source pattern wiring methods and support external power A00E08 All Resolver PG Card Resolver Expansion Card A00E12 All Injection Molding Machine Current Riser Card S...

Страница 23: ...input terminals 5 X1 X2 Digital input terminals 1 Digital input terminals 2 Control loop Relay output 1 EC EA EB Relay output 2 RC RA RB Y1 YCM Open collector output Y2 D0 YCM Open collector output Hi...

Страница 24: ...odel Rated Input Current A Recommended Input Output Power Cable mm Recommended Solderless Terminal Models Recommended Ground Cable mm Recommended Solderless Terminal Models JT550 S2 0R4GB 5 4 0 75 SNB...

Страница 25: ...Models Recommended Ground Cable mm Recommended Solderless Terminal Models JT550 T3 0R75G 1R5PB 3 4 0 75 SNB1 25 4S 0 75 SNB1 25 4S JT550 T3 1R5G 2R2PB 5 0 75 SNB1 25 4S 0 75 SNB1 25 4S JT550 T3 2R2G...

Страница 26: ...erminal Models JT550 T3 7R5G 011PB 20 5 4 0 SNB3 5 5 4 0 SNB3 5 5 JT550 T3 011G 015PB 26 4 0 SNB3 5 5 4 0 SNB3 5 5 Model Rated Input Current A Recommended Input Output Power Cable mm Recommended Solde...

Страница 27: ...ded Input Output Power Cable mm Recommended Solderless Terminal Models Recommended Ground Cable mm Recommended Solderless Terminal Models JT550 T3 045G 055P 92 35 RNB38 8S 16 SNB14 6 JT550 T3 055G 075...

Страница 28: ...minal Models JT550 T3 110G 132P 214 120 DT120 10 70 RNB60 10 JT550 T3 132G 160P 256 150 DT150 10 70 RNB60 10 Model Rated Input Current A Recommended Input Output Power Cable mm Recommended Solderless...

Страница 29: ...erminal Models Recommended Ground Cable mm Recommended Solderless Terminal Models JT550 T3 315G 355P 590 2 150 DT300 16 150 DT150 16 JT550 T3 355G 400P 665 2 185 DT400 16 185 DT185 16 JT550 T3 400G 78...

Страница 30: ...braking components to the corresponding terminals and Otherwise it could cause a fire The cable length of the braking units shall be no longer than 10m Use twisted pair cables or pair wires for parall...

Страница 31: ...of the inverter Otherwise it may cause frequent errors or even damage the inverter If the motor cable is too long electrical resonance will be generated due to the impact of distributed capacitance T...

Страница 32: ...supply to external potentiometer with resistance range of 1 5 k Maximum output current 10 mA 24V COM External 24V power supply Provide 24 V power supply to external unit Generally it provides power su...

Страница 33: ...O1 Output voltage range 0 10 V Output current range 0 20 mA AO2 GND Analog output 2 Output range 0V 10V 0mA 20mA Using the AO2 jumper on the left side of the control board to determine the voltage or...

Страница 34: ...that is no longer than 20 m When active drive is adopted it is necessary to apply filtering in order to prevent the interference to the power supply It is recommended to use the contact control mode S...

Страница 35: ...de must be installed properly As shown in Figure 3 9 failure to comply will lead to burning the 24V DC power supply whenever the digital output terminal is active 24V AT500 Y1 YCM Figure 3 22 DO Termi...

Страница 36: ...lling the operation of inverter start and stop Its appearance and function area are shown below RUN key Stop Reset key Confirm Key Knob Data Display Cancel Key Increment key Decrement key Shift Malti...

Страница 37: ...Start the inverter STOP RESET Stop Reset key Stop the inverter when it is in the Operating state and reset the inverter when it is in the fault state MK Multi Function Key Switch functions according...

Страница 38: ...and switch using the button MK Follow figure 3 4 to switch the menus after setting the function parameters Note Only when F8 01 is set to 1 MK button selects menu modes 50 00 bASE FASt ndFt F0 uF0 03...

Страница 39: ...JT550 Series inverter Manual Chapter 5 Basic Operation and Test Run 39 Chapter 5 Basic Operation and Test Run 5 1 Quick Adjustment Guidance Figure 5 1 Quick Adjustment Procedure...

Страница 40: ...n normal status is shown as below Status Display Description Normal Default Display of Digital Setting of 50Hz Faulty Inverter stops working when an error occur and displays the error type 5 4 Motor C...

Страница 41: ...JT550 Series inverter Manual Chapter 5 Basic Operation and Test Run 41 5 4 2 Control and Adjustment Flow Chart of V f and SVC Figure 5 2 Inverter s Adjustment Sub Process Flow V f Control...

Страница 42: ...meters frequency reference resolution errors records accumulated operating time accumulated power on time and accumulated power consumption 2 Clear records If F0 24 is set to 2 the fault records accum...

Страница 43: ...parameters set down by F0 20 cleared or unclear 0 factory default is cleared down 2 AI1 0 10 V voltage input 3 AI2 0 10 V voltage input or 4 20 mA current input determined by jumper 4 AI3 0 10 V volt...

Страница 44: ...used as the operating frequency PID control is generally used in on site closed loop control such as constant pressure closed loop control and constant tension closed loop control When applying PID a...

Страница 45: ...on Selection Range 0 45 Default 1 F3 02 Y2 Output Function Selection Range 0 45 Default 0 F3 03 Relay R Output Function Selection Range 0 45 Default 2 F3 04 Relay E Output Function Selection Range 0 4...

Страница 46: ...que Load e g Fan and Pump Model Dependent F0 01 Motor Control Mode 0 Sensor less Flux Vector Control SVC 1 Closed Loop Vector Control FVC 2 Voltage Frequency V F Control 2 F0 02 Operation Command Sour...

Страница 47: ...Pulse Setting X5 5 Communication Setting 0 F0 12 Upper Limit of Frequency Lower Limit of Frequency F0 14 to Maximum Frequency F0 10 50 00 Hz F0 13 Upper Limit Offset of Frequency 0 00 Hz to Maximum F...

Страница 48: ...nalized Menu Display Options Units Quick Menu Display Selection 0 No Display 1 Display Tens User modified Menu Display Selection 0 No Display 1 Display 00 F0 26 Parameter Modification Property 0 Modif...

Страница 49: ...e Inductance 0 01 655 35 mH Inverter Power 55 kW 0 001 65 535 mH Inverter Power 55 kW Harmonic Parameters F1 09 Motor Mutual Inductance 0 1 6553 5 mH Inverter Power 55 kW 0 01 655 35 mH Inverter Power...

Страница 50: ...set 24 Swing Frequency Pause 25 Counter Input 26 Counter Reset 27 Length Count Input 28 Length Reset 29 Torque Control Prohibition 30 Pulse Input Enabled Only for X5 31 Reserved 32 Immediate DC Brakin...

Страница 51: ...um Input F2 16 10 00V 10 00V F2 19 Corresponding Setting of AI Curve 1 Maximum Input 100 0 100 0 100 0 F2 20 AI Curve 2 Minimum Input 0 00V F2 22 0 20V F2 21 Corresponding Setting of AI Curve 2 Minimu...

Страница 52: ...I Less Than Minimum Input 000 F2 35 X1 switch on delay 0 0s 3600 0s 0 0s F2 36 X1 switch off delay 0 0s 3600 0s 0 0s F2 37 X2 switch on delay 0 0s 3600 0s 0 0s F2 38 X2 switch off delay 0 0s 3600 0s 0...

Страница 53: ...Frequency Upper Limit Reached 18 Frequency Lower Limit Reached No Output at Stop 19 Under Voltage State Output 20 Communication Setting 21 Reserved 22 Reserved 23 Zero Speed Operating 2 Having Output...

Страница 54: ...oefficient 100 0 100 0 0 0 F3 11 AO1 Gain 10 00 10 00 1 00 F3 12 AO2 Offset Coefficient 100 0 100 0 0 0 F3 13 AO2 Gain 10 00 10 00 1 00 F3 14 Y1 switch on delay 0 0s 3600 0s 0 0s F3 15 Y1 switch off d...

Страница 55: ...litude 0 00 Hz to Maximum Frequency 0 01Hz F4 12 Forward Reverse Rotation Dead time 0 0s 3000 0s 0 0s F4 13 Reverse Control 0 Enabled 1 Disabled 0 F4 14 Operating Mode Set frequency is lower than the...

Страница 56: ...1 300 0 Rated Motor Current 200 0 F4 37 Output Over current Detection Delay Time 0 00s 600 00s 0 00s F4 38 Any Current Reaching 1 0 0 300 0 Rated Motor Current 100 0 F4 39 Any Current Reaching 1 Ampli...

Страница 57: ...0 Speed Loop Proportion Gain 1 1 100 30 F5 01 Speed Loop Integral Time 1 0 01s 10 00s 0 50s F5 02 Frequency Switch1 0 00 A2 05 5 00Hz F5 03 Speed Loop Proportion Gain 2 1 100 20 F5 04 Speed Loop Integ...

Страница 58: ...t V F 2 Square V F 3 1 2 power V F 4 1 4 power V F 6 1 6 power V F 8 1 8 power V F 0 F6 01 Torque Boost 0 0 Automatic Torque Boost 0 1 30 0 Model Dependent F6 02 Cut off Frequency of Torque Boost 0 00...

Страница 59: ...peed Tracking Mode 0 Start from the frequency at stop 1 Start from zero speed 2 Start from the maximum frequency 0 F7 02 Speed of Speed Tracking 1 100 20 F7 03 Startup Frequency 0 00Hz 10 00Hz 0 00Hz...

Страница 60: ...verse JOG 0 F8 03 LED Display Parameters in Operation 1 0000 FFFF Bit00 Operating Frequency Hz Bit01 Set Frequency Hz Bit02 Output Current A Bit03 Output Voltage V Bit04 Output Power kW Bit05 Output T...

Страница 61: ...lace 2 2 Decimal Places 3 3 Decimal Places 1 F8 13 Accumulated Power On Time 0h 65535h F8 14 Accumulated Power Consumption 0 65535 kWh Group F9 Fault and Protection Parameters Function Codes Parameter...

Страница 62: ...ion Errors 19 Motor Auto tuning Errors 20 Encoder PG Card Errors 21 EEPROM Read Write Errors 22 Inverter Hardware Errors 23 Motor Short to Ground 24 Reserved 25 Reserved 27 User Defined Fault 1 28 Use...

Страница 63: ...r F9 34 Operating Time upon 2nd Error F9 37 Frequency upon 1st Error F9 38 Current upon 1st Error F9 39 Bus Voltage upon 1st Error F9 40 X Status upon 1st Error F9 41 Inverter Temperature upon 1st Err...

Страница 64: ...F9 59 Action Selection at Instantaneous Power Failure 0 Invalid 1 PI Automatic Voltage Stabilization 2 Decelerate According to F4 08 0 F9 60 Voltage Check at Instantaneous Power 80 0 F9 61 Standard Bu...

Страница 65: ...g Source 0 FA 01 1 AI1 2 AI2 3 AI3 4 Pulse Setting DI5 5 Communication Setting 6 Multi Command 0 FA 01 PID Digital Setting 0 0 100 0 50 0 FA 02 PID Feedback Source 0 AI1 1 AI2 2 AI3 3 AI1 AI2 4 Pulse...

Страница 66: ...ia Terminal X 2 Automatic Switch Based on Deviation 0 FA 19 PID Parameter Switch Deviation 1 0 0 FA 20 20 0 FA 20 PID Parameter Switch Deviation 2 FA 19 100 0 80 0 FA 21 PID Initial Value 0 0 100 0 0...

Страница 67: ...0 Speed Control 1 Torque Control 0 Fb 11 Setting Source of Torque in Torque Control Mode 0 Digital setting Fb 12 1 AI1 2 AI2 3 AI3 4 Pulse Setting DI5 5 Communication Setting 6 MIN AI1 AI2 7 MAX AI1 A...

Страница 68: ...mand12 100 0 100 0 0 0 FC 13 Command13 100 0 100 0 0 0 FC 14 Command14 100 0 100 0 0 0 FC 15 Command15 100 0 100 0 0 0 FC 16 Simple PLC Operation Mode 0 Stop after one cycle 1 Keep the final values af...

Страница 69: ...2 Operating Time of Simple PLC Command 7 0 0s h 6500 0s h 0 0s h FC 33 Acceleration Deceleration Time of Simple PLC Command 7 0 3 0 FC 34 Operating Time of Simple PLC Command 8 0 0s h 6500 0s h 0 0s h...

Страница 70: ...0 source 1 AI1 2 AI2 3 AI3 4 Pulse setting 5 PID 6 Set by preset frequency F0 08 modified via terminal UP DOWN 0 Group Fd Communication Parameters Function Codes Parameter Name Range of Settings Defau...

Страница 71: ...FE 13 Quick Menu 13 F5 07 FE 14 Quick Menu 14 F6 00 FE 15 Quick Menu 15 F6 10 FE 16 Quick Menu 16 F0 00 FE 17 Quick Menu 17 F0 00 FE 18 Quick Menu 18 F0 00 FE 19 Quick Menu 19 F0 00 FE 20 Quick Menu 2...

Страница 72: ...flection Point 1 Input 100 0 100 0 30 0 P0 12 AI Curve 5 Inflection Point 2 Input P0 10 P0 14 3 00V P0 13 Corresponding Setting of AI Curve 5 Inflection Point 2 input 100 0 100 0 30 0 P0 14 AI Curve 5...

Страница 73: ...10 AI3 Measured Voltage 2 5 000V 10 000V Factory Corrected P1 11 AI3 Displayed Voltage 2 5 000V 10 000V Factory Corrected P1 12 AO1 Target Voltage 1 0 000V 5 000V Factory P1 13 AO1 Measured Voltage 1...

Страница 74: ...13 Input Pulse Frequency kHz 0 01kHz H0 14 PID Setting 1 H0 15 PID Feedback 1 H0 16 PID Output 1 H0 17 Load Speed 1 H0 18 Main Frequency 0 01Hz H0 19 Auxiliary Frequency 0 01Hz H0 20 Feedback Speed 0...

Страница 75: ...from host computer F0 03 Main frequency X source selection Range 0 13 Default 4 0 Digital setting non retentive at power failure The initial value of the set frequency is the value of F0 08 Preset fr...

Страница 76: ...igital setting the preset frequency F0 08 does not take effect You can directly adjust the set main frequency by pressing keys V on the operation panel or using the UP DOWN function of input terminals...

Страница 77: ...unication setting If the frequency upper limit is set by means of AI1 AI2 AI3 DI5 or communication the setting is similar to that of the main frequency source X For details see the description of F0 0...

Страница 78: ...rise of the inverter s heatsink In this case you need to derate the inverter Otherwise the inverter may overheat and alarm F0 16 Carrier frequency adjustment with temperature Range 0 1 Default 1 0 No...

Страница 79: ...e different there will be a large difference between the inverter s performance during the acceleration deceleration process If it is set to any non zero number the password protection function is ena...

Страница 80: ...ve reactance Range 0 01mH 655 35mH 55kW 0 001mH 65 535mH 55kW Default Model dependent F1 09 Mutual inductive reactance Range 0 1mH 6553 5mH 55kW 0 01mH 655 35mH 55kW Default Model dependent F1 10 No l...

Страница 81: ...igh speed pulse input two analog input terminal AI1 AI2 which can be used as a voltage input AI2 but also as a current input a keyboard potentiometer F2 00 X1 function selection Range 0 50 Default 1 F...

Страница 82: ...etting the terminal is used to clear the modification by using the UP DOWN function or the increment decrement key on the operation panel returning the set frequency to the value of F0 08 20 Command s...

Страница 83: ...l is enabled the frequency source Y is replaced by the preset frequency set in F0 08 41 Switch over between PID parameters If the PID parameters switchover performed by means of DI terminal FA 18 1 th...

Страница 84: ...ce Setting Acceleration Deceleration Time Selection acceleration deceleration time terminal 2 Acceleration deceleration time terminal 1 Acceleration deceleration time selection Corresponding parameter...

Страница 85: ...00s Default 0 10s F2 15 AI3 filter time Range 0 00s 10 00s Default 0 10s Definition analog input terminal AI1 AI2 and keyboard potentiometer filter time the input signal filtering Long filtering time...

Страница 86: ...ng of AI curve 3 maximum input Range 100 0 100 0 Default 100 0 Please refer to the AI1 when use AI2 and AI3 curve function F2 28 PULSE minimum input Range 0 00kHz F2 30 Default 0 00kHz F2 29 Correspon...

Страница 87: ...voltage is less than the minimum input the corresponding setting of the minimum input F2 17 F2 21 F2 25 is used If the value of a certain digit is 1 when analog input voltage is less than the minimum...

Страница 88: ...lue reached The terminal becomes ON when the count value reaches the value set in group Fb 10 Length reached The terminal becomes ON when the detected actual length exceeds the value set in Fb 05 11 P...

Страница 89: ...put If a fault occurs on the inverter and the inverter continues to run the terminal outputs the alarm signal 40 Current running time reached If the current running time of inverter exceeds the value...

Страница 90: ...z X2 according to the formulas you can obtain gain and zero offset coefficient as follows 20 100 10 50 0 2 50 10 0 8 0 10 50 0 50 10 2 b K Then you can set F3 10 to 20 and set F3 11 to 0 8 In the form...

Страница 91: ...Model dependent F4 07 Acceleration time 4 Range 0 0s 6500 0s Default Model dependent F4 08 Deceleration time 4 Range 0 0s 6500 0s Default Model dependent The JT550 provides a total of four groups of a...

Страница 92: ...d of the motor output frequency drops more which can reduce the load on the motor to achieve multiple motors load evenly This parameter refers to the inverter rated output load the output frequency de...

Страница 93: ...n in the following Figure F4 21 Detection range of frequency reached Range 0 0 100 0 Default 0 0 If the inverter running frequency is within the certain range of the set frequency the corresponding DO...

Страница 94: ...al JOG preferred Range 0 1 Default 0 0 Disabled 1 Enabled It is used to set whether terminal JOG is preferred If terminal JOG is preferred the inverter switches to terminal JOG running state when ther...

Страница 95: ...responding output terminal becomes ON The zero current detection is shown in the following figure F4 36 Output overcurrent threshold Range 0 0 300 0 Default 200 0 F4 37 Output overcurrent detection de...

Страница 96: ...iming duration can be queried by H0 28 The timing duration is set in F4 43 and F4 44 in unit of minute F4 45 AI1 input voltage lower limit Range 0 00V F4 46 Default 3 10V F4 46 AI1 input voltage upper...

Страница 97: ...t in this parameter the corresponding output terminal becomes ON indicating that the current running time is reached F4 54 ADT1channel selection Unit s digit 0 AI1 1 AI2 Ten s digit 0 No output when s...

Страница 98: ...this parameter is not required normally F5 08 Vector control over excitation gain Range 0 200 Default 64 During deceleration over excitation control can restrain rise of the bus voltage to avoid the...

Страница 99: ...0 30 0 Default Model dependent F6 02 Cut off frequency of torque boost Range 0 00Hz max freq Default 50 00Hz The torque compensation function compensates for insufficient torque production at low fre...

Страница 100: ...braking unit or energy feedback unit set F6 10 V F over excitation gain to 0 Otherwise too large current may occur during drive running F6 11 V F oscillation suppression gain Range 0 100 Default Mode...

Страница 101: ...ove motor running characteristic you can lower current limit level above rated frequency The current limit function above rated frequency helps to improve acceleration performance in the applications...

Страница 102: ...up F1 are set correctly 2 DC braking restart The DC injection braking function is applicable to drive load such as elevator and crane F7 01 Rotational speed tracking mode Range 0 2 Default 0 To comple...

Страница 103: ...segment and the end segment of S curve acceleration deceleration They must satisfy the requirement F7 08 F7 09 100 0 F7 10 Stop mode Range 0 1 Default 0 0 Decelerate to stop After the stop command is...

Страница 104: ...meters 1 Range 0x0000 0xFFFF Default 0x001F A maximum of 32 parameters in the running status can be viewed in F8 03 and F8 04 The display starts from the lowest bit of F8 03 A total of 13 parameters i...

Страница 105: ...2 decimal places When the running frequency of the inverter is 40 00 Hz the load speed is 40 00 2 000 80 00 If the inverter is at the stop state the load speed is the speed corresponding to the set f...

Страница 106: ...termine whether to check the motor is short circuited to ground at power on of the inverter If this function is enabled the inverter s UVW will have voltage output a while after power on F9 09 Fault a...

Страница 107: ...Stop according to the stop mode 2 Continue to run F9 49 Fault protection action selection 3 Range 0000 2222 Default 0000 Ten thousand s digit PID feedback lost during running Thousand s digit Load bec...

Страница 108: ...oltage dip the inverter decelerates to stop F9 63 Protection upon load becoming 0 Range 0 1 Default 0 F9 64 Detection level of load becoming 0 Range 0 0 100 0 Default 10 0 F9 65 Detection time of load...

Страница 109: ...control requires reverse PID action Note that this function is influenced by the DI function 35 Reverse PID action direction FA 04 PID setting feedback range Range 0 65535 Default 1000 This parameter...

Страница 110: ...a small range FA 11 PID setting change time Range 0 00 650 00s Default 0 00s The PID setting change time indicates the time required for PID setting changing from 0 0 to 100 0 The PID setting changes...

Страница 111: ...the X allocated with function 38 PID integral pause is ON In this case only proportional and differential operations take effect If it is set to invalid integral separated remains invalid no matter wh...

Страница 112: ...ermine the swing amplitude and jump frequency amplitude The swing frequency is limited by the frequency upper limit and frequency lower limit If relative to the central frequency Fb 00 0 the actual sw...

Страница 113: ...value is reached Fb 09 should be equal to or smaller than Fb 08 Fb 10 Speed Torque control selection Range 0 1 Default 0 It is used to select the inverter s control mode speed control or torque contr...

Страница 114: ...e the acceleration deceleration time of the slave in torque control is set to 0 0s Group FC Multi Reference and Simple PLC Function Parameters FC 00 Reference 0 Range 100 0 100 0 Default 0 0 FC 01 Ref...

Страница 115: ...Default 00 0 Not retentive 1 Retentive Unit position Retentive at power down Tens position Retentive at stop FC 18 Running time of simple PLC reference 0 Range 0 0s h 6553 5s h Default 0 0s h FC 19 Ac...

Страница 116: ...ing time of simple PLC reference 10 Range 0 0s h 6553 5s h Default 0 0s h FC 39 Acceleration deceleration time of simple PLC reference 10 Range 0 3 Default 0 FC 40 Running time of simple PLC reference...

Страница 117: ...23 Quick Menu 23 Default F0 00 FE 25 Quick Menu 24 Default F0 00 FE 26 Quick Menu 24 Default F0 00 FE 27 Quick Menu 24 Default F0 00 FE 28 Quick Menu 24 Default F0 00 FE 29 Quick Menu 24 Default F0 00...

Страница 118: ...ve 1 to AI curve 3 AI curve 1 to AI curve 3 are linear correspondence and AI curve 4 and AI curve 5 are four point correspondence Group P1 Analog calibration parameters P1 00 AI1 measured voltage 1 Ra...

Страница 119: ...ured voltage 1 Range 0 500V 4 000V Factory corrected P1 14 AO1 target voltage 2 Range 6 000V 9 999V Factory corrected P1 15 AO1 measured voltage 2 Range 6 000V 9 999V Factory corrected P1 16 AO2 targe...

Страница 120: ...04 PID feedback PID feedback percentage FA 04 PID output PID output percentage FA 04 H0 17 Load speed 1 Displayed value reference to F8 12 H0 18 Main frequency 0 01Hz H0 19 Auxiliary frequency 0 01Hz...

Страница 121: ...0 30 Communication setting value 0 01 It displays the data written by means of the communication address 0x1000 H0 31 AI1 input voltage Before correction 0 01V H0 32 AI2 input voltage Before correctio...

Страница 122: ...n circuit when measuring insulation resistance using a megohmmeter DC 500V Megohmmeter Do not test the control circuit insulation using an insulation resistance meter No need to perform High Voltage T...

Страница 123: ...according to the following tables If the fault cannot be rectified contact the agent or Juditech Err22 is the inverter hardware overcurrent or overvoltage signal In most situations hardware overvolta...

Страница 124: ...Err06 1 Input voltage is too high 2 An external force drags the motor during deceleration 3 Deceleration time is too short 4 No braking units or braking resistors added 1 Adjust the voltage to the nor...

Страница 125: ...1 Ambient temperature is too high 2 Clogged vents 3 Broken fans 4 Broken thermistor modules 5 Broken inverter module 1 Lower ambient temperature 2 Clean the vents 3 Replace the fans 4 Replace the ther...

Страница 126: ...ches the set value F4 16 Clear the records using the initiation of parameters Offload Errors Err30 Operation current of inverter is smaller than F9 64 Confirm the removal of load or if parameters sett...

Страница 127: ...d parts of motor drive Thermocouple etc Lower the carrier frequency F0 15 Replace fans and clean the vents Contact tech support 5 Motor Does Not Work After Starting The Motor Drive Motor and motor cab...

Страница 128: ...lert Soft starter does not pull in Check if there are the loose wires on the contactor Check if the contactor malfunctions Check if 24V power supply can normally power the contactor Contact tech suppo...

Страница 129: ...ss from the host or communication operations Only one device can send out data at one time and other devices are receiving data The setting range of slave address is 1 247 of which 0 is the broadcasti...

Страница 130: ...s divided into function code parameters and non function code parameters Please refer to address definitions for more info While transmitting high bit is in front of low bit Function Codes Address L F...

Страница 131: ...e 1 word Function Write the data of a word to the designated data address in order to modify the parameters of inverter For example Write 5000 1388H to the address F00A F0 10 of Inverter Slave address...

Страница 132: ...0 0x70FF For example if the function code is F3 12 then its access address is 0xF30C Note Group FF No reading or modification of parameters Group H Parameters can be read only No modification of param...

Страница 133: ...and Function 2000H 0001 Forward Operation 0002 Reverse Operation 0003 Forward JOG 0004 Reverse JOG 0005 Coasting to Stop 0006 Decelerating to Stop 0007 Fault Reset 3 Reading Inverter s Status Read Onl...

Страница 134: ...perating Time Reached 001B User Defined Fault 1 001C User Defined Fault 2 001D Accumulated Power On Time Reached 001E Load Drop 001F PID Feedback Lost during Operating 0028 Rapid Current Limit Over Ti...

Страница 135: ...of system processing if the response delay is larger than the time of system processing then it will have to wait until the response time is reached and sends data to the host Fd 04 Communication Over...

Страница 136: ...Chapter 7 Maintenance and Troubleshooting JT550 Series Inverter Manual 136...

Отзывы: