19 Vaultek
®
Securing Your Safe
Your Vaultek
®
safe can be secured via the included mounting plate and hardware to a vertical surface.
Securing Your Safe:
Multiple Plate Configurations
Your Vaultek
®
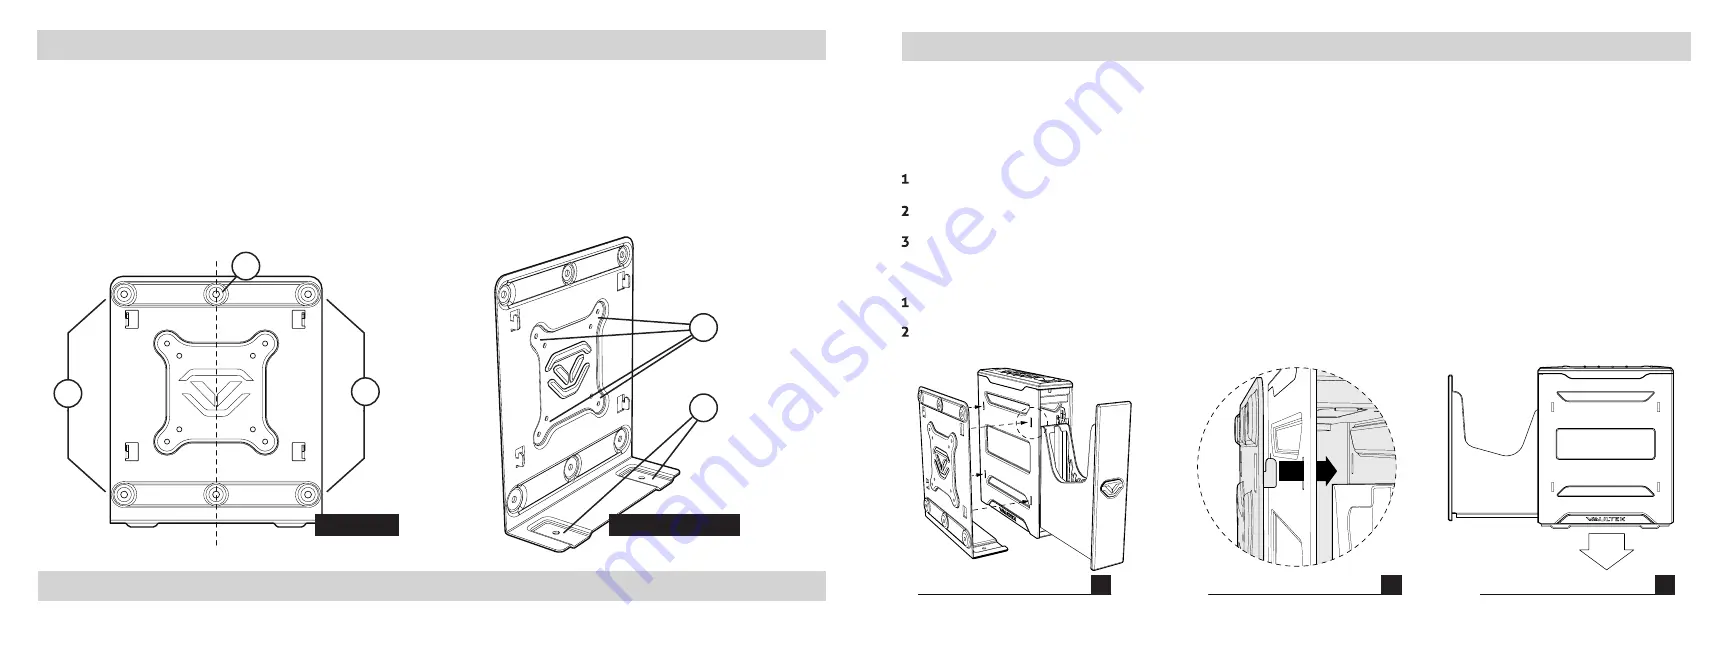
safe includes a mounting plate with multiple configurations for mounting. A four point configuration
can be used for standard vertical surface mounting (1.1), two point mounting for installing in a vertical wall stud
(1.2), and additional base mounts (1.3).
The mounting plate also features standard VESA 75mm and 100mm fitment for use with other adapter plates (1.4).
Hardware for VESA fitment not included.
1.2
1.3
1.1
1.1
Front View
Perspective View
1.4
For setup, tutorials, and FAQs visit
www.vaulteksafe.com/support/slider-series/
Securing Your Safe:
Mounting Bracket Installation
Securing Your Safe:
Mounting Safe
Locate the 4 receiving slots located on the safe sides, and the 4 tabs located on the mounting plate.
Fully insert the tabs on the mounting plate into the receiving slots on the safe (Figure N/O), and press the safe
downwards to lock in place (Figure P).
Tip!
Your safe can install on the mounting plate from the left or right side. When installing the plate, be sure
the bottom is parallel to the floor (Figure P) so the safe opens horizontally. Angling the plate or aiming the safe
downwards can affect the rail mechanics and prevent safe from opening correctly.
Locate mounting surface, making sure the safe will have enough clearance to open properly prior to installing.
Hold mounting plate in place and use a pencil to mark desired hole locations. Drill 7/32" inch pilot holes.
Using hardware provided fasten mounting plate in place and tighten firmly.
20 Vaultek
®
N
O
P
Continue on next page for more information about Securing Your Safe.


