E
N
G
L
IS
H
49
QUICK CONFIGURATION
This paragraph concerns a quick procedure to set the control unit
and set it at work immediately.
We recommend following these instructions, in order to
check quickly the correct operation of control unit, motor
and accessories, and then changing the configuration in
case of any non-satisfactory parameter.
1.
Call up the default configuration: see paragraph “LOADING
OF DEFAULT PARAMETERS”
2.
Set the voice menus
StoP, Foto, CoS,
based on the safety
installed on the barrier (see paragraph “CONTROL UNIT
CONFIGURATION).
3.
Set the
dir
parameter (see paragraph Direction pag. 52)
4.
Start the auto-learning cycle: see paragraph “AUTO-LEARNING
END-STOP”
5.
Check that the automation work properly and if necessary
modify the configuration of the desired parameters. For the
position of the item menus inside the main menu and for the
options related to each item menu, refer to the paragraph
“CONFIGURATION OF THE CONTROL UNIT”.
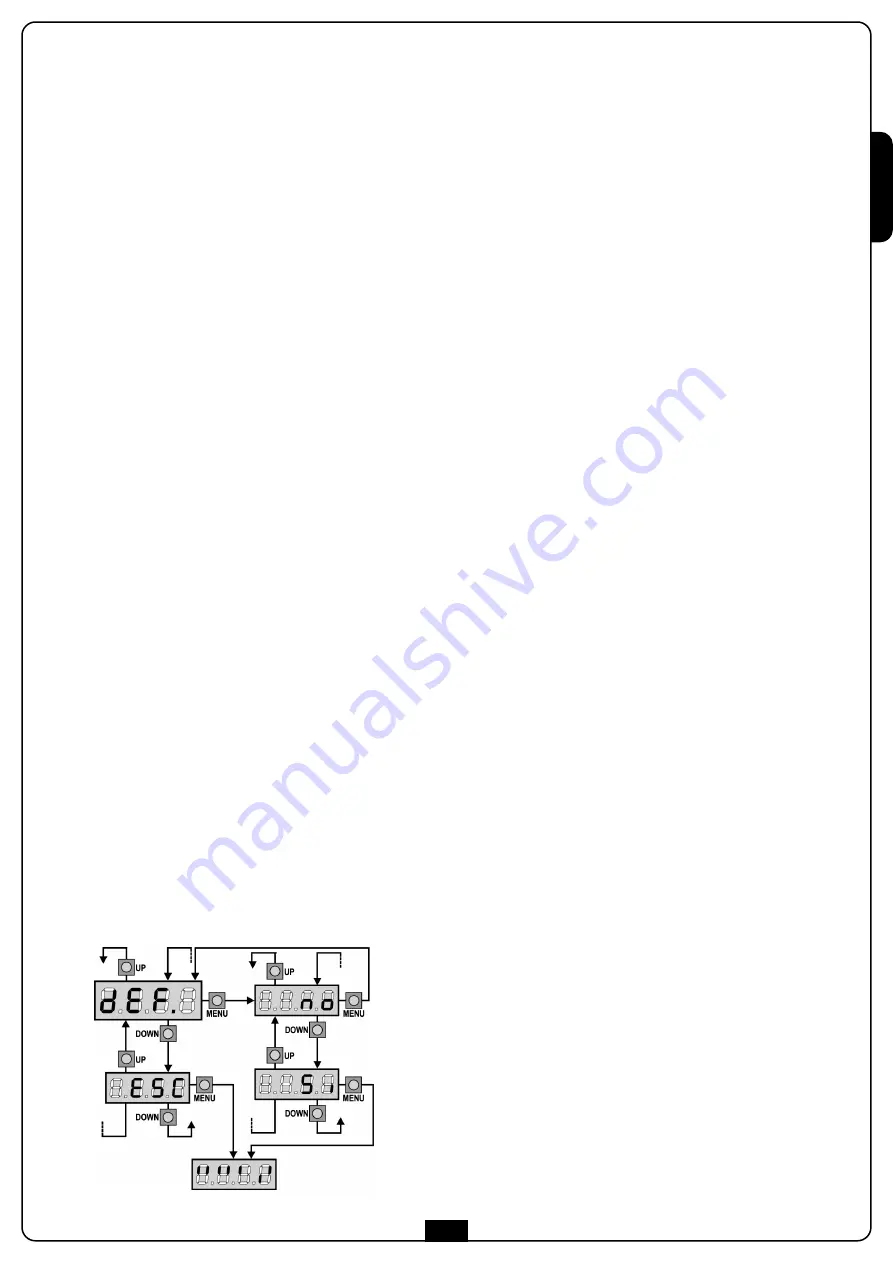
LOADING OF DEFAULT
PARAMETERS
If necessary, it is possible to restore all the parameters to their
standard or default value (see table at the end)
m
WARNING: This procedure causes the loss of all the
customized parameters, therefore it has been put outside
the configuration menu, to reduce the possibility of
executing it by mistake.
1.
Press and hold down the MENU key until the
-dEF
appears
on the display
2.
Release the MENU key: the display will show
ESC
(press the
MENU key only if you want to leave this menu)
3.
Press the DOWN key:
dEF
will appear on the display.
4.
Press the MENU key:
no
will appear on the display.
5.
Press the DOWN key:
Si
will appear on the display.
6.
Press the MENU key: All of the parameters are returned to
their default values and the display shows the control panel
AUTO-LEARNING END-STOP
This menu allows automatically learning the end-stop positions of
the barrier in opening and closing.
m
ATTENTION: before proceeding, make sure to position
the mechanical stops correctly.
m
ATTENTION: before proceeding set the dir parameter
(see paragraph Direction pag. 52)
1.
Set the voice menus
StoP, Foto, CoS,
based on the safety
installed on the barrier (see paragraph “CONTROL UNIT
CONFIGURATION).
2.
Set up the
St.rt
parameter in
StAn
modality
3.
Maintain hold pressed push-button MENU until the display
reads
-APP
4.
Release push-button MENU: the display reads
ESC
(press
push-button MENU only if desired to exit from this menu)
5.
Press the push-button DOWN: the display reads
FC
6.
Press the push-button MENU in order to start the
auto-learning:
6.1
The boom moves in closing until reaching the arrest
point (end of closing)
6.2
The boom opens. Press UP when the boom reaches the
desired opening. As alternative let the mechanical arrest
intervene.
6.3
The boom recloses automatically and it memorizes the
length
During normal operations, the travel height of the boom is
always reported to the point of arrest in closing. Any movements
of this point will cause an equal movement of the end opening
point.
7.
On the display it reads a reference value for the obstacles
sensor. At this point it is possible to set up the sensitivity as
follows:
7.1
Regulate this value with the UP and DOWN push-buttons
7.2
Confirm the value pressing MENU (the display reads
SEnS
)
7.3
Hold pressed push-button DOWN, until the display reads
FinE
, press MENU, press UP in order to select the voice
command
Si
and press MENU.
m
ATTENTION: If this procedure is not followed, the
control panel will exit from the Time out programming
(20 sec- 1 min) retaining the last memorized value.
Содержание 36A004
Страница 2: ......
Страница 9: ...ITALIANO 7 Fig 3...
Страница 11: ...ITALIANO 9...
Страница 16: ...ITALIANO 14...
Страница 34: ...ITALIANO 32 INSTALLAZIONE DELL ACCESSORIO 163604...
Страница 41: ...ENGLISH 39 Fig 3...
Страница 43: ...ENGLISH 41...
Страница 48: ...ENGLISH 46...
Страница 66: ...ENGLISH 64 INSTALLATION OF THE ACCESSORY 163604...
Страница 73: ...FRAN AIS 71 Fig 3...
Страница 75: ...FRAN AIS 73...
Страница 80: ...FRAN AIS 78...
Страница 98: ...FRAN AIS 96 INSTALLATION DE L ACCESSOIRE 163604...
Страница 105: ...ESPA OL 103 Fig 3...
Страница 107: ...ESPA OL 105...
Страница 112: ...ESPA OL 110...
Страница 130: ...ESPA OL 128 INSTALACI N DEL ACCESORIO 163604...
Страница 131: ......
Страница 132: ......


