background image

Chapter 3  Using the Operator Panel

3-25

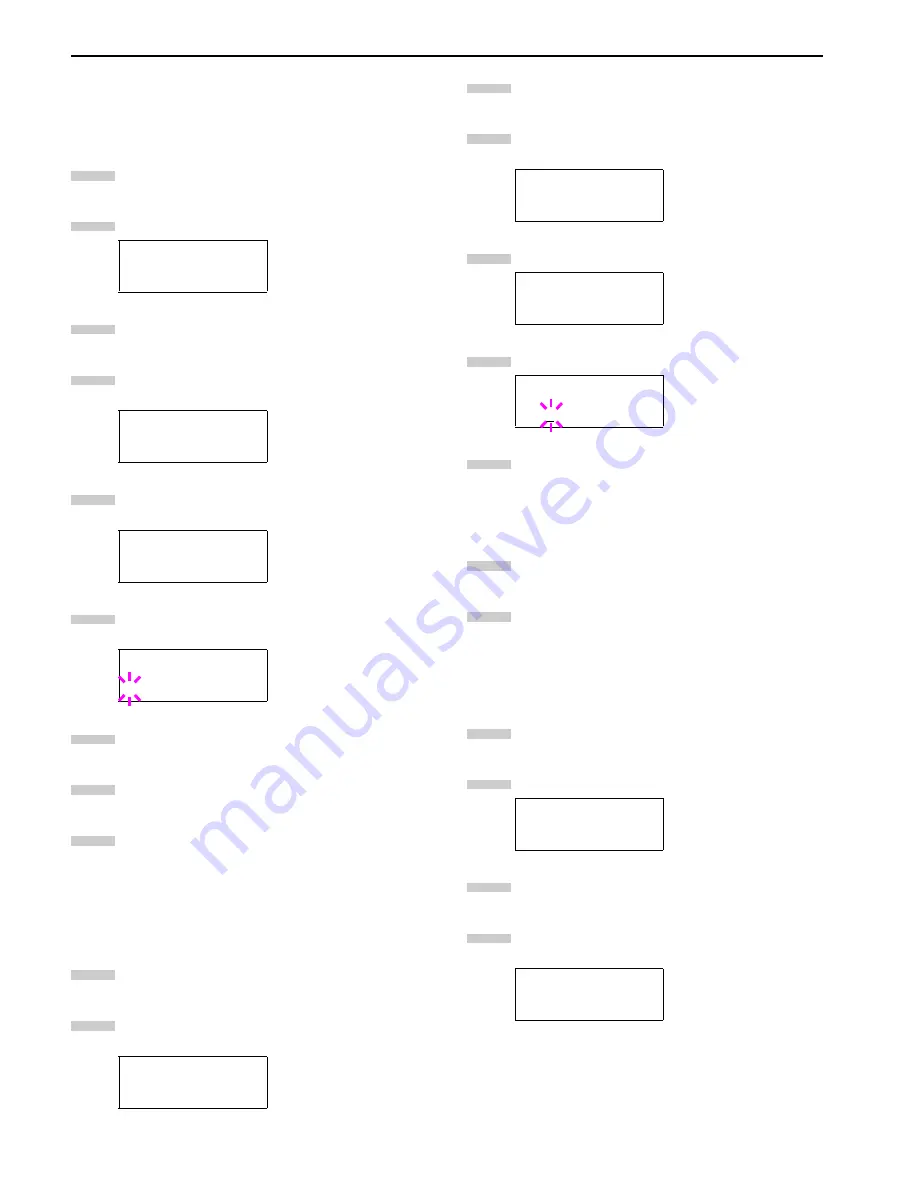
Changing Type for Courier/Letter Gothic

Courier or Letter Gothic font type can be selected as Regular or
Dark. For example, to change the type of Courier, proceed as
follows:

Press the 

MENU

 key.

Press the 

3

 or 

4

 key repeatedly until 

Font >

 appears.

Press the 

2

 key.

Check that 

Internal

 is displayed and press the 

2

key.

Press the 

3

 or 

4

 key repeatedly until 

>Courier

 ap-

pears.

Press the 

ENTER

 key. A blinking question mark (

?

) ap-

pears.

Select 

Regular

 or 

Dark

 using the 

3

 or 

4

 key. 

Press the 

ENTER

 key. 

Press the 

MENU

 key and the message display returns

to 

Ready

.

Changing the Font Size

You can change the size of the default font. If the default font is
a fixed-pitch font such as Courier or Letter Gothic, the character
pitch can be changed instead of the font size.

Press the 

MENU

 key.

Press the 

3

 or 

4

 key repeatedly until 

Font >

 appears.

Press the 

2

 key.

Check that 

Internal

 is displayed and press the 

2

key.

Press the 

3

 or 

4

 key repeatedly until 

>Size

 appears.

Press the 

ENTER

 key. A blinking cursor ( 

_

 ) appears.

Press the 

3

 or 

4

 key to increase or decrease the value

of the figure where the cursor is blinking. The font size
can be set between 4 and 999.75 points, in 0.25-point
increments. You can use the 

2

 and 

1

 key to move the

cursor right and left.

When the desired size is displayed, press the 

ENTER

key.

Press the 

MENU

 key. The message display returns to

Ready

.

Setting the Character Pitch for Courier/Letter Gothic

You can set the character pitch for fixed-pitch fonts when the de-
fault font is Courier or Letter Gothic.

Press the 

MENU

 key.

Press the 

3

 or 

4

 key repeatedly until 

Font >

 appears.

Press the 

2

 key.

Check that 

Internal

 is displayed and press the 

2

key.

Font            >

>Font Select   >

 Internal

>>Courier

  Regular

>>Courier

? Regular

Font            >

1

2

3

4

5

6

7

8

9

1

2

>Font Select   >

 Internal

>Size

 012.00 point(s)

>Size

 012.00 point(s)

Font            >

>Font Select   >

 Internal

3

4

5

6

7

8

9

1

2

3

4

Содержание LP 3036

Страница 1: ...er printer LP 3036 LP 3051 your office partner I N S T R U C T I O N H A N D B O O K please read the instruction handbook carefully before using this machine keep it close to the machine for easy reference ...

Страница 2: ...on Additional pages may be inserted in future editions The user is asked to excuse any technical inaccuracies or typograph ical errors in the present edition No responsibility is assumed if accidents occur while the user is following the instructions in this guide No responsibility is as sumed for defects in the printer s firmware contents of its read only memory This guide any copyrightable subje...

Страница 3: ... any in cidental damages or other economic consequential damages even if IBM or its authorized supplier has been advised of the possibility of such damages IBM will not be liable for any dam ages claimed by you based on any third party claim This limita tion of remedies also applies to any developer of Programs supplied to IBM IBM s and the developer s limitations of reme dies are not cumulative S...

Страница 4: ...AND MER CHANTABILITY ARE EXCLUDED 8 Your exclusive remedy and the sole liability of Agfa Japan in connection with the Software and Typefaces is repair or re placement of defective parts upon their return to Agfa Ja pan IN NO EVENT WILL AGFA JAPAN BE LIABLE FOR LOST PROFITS LOST DATA OR ANY OTHER INCIDENTAL OR CONSEQUENTIAL DAMAGES OR ANY DAMAGES CAUSED BY ABUSE OR MISAPPLICATION OF THE SOFTWARE AN...

Страница 5: ...1 2 2 10 Operating a RAM Disk 3 34 2 2 11 Operating a Memory Card 3 36 2 2 12 Paper Handling 3 40 2 2 13 Other Modes 3 47 Chapter 4 Troubleshooting 4 1 1 General Guide 4 1 2 Print Quality Problems 4 2 3 1 Indicators 4 4 3 2 Maintenance Messages 4 4 3 Indicators and Messages 4 4 3 3 Error Messages 4 6 4 Correcting a Paper Jam 4 8 4 2 Jam at the MP Tray 4 9 4 1 Jam in Paper Cassette 4 9 4 3 Jam in L...

Страница 6: ...tocol C 3 4 2 Connecting the RS 232C Cable C 4 4 RS 232C Cable Connection C 4 4 1 Preparing an RS 232C Cable C 4 4 3 Setting the RS 232C Parameters C 4 Appendix D Option Units D 1 1 Available Options D 1 2 2 DF 70 71 75 Document Finishers D 3 2 3 Network Interface D 3 2 Installing Option Units D 3 2 1 PF 70 75 Paper Feeders D 3 2 5 Memory Card D 4 2 4 Hard Disk D 4 Appendix E Specifications E 1 Gl...

Страница 7: ...ts This appendix explains about fonts and lists the printer s internal fonts Appendix B Expansion Memory This appendix explains how to expand the printer s memory Appendix C Host Computer Interface This appendix explains the pin assignment and specifications for the printer s parallel interface and serial interface Appendix D Option Units This appendix introduces the available options using with t...

Страница 8: ... a paper jam or when replacing toner Label 1 High voltage inside NEVER touch parts in this area because there is a danger of electric shock Label 4 Moving parts inside May cause personal injury Do not touch moving parts Label 3 Do not incinerate toner and waste toner box Dangerous sparks may cause burn Label 2 High temperature inside Do not touch parts in this area because there is a danger of get...

Страница 9: ...ra ture around 20 C humidity around 65 RH and avoid the following locations when selecting a site for the printer Avoid locations near a window or with exposure to di rect sunlight Avoid locations with vibrations Avoid locations with drastic temperature fluctuations Avoid locations with direct exposure to hot or cold air Avoid poorly ventilated locations Power Supply Grounding the Printer WARNING ...

Страница 10: ...d from the outlet ALWAYS remove the power plug from the outlet when moving the printer If the power cord is damaged there is a danger of fire or electrical shock If the printer will not be used for a short period of time overnight etc turn the power switch OFF O If it will not be used for an extended period of time va cations etc remove the power plug from the outlet for safety purposes during the...

Страница 11: ...ith the toner And make sure not stick to your skin For the disposal of old toner container and waste toner box consult your dealer Or dispose of the toner or toner containers in accordance with Federal state and Local rules and regulations Keep away the toner container and the waste toner box from children Other Precautions If the printer will not be used for an extended period of time remove the ...

Страница 12: ...1 1 Chapter 1 Name of Parts A B C D E F 2 3 4 1 0 9 8 7 6 5 H I J K M L G ...

Страница 13: ...cted D Cleaning knob Pull and push back in after toner container replacement or when print images become soiled with toner E Main charger unit When replacing the toner container install the grid cleaner to clean the grid F Cleaning brush Used to clean the internal part of the printer G Power cord H Power cord connector 220 to 240 V models only I Option unit connector When using the option device c...

Страница 14: ...per cassette can be set to hold paper of any desired size from A3 to A5R Pull the paper cassette out toward you as far as it will go Do not pull more than one paper cassette out at a time Hold the paper guide and move it to align the paper guide with the required paper width Paper sizes are marked inside the paper cassette Hold the paper stopper and move it to align with the re quired paper length...

Страница 15: ...emove the paper from the paper cassette s and seal it in its original packaging to protect from moisture Also when stor ing paper in a high temperature and high humidity environment seal it in a moisture proof bag Special paper as well as standard paper can be loaded into the MP tray When printing onto transparencies or thick paper be sure to use the MP tray Number of sheets of standard paper colo...

Страница 16: ...nter function envelopes can be set in the MP tray The types of envelopes that can be used are Monarch DL and C5 Up to 6 envelopes can be loaded in the MP tray at a time Open the MP tray Align the insert guides with the envelope size Open the flap of the envelope and set it with the copy side facing upward With the flap facing the outside in sert the envelope into the slot along the insert guides a...

Страница 17: ... panel has an LCD message display indicators and eight keys 1 Understanding the Operator Panel ENTER GO CANCEL MENU READY INTERFACE SIZE TYPE DATA ATTENTION Ready A4 PLAIN Message Display See page 3 2 Interface Indicator See page 3 2 Keys See page 3 3 Paper Size Indicator See page 3 3 Paper Type Indicator See page 3 3 Operation Indicators See page 3 2 ...

Страница 18: ... warming up Please wait Lit Indicates when a problem or an error occurs that you can clear by yourself For example paper jam occurs 1Flashing Indicates when no papers are detected Fast Flashing Indicates that the paper jam occurs Lit Indicates that the MP tray is being selected 2Flashing Indicates when the cassette or paper is not detected or when the pa pers are loading Fast Flashing Indicates th...

Страница 19: ...YCLED Recycled CUSTOM1 to 8 Custom 1 to 8 VELLUM Vellum 1 6 Keys NOTE Key Function Switches the printer on line and off line Prints and feeds out one page Cancels a printing job To cancel proceed as follows 1 Check if Processing is displayed in the message display 2 Press the CANCEL key Print Cancel appears in the message display and then interface to be canceled appears Parallel Serial Network Op...

Страница 20: ...erator panel settings The following is the hierarchy diagram of the menu selection system of the printer The vertical transition is made with the 3 and 4 keys and horizontal transition is made with the 2 and 1 keys To change or finalize configuration on an item use the ENTER key 2 Using the Operator Panel 2 1 Menu Selection System These items will not appear unless the printer is installed with th...

Страница 21: ...net Mask 000 000 000 000 Gateway 000 000 000 000 Parity None Protocol DTR pos XON NetWare On TCP IP On TCP IP Off NetWare Off Ether Talk On OPT StatusPage On OPT StatusPage Off Ether Talk Off Ether Talk On Network Status Page On Network Status Page Off OPT StatusPage On OPT StatusPage Off Ether Talk Off Continued on the next page Data Bits 8 Data Bits 7 Stop Bits 1 Stop Bits 2 Barcode Mode On Barc...

Страница 22: ...ulation EPSON LQ 850 Emulation IBM Printer Emulation Line Printer Print KPDL Errs Off Emulation KPDL AUTO Emulation KPDL Code Set IBM US Code Set DIALO US Code Set LQ US Code Set IBM PC 8 Print KPDL Errs Off KC GL Pen Width Alt Emulation PCL 6 KC GL Page Set SPSZ Emulation KC GL Emulation PCL 6 Pen 1 Width 01 dot s Courier Dark Courier Regular Letter Gothic Dark Letter Gothic Regular Emulation DIA...

Страница 23: ... Disk Size 0008 MByte read Data Write Data Delete Data List of Partition Read Data Opt ROM List of Partition Read Fonts Read Data Write Data Delete Data Format List of Partition Print Quality Resolution Fast 1200 mode Print Density 03 KIR Mode On KIR Mode Off EcoPrint Mode Off EcoPrint Mode On RAM DISK Mode Off RAM DISK Mode On Memory Card ...

Страница 24: ... Adjust Reset Type Adjust MP Tray Size A4 MP Tray Type Plain Cassette 1 Type Plain MP Tray Mode Cassette MP Tray Mode First Cassette1 Size Feed Select Cassette 1 Stack Select Face down tray Duplex Mode None Unit mm Unit inch A4 Letter 000 A3 Ledger 000 B4 000 Type Adjust Custom 1 Override A4 LT Off Override A4 LT On Paper Weight Normal ...

Страница 25: ...og Developer Drum Life Counters Others New Toner Installed Sleep Timer 030 min Print HEX DUMP Printer Reset MSG Language English Form Feed Time Out 030sec Sleep Mode On Sleep Mode Off Resource Prot Off Buzzer Off Auto Continue Mode On Auto Continue Mode Off Auto Continue Timer 030sec Service Buzzer On ...

Страница 26: ... If you want to check the printer s current status including mem ory available and option settings you can find the information you need on the status page Press the MENU key Press the 3 or 4 key repeatedly until Print Status Page appears Press the ENTER key A question mark appears Press the ENTER key again The printer prints a status page For a full description of the status see the following sam...

Страница 27: ...b Retention Job Storage In either job mode when printing a document the print data is transferred from the computer to the printer then stored on the printer s hard disk Since copies of the document are printed us ing the stored data printing is performed faster with less compu ter spooling time and less network traffic To use the e MPS system an optional hard disk must be in stalled in the printe...

Страница 28: ... one When the printer is turned off all stored jobs will be deleted Printing Additional Copies using Quick Copy To print additional copies of a job stored in the printer Press the MENU key Press the 3 or 4 key repeatedly until e MPS ap pears Press the 2 key Press the 3 or 4 key repeatedly until Quick Copy appears followed by the user name Harold in this example The user name is assigned at printin...

Страница 29: ...ample appear with a blinking question mark before the letters Press the 3 or 4 key to scroll to the desired job title Press the ENTER key The number of copies to be printed can be set To increase the copy count press the 3 key to decrease the copy count press the 4 key Press the ENTER key to finalize the copy count The printer prints the specified number of copies for the job Printing a Private Jo...

Страница 30: ...mber of copies Press the ENTER key The private job is deleted from the hard disk Storing a Print Job You can download a job to the hard disk without printing it This allows you to store print jobs that are frequently needed such as fax cover pages check lists and order forms for printing at any later time using the operator panel When the printer is turned off all the print jobs will be deleted Re...

Страница 31: ...a List of Code Jobs If you select Permanent Job Storage on the printer driver you can have a List of Code Job printed using the operator panel The List of Code Job may be used to read the barcode ID for the stored job you want to reprint by using a barcode reader See Appendix D Option Units A sample Code Job List is shown on page 3 15 Press the MENU key Press the 3 or 4 key repeatedly until e MPS ...

Страница 32: ... operation Maximum number of Quick Copy Proof and Hold jobs Maximum space assigned to temporary code jobs Maximum space assigned to permanent code jobs Maximum space assigned to virtual mailboxes The total amount of storage areas specified must not exceed the total size of the hard disk Otherwise you may only be able to accommodate print jobs of a smaller amount of print jobs than specified Changi...

Страница 33: ...the blinking cursor Use the 2 and 1 keys to move the cursor right and left When the desired size is displayed press the ENTER key Press the MENU key The display returns to Ready Maximum Space Assigned to Permanent Code Jobs This changes the hard disk space that holds permanent code jobs You can change the maximum space from 0 to 9999 megabytes The actual maximum size depends on the size of free ha...

Страница 34: ...endently on different interfaces by using the printer s menu selection sys tem Select the interface to apply the changes in the procedure described below This interface selection described below does not select which interface data will be received from The printer automatically selects an interface data to be received Changing Parallel Interface Modes The parallel interface mode of this printer s...

Страница 35: ...low Display the setting item to be changed and press the ENTER key A question mark appears The following example explains how to change the baud rate The settings for other items can be changed in a similar manner Press the 3 or 4 key to display the desired setting The baud rate can be selected from 1200 2400 4800 9600 default 19200 38400 57600 and 115200 Some computers may not be compatible with ...

Страница 36: ...ap pears Press the 3 or 4 key repeatedly until Network ap pears Press the ENTER key again Press the 2 key Each time the 3 or 4 key is pressed the display changes as shown below The following example explains how to activate TCP IP protocol to connect the printer in the network You can select Netware or EtherTalk in a similar manner If TCP IP is currently Off is displayed select On using the 3 or 4...

Страница 37: ...rface The default setting is Off print The network interface status page will be outputted after the printer status page Printing out a network interface status page may not be possi ble with some optional network interface cards For details see the manual for the network interface Press the MENU key Press the 3 or 4 key repeatedly until Interface appears Press the ENTER key A blinking question ma...

Страница 38: ...ange the character code set Available character code sets vary depending on the current emulation KPDL AUTO Emulation KPDL is the Kyocera s implementation of the PostScript lan guage The KPDL AUTO emulation enables the printer to au tomatically change the emulation mode according to the data received when printing In addition to KPDL AUTO emulation you can use the operator panel to set another emu...

Страница 39: ...A blinking question mark ap pears Select On using the 3 or 4 key Press the ENTER key Press the MENU key The message display returns to Ready KC GL Pen Width The KC GL emulation mode enables you to set the pen widths in dots for pen numbers 1 to 8 and the KC GL page size Press the MENU key Press the 3 or 4 key repeatedly until Emulation ap pears on the message display If the current emulation is ot...

Страница 40: ... or option ROM can be selected as the default font In this menu you can also set the type and pitch for Courier and Letter Gothic as well as print a font list Selecting the Default Font Press the MENU key Press the 3 or 4 key repeatedly until Font appears Press the 2 key to select an internal font press the 3 or 4 key repeatedly until Internal appears To select an option font press the ENTER key w...

Страница 41: ...edly until Font appears Press the 2 key Check that Internal is displayed and press the 2 key Press the 3 or 4 key repeatedly until Size appears Press the ENTER key A blinking cursor _ appears Press the 3 or 4 key to increase or decrease the value of the figure where the cursor is blinking The font size can be set between 4 and 999 75 points in 0 25 point increments You can use the 2 and 1 key to m...

Страница 42: ...2 key Press the 3 or 4 key repeatedly until List of In ternal Fonts appears List of Option Fonts appears Internal Fonts Optional Fonts Press the ENTER key A question mark appears Internal Fonts Optional Fonts Press the ENTER key again Processing appears then Ready The printer prints a list of fonts with a short sample and font ID number for each font List of Fonts 2 2 7 Using Page Set Menus In Pag...

Страница 43: ...age patterns Bring up the Zoom menu The following display will appear Source size indicator This is the paper size before reduction This must be the same as the paper size set for print data from the computer Target size indicator This is the paper size after reduction This must be the same as the paper size set for the paper cas sette The message display will show the messages given in the fol lo...

Страница 44: ...trait or Landscape using the 3 or 4 key Press the ENTER key Press the MENU key The message display returns to Ready Page Protect Mode Although Auto is the default setting and this menu does not usu ally appear Page Protect will be forcibly set to On if a Print overrun Press GO error occurs due to insufficient printer memory Be sure to return this setting to Auto in order to main tain high printer ...

Страница 45: ...Set ap pears Press the 2 key Press the 3 or 4 key repeatedly until CR Action ap pears Press the ENTER key A blinking question mark ap pears Press the 3 or 4 key repeatedly until desired carriage return action appears CR only A carriage return is performed Default CR and LF A carriage return and linefeed are performed Ignore CR The carriage return code is ignored When the desired action is displaye...

Страница 46: ...age to make the optimum KIR mode setting Press the MENU key Press the 3 or 4 key repeatedly until Print Quali ty appears Press the 2 key Press the 3 or 4 key repeatedly until KIR Mode ap pears Press the ENTER key A blinking question mark ap pears Select On or Off using the 3 or 4 key Press the ENTER key Press the MENU key The message display returns to Ready EcoPrint The EcoPrint enables you to re...

Страница 47: ...actory setting is 03 Press the MENU key Press the 3 or 4 key repeatedly until Print Quali ty appears Press the 2 key Press the 3 or 4 key repeatedly until Print Den sity appears Press the ENTER key A blinking question mark ap pears Select the print density from five steps from 01 light to 05 dark using the 3 or 4 key Press the ENTER key Press the MENU key The message display returns to Ready 2 2 9...

Страница 48: ... hard disk given a destination name also referred to as a partition name which the printer automatically assigns one after another as follows DataH001 first data DataH002 second data DataH003 third data In the example above if the file TEST TXT is the first data to be written onto the hard disk the destination name will be DataH001 As the printer receives data the message display changes to Proces...

Страница 49: ...l data names referred to as parti tions stored in a hard disk for reference To print a list of data names for the hard disk proceed as follows Press the MENU key Press the 3 or 4 key repeatedly until Hard Disk appears Press the 2 key Press the 3 or 4 key repeatedly until List of Par titions appears Press the ENTER key A question mark appears Press the ENTER key Processing appears and the printing ...

Страница 50: ...ter must be reset To activate RAM disk in the printer s memory first you must use the printer s menu selection system The printer s menu selec tion system allows you to perform the following operations on the RAM disk Setting RAM disk size Reading data Writing data Deleting data Printing of list of partitions By default the RAM disk is not activated Off To confirm the RAM disk size or activate the...

Страница 51: ... referred to as a partition name which the printer automatically assigns one after another as follows DataH001 first data DataH002 second data DataH003 third data In the example above if the file TEST TXT is the first data to be written onto the RAM disk the destination name will be DataH001 As the printer receives data the message display changes to Processing then when the end of the data is rec...

Страница 52: ...he ENTER key Processing appears and the data is deleted from the RAM disk The message dis play returns to Ready Printing a List of Data Names The printer prints a list of all data names referred to as parti tions stored in a RAM disk for reference Printing a list is also available for a font card To print a list of data names for the RAM disk proceed as follows Press the MENU key Press the 3 or 4 ...

Страница 53: ...ars before the data name Press the 3 or 4 key to display the desired data name Press the ENTER key Processing appears and the reading of data from the memory card starts Writing Data Data can be written to a memory card until no space is left for storing When writing to a memory card a name is assigned to the file automatically You can use the procedure explained later in this section to print a l...

Страница 54: ...sages on page 4 6 If this happens press the GO key The message display returns to Ready Repeat above steps until you have transferred all data files that you want to write to the memory card Each time you finish writing data a memory card write informa tion page is printed from the printer showing the informa tion explained in step 8 above but pertaining only to the data just written To see all da...

Страница 55: ... proceed as follows Press the MENU key Press the 3 or 4 key repeatedly until Memory Card appears Press the 2 key Press the 3 or 4 key repeatedly until List of Par titions appears Press the ENTER key A question mark appears Press the ENTER key Processing appears and the printing of the list starts The printout example above includes the following information Device Name Number CARD A is indicated f...

Страница 56: ...ling appears Press the 2 key Press the 3 or 4 key repeatedly until MP Tray Mode appears Press the ENTER key A blinking question mark ap pears Select First or Cassette using the 3 or 4 key Press the ENTER key Press the MENU key The message display returns to Ready Setting the MP Tray Size When using the MP tray in the cassette mode you should set the MP tray size to the paper size that is used to f...

Страница 57: ... Han dling appears Press the 2 key Press the 3 or 4 key repeatedly until MP Tray Type appears Press the ENTER key A blinking question mark ap pears Press the 3 or 4 key to display the desired MP tray type The display changes as shown below Plain Transparency Pre printed Labels Bond Recycled Vellum Rough Letterhead Color Pre punched Envelope Cardstock Custom 1 to 8 When the desired MP tray type is ...

Страница 58: ...e lect the paper size and unit Press the MENU key Press the 3 or 4 key repeatedly until Paper Handling appears Press the 2 key Press the 3 or 4 key repeatedly until Cassette1 size appears Press the 2 key Unit appears Press the ENTER key A blinking question mark ap pears Press the 3 or 4 key to select mm or inch Select mm or inch and then press the ENTER key Press the MENU key The message display r...

Страница 59: ...standard lower paper cas sette MP tray printer s MP tray Cassette3 Option upper paper feeder Cassette4 Option lower paper feeder When the desired paper source displayed press the ENTER key Press the MENU key The message display returns to Ready Setting Duplex Printing Using the duplex unit you can automatically print on both sides of the paper The duplex unit is installed underneath the printer Bi...

Страница 60: ...e 3 or 4 key to display the desired destination The output tray changes as shown below Face down tray Finisher F up Finisher F down When the desired paper source displayed press the ENTER key Press the MENU key The message display returns to Ready Adjusting the Stitch Positions When installing the option document finisher DF 75 adjust the stitch positions using the following procedures In the defa...

Страница 61: ...rom the paper size formatting the jobs Press the MENU key Press the 3 or 4 key repeatedly until Paper Handling appears Press the 2 key Press the 3 or 4 key repeatedly until Override A4 LT appears Press the ENTER key A blinking question mark ap pears Select On or Off using the 3 or 4 key Press the ENTER key Press the MENU key The message display returns to Ready Customizing Paper Type The following...

Страница 62: ...Heavy Thick Extra Heavy Light Thin When the desired paper thickness displayed press the ENTER key Press the MENU Key The message display returns to Ready Setting the Duplex Path If the paper type is set to Custom you can set whether or not to enable duplex printing as follows The default setting is Enable Display the custom paper type see Customizing Paper Type on page 3 45 and press the 2 key Pre...

Страница 63: ...ent is indi cated on the status page Note that if this operation is per formed when the toner container is not replaced the toner gauge measurement will not be indicated correctly Also refer to the Installation Guide supplied with the toner kit when replacing the toner container Press the MENU key Press the 3 or 4 key repeatedly until Life Counters appears Press the 2 key Press the 3 or 4 key repe...

Страница 64: ...tting is 30 seconds Press the ENTER key A blinking cursor _ appears Press the 3 or 4 key to increase or decrease the value of the figure where the cursor is blinking and set the desired time The time can be set between 0 and 495 seconds in 5 second increments The printer does not timeout with the value set to 0 You can use the 2 and 1 keys to move the cursor right and left Display the desired time...

Страница 65: ...for the purposes of debugging programs and files Press the MENU key Press the 3 or 4 key repeatedly until Others ap pears Press the 2 key Press the 3 or 4 key repeatedly until Print HEX DUMP appears Press the ENTER key A question mark appears Press the ENTER key again Processing appears for a second and then Waiting appears Send data to be dumped to the printer The message Processing will be displ...

Страница 66: ...ears Press the ENTER key A blinking question mark ap pears Press the 3 or 4 key to display the desired mode The display changes as shown below Off default Permanent Perm Temp When the desired mode is displayed press the ENTER key Press the MENU key The message display returns to Ready Alarm Buzzer Setting In addition to the message displayed when the paper supply is exhausted or when paper jamming...

Страница 67: ... The message display returns to Ready Setting the Auto Continue Recovery Time Follow the procedure given below to change the recovery time for Auto Continue Press the MENU key Press the 3 or 4 key repeatedly until Others ap pears Press the 2 key Press the 3 or 4 key repeatedly until Auto Continue Mode appears Press the 2 key and display Auto Continue Timer Press the ENTER key A blinking cursor _ a...

Страница 68: ...NU key Press the 3 or 4 key repeatedly until Others ap pears Press the 2 key Press the 3 or 4 key repeatedly until Service ap pears Press the 2 key Press the 3 or 4 key repeatedly until Print Sta tus Page appears Press the ENTER key A question mark appears Press the ENTER key The message display indicates Processing and printing starts The network interface status page will be printed after the pr...

Страница 69: ...lashing See Indicators on page 4 4 Lit A maintenance message appears in the message display See Maintenance Messages on page 4 4 Print quality is not good See Print Quality Problems on page 4 2 Paper is jammed See Correcting a Paper Jam on page 4 8 Nothing lights on the operator panel even when power is turned on and the fan makes no noise Check thatthepower cordis properly plugged into the power ...

Страница 70: ...g knob slowly in and out a few times See Toner Container Replacement on page 6 1 Refresh drum See the following procedures in the operator panel and try cleaning the drum surface using the printer s built in cleaning system 1 Press the MENU key and then press the 3 or 4 key to display Others 2 Press the 2 key and then press the 3or 4 key to display Service 3 Press the 2 key and then press the 3 or...

Страница 71: ... printer reverts to Ready Check the operator panel If the Toner low TK 70 message is displayed and the ATTENTION indicator is flashing install a new toner kit See Toner Container Replacement on page 6 1 Check the print density Display the print density menu from the operator panel and select a lighter density setting See Adjusting the Print Density on page 3 31 Clean the charger wire Open the prin...

Страница 72: ...wait Processing Waiting and FormFeed Time Out are displayed alternately These messages will not appear when the number of copies is set to 2 or more Add staples No staples are installed in the stapler Set it in the stapler Call service 0123456 represents a mechanical error 0 1 2 Call a service The printer does not operate when this message is displayed The total number of pages printed is also ind...

Страница 73: ...paper type papersize and papertype are displayed flashing alternately There is no paper cassette set paper size paper type that matches with the data for printing so printing is done from the MP tray Set paper into the MP tray that matches the paper size and type shown on the display and press the GO key to restart printing Or if you want to print from a different paper source press the 3 or 4 key...

Страница 74: ... not formatted and therefore cannot be read or written Format error Hard disk Initialization formatting of the hard disk is required Initialize the hard disk Hard disk err Press GO Look at the error code given in place of and refer to the corresponding description given below 01 hard disk format error If this error recurs even if the power has been turned off and then on reformat the hard disk 02 ...

Страница 75: ... card using the PRESCRIBE RWER command or from the printer s operator panel Look at the error code given in place of and refer to the corresponding description given below 01 The memory card does not meet specifications This memory card cannot be used by this printer Insert a memory card which can be used by this printer See Memory Card CF on page D 2 02 The memory card is not installed Recheck th...

Страница 76: ...nd may be easily over looked deterring the jam recovery Online help messages With the online help message function this printer can display the procedure to correct a paper jam on the message display When a paper jam message is displayed press the key Pressing the 4 key at the online help message display shows the next step pressing the 3 key shows the previous step To exit the online help message...

Страница 77: ...e the paper cassette Paper is jammed at the MP tray Remove the jammed paper us ing the procedure given below Remove the paper jammed at the MP tray Pull up the lever to remove the jammed paper If the misfed paper cannot be removed go the to next stop Pull up the look lever and open left cover 1 Remove the jammed paper Push the lever gray colored to raise the duplex unit and remove the jammed paper...

Страница 78: ...the paper has been torn remove the MP transport tray Remove the jammed paper Replace the MP transport tray in tis original posiiton Close the front cover 6 7 8 9 10 4 3 Jam in Left Cover 1 CAUTION Take care not to leave any small pieces of paper in the printer when removing paper jams as this may result in fire The printer s fixing unit is extremely hot Take sufficient care when working in this ar...

Страница 79: ...ove the jammed paper If there is jammed paper in the output section remove it Close left cover 1 Open left cover 2 Remove the jammed paper Close left cover 2 Paper is jammed at the option document finisher Remove jammed paper referring to the Document Finisher Operation Guide 1 2 3 4 4 4 Jam in Left Cover 2 4 5 Paper Jam at the Option Document Finisher 5 1 2 3 ...

Страница 80: ...high quality results when the wrong paper is used Low priced paper is not economical in the long run if it causes printing problems Paper in each grade is available in a range of basis weights de fined later The traditional standard weights are 16 20 and 28 pounds 60 to 105 g m2 The following table summarizes the basic paper specifications Details are given on the following pages Laser printing is...

Страница 81: ...mely thick nor extremely thin If you are having prob lems with paper jams multiple feeds and faint printing the paper you are using may be too thin If you are having problems with paper jams and blurred printing the paper may be too thick The proper thickness is 0 086 to 0 110 mm 3 4 to 4 3 mils Moisture Content Moisture content is defined as the percent ratio of moisture to the dry mass of the pa...

Страница 82: ...ght er appearance Quality control Uneven sheet size corners that are not square ragged edges welded uncut sheets and crushed edg es and corners can cause the printer to malfunction in various ways A quality paper supplier should take considerable care to ensure that these problems do not occur Packaging Paper should be packed in a sturdy carton to pro tect it from damage during transport Quality p...

Страница 83: ...d crease on its way through the printer Before purchasing enve lopes for use with the printer test a sample to verify the enve lope s suitability Do not use envelopes that have an encapsulated liquid adhe sive Avoid long printing runs consisting of envelopes only Extensive envelope printing can cause premature printer wear To avoid jamming due to curled envelopes do not leave more than ap proximat...

Страница 84: ...n page 3 45 The following types of paper can be set Yes Can be stored No Cannot be stored This is a paper type defined and registered by the user Up to eight types of user settings may be defined For details on Customizing Paper Type on page 3 45 3 Paper Type Paper source Media Type MP tray Paper Cas sette Paper Weight Duplex path MP tray availableonly in Cassette mode Plain Yes Yes Normal Yes Tra...

Страница 85: ...lled for the first time the number of copies that can be printed will be approximately 20 000 Toner Kits to be Used Name Toner Kit LP30XX 40 000 pages Contents Toner container Waste toner box Wiper cloth Grid cleaner 2 plastic bags for disposal of the old toner container and waste toner box Installation Guide Be sure to distance items such as floppy disks during toner container replacement Be sure...

Страница 86: ... container from the bag and then lightly tap it on the top 5 to 6 times Thoroughly shake the toner container in the direction of the arrow ten times or more to loosen and mix the toner inside Grasp the handle on the toner container and insert the toner container along the rail of the printer Hold the toner container by hands and fully insert it into the printer Remove the old waste toner box as sh...

Страница 87: ...veral times and then push it back in Take out the new grid cleaner from the protective bag and then remove the cap from the grid cleaner Attach the grid cleaner to the printer aligning with the notches Gently pull the charger unit as far as it will go push and pull it several times and then push it back in When the grid is clean remove the grid cleaner from the printer and dispose of it The grid c...

Страница 88: ... on the left side of the printer and open the left cover 1 Clean the separator by moving the cleaning brush from left to right along with the separator Replacing of toner and cleaning of the internal parts of the printer are completed Close the front cover and the left cover 1 16 17 18 19 ...

Страница 89: ...pplied Digital Library CD ROM and Network Library CD ROM spacing pitch height style stroke weight and typeface family List of Fonts This section contains a full list of the printer s internal fonts The printer has 80 PCL fonts and 136 PostScript Level 3 compatible fonts You can print the same font list from the printer by using the printer s operator panel key To print a list of fonts refer to Pri...

Страница 90: ...Appendix A Fonts A 2 PCL Scalable and Bitmap Fonts 1 ...

Страница 91: ...Appendix A Fonts A 3 PCL Scalable and Bitmap Fonts 2 ...

Страница 92: ...Appendix A Fonts A 4 KPDL Fonts 1 ...

Страница 93: ...Appendix A Fonts A 5 KPDL Fonts 2 ...

Страница 94: ...Appendix A Fonts A 6 KPDL Fonts 3 ...

Страница 95: ...Appendix A Fonts A 7 KPDL Fonts 4 ...

Страница 96: ...Appendix A Fonts A 8 KPDL Fonts 5 ...

Страница 97: ...by taking these precautions Before touching the main circuit board and DIMM touch a wa ter pipe or other large metal object to discharge yourself of static electricity While doing the work it is recommended that you wear an antistatic wrist strap Touch the main circuit board and DIMM only at the edges Remove the main circuit board completely from the printer as fol lows Turn off the printer and di...

Страница 98: ...fully pull the end clips outwards then pull the DIMM out of the socket Return the main circuit board to the printer by reversing the pro cedure explained in Removing the Main Circuit Board from the Printer on page B 1 After you finish installing DIMMs in the printer test the printer to see if the installation was successful To test the expansion memory proceed as follows Make sure printer is turne...

Страница 99: ...uter Select this mode if printing problems oc cur when the printer is connected to a workstation The pins of the parallel interface connector carry the signals list ed in the table in Parallel Connector Pin Assignment Asterisks in the table indicate signals that are active low The table also in dicates whether each signal is incoming or outgoing with respect to the printer Parallel Connector Pin A...

Страница 100: ...coming or outgoing with respect to the printer RS 232C Signal Pin Assignment Brief descriptions of the signals follow FG Frame Ground Pin 1 This pin is connected directly to the printer frame TXD Transmit Data Pin 2 This output carries asynchronous data sent by the printer to the computer It is used mainly in handshaking protocols RXD Receive Data Pin 3 This input carries serial asynchronous data ...

Страница 101: ... default settings of the buffer nearly full and nearly empty thresholds H6 and H7 are subject to change without no tification The gap between the nearly full and nearly empty thresholds al lows the computer to send a fairly large amount of data in a con tinuous stream H8 Received data buffer size This is the size of the input buffer specified in units of 10 Kbytes The factory default setting is 6 ...

Страница 102: ...ectricity by touching a metal object such as a doorknob Plug the printer end of the RS 232C interface cable into the printer s RS 232C connector and attach it in place Plug the other end of the cable into the computer s RS 232C interface connector Turn on the printer The printer RS 232C parameters are factory set to the following values Baud rate 9600 bps data bits character length 8 bits stop bit...

Страница 103: ...ODE COM1 96 N 8 1 P C MODE LPT1 COM1 To test the interface enter the following CTRL P C DIR CTRL P The software settings made using the above procedures are temporary On most computers permanent settings must be made with DIP switches If you want to use a different baud rate or change any of the other RS 232C parameters this can be accomplished from the print er s operator panel See Changing the I...

Страница 104: ...ons on installing individual options refer to the documentation included with the option 1 Available Options Memory Card CF Network Interface Card Expansion Memory DIMM 16 32 64 128MB Hard Disk Unit Barcode Reader BC 1 Paper Feeder PF 70 Paper Feeder PF 75 Reverse Unit RA 1 Punch Unit PH 2A 2B 2B Document Finisher DF 75 Document Finisher DF 70 DF 71 High speed printing into the face down tray is d...

Страница 105: ...unch option offset and stitch functions It is installed at the left side of the printer BC 1 Barcode Reader Reads the barcode ID code printed on the paper when reprint ing with the code job function It is connected to the printer with the serial interface Other Options Hard Disk Unit Enables the electronic sorting and job retention functions To be inserted into the slot OPT1 HDD designed for it on...

Страница 106: ...k inter face This printer supports the TCP IP IPX SPX NetBEUI and EtherTalk protocols so the network printing under various plat forms such as Windows Macintosh UNIX NetWare is available Option network interface card can be added by the following pro cedure Turn off the printer and disconnect the power cord and printer cable Remove the two screws from the option interface slot cover OPT2 Insert th...

Страница 107: ...into the slot Tighten the two screws to secure the hard disk unit to the main circuit board Insert the memory card into the memory card slot located the right side of the printer A memory card is a microchip card that may contain option fonts macros forms etc The printer reads the contents of the card into its internal memory when printer is turned on For details of available memory cards see your...

Страница 108: ...econds or less from power on sleep mode at 23 C 120 or 230 V Approx 130 seconds or less from power on sleep mode at 23 C 120 or 230 V Controller PowerPC 750 CX 350 MHz PowerPC 750 CX 400 MHz Main memory 32 MB expandable up to 288 MB Operating system Windows 95 98 ME Windows NT 2000 Macintosh Linux Interfaces Parallel 1 IEEE1284 Serial 1 RS 232C Network 1 Protocol support IPX SPX TCP IP DLC Option ...

Страница 109: ...n 10 Max allowable frequency fluctuation 2 120 V 60 Hz max 10 9 A U S A Canada 220 240 V 50 Hz 60 Hz max 5 7 A European countries Max allowable voltage fluctuation 10 Max allowable frequency fluctuation 2 Power consumption Max 1 400 W During printing 680 W During standby 140 W During low power mode 99 W During sleep mode 16 W Max 1 400 W During printing 790 W During standby 150 W During low power ...

Страница 110: ...oduce high qual ity printing The default setting is On Digital Library This is contained on the CD ROM supplied with the printer The contents of the CD ROM include manuals printer drivers and various utilities KM NET VIEWER This is a network management tool that can be used with the LP series You can view information for printers connected to the network using SNMP commands NET VIEWER is contained...

Страница 111: ... and use electronic sorting to reduce print time Simple Network Management Protocol SNMP This is a protocol for the management of networks that use TCP IP Transmission Control Protocol Internet Protocol Sleep mode This mode is activated after a specified amount of time elapses The printer goes into economy mode and a minimum amount of power is consumed You can change the amount of time before the ...

Страница 112: ... Proof and hold 3 13 Quick copy 3 12 Stored job 3 14 Virtual mailbox 3 15 Code jobs 3 15 Emulation 3 22 Glossary 1 Envelopes 2 3 5 4 Error messages 4 6 Expansion memory B 1 Glossary 1 F Face down tray 1 2 3 44 Font 3 24 A 1 Font list 3 26 A 1 Front cover 1 2 G Grid cleaner 6 1 6 3 H Handles for transport 1 2 Hard disk 3 31 D 4 I Indicators 3 2 3 3 4 4 Interface 3 2 3 18 C 1 Internal fonts 3 24 A 1...

Страница 113: ...r 3 1 3 3 Paper weight 3 46 5 2 Parallel interface 3 18 C 1 Glossary 1 Partition 3 32 3 33 3 35 3 38 3 39 PCL fonts A 1 Plastic bag 6 1 6 2 Preprinted paper 5 3 5 4 PRESCRIBE 4 3 C 3 Print density 3 31 4 3 Print quality 3 30 4 2 Printer driver 3 11 Glossary 2 Protocol 3 19 C 1 C 3 Punch unit 4 4 D 1 R RAM disk 3 34 4 7 Glossary 2 Recycled paper 5 4 Reduced print 3 27 Resolution 3 31 E 1 Resource p...

Отзывы: