background image

10

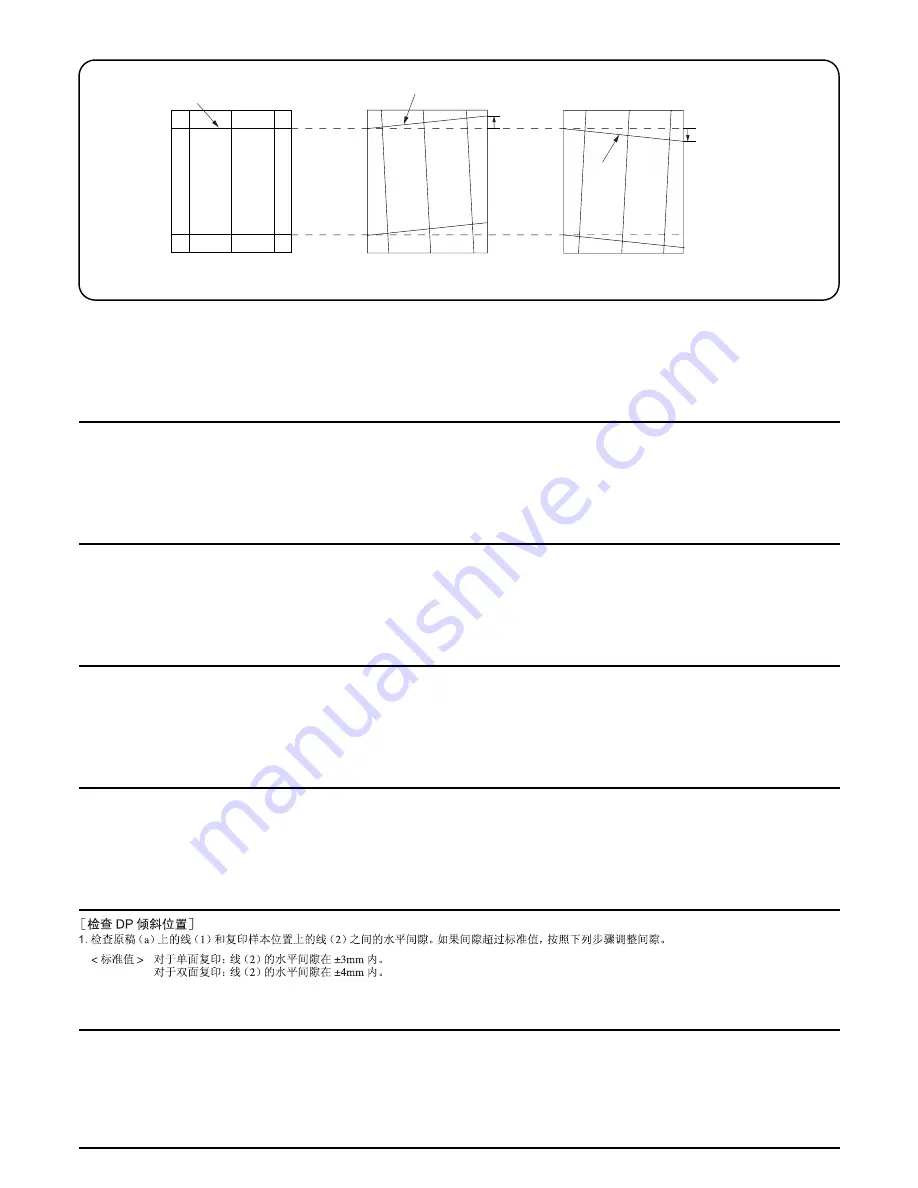
a

1

e

2

d

2

3mm/4mm

3mm/4mm

[Checking DP oblique position]

1.

Check the horizontal gap between line (1) of original (a) and line (2) of copy example positions. If the gap exceeds the reference value, adjust the gap 
according to the following procedure.
<Reference value> For single copying: The horizontal gap of line (2) should be within ±3 mm.

For duplex copying: The horizontal gap of line (2) should be within ±4 mm.

[Vérification de la position oblique du DP]

1.

Vérifier l’écart horizontal entre la position de la ligne (1) de l’original (a) et celle de la ligne (2) de l’exemple de copie. Si l’écart excède la valeur de réfé-
rence, le régler selon la procédure suivante.
<Valeur de référence> Pour la copie recto : l’écart horizontal de la ligne (2) doit être de ±3 mm.

Pour la copie recto-verso : l’écart horizontal de la ligne (2) doit être de ±4 mm.

[Verificación de la posición oblicua del DP]

1.

Compruebe la separación horizontal entre la línea (1) del original (a) y la línea (2) de las posiciones del ejemplo de copia. Si la separación supera el 
valor de referencia, ajústela siguiendo este procedimiento.
<Valor de referencia> Para el copiado por una cara: la separación horizontal de la línea (2) debe estar dentro de ±3 mm.

Para el copiado dúplex: la separación horizontal de la línea (2) debe estar dentro de ±4 mm.

[Prüfen der Schräglage des DP]

1.

Den horizontalen Abstand zwischen der Linie (1) des Originals (a) und der Linie (2) der Kopierbeispielspositionen prüfen. Wenn der Abstand größer 
als der Bezugswert ist, den Abstand mit dem folgenden Verfahren einstellen.
<Bezugswert> Einzelkopie: Der horizontale Abstand der Linie (2) sollte innerhalb von ±3 mm liegen.

Duplexkopie: Der horizontale Abstand der Linie (2) sollte innerhalb von ±4 mm liegen.

[Verifica della posizione obliqua del DP]

1.

Verificare lo scostamento orizzontale fra la linea (1) dell’originale (a) e la linea (2) delle posizioni dell’esempio di copia. Se lo scostamento supera il 
valore di riferimento, regolare lo scostamento stesso seguendo questa procedura.
<Valore di riferimento> Per la copia singola: lo scostamento orizzontale della linea (2) deve limitarsi a ± 3 mm.

Per la copia duplex: lo scostamento orizzontale della linea (2) deve limitarsi a ±4 mm.

[DP 斜め確認 ]

1.

原稿 (a) の線 (1) とコピーサンプルの線 (2) の左右のずれを確認する。

ずれが基準値外の場合、次の手順で調整を行う。

<基準値> 片面の場合、線 (2) の左右ずれ:± 3mm 以内

両面の場合、線 (2) の左右ずれ:± 4mm 以内

Содержание CD 1230

Страница 1: ...Service Manual Copy CD 1230 CD 1240 CD 1250 Version 1 0 Date 04 07 2006 2GNSM060 ...

Страница 2: ...Service Manual Copy DC 2230 DC 2240 DC 2250 Version 1 0 Date 04 07 2006 2GNSM060 ...

Страница 3: ...URER DISPOSE OF USED BATTERIES ACCORDING TO THE MANUFACTURER S INSTRUCTIONS ATTENTION IL Y A DANGER D EXPLOSION S IL Y A REMPLACEMENT INCORRECT DE LA BATTERIE REMPLACER UNIQUEMENT AVEC UNE BATTERIE DU MÊME TYPE OU D UN TYPE REC OMMANDÉ PAR LE CONSTRUCTEUR METTRE AU RÉBUT LES BATTERIES USAGÉES CON FORMÉMENT AUX INSTRUCTIONS DU FABRICANT ...

Страница 4: ...Revision history Revision Date Replaced pages Remarks ...

Страница 5: ...This page is intentionally left blank ...

Страница 6: ...rsonnel to ensure the safety of their customers their machines as well as themselves during maintenance activities Service personnel are advised to read this booklet carefully to familiarize themselves with the warnings and precautions described here before engaging in maintenance activities ...

Страница 7: ... this symbol CAUTION Bodily injury or damage to property may result from insufficient attention to or incorrect compliance with warning messages using this symbol Symbols The triangle symbol indicates a warning including danger and caution The specific point of attention is shown inside the symbol General warning Warning of risk of electric shock Warning of high temperature indicates a prohibited ...

Страница 8: ... or dusty place This may cause fire or electric shock Do not install the copier near a radiator heater other heat source or near flammable material This may cause fire Allow sufficient space around the copier to allow the ventilation grills to keep the machine as cool as possible Insufficient ventilation may cause heat buildup and poor copying performance Always handle the machine by the correct l...

Страница 9: ... carefully Always check that the copier is correctly connected to an outlet with a ground connection Check that the power cable covering is free of damage Check that the power plug is dust free If it is dirty clean it to remove the risk of fire or electric shock Never attempt to disassemble the optical unit in machines using lasers Leaking laser light may damage eyesight Handle the charger section...

Страница 10: ...r trapped wire and missing screws Check that all the caution labels that should be present on the machine according to the instruction handbook are clean and not peeling Replace with new ones if necessary Handle greases and solvents with care by following the instructions below Use only a small amount of solvent at a time being careful not to spill Wipe spills off completely Ventilate the room wel...

Страница 11: ...ound is visible 1 4 46 5 A white line appears longitudinally 1 4 46 6 A black line appears longitudinally 1 4 47 7 A black line appears laterally 1 4 47 8 One side of the copy image is darker than the other 1 4 47 9 Black dots appear on the image 1 4 47 10 Image is blurred 1 4 48 11 The leading edge of the image is consistently misaligned with the original 1 4 48 12 The leading edge of the image i...

Страница 12: ...user unit thermistor 1 and 2 1 5 33 7 Adjusting front position of the fuser unit adjusting lateral squareness 1 5 34 1 5 8 Others 1 5 35 1 Detaching and refitting the ozone filter 1 and 2 1 5 35 2 Detaching and refitting the dust filter 1 and 2 1 5 36 1 6 Requirements on PWB Replacement 1 6 1 Upgrading the firmware 1 6 1 1 6 2 Adjustment free variable resistors VR 1 6 2 1 6 3 Remarks on main PWB r...

Страница 13: ...nce parts list 2 4 1 Periodic maintenance procedures 2 4 3 Chart of image adjustment procedures 2 4 7 General wiring diagram 2 4 9 INSTALLATION GUID THE DOCUMENT PROCESSOR BUILT IN FINISHER JOB SEPARATOR FAX System M Data Security Kit C ...

Страница 14: ... 2 00 1 1 29 1 1 21 1 0 78 1 0 64 1 0 50 1 0 25 Copy speed At 100 magnification in copy mode 30 ppm model A3 Ledger 20 sheets min B4 Legal 20 sheets min A4 Letter 30 sheets min A4R Letter R 22 sheets min B5 30 sheets min B5R 20 sheets min A5R Statement 14 sheets min A6R 16 sheets min 40 ppm model A3 Ledger 23 sheets min B4 Legal 23 sheets min A4 Letter 40 sheets min A4R Letter R 27 sheets min B5 4...

Страница 15: ...mbering Memo mode Density adjustment Selection of image qual ity EcoPrint mode Batch scanning Auto image rotation Inverted copying Mirror image Job finish notice File name Priority override Multi page forms Repeat copy Programmed copying Registering shortcuts Power source 120 V AC 60 Hz 12 A or less 220 D 240 V AC 50 60 Hz 6 5 A or less Options Document processor paper feeder 3000 sheet paper feed...

Страница 16: ...on system PC transmission SMB Scan to SMB FTP Scan to FTP E mail transmission SMTP Scan to E mail TWAIN scan TWAIN source Resolution 600 dpi 400 dpi 300 dpi 200 dpi 200 x 100 dpi 200 x 400 dpi File Format Monochrome TIFF MMR PDF MMR Gray JPEG PDF JPEG Color JPEG PDF high compression Scanning Speed 1 sided monochrome 50 sheets min Color 25 sheets min 2 sided monochrome 25 sheets min Color 12 5 shee...

Страница 17: ... Cassette 2 13 Toner container 14 Toner container stopper 15 Waste toner box 16 Front cover 17 Paper width adjusting tab 18 Length adjustment plate 19 Top tray 20 Main power switch 21 Paper width guides 22 Multi purpose tray 23 Memory card cover holder 24 Handles 25 USB memory slot A2 26 USB memory slot A3 27 Memory card slot 28 Network interface connector 29 USB interface connector 30 Parallel in...

Страница 18: ...cation key 5 Counter key indicator 6 Copy key indicator 7 Send key indicator 8 Document box key indicator 9 Accessibility key indicator 10 Print indicator 11 Transmission indicator 12 Reception indicator 13 Memory indicator 14 Error indicator 15 Help key indicator 16 Log out key indicator 17 Power key 18 Main power indicator 19 Numeric keys 20 Clear key 21 Start key indicator 22 Stop key 23 Reset ...

Страница 19: ...achine cross section Light path Paper path 1 Paper feed section 2 Main charging section 3 Optical section 4 Developing section 5 Transfer and separation section 6 Cleaning and charge erasing section 7 Fuser section 8 Eject and switchback section 9 Duplex section ...

Страница 20: ...r directed onto the machine Avoid dust and vibration Choose a surface capable of supporting the weight of the machine Place the machine on a level surface maximum allowance inclination 1 Avoid air borne substances that may adversely affect the machine or degrade the photoconductor such as mer cury acidic of alkaline vapors inorganic gasses NOx SOx gases and chlorine based organic solvents Select a...

Страница 21: ...et Connect the power cord Install the optional original cover or the DP Install other optional devices Print out the user setting list Make test copies Output an own status report maintenance item U000 Attaching the language label 230 V specifications only Exit maintenance mode Start Load paper Install the waste toner box Carry out initial developer setting maintenance item U130 Release of cassett...

Страница 22: ...P 2GR 1 2 3 Moving the machine When moving the machine pull out the four carrying handles on the right and left sides and hold them Figure 1 2 2 Carrying handle Carrying handle Carrying handle Carrying handle ...

Страница 23: ...Outer case 3 Inner frame 4 Skid 5 Bottom front left pad 6 Bottom front right pad 7 Bottom rear left pad 8 Bottom rear right pad 9 Machine cover 10 Upper pad 11 Spacer 12 Document tray 13 Hinge joints 14 Bar code labels 15 Power cord 16 Plastic bag 17 Leaflet 18 Plastic bag 19 M3 x 8 screws 20 Operation guide ...

Страница 24: ...ional paper feeder as necessary 2 Verify levelness at the four corners of the platen using a level gauge and adjust the level bolts at the bottom of the machine to optimize levelness 1 Turn the lever of the machine rear side with the tool to release the lever holding the mir ror 1 and 2 frames Figure 1 2 5 Remove the tapes spacers and pad Tape Tape Pad Spacers Install the optional paper feeder Rel...

Страница 25: ... plate in original position Figure 1 2 6 1 Pull the cassette out 2 Holding the paper width adjusting tab both ends move the paper width guides to fit the paper Figure 1 2 7 3 Adjust the length adjustment plate to fit the paper size Figure 1 2 8 Release of cassette lift plate Lift plate stopper Load paper Paper width adjusting tab Paper width guides Length adjustment plate ...

Страница 26: ...ette Figure 1 2 9 1 Open the front cover 2 Tap the top of the toner container five to six times Figure 1 2 10 3 Shake the toner container approximately 10 times in the horizontal direction to stir toner Figure 1 2 11 Install the toner container Toner container Toner container ...

Страница 27: ...over Figure 1 2 13 1 Install the optional original cover or DP 1 Install the optional devices job separator built in finisher document finisher and or fax kit etc as necessary 1 Connect the power cord to the connector on the machine 2 Insert the power plug into the wall outlet Toner container Install the waste toner box Waste toner box Install the optional original cover or the DP Install other op...

Страница 28: ...d press the start key 2 Select MAINTENANCE and press the start key to output a list of the current settings of the maintenance items 3 Press the stop key 1 Enter 001 using the numeric keys and press the start key The machine exits the maintenance mode 1 Select Report Print to output the user various setting reports 1 Place an original and make test copies 1 According to need attach the correspond ...

Страница 29: ...53 Switching between double and single counts Double count U260 Selecting the timing for copy counting After ejection U285 Setting service status page ON U326 Setting the black line cleaning indication ON U328 Side ejection setting OFF U342 Setting the ejection restriction ON U343 Switching between duplex simplex copy mode OFF ...

Страница 30: ...B8014100 Procedure 1 Press the Power key on the operation panel to off Make sure that the Power indicator and the Memory indicator are off before turning off the main power switch And then unplug the power cable from the wall outlet 2 Fit the key counter socket assembly to the key counter retainer using the two screws and nut 3 Fit the key counter mount to the key counter cover using the two screw...

Страница 31: ...er on the machine using the screw 10 Insert the key counter into the key counter socket assembly Figure 1 2 17 11 Turn the main power switch on and enter the maintenance mode 12 Run maintenance item U204 and select ON 13 Exit the maintenance mode 14 Check that the message requesting the key counter to be inserted is displayed on the touch panel when the key counter is pulled out 15 Check that the ...

Страница 32: ...eys Enter 001 using the cursor up down keys or numeric keys and press the start key Enter the maintenance item number using the cursor up down keys or numeric keys The selected maintenance item is run Press the stop key Press the start key Start End Maintenance mode is entered The maintenance item is selected Maintenance mode is exited Repeat the same maintenance item Run another maintenance item ...

Страница 33: ... amount of slack in the paper 0 0 0 0 1 U053 Setting the adjustment of the motor speed Drive motor Eject motor Polygon motor 2 1 0 1 5 1 Optical U061 Turning the exposure lamp on U063 Adjusting the shading position 0 1 U065 Adjusting the scanner magnification Main scanning direction auxiliary scanning direction 0 0 1 U066 Adjusting the scanner leading edge registration 0 0 1 U067 Adjusting the sca...

Страница 34: ...pying Control temperature during printing 175 30 ppm 1 2 185 40 50 ppm 1 2 190 30 ppm 1 2 200 40 50 ppm 1 2 190 30 ppm 1 2 200 40 50 ppm 1 2 U163 Resetting the fuser problem data U167 Checking fuser counts U196 Turning the fuser heater on U199 Checking the fuser temperature Operation panel and support equipment U200 Turning all LEDs on U201 Initializing the touch panel U202 Setting the KMAS host m...

Страница 35: ...Image processing U402 Adjusting margins of image printing 74 70 68 85 140 55 1 U403 Adjusting margins for scanning an original on the platen 2 0 2 0 2 0 2 0 1 U404 Adjusting margins for scanning an original from the DP 3 0 2 5 3 0 4 0 1 3 0 2 5 3 0 4 0 1 U407 Adjusting the leading edge registration for memory image printing 47 1 U411 Adjusting the scanner automatically U425 Setting the target Netw...

Страница 36: ...number U985 Displaying the developing unit history U989 HDD scandisk U990 Checking clearing the time for the exposure lamp to light U991 Checking the scanner count U993 Outputting a VTC PG pattern Section Item No Content of maintenance item Initial setting Initial setting for executing U020 1 The item initialized for executing U020 2 The item initialized for executing U021 ...

Страница 37: ...036 Paper Jam Log Counter Log 2006 04 17 J01 000 J02 000 J03 000 J04 000 J05 002 J06 002 J15 000 J16 000 J17 000 J18 000 J19 000 J20 000 J21 000 J22 000 J23 002 J24 002 J33 000 J34 000 J35 000 J36 000 J37 000 J38 000 J39 000 J40 000 J41 002 J42 002 J51 000 J52 000 J53 000 J54 000 J61 002 J62 000 J63 000 J64 000 C0101 001 C0102 001 C0107 001 C0108 001 C0220 001 C0221 001 C2002 001 C2030 001 C2031 0...

Страница 38: ...f occurrence of replace ment If the occurrence of the previous replace ment of toner container is less than 8 all of the occurrences of replace ment are logged The total page count at the time of the replace ment of the toner con tainer Code of maintenance replacing item 1 byte 2 categories First byte Replacing item 01 Toner container 02 Maintenance kit Second byte Type of replacing item 00 fixed ...

Страница 39: ...e Data and Time Time Server 01 00_Amsterdam 10 27 2005 09 06 10 183 53 13 FRPO Status User Top Margin User Left Margin User Page Length A1 A2 100 A3 A4 100 A5 A6 100 0 00 0 00 17 30 Auto Continue Mode Auto Continue Timer Y0 Y1 00 06 Service Status Page MFP 1 3 4 5 6 7 8 9 2 No Description Supplement 1 System version 2 System date 3 Slot 1 RAM size 4 Slot 2 RAM size 5 Total RAM size 6 Local time zo...

Страница 40: ...L SGL LVL MODEM 3 3 3 V 29 9600bps 9600bps ON OFF TX 4db 0db 43dBm 9dBm Installed Options Document Processor Paper Feeder Finisher Mail Box Job Separator Memory Card PDF Expansion Kit Fax Backup Kit Security Kit Data Security Kit C Software Security Library Version 0 50 1 1 500 530 0 0 0 0 97 0 F00 U00 0A001300 F0A8EF98 000000000000 000000000000 020A1Bt 1234 1234 0001234abcd567800001234abcd5678 01...

Страница 41: ...utput date 18 Page of relation to the A4 Letter 19 Average coverage Total Copy Printer Fax 20 Coverage on the final output page 21 Presence or absence of the optional DP Installed Not Installed 22 Presence or absence of the optional paper feeder Cassette paper feeder LCF 3000 sheet paper feeder Not Installed 23 Presence or absence of the optional document finisher Inner Finisher built in finisher ...

Страница 42: ...r Codes on P 1 3 14 If ERROR 09 occurs turn the main powe switch off then on and run maintenance item U024 to format the hard disk And then and run maintenance item U002 for initialization again If other error occurs turn the main powe switch off then on and run maintenance item U002 for initialization Maintenance item No Description No Description Supplement 29 Identification name for the securit...

Страница 43: ...Purpose To check the overall operation of the machine Method 1 Press the start key 2 Select the item to be operated 3 Press the system menu key The copy mode screen is displayed 4 Set the operation conditions required on the copy mode screen Changes in the following settings can be made Paper feed locations Magnifications Simplex or duplex copy mode Number of copies in simplex copy mode continuous...

Страница 44: ...INE BOOT Engine PWB booting SCANNER Scanner PWB ROM IC OPTION LANGUAGE Optional language ROM IC DICTIONARY DP Optional DP main PWB ROM IC LCF Optional 3000 sheet paper feeder main PWB ROM IC OPTION CASSETTE Optional paper feeder main PWB ROM IC DF MAIN Optional 3000 sheet document finisher main PWB ROM IC DF MTRAY Optional 3000 sheet document finisher internal tray PWB ROM IC DF SADDLE Optional ce...

Страница 45: ... error occurs turn the main powe switch off then on and run maintenance item U020 for initialization Error codes Maintenance item No Description Display Description INCH Inch North America specifications EUROPE METRIC Metric Europe specifications ASIA PACIFIC Metric Asia Pacific specifications Codes Description ERROR 01 Configuration initialization error ERROR 02 Counter initialization error ERROR...

Страница 46: ...gain If other error occurs turn the main powe switch off then on and run maintenance item U021 for initialization U022 Initializing backup memory Description Initializes only the backup data for image processing Purpose To be executed as required Method 1 Press the start key 2 Select the item to initialize 3 Select the destination 4 Press the start key All data in the backup RAM is initialized 5 T...

Страница 47: ...for paper conveying Description Displays the on off status of each paper detection switch on the paper path Purpose To check if the switches for paper conveying operate correctly Method 1 Press the start key 2 Turn each switch on and off manually to check the status When a switch is detected to be in the ON position the display for that switch will be highlighted Optional Completion Press the stop...

Страница 48: ...operated 3 Press the start key The solenoid turns on for 1 s Optional To stop motor driving press MOTOR ON again Completion Press the stop key The screen for selecting a maintenance item No is displayed Maintenance item No Description Display Clutches PF1 Upper paper feed clutch PFCL U PF2 Lower paper feed clutch PFCL L PF MP TRAY MP paper feed clutch MPPFCL FEED1 Feed clutch 1 FCL1 FEED2 Feed clu...

Страница 49: ...s the system menu key 5 Change the setting value using the or numeric keys For output example 1 decrease the value For output example 2 increase the value Figure 1 3 4 6 Press the start key The value is set Caution Check the copy image after the adjustment If the image is still incorrect perform the following adjustments in maintenance mode Maintenance item No Description Display Description LSU O...

Страница 50: ...side of copy paper by setting the actual printing area for folio paper Setting 1 Press the start key 2 Select the item to be set 3 Change the setting using the or numeric keys 4 Press the start key The value is set Completion Press the stop key The screen for selecting a maintenance item No is displayed Maintenance item No Description Display Description Setting range Initial setting Change in val...

Страница 51: ...e using the or numeric keys For output example 1 increase the value For output example 2 decrease the value The greater the value the larger the amount of slack the smaller the value the smaller the amount of slack Figure 1 3 6 7 Press the start key The value is set Completion Press the stop key The indication for selecting a maintenance item No appears Maintenance item No Description Display Desc...

Страница 52: ...decreasing it makes the image shorter in the auxiliary scanning direction B Polygon motor speed adjustment Increasing the setting makes the image shorter in the main scanning direction and longer in the auxiliary scanning direction decreasing the setting makes the image longer in the main scanning direction and shorter in the auxiliary scanning direction 5 Press the start key The value is set Comp...

Страница 53: ... plate To prevent this problem the shading position should be changed so that shading is possible without being affected by the flaws or stains Method 1 Press the start key 2 Change the setting using the or numeric keys Increasing the setting moves the shading position toward the machine right and decreasing it moves the position toward the machine left 3 Press the start key The value is set Suppl...

Страница 54: ... 3 8 5 Press the start key The value is set Adjustment auxiliary scanning direction 1 Press the system menu key 2 Place an original and press the start key to make a test copy 3 Press the system menu key 4 Change the setting value using the or numeric keys For copy example 1 increase the value For copy example 2 decrease the value Figure 1 3 9 5 Press the start key The value is set Completion Pres...

Страница 55: ...xample 1 increase the value For copy example 2 decrease the value Figure 1 3 10 7 Press the start key The value is set Caution Check the copy image after the adjustment If the image is still incorrect perform the following adjustments in maintenance mode Completion Press the stop key The screen for selecting a maintenance item No is displayed Maintenance item No Description Display Description Set...

Страница 56: ...copy example 1 increase the value For copy example 2 decrease the value Figure 1 3 11 7 Press the start key The value is set Caution Check the copy image after the adjustment If the image is still incorrect perform the following adjustments in maintenance mode Completion Press the stop key The screen for selecting a maintenance item No is displayed Maintenance item No Description Display Descripti...

Страница 57: ...de is displayed 9 Press the start key Test copy is executed 10 Perform the test copy at each scanning position with the setting value from 0 to 4 and check that no black line appears and the image is normally scanned Completion Press the stop key The screen for selecting a maintenance item No is displayed U070 Adjusting the DP magnification Description Adjusts the DP original scanning speed Purpos...

Страница 58: ...nning direction of CCD CIS 1 Press the system menu key 2 Place an original on the DP and press the start key to make a test copy 3 Press the system menu key 4 Change the setting value using the or numeric keys For copy example 1 increase the value For copy example 2 decrease the value Figure 1 3 13 5 Press the start key The value is set Caution Check the copy image after the adjustment If the imag...

Страница 59: ... 1 increase the value For copy example 2 decrease the value Figure 1 3 14 5 Press the start key The value is set Caution Check the copy image after the adjustment If the image is still incorrect perform the following adjustments in maintenance mode Maintenance item No Description Display Description Setting range Initial setting Change in value per step ADJUST DATA1 Leading edge registration first...

Страница 60: ...py example 1 increase the value For copy example 3 decrease the value Figure 1 3 15 5 Press the start key The value is set Caution Check the copy image after the adjustment If the image is still incorrect perform the following adjustments in maintenance mode Completion Press the stop key The screen for selecting a maintenance item No is displayed Maintenance item No Description Original Copy examp...

Страница 61: ...example 1 increase the value For copy example 2 decrease the value Figure 1 3 16 7 Press the start key The value is set Caution Check the copy image after the adjustment If the image is still incorrect perform the following adjustments in maintenance mode Completion Press the stop key The screen for selecting a maintenance item No is displayed Maintenance item No Description Display Description Se...

Страница 62: ...r frame of the scanner moves to the reading position Method DUST CHECK 1 Select DUST CHECK 2 Press the start key The exposure lamp lights 3 To turn the exposure lamp off press the stop key Completion Press the stop key when scanning stops The screen for selecting a maintenance item No is displayed Maintenance item No Description Display Description SCANNER MOTOR Scanner operation HOME POSITION Hom...

Страница 63: ...intenance item No is displayed U080 Setting the economy mode Description Sets the level in the economy mode Purpose To increase or decrease the image density in the eco print mode Setting 1 Press the start key 2 Select ADJUST DATA 3 Change the setting value using the or numeric keys Increasing the setting makes the image darker decreasing it makes the image lighter 4 Press the start key The value ...

Страница 64: ... for the selected item is displayed Setting standard data when dust is detected 1 Select the item to be set 2 Change the value using the or numeric keys 3 Press the start key The value is set Setting Initialization of original reading position 1 Select CLEAR 2 Press the start key The setting is cleared Completion Press the stop key The screen for selecting a maintenance item No is displayed Mainte...

Страница 65: ...ss the system menu key 5 Press the start key A MIP PG pattern is output 6 To return to the screen for selecting an item press the system menu key Completion Press the stop key The screen for selecting a maintenance item No is displayed Maintenance item No Description Display PG pattern to be output Purpose GRAYSCALE To check the laser scanner unit engine output characteristics MONO LEVEL To check ...

Страница 66: ...lecting an item press the stop key Setting Density in text mode 1 Select the item to be set 2 Adjust the setting using the or numeric keys Increasing the setting makes the change in density larger and decreasing it makes the change smaller 3 Press the start key The value is set 4 To return to the screen for selecting an item press the stop key Maintenance item No Description Display Description MI...

Страница 67: ...screen for selecting an item press the stop key Supplement While this maintenance item is being executed copying from an original is available in the interrupt copying mode Completion Press the stop key The screen for selecting a maintenance item No is displayed Maintenance item No Description Display Description Setting range Initial setting PHOTO DARKER Change in density when manual density is s...

Страница 68: ... key The screen for selecting a maintenance item No is displayed Maintenance item No Description Display Description DATA Displaying detection sensor transmission data B W LEVEL Setting detection sensor threshold value Setting original size judgment time Display Description ORIGINAL AREA R Detected original width size R ORIGINAL AREA G Detected original width size G ORIGINAL AREA B Detected origin...

Страница 69: ...e darker decreasing it makes the image lighter Increasing the DEV SBIAS setting makes the image darker Increasing the DEV DUTY setting makes the image lighter decreasing it makes the image darker Increasing the TC DATA setting makes the transfer voltage higher and decreasing it makes the voltage lower Increasing the SC DATA setting makes the separation voltage higher and decreasing it makes the vo...

Страница 70: ...thod Press the start key The drum counter count is displayed Setting 1 Change the setting using the or numeric keys 2 Press the start key The count is set Completion Press the stop key The screen for selecting a maintenance item No is displayed U112 Setting toner refresh operation Description Sets the toner refresh operation time and the developing bias on time at power on and after copying Purpos...

Страница 71: ...ses is displayed Completion Press the stop key The screen for selecting a maintenance item No is displayed U130 Initial setting for the developing unit Description Replenishes toner to the developing unit to a certain level from the toner container that has been installed Purpose To operate when installing the machine or replacing the developing unit Method 1 Press the start key The screen for exe...

Страница 72: ...ntenance item No is displayed U157 Checking clearing the developing drive time Description Displays the developing drive time for checking or clearing a figure which is used as a reference when cor recting the toner control Purpose To check the developing drive time after replacing the developing unit Method Press the start key The developing drive time is displayed in minutes Clearing 1 Press the...

Страница 73: ...ting the fuser problem data Description Resets the detection of a service call code indicating a problem in the fuser section Purpose To prevent accidents due to an abnormally high fuser temperature Method 1 Press the start key 2 Press EXECUTE on the touch panel 3 Press the start key The fuser problem data is initialized 4 Turn the main power switch off and on U167 Checking fuser counts Descriptio...

Страница 74: ... on Purpose To check if all the LEDs on the operation panel light Method Press the start key All the LEDs on the operation panel light Press the stop key or wait for 10 s The LEDs turns off and the screen for selecting a maintenance item No is displayed U201 Initializing the touch panel Description Automatically correct the positions of the X and Y axes of the touch panel Purpose To automatically ...

Страница 75: ...a key card or key counter Description Sets the presence or absence of the optional key card or key counter Purpose To run this maintenance item if a key card or key counter is installed Method 1 Press the start key 2 Select the item to be set The setting screen for the selected item is displayed Setting KEY DEVICE 1 Select ON or OFF 2 Press the start key The setting is set 3 Turn the main power sw...

Страница 76: ...the touch panel increases in increments of 1 When all the keys in that line are pressed and if there are any LEDs corresponding to the keys in the line on the immediate right the top LED in that line will light 4 When all the keys on the operation panel have been pressed all the LEDs light for up to 10 seconds Completion Press the stop key The screen for selecting a maintenance item No is displaye...

Страница 77: ...unch destination Description Sets the destination of optional punch unit of 3000 sheet document finisher Purpose To be set when installing a different punch unit from the destination of the machine Setting 1 Press the start key 2 Select the destination Initial setting INCH Inch specifications EUROPE METRIC Metric specifications 3 Press the start key The setting is set Completion Press the stop key...

Страница 78: ...ch stack on the main tray and on the internal tray in the optional 3000 sheet document finisher Purpose To change the setting when a stack malfunction has occurred Method 1 Press the start key 2 Select the item to be set Setting the number of sheets of stack on the main tray 1 Change the setting using the or numeric keys Initial setting 0 2 Press the start key The setting is set Setting the number...

Страница 79: ...FEED IN MOTOR L Paper entry motor PEM is turned on clockwise CONV MOTOR H Paper conveying motor is turned on at high speed CONV MOTOR M Paper conveying motor is turned on at middle speed CONV MOTOR L Paper conveying motor is turned on at low speed EJECT MOTOR H Eject motor EJM is turned on at high speed EJECT MOTOR M Eject motor EJM is turned on at middle speed EJECT MOTOR L Eject motor EJM is tur...

Страница 80: ... SUB TRAY L SOL Feedshift solenoid 2 FSSOL2 BOOKLET SOL Feedshift solenoid 3 FSSOL3 PADDLE SOL Paddle solenoid PDSOL HOLD DOWN SOL Paper holder solenoid PHSOL EJECT SOL Pressure switching solenoid PSWSOL PUNCH SOL Punch pattern solenoid PPSOL M TRAY LOCK SOL Lock solenoid LSOL Display Motors and solenoids FEED IN MOTOR Mail box drive motor MBDM BRANCH SOL 2 Tray feedshift solenoid 1 TFSSOL1 BRANCH...

Страница 81: ...H TANK SW Punch waste box sensor PWBS TRAY L LIMIT SW Main tray lower limit detection sensor MTLLDS TRAY U LIMIT SW Main tray upper limit detection sensor MTULDS TRAY MIDDLE SW Main tray middle position detection sensor MTMPDS PAP HOLD DOWN SW Paper holder home position sensor PHHPS LOAD DET SW Main tray load detection sensor MTLDS FEED IN SW Paper entry sensor PES EJECT SW 1 Eject switch 1 ESW1 E...

Страница 82: ...sensor TEJS COVER SW Mail box cover open close switch MBCOSW OVER FLOW SW 1 Tray overflow switch 1 TOFSW1 OVER FLOW SW 2 Tray overflow switch 2 TOFSW2 OVER FLOW SW 3 Tray overflow switch 3 TOFSW3 OVER FLOW SW 4 Tray overflow switch 4 TOFSW4 OVER FLOW SW 5 Tray overflow switch 5 TOFSW5 OVER FLOW SW 6 Tray overflow switch 6 TOFSW6 OVER FLOW SW 7 Tray overflow switch 7 TOFSW7 Display Switches BUNDLE ...

Страница 83: ...hod 1 Press the start key 2 Select the item to be displayed 3 Change the screen using the cursor up down keys to display each message one at a time When a message number is entered with the numeric keys and then the start key is pressed the mes sage corresponding the specified number is displayed Completion Press the stop key The screen for selecting a maintenance item No is displayed Maintenance ...

Страница 84: ...ng position in the stitching mode if the position is not proper Start 1 Press the start key 2 Select the item to be set The screen for setting each item is displayed Setting 3000 sheet document finisher 1 Select the item to be set Setting adjustment of registration stop timing 1 Select PUNCH REG ADJ 2 Change the setting using the or numeric keys If skewed paper conveying occurs sample 1 increase t...

Страница 85: ...heck that paper is abut the guides 7 Repeat the above adjustment until paper is properly in position Setting adjustment of front and back stapling home position 1 Select STAPLE HP ADJ 2 Change the setting using the or numeric keys When staple positions are off toward the front side of the machine sample 1 increase the preset value When staple positions are off toward the rear side of the machine s...

Страница 86: ...nsert paper between the guides and check that paper is abut the guides 7 Repeat the above adjustment until paper is properly in position Maintenance item No Description Description Setting range Initial setting Change in value per step Adjustment of slanted stapling home position 10 to 10 0 0 99 Sample 1 Sample 2 Display Description WIDTH U HP ADJ Adjustment of upper side registration home positio...

Страница 87: ...hen the centerfold position too far left sample 2 decrease the setting value Reference value within 3 mm Figure 1 3 23 3 Press the start key The value is set 4 To return to the screen for selecting an item press the stop key Maintenance item No Description Description Setting range Initial setting Change in value per step Adjustment of booklet stapling position for A4 letter size 10 to 10 0 0 55 m...

Страница 88: ... the item to be operated 3 Press the start key The operation starts 4 To stop operation press the stop key Completion Press the stop key The screen for selecting a maintenance item No is displayed Maintenance item No Description Display Description Setting range Initial setting FRONT Front side registration cursor stop position 4 to 4 0 REAR Rear side registration cursor stop position 4 to 4 0 END...

Страница 89: ... clearing the maintenance count Description Displays clears and changes the maintenance count Purpose To check the maintenance count Also to clear the count during maintenance service Method Press the start key The maintenance count is displayed Clearing 1 Press the clear key 2 Press the start key The count is cleared Setting 1 Enter a count using the numeric keys 2 Press the start key The count i...

Страница 90: ...ingle counts Description Switches the count system for the total counter and other counters Purpose Used to select according to the preference of the user copy service provider if A3 Ledger paper is to be counted as one sheet single count or two sheets double count Setting 1 Press the start key 2 Select double or single count Initial setting DBL CNT A3 LGR 3 Press the start key The setting is set ...

Страница 91: ...itial setting EJECT 3 Press the start key The setting is set Completion Press the stop key The screen for selecting a maintenance item No is displayed U265 Setting OEM purchaser code Description Sets the OEM purchaser code Purpose Sets the code when replacing the main PWB and the like Setting 1 Press the start key 2 Adjust the preset value using the or numeric keys 3 Press the start key The settin...

Страница 92: ... black line is detected 3 Press the start key The count is set Completion Press the stop key The screen for selecting a maintenance item No is displayed U328 Side ejection setting Description Sets whether to eject to the side of the machine when an optional curl eliminator is installed Purpose Set according to the preference of the user Setting 1 Press the start key 2 Select ON or OFF Initial sett...

Страница 93: ...ting is set Completion Press the stop key The screen for selecting a maintenance item No is displayed U341 Specific paper feed location setting for printing function Description Sets a paper feed location specified for printer output Purpose To use a paper feed location only for printer output A paper feed location specified for printer output cannot be used for copy output Setting 1 Press the sta...

Страница 94: ... 1 Press the start key 2 Select ON or OFF Initial setting OFF 3 Press the start key The setting is set Completion Press the stop key The screen for selecting a maintenance item No is displayed U345 Setting the value for maintenance due indication Description Sets when to display a message notifying that the time for maintenance is about to be reached by setting the number of copies that can be mad...

Страница 95: ...erform the following adjustments in maintenance mode Completion Press the stop key The screen for selecting a maintenance item No is displayed Maintenance item No Description Display Description Setting range Initial setting Change in value per step LEAD Printer leading edge margin 0 to 236 74 0 1 mm A Printer left margin 80 to 236 70 0 1 mm C Printer right margin 118 to 236 68 0 1 mm TRAIL Printe...

Страница 96: ... the start key The value is set Caution Check the copy image after the adjustment If the image is still incorrect perform the following adjustments in maintenance mode Completion Press the stop key The indication for selecting a maintenance item No appears Maintenance item No Description Display Description Setting range Initial setting Change in value per step A MARGIN Scanner left margin 0 to 10...

Страница 97: ... 3 26 7 Press the start key The value is set Completion Press the stop key The screen for selecting a maintenance item No is displayed Maintenance item No Description U403 P 1 3 65 U402 P 1 3 64 U404 Display Description Setting range Initial setting Change in value per step A MARGIN Left margin first page 0 to 10 0 3 0 0 1 mm B MARGIN Leading edge margin first page 0 to 10 0 2 5 0 1 mm C MARGIN Ri...

Страница 98: ... key 3 Place an original and press the start key to make a test copy 4 Press the system menu key 5 Change the setting value using the or numeric keys For copy example 1 decrease the value For copy example 2 increase the value Figure 1 3 27 6 Press the start key The value is set Completion Press the stop key The screen for selecting a maintenance item No is displayed Maintenance item No Description...

Страница 99: ...ine the details of the problem and either repeat the procedure from the beginning or adjust the remaining items manually by running the corresponding maintenance items 5 To return to the screen for selecting an item press the stop key Maintenance item No Description Display Description Original to be used for adjustment P N SCANNER Automatic adjustment in the scanner section 302FZ56990 DP FACE UP ...

Страница 100: ... key Auto adjustment starts GAMMA 1 Enter the target values which are shown on the specified original P N 303JX57010 executing mainte nance item U425 2 Set a specified original P N 303JX57010 in the DP 3 Press the start key Auto adjustment starts MTF MATRIX 1 Enter the target values which are shown on the specified original P N 303JX57020 executing mainte nance item U425 2 Set a specified original...

Страница 101: ... specified original P N 303JX57010 in the DP 2 Press the start key Auto adjustment starts MTF MATRIX 1 Set a specified original P N 303JX57020 in the DP 2 Press the start key Auto adjustment starts When automatic adjustment has normally completed RESULT OK 00 is displayed If a problem occurs during auto adjustment ERROR XX XX is replaced by an error code is displayed and opera tion stops Should th...

Страница 102: ...nd is not detected DP auxiliary scanning direction trailing edge ERROR 0d Black band is not detected DP auxiliary scanning direction trailing edge 2 ERROR 0e DMA time out ERROR 0f Auxiliary scanning direction magnification error ERROR 10 Auxiliary scanning direction leading edge detection error ERROR 11 Auxiliary scanning direction trailing edge detection error ERROR 12 Auxiliary scanning directio...

Страница 103: ...ts Measurement procedure 1 Measure the distances D 30 mm E 148 5 mm and C 267 mm along the main scanning direction 2 Apply the following formula for the values obtained D F 2 E 2 2 Enter the values solved using the or numeric keys in SUB ADJ 3 Press the start key The value is set 4 To return to the screen for selecting an item press the stop key Maintenance item No Description Display Description ...

Страница 104: ...y Description N950 Setting the N950 patch for the original for adjustment N850 Setting the N850 patch for the original for adjustment N770 Setting the N770 patch for the original for adjustment N650 Setting the N650 patch for the original for adjustment N500 Setting the N500 patch for the original for adjustment N300 Setting the N300 patch for the original for adjustment CYAN Setting the cyan patc...

Страница 105: ... the user of the time to replace punch waste Also used to manually clear the punch hole scrap count if a message requiring collection of punch hole scrap is shown on the touch panel after collection If punch hole scrap is collected with the machine power turned off the punch hole scrap count is not cleared and consequently this problem occurs Method 1 Press the start key 2 Select the item 3 Change...

Страница 106: ...on Displays or clears the service call code counts by types Purpose To check the service call code status by types Also to clear the service call code counts after replacing con sumable parts Method 1 Press the start key 2 Select the item The screen for executing is displayed Method Displays clears the service call counts 1 Select COUNT The count for service call detection by type is displayed 2 C...

Страница 107: ...ts are serviced Method 1 Press the start key 2 Press EXECUTE on the touch panel 3 Press the start key to reset partial operation control The maintenance mode is exited and the machine returns to the same status as when the main power switch is turned on U908 Checking the total counter value Description Displays the total counter value Purpose To check the total counter value Method Press the start...

Страница 108: ... copy counts Purpose To check the copy counts Method Press the start key The current counts of copy counter printer counter and fax counter are displayed Completion Press the stop key The screen for selecting a maintenance item No is displayed U927 Clearing the all copy counts and machine life counts one time only Description Resets all of the counts back to 0 Purpose To start the counters with va...

Страница 109: ...he setting call for service C0060 occurs again when progress of period Setting 1 Press the start key 2 Select the item Initial setting MODE 0 3 Press the start key The setting is set 4 Turn the main power switch off and on Supplement After removing the cause of the problem be sure to change the setting in OFF Maintenance item No Description Display Description INITIALIZE CF Initializes the data ba...

Страница 110: ...e item No is displayed U984 Checking the developing unit number Description Displays the developing unit number Purpose To check the developing unit number Method Press the start key The number is displayed Completion Press the stop key The screen for selecting a maintenance item No is displayed U985 Displaying the developing unit history Description Displays the past record of machine number and ...

Страница 111: ...ation of use of the exposure lamp Also to clear the accumulated time for the lamp after replace ment Method Press the start key The accumulated time of illumination for the exposure lamp is displayed in minutes Clearing 1 Select the item to be cleared 2 Press the start key The accumulated time is cleared Completion Press the stop key The screen for selecting a maintenance item No is displayed U991...

Страница 112: ...Select the VTC PG pattern to be output 3 Press the system menu key 4 Press the start key A VTC PG pattern is output 5 To return to the screen for selecting an item press the system menu key Completion Press the stop key The screen for selecting a maintenance item No is displayed Maintenance item No Description Display PG pattern to be output Purpose PG1 Leading edge registration adjust ment Center...

Страница 113: ...2GN 2GP 2GR 1 3 82 ...

Страница 114: ...tion can be checked in maintenance item U903 To remove paper jammed in the machine open the front cover left cover or pull the cassette out To remove original jammed in the optional DP open the document processor top cover or document processor reverse unit To remove the jammed paper in optional document finisher detach the finisher from the machine Paper misfeed detection can be reset by opening ...

Страница 115: ...1 FSW1 FSW2 FSW3 DUPPCSW RSW RCL MPFCL MPPFCL MPFSW PFCL U PFCL L PFPFCL1 PFPFCL2 ESW FSSW PCSW FCL1 DUPFCL FCL2 FCL3 PFFSW PFFCL OFSW ORSW Document processor Built in finisher Paper feeder 3000 sheet paper feeder DPTSW1 DPTSW2 PFPFCL1 PFPFCL2 PPSENS1 PPSENS3 PPSENS2 ...

Страница 116: ...1 PFPFCL1 turning on the clutch is then successively turned off for 1 s and turned back on but the switch again fails to turn on within the specified time paper feed from optional 3000 sheet paper feeder 2044 ms 30 ppm 1582 ms 40 50 ppm 13 No paper feed from optional cassette 4 The paper feeder feed switch PFFSW does not turn on within the specified time of paper feeder paper feed clutch 2 PFPFCL2...

Страница 117: ...tch 3 FSW3 does not turn off within speci fied time of its turning on paper feed from optional paper feeder 3382ms 30 ppm 2617ms 40 50 ppm The feed switch 3 FSW3 does not turn off within speci fied time of its turning on paper feed from optional 3000 sheet paper feeder Paper length 1595ms 30 ppm Paper length 1234ms 40 50 ppm The paper feeder feed switch PFFSW does not turn off within specified tim...

Страница 118: ...pm 1278 ms 40 50 ppm Fuser section 40 Misfeed in fuser section MP tray 41 Misfeed in fuser section cassette 1 42 Misfeed in fuser section cassette 2 43 Misfeed in fuser section optional cassette 3 44 Misfeed in fuser section optional cassette 4 45 Misfeed in fuser section optional 3000 sheet paper feeder 46 Misfeed in fuser section duplex section The eject switch ESW does not turn on within specif...

Страница 119: ...y ing section 2 The feed switch 1 FSW1 does not turn on within speci fied time of the duplex paper conveying switch DUP PCSW turning on 1994 ms 30 ppm 1543 ms 40 50 ppm The feed switch 1 FSW1 does not turn off within speci fied time of the duplex paper conveying switch DUP PCSW turning off 1994 ms 30 ppm 1543 ms 40 50 ppm Optional DP 70 No original feed The original feed switch OFSW does not turn ...

Страница 120: ... the machine eject signal was received 1360 ms 30 ppm 1052 ms 40 50 ppm 3000 sheet document finisher The paper entry sensor PES does not turn off within specified time of its turning on 2989 ms 30 ppm 2313 ms 40 50 ppm Document finisher The paper entry sensor PES is not turned on even if a specified time has elapsed after the machine eject signal was received 2627 ms Built in finisher The paper co...

Страница 121: ...s not turn off within specified time of paper entry sensor PES turning on 1843 ms 30 ppm 1426 ms 40 50 ppm Eject switch 3 ESW3 does not turn on within specified time of paper entry sensor PES turning on 1843 ms 30 ppm 1426 ms 40 50 ppm Eject switch 3 ESW3 is not turned off within specified time of its turning on 2989 ms 30 ppm 2313 ms 40 50 ppm 86 Jam in eject section of internal tray 1 3000 sheet...

Страница 122: ...s not turned on within specified time 4528 ms 30 ppm 3504 ms 40 50 ppm The centerfold paper detection sensor CPDS is not turned off within specified time of its turning on 2989 ms 30 ppm 2313 ms 40 50 ppm 90 Jam in mail box 3000 sheet document finisher only The mail paper entry switch MPESW is not turned on within specified time 1315 ms 30 ppm 1017 ms 40 50 ppm The mail paper entry switch MPESW is...

Страница 123: ...ning jam document finisher only The paper entry sensor PES is not turned off within specified time its turning on Depends on paper size 95 Paper conveying sen sor jam document fin isher only The paper conveying sensor PCS does not turn on within specified time of reverse sensor REVS turning on 735 ms The paper conveying sensor PCS does not turn off within specified time of reverse sensor REVS turn...

Страница 124: ...d switch 1 on and off manually Replace the switch if indication of the corresponding switch on the touch panel is not displayed in reverse Check if the upper paper feed clutch malfunctions Run maintenance item U032 and select the upper paper feed clutch on the touch panel to be turned on and off Check the status and remedy if necessary Electrical problem with the upper paper feed clutch Check see ...

Страница 125: ... of the corresponding switch on the touch panel is not displayed in reverse Check if the clutch malfunc tions Run maintenance item U247 and select following clutch on the touch panel to be turned on and off Check the status and remedy if necessary Paper feeder paper feed clutch 1 2 paper feeder paper conveying clutch Electrical problem with clutch Check see service manual of 3000 sheet paper feede...

Страница 126: ...N6 12 on the paper feeder main PWB check if CN6 11 on the paper feeder main PWB remains low when paper path sensor 3 is turned on and off If it does replace paper path sensor 3 Check if paper feeder paper feed clutch 2 malfunctions Run maintenance item U247 and select paper feeder paper feed clutch 2 on the touch panel to be turned on and off Check the sta tus and remedy if necessary Electrical pr...

Страница 127: ... switch on the touch panel is not displayed in reverse Feed switch 1 2 3 registration switch Defective feed pulleys or feed rollers Check visually and replace 11 A paper jam in the paper feed section is indicated during copying jam in optional paper feeder vertical paper con veying section Jam code 19 Broken feed switch 3 actua tor Check visually and replace switch Defective feed switch 3 Run main...

Страница 128: ...d during copying multiple sheets in vertical conveying section Jam code 22 Broken feed switch 1 2 3 actuator Check visually and replace switch Defective switch Run maintenance item U031 and turn switch on and off manually Replace the switch if indication of the corresponding switch on the touch panel is not displayed in reverse Feed switch 1 2 3 Defective feed pulleys or feed rollers Check visuall...

Страница 129: ...l problem with the registration clutch Check see page 1 4 51 19 A paper jam in the eject section is indi cated during copying jam in optional job separator eject sec tion Jam code 51 Broken feedshift switch or job separator eject switch actuator Check visually and replace switch Defective switch Run maintenance item U031 and turn switch on and off manually Replace the switch if indication of the c...

Страница 130: ...responding switch on the touch panel is not displayed in reverse Duplex paper conveying switch feed switch 1 24 An original jams in optional DP is indi cated during copying no original feed Jam code 70 Defective original feed switch Run maintenance item U244 and turn the original feed switch on and off manually Replace the switch if indication of the corre sponding switch on the touch panel is not...

Страница 131: ...turn the paper entry sensor on and off manually Replace the original switchback switch if indica tion of the corresponding switch on the touch panel is not dis played in reverse 32 A paper jam in optional document finisher is indicated during copying paper jam during paper insertion to the finisher Jam code 81 3000 sheet document finisher document finisher Extremely curled paper Change the paper D...

Страница 132: ...her main PWB remains low or high when the eject sensor is turned on and off If it does replace the eject sen sor Check if the paper convey ing motor malfunctions Check and remedy Check if the eject roller and eject pulley contact each other Check and remedy Check if the eject guide is deformed Check and remedy Defective finisher main PWB Replace the finisher main PWB and check for correct operatio...

Страница 133: ...er jam in optional document finisher is indicated during copying cen terfold unit jam Jam code 89 Defective sensor switch Run maintenance item U241 and turn the following switch on and off manually Replace the original switchback switch if indication of the corresponding switch on the touch panel is not displayed in reverse Centerfold paper entry sensor centerfold eject switch centerfold paper det...

Страница 134: ...e paper entry guide is deformed Check and remedy Defective finisher main PWB Replace the finisher main PWB and check for correct operation 45 A paper jam in optional document finisher is indicated during copying paper conveying sensor jam Jam code 95 Defective paper conveying sensor With 5 V DC present at CN4 4 on the finisher main PWB check if CN4 6 on the finisher main PWB remains low or high wh...

Страница 135: ...ver perform the operation shown in Table 1 4 1 If a system error occurs frequently a fault may have occurred Check the details of the C call to take proper measures Table 1 4 1 Partial operation control If any of the following calls for service is detected partial operation control will be activated After taking measures against the cause of trouble run maintenance item U906 to reset partial opera...

Страница 136: ...e performed Defective engine PWB Replace the engine PWB and check for cor rect operation Device damage of EEPROM Contact the Service Administrative Division C0160 Backup memory data problem Engine PWB Reading data from EEPROM is abnor mal Read and write data does not match five times continuously Problem with the backup memory data Run maintenance item U022 to initialize the backup memory data Def...

Страница 137: ...ith the pro gram in the Flash ROM on the fax con trol PWB Defective fax con trol PWB Replace the fax control PWB and check for correct operation C0870 Fax control PWB to main PWB high capacity data transfer problem optional fax High capacity data transfer between the fax control PWB and the main PWB was not normally performed even if the data transfer was retried the specified times Poor contact i...

Страница 138: ...Defective engine PWB Replace the engine PWB and check for cor rect operation C1020 Lower lift motor error When cassette 2 is inserted lower lift limit switch does not turn on within 12 s of lower lift motor turning on Poor contact in the connector termi nals Check the connection of connector of lower lift motor and the connector YC13 on the engine PWB and the continuity across the connector termin...

Страница 139: ...f necessary Broken gears or couplings of paper feeder lift motor 2 Replace paper feeder lift motor 2 Defective paper feeder lift motor 2 Check for continuity across the coil If none replace paper feeder lift motor 2 Defective paper feeder lift switch 2 Check if YC1 7 on the paper feeder main PWB goes low when paper feeder lift switch 2 is turned off If not replace paper feeder lift switch 2 C1100 ...

Страница 140: ...eder lift switch 1 Defective paper feeder lift motor 2 Check for continuity across the coil If none replace paper feeder lift motor 2 The paper feeder right lift does not rise properly Check the gears and belts and remedy if necessary C1800 Paper feeder unit communication problem optional paper feeder 3000 sheet paper feeder No communication there is no reply after 5 retries Abnormal communication...

Страница 141: ...g motor and the conti nuity across the connector terminals Repair or replace if necessary Defective drive transmission sys tem Check if the rollers and gears rotate smoothly If not grease the bushings and gears Check for broken gears and replace if any Defective engine PWB Replace the engine PWB and check for cor rect operation Defective main charger cleaning motor Replace the main charger cleanin...

Страница 142: ...tion switch and the conti nuity across the connector terminals Repair or replace if necessary Defective scanner PWB Replace the scanner PWB and check for correct operation Defective scanner home position switch Replace the scanner home position switch Defective scanner motor Replace the scanner motor The mirror frame exposure lamp or scanner wire is defective Check if the mirror flames and exposur...

Страница 143: ...nd check for correct operation C3500 Communication error between scan ner and SHD An error code is detected Poor contact in the connector termi nals Check the connection of connector YC3 on the scanner PWB and the connector YC4 on the SHD PWB and the continuity across the connector terminals Repair or replace if necessary Defective PWB Replace the scanner PWB or SHD PWB and check for correct opera...

Страница 144: ... engine PWB and check for cor rect operation C6000 Fuser heater break Fuser thermistor 1 is detected 40 C 104 F below with 10 s continuously dur ing warm up and ready in Defective fuser heater M or S Replace the fuser heater M or S Installation defec tiveness on fuser thermistor 1 Check the mounting state of the fuser ther mistor 1 If any problem is found repair it Defective fuser thermostat Repla...

Страница 145: ...inals Repair or replace if necessary Fuser unit connec tor inserted incor rectly Reinsert the fuser unit connector if neces sary C7300 Toner container problem Toner level is not detected when toner empty is detected Poor contact in the connector termi nals Check the connection of connector YC9 on the engine PWB and the continuity across the connector terminals Repair or replace if necessary Defect...

Страница 146: ...place the developing unit C8020 Punch motor problem optional 3000 sheet document finisher The LOCK signal of the punch motor is detected for more than 500 ms while the punch motor is operating Poor contact in the connector termi nals Check the connection of connector on the punch PWB and the continuity across the connector terminals Repair or replace if necessary Defective punch motor Replace the ...

Страница 147: ...er conveying belt home position sen sor 2 does not turn on within 2 5 s Poor contact in the connector termi nals Check the connection of connector YC6 on the internal tray PWB and the connector on paper conveying belt motor 2 and the conti nuity across the connector terminals Repair or replace if necessary Defective paper conveying belt home position sen sor 2 Replace paper conveying belt home pos...

Страница 148: ...efective main tray upper limit detec tion sensor main tray load detection sensor main tray lower limit detec tion sensor Replace the sensor Defective finisher main PWB Replace the finisher main PWB and check for correct operation Tray elevation motor problem optional document finisher When the tray elevation motor is driving the ON status of the tray lower limit sen sor or surface view sensor cann...

Страница 149: ...sen sor connector makes poor con tact Reinsert the connector Also check for conti nuity within the connector cable If none remedy or replace the cable Defective adjust ment home posi tion sensor Replace the adjustment home position sen sor Defective finisher main PWB Replace the finisher main PWB and check for correct operation Finisher front side registration motor problem optional built in finis...

Страница 150: ... istration home position sensor connector makes poor contact Reinsert the connector Also check for conti nuity within the connector cable If none remedy or replace the cable Defective rear side registration home position sensor Replace the rear side registration home position sensor Defective finisher control PWB Replace the finisher control PWB and check for correct operation C8190 Finisher trail...

Страница 151: ...tion sensor does not change state from non detection to detection within 600 ms of the start of stapler motor clockwise reverse rotation The stapler con nector makes poor contact Reinsert the connector Also check for conti nuity within the connector cable If none remedy or replace the cable The stapler is blocked with a sta ple Remove the stapler cartridge and check the cartridge and the stapling ...

Страница 152: ... Poor contact in the connector termi nals Check the connection of connector YC6 YC7 on the centerfold main PWB and the connector of centerfold paper conveying belt motor 1 2 and the continuity across the con nector terminals Repair or replace if neces sary Defective center fold paper convey ing belt motor 1 2 Replace centerfold paper conveying belt motor 1 2 Defective PWB Replace the centerfold ma...

Страница 153: ...WB or finisher main PWB and check for correct operation C8440 Sensor adjusting problem optional document finisher The sensor cannot be adjusted within the specified range The paper entry sensor connector makes poor con tact Reinsert the connector Also check for conti nuity within the connector cable If none remedy or replace the cable Defective paper entry sensor Replace the paper entry sensor and...

Страница 154: ...r on the engine PWB and the continuity across the connector terminals Repair or replace if necessary Defective finisher main PWB Replace the finisher main PWB and check for correct operation C8910 Backup memory data problem optional punch unit of 3000 sheet document finisher Read and write data does not match Poor contact in the connector termi nals Check the connection of connector on the punch P...

Страница 155: ...tch could not be turned on Loose connection of the DP lift motor connector Reinsert the connector Also check for conti nuity within the connector cable If none remedy or replace the cable Malfunction of the DP lift motor Replace the DP lift motor and check for cor rect operation Malfunction of the DP lift lower limit switch Replace the DP lift lower limit switch and check for correct operation Loo...

Страница 156: ...PWB and check for cor rect operation Defective engine PWB Replace the engine PWB and check for cor rect operation F041 Scanner PWB communication error Defective main PWB Replace the main PWB and check for cor rect operation Defective scanner PWB Replace the scanner PWB and check for correct operation F050 Engine ROM checksum error Defective engine PWB Replace the engine PWB and check for cor rect ...

Страница 157: ...ack dots appear on the image 10 Image is blurred See page 1 4 47 See page 1 4 47 See page 1 4 47 See page 1 4 47 See page 1 4 48 11 The leading edge of the image is con sistently misaligned with the original 12 The leading edge of the image is spo radically misaligned with the original 13 Paper creases 14 Offset occurs 15 Image is partly missing See page 1 4 48 See page 1 4 48 See page 1 4 48 See ...

Страница 158: ... replace the engine PWB Defective high voltage PWB Check if developing bias is output when CN1 14 on the high voltage PWB goes low while maintenance item U101 is run If not replace the high voltage PWB Copy example Causes Check procedures corrective measures No main charging Broken main charger wire Replace the main charger unit see page 1 5 25 Leaking main charger housing Clean the main charger w...

Страница 159: ...PWB Check if YC7 10 on the engine PWB goes low when mainte nance item U101 is run If not replace the engine PWB Defective high voltage PWB Check if transfer charging takes place when CN1 5 on the high voltage PWB goes low while maintenance item U101 is run If not replace the high voltage PWB Copy example Causes Check procedures corrective measures Deteriorated toner Perform the drum refresh operat...

Страница 160: ...ty developing section Clean any part contaminated with toner in the developing section Leaking main charger housing Clean the main charger wire and grid Leaking separation electrode Clean the separation electrode Copy example Causes Check procedures corrective measures Dirty main charger wire Clean the wire or if it is extremely dirty replace it see page 1 5 25 Defective exposure lamp Check if the...

Страница 161: ...ading edge registration Run maintenance mode U034 to readjust the leading edge registration see page 1 3 18 Misadjusted scanner leading edge registration Run maintenance mode U066 to readjust the scanner lead ing edge registration see page 1 3 24 Copy example Causes Check procedures corrective measures Feed clutch paper feed clutch MP paper feed clutch or registration clutch installed or operating...

Страница 162: ...ange the paper Drum condensation Perform the drum refresh operation Dirty or flawed drum Perform the drum refresh operation If the drum is flawed replace the drum unit see page 1 5 24 Copy example Causes Check procedures corrective measures Wrong types of paper Check if the paper meets specifications Replace paper Defective pressure springs Replace the pressure springs Flawed press roller Replace ...

Страница 163: ...adjust the center line of image printing see page 1 3 19 Misadjusted scanner center line Run maintenance item U067 to readjust the scanner leading edge registration see page 1 3 25 Original is not placed correctly Place the original correctly Copy example Causes Check procedures corrective measures Laser scanner unit positioned incor rectly Adjust the installation position of the laser scanner uni...

Страница 164: ...ot operate 1 Poor contact in the con nector terminals Reinsert the connector Also check for continuity within the con nector cable If none remedy or replace the cable 2 Broken motor coil Check for continuity across the coil If none replace the motor 4 The upper lower paper feed clutch feed clutch 1 2 3 MP paper feed clutch MP feed clutch reg istration clutch or duplex feed clutch does not operate ...

Страница 165: ...e high voltage PWB make poor contact 4 Defective engine PWB 5 Defective high voltage PWB 8 No developing bias is output 1 The connector terminals of the high voltage PWB make poor contact See page 1 4 45 2 Defective engine PWB 3 Defective high voltage PWB 9 Transfer charging is not performed 1 The connector terminals of the high voltage PWB make poor contact See page 1 4 45 2 Defective engine PWB ...

Страница 166: ... continuity within the con nector cable If none remedy or replace the cable 2 Defective upper lower paper size length switch or MP paper size length switch If the level of following terminal on PWB does not go low when the switch is turned on and off replace the switch Upper paper size length switch YC13 B2 on the engine PWB Lower paper size length switch YC13 A19 on the engine PWB MP paper size l...

Страница 167: ...h Reinsert the connector Also check for continuity within the con nector cable If none remedy or replace the cable 2 Defective front cover switch left cover 1 switch or left cover 2 switch Check for continuity across each switch If there is no continuity when the switch is on replace it 16 Others 1 Wiring is broken shorted or makes poor contact Check for continuity If none repair Problem Causes Ch...

Страница 168: ...feed clutch and MP feed clutch See page 1 4 51 2 No secondary paper feed Check if the surfaces of the right and left reg istration rollers are dirty with paper powder Clean with isopropyl alcohol Electrical problem with the registration clutch See page 1 4 51 3 Skewed paper feed Width guide in a cassette installed incorrectly Check the width guide visually and correct or replace if necessary Defor...

Страница 169: ...prings are off the separation claws Check if the contact between the eject roller and pulley is correct Check visually and remedy if necessary The feedshift solenoid malfunctions See page 1 4 51 Check if the duplex feed pulley upper duplex feed roller or lower duplex feed roller is deformed Check visually and replace the pulley or roller if deformed 7 Toner drops on the paper conveying path Check ...

Страница 170: ... hands or any object prone to static charge Use only the specified parts to replace the fuser unit thermostat Never substitute electric wires as the machine may be seriously damaged When replacing battery on a PWB dispose properly according to laws and regulations When removing the hook of the connector be sure to release the hook 2 Drum Note the following when handling or storing the drum When re...

Страница 171: ...nd remove the primary paper feed unit Figure 1 5 1 Removing the forwarding pulley 3 Remove the stopper from the primary paper feed unit 4 Raise the forwarding pulley retainer in the direction the arrow and remove from the pri mary paper feed unit Figure 1 5 2 5 Remove the stop ring from the forwarding pulley retainer 6 Remove the forwarding pulley from the for warding pulley shaft Figure 1 5 3 Pri...

Страница 172: ...tall the separation and paper feed pulleys to the primary paper feed unit 13 Install the forwarding pulley to the forward ing pulley retainer When refitting the forwarding pulley orient it correctly as shown in Figure 1 5 6 14 Refit the forwarding pulley retainer to the pri mary paper feed unit 15 Refit the primary paper feed unit Figure 1 5 6 16 When the forwarding pulley paper feed pul ley separ...

Страница 173: ...e right lower cover Figure 1 5 7 2 Remove two screws and two MP holder plates 3 Remove two pins two screws and two con nectors and then remove the MP unit Figure 1 5 8 Removing the MP separation pulley 4 Reverse the MP unit and remove the spring and stop ring from the MP separation pulley shaft and move the bushing inside Figure 1 5 9 Right lower cover MP unit Connectors Pin Pin MP holder plate MP...

Страница 174: ... refit it to its original position Figure 1 5 10 Removing the MP paper feed pulley 6 Remove the connector of the MP paper switch and remove the wire from the three clamps 7 Remove the screw and remove the MP unit cover Figure 1 5 11 8 Remove the stop ring and bushing on the front of the MP paper feed pulley shaft Figure 1 5 12 Holder plate Bushing MP separation pully MP separation pully shaft Clam...

Страница 175: ...he stop ring and MP paper feed clutch When refitting insert the cutout in the MP paper feed clutch over the stopper on the machine Figure 1 5 14 12 Remove the screw from the cam at the rear of the MP forwarding pulley shaft and move the cam and the bushing toward the inner side Figure 1 5 15 Stop ring MP paper feed pully MP paper feed pully shaft MP paper feed clutch Stop ring Sponge Bushing MP fo...

Страница 176: ...ey shaft tempo rarily toward the rear side and then raise it to remove from the MP unit Remove the shaft while raising the actuator of the MP paper switch Figure 1 5 17 15 Remove the bushing an cam on the rear of the MP forwarding pulley shaft Figure 1 5 18 MP paper feed pully shaft Bushing Stop ring MP forwarding pully shaft Actuator Cam Bushing MP forwarding pully shaft ...

Страница 177: ...MP unit 20 Install the MP paper feed pulley to the MP unit 21 Refit the MP unit cover to the MP unit When refitting the MP unit cover the film on the cover is positioned under the MP paper feed pulley shaft 22 Install the MP separation pulley to the MP unit 23 Refit the MP unit Figure 1 5 20 24 When the MP forwarding pulley MP paper feed pulley or the MP separation pulley is replaced perform maint...

Страница 178: ... 27 2 Remove two roller stoppers and remove the left registration roller 3 Remove two registration guides Figure 1 5 21 4 Remove the left registration cleaner 5 Replace the left registration cleaner and reg istration guides Install the left registration cleaner and regis tration guides 6 Refit the left registration roller roller stop pers and transfer roller unit Figure 1 5 22 Left registration ro...

Страница 179: ...1 Remove the developing unit and drum unit see pages 1 5 26 and 24 2 Remove the right registration cleaner 3 Replace the right registration cleaner and Install the cleaner 4 Refit the drum unit and developing unit Figure 1 5 23 Right registration cleaner Frame ...

Страница 180: ...en screws and remove the rear cover Figure 1 5 24 3 Remove two screws and remove the scan ner right cover 4 Remove the platen Figure 1 5 25 5 Remove the connector of the inverter PWB 6 Release the wire from the wire saddles and pull the connector out from the opening on the rear of the scanner unit Figure 1 5 26 Rear cover Platen Scanner right cover Wire saddles Connector Opening ...

Страница 181: ... 1 frame to notch position and release the wire from the wire holder Figure 1 5 27 9 Remove the screw and remove the expo sure lamp 10 Replace the exposure lamp and install the lamp 11 Refit the platen scanner right cover and rear cover Figure 1 5 28 Sponge Wire guide Wire Wire holder Exposure lamp ...

Страница 182: ...7100 black Fitting requires the following tools Two frame securing tools P N 302C968310 Two scanner wire stoppers P N 3596811 Procedure Detaching the scanner wires 1 Remove the exposure lamp see page 1 5 11 2 Remove the clip holder 3 Open the front cover and left cover 1 4 Remove four screws and remove front left cover Figure 1 5 29 5 Remove the screw and pin and then remove the left upper cover F...

Страница 183: ... wire holder plates from mirror 1 frame 8 Remove the mirror 1 frame Figure 1 5 32 9 Remove the round terminals from the scan ner wire springs on scanner unit left side 10 Remove the scanner wire Figure 1 5 33 Scanner left cover Front wire holder plate Rear wire holder plate Mirror 1 frame Scanner wire springs Round terminal Round terminal ...

Страница 184: ...he mirror 2 frame as shown in the fig ure and insert two frame securing tools into the positioning holes at the front and rear of the machine center to fix the mirror 2 frame in position Figure 1 5 34 Frame securing tool Mirror 2 frame Frame securing tool ...

Страница 185: ...ner wire drum 5 17 Wind the scanner wires three turns from the inner toward the hole in the drum 6 18 Install the scanner wire stoppers to the scanner wire drum to fix the wires 7 19 Loop the scanner wire around the groove in the scanner wire pulley at the scanner unit left winding from below to above 8 20 Loop the scanner wires around the inner grooves in the pulleys on the mirror 2 frame winding...

Страница 186: ...the mirror 1 frame 27 Move the mirror 1 and 2 frames to the machine left and insert the two frame secur ing tools into the positioning holes at the front and rear of the scanner unit to secure the frames in position 28 Hold the wires and fix each front and rear wire holder plate to mirror 1 frame with the screw 29 Remove the two frame securing tools 30 Refit the exposure lamp Figure 1 5 36 Frame s...

Страница 187: ...equires the following tools Two positions pins P N 1856812 Procedure Detaching the ISU 1 Remove the platen see page 1 5 11 2 Remove seven screws and then remove the ISU cover Figure 1 5 37 3 Remove three screws and two connectors and then remove the ISU 4 Replace the ISU Figure 1 5 38 ISU cover Connector Connector ISU ...

Страница 188: ...en insert two positioning pins Example When a lens number is 5 move ISU so that the positioning hole of 5 of the number stamped in the scanner unit suit and insert two pins 6 Remove two positioning pins after fixing ISU with three screws 7 Refit two connectors and ISU cover 8 Refit the platen Figure 1 5 39 Positioning holes Positioning pins ISU Lens number ...

Страница 189: ...ing the position of the ISU reference Perform the following adjustment if the leading and trailing edges of the copy image are laterally skewed lateral square ness not obtained Caution Adjust the amount of slack in the paper at the registration roller first see page 1 3 20 Check for the longitudinal square ness of the copy image and if it is not obtained perform the longitudinal squareness adjustm...

Страница 190: ... the developing unit and drum unit see pages 1 5 24 and 26 2 Remove the right lower cover and front left cover see pages 1 5 4 and 13 3 Remove four screws and remove the front right cover Figure 1 5 42 4 Remove three screws and remove the top tray Figure 1 5 43 5 Remove five screws and remove the inner cover Figure 1 5 44 Front right cover Top tray Inner cover ...

Страница 191: ...rews and the connector and then remove the laser scanner unit 9 Replace the laser scanner unit and install the unit 10 Refit the toner container retainer fan duct and inner cover 11 Refit the top tray front right cover right lower cover and front left cover 12 Refit the drum unit and the developing unit Figure 1 5 47 Fan duct Connectors Toner container retainer Connector Laser scanner unit ...

Страница 192: ...example 1 Loosen the screw in the direction of the white arrow Reduce the height of the LSU spacer in the direction of the white arrow For copy example 2 Tighten the screw in the direction of the black arrow Increase the height of the LSU spacer in the direction of the black arrow Press the stop key to exit maintenance mode 6 Adjusting the skew of the laser scanner unit reference Perform the follo...

Страница 193: ...hen detaching and refitting the drum unit Never touch the drum surface when holding the drum unit Procedure 1 Remove the developing unit see page 1 5 26 2 Remove the main charger unit see page 1 5 25 3 Remove the screw and the drum unit 4 Replace the drum unit and install the unit 5 Perform maintenance mode U110 to clear the counter value see page 1 3 39 Figure 1 5 50 Drum unit ...

Страница 194: ...nnector Figure 1 5 51 4 While pushing the hole with a sharp pointed object remove the main charger unit Figure 1 5 52 5 Release the inserted part and remove the cleaning motor unit from the main charger unit 6 Replace the main charger unit 7 Refit the cleaning motor unit to the main charger unit 8 Install the main charger unit Figure 1 5 53 Connector cover Connector Inserted part Main charger unit...

Страница 195: ...over 2 Remove the toner container and waste toner box 3 Remove the pin and turn the developing release lever in the direction of the arrow Figure 1 5 54 4 Remove the developing unit 5 Replace the developing unit and install the unit 6 Perform maintenance mode U157 and U158 to clear the counter value see page 1 3 41 42 Figure 1 5 55 Pin Developing release lever Developing unit ...

Страница 196: ...Follow the procedure below to replace the transfer roller unit Procedure 1 Open the left cover 1 2 While holding down the projection slide the transfer roller unit toward the front to remove it 3 Replace the transfer roller unit and install the unit Figure 1 5 56 Transfer roller unit Projection ...

Страница 197: ... Remove the clip holder 2 Open the front cover and left cover 1 3 Remove four screws and remove front left cover Figure 1 5 57 4 Remove the screw and remove the fuser unit 5 Check or replace the fuser unit and install the unit 6 Perform maintenance mode U167 to clear the counter value see page 1 3 42 Figure 1 5 58 Front left cover Clip holder Fuser unit ...

Страница 198: ... 5 28 2 Remove the two screws and remove the upper fuser cover while holding the four claws Figure 1 5 59 3 Remove the heat roller separation claws from the upper fuser cover 4 Replace the heat roller separation claws and install the claws to upper fuser cover 5 Refit the upper fuser cover 6 Refit the fuser unit Figure 1 5 60 Upper fuser cover Pin Pin Claws Claws Heat roller separation claws ...

Страница 199: ...ser unit see page 1 5 28 2 Remove the upper fuser cover see page 1 5 29 3 Remove the front and rear press springs Figure 1 5 61 4 Remove the press roller from the fuser unit 5 Replace the press roller and install the roller to fuser unit 6 Refit the upper fuser cover 7 Refit the fuser unit Figure 1 5 62 Press spring Press spring Press roller ...

Страница 200: ...e fuser unit see page 1 5 28 2 Remove the upper fuser cover see page 1 5 29 3 Remove two screws and two connectors Figure 1 5 63 4 Pull out the fuser heater from the fuser unit Figure 1 5 64 5 Replace the fuser heater and install the heater to fuser unit 6 Refit the upper fuser cover 7 Refit the fuser unit Connector Connector Fuser heater ...

Страница 201: ...fuser gear Figure 1 5 65 5 Remove the heat roller from the fuser unit Remove the C ring gear bearing and bush ing on the rear side of the heat roller and remove the C ring ground plate bearing and bushing on the front side 6 Replace the heat roller and install the roller to fuser unit Figure 1 5 66 7 Refit the fuser gear 8 Refit the fuser heater press roller and upper fuser cover 9 Refit the fuser...

Страница 202: ...rmistor 1 5 Replace the fuser unit thermistor 1 and install the thermistor to fuser unit Figure 1 5 67 6 Remove the press roller and fuser heater see page 1 5 30 and 31 7 Remove the heat roller see page 1 5 32 8 Remove the screw and the connector and then remove the fuser unit thermistor 2 9 Replace the fuser unit thermistor 2 and install the thermistor to fuser unit 10 Refit the heat roller fuser...

Страница 203: ...rection of the white arrow to lower the front position of the fuser unit Yes No Press the start key and make a test copy at 100 magnification Start End Is the image correct Place the original on the contact glass 7 Adjusting front position of the fuser unit adjusting lateral squareness Follow the procedure below if the drum is not parallel to the fuser unit and therefore paper is not fed straight ...

Страница 204: ...w to replace the ozone filter 1 and 2 Procedure 1 Remove the ozone filter 1 from the machine left side Figure 1 5 71 2 Open the filter cover of the machine rear side and remove the ozone filter 2 3 Replace the ozone filter 1 and 2 and install the filter Figure 1 5 72 Ozone filter 1 Ozone filter 2 Filter cover ...

Страница 205: ... filter 1 and 2 Follow the procedure below to replace the dust filter 1 and 2 Procedure 1 Open the MP tray 2 Remove the dust filter 1 and 2 from the machine 3 Replace the dust filter 1 and 2 and install the filter Figure 1 5 73 Dust filter 1 Dust filter 2 ...

Страница 206: ...g the power cable from the wall outlet 2 Insert Compact Flash or USB memory in a notch hole of the machine The Compact Flash must be inserted into the machine with its rear side facing up 3 Insert the power plug and turn the main power switch on Upgrading firmware starts for 9 minutes Caution Never turn the main power switch off during upgrading Figure 1 6 1 4 Completed is displayed on the touch p...

Страница 207: ...1 VR204 1 6 3 Remarks on main PWB replacement When replacing the main PWB remove EEPROM from the main PWB that has been removed and then reattach it to the new main PWB Figure 1 6 2 1 6 4 Remarks on scanner PWB replacement When replacing the scanner PWB remove the EEPROM from the scanner PWB that has been removed and then reattach it to the new scanner PWB Figure 1 6 3 EEPROM Main PWB EEPROM Scann...

Страница 208: ... the torque limiter Figure 2 1 1 Paper feed from the cassettes 1 and 2 1 Upper forwarding pulley 2 Lower forwarding pulley 3 Upper paper feed pulley 4 Lower paper feed pulley 5 Upper separation pulley 6 Lower separation pulley 7 Upper paper switch PSW U 8 Lower paper switch PSW L 9 Upper lift limit switch LICSW U 10 Lower lift limit switch LICSW L 11 Upper paper width switch PWSW U 12 Lower paper ...

Страница 209: ...eparation pulley prevents multiple sheets from being fed at one time by the torque limiter Figure 2 1 2 Paper feed from the MP tray 1 MP tray 2 MP lift guide 3 MP forwarding pulley 4 MP paper feed pulley 5 MP separation pulley 6 MP feed pulley 7 MP feed roller 1 8 MP feed pulley 9 MP feed roller 2 10 MP paper switch MPPSW 11 MP feed switch MPFSW 12 MP paper length switch MPPLSW 13 MP paper width s...

Страница 210: ...per feed section block diagram MP tray EPWB YC14 B6 RCL PFCL U PFCL L FCL1 FCL2 FCL3 FSW2 FSW3 FSW1 RSW PSW U PSW L LICSW U LICSW L YC10 A2 YC11 14 YC11 17 YC13 B9 YC13 B12 YC14 B1 YC13 A12 YC13 B15 YC13 B18 YC14 B4 YC13 A5 YC13 A2 YC13 A7 EPWB YC9 A2 YC6 A11 YC6 A6 YC6 A9 MPPFCL MPFCL MPPSW MPFSW ...

Страница 211: ...arges the drum so that a latent image is formed on the surface the shield grid ensuring the charge is applied uniformly In addition the main charger unit is equipped with the main charger cleaning motor and it is cleaning automatically Figure 2 1 5 Main charging section Figure 2 1 6 Main charging section block diagram Main charger unit Shield grid Tungsten wire Drum MHVDR MCCM_FWD REV MC Grid ZENE...

Страница 212: ...nner mirror frame and image scanning unit for scanning and the laser scanner unit for printing Figure 2 1 7 Optical section 1 Mirror 1 frame 2 Mirror 2 frame 3 Exposure lamp EL 4 Mirror 1 5 Mirror 2 6 Mirror 3 7 Lens 8 CCD PWB CCDPWB 9 Image scanning unit 10 Laser scanner unit LSU ...

Страница 213: ...o scan on the optical rails on the front and rear of the machine to scan from side to side The speed of the mirror frames is half the speed of the scanner When the DP is used the scanner and mirror frames stop at the DP original scanning position to start scanning Figure 2 1 8 Optional section block diagram YC9 1 YC9 4 YC4 8 YC4 5 YC20 YC18 YC5 YC6 3 YC3 LAMP ON CN1 3 SPWB INPWB MPWB SM SHPSW ODSW...

Страница 214: ... the laser scanner unit LSU By repeatedly turning the laser on and off the laser scanner unit forms a latent image on the drum surface Figure 2 1 9 Laser scanner unit 1 1 Laser diode PWB LDPWB 2 Collimator lens 3 Cylindrical lens 4 Polygon motor PM 5 Polygon mirror 6 fθ lens 7 Mirror 8 Mirror 9 BD sensor mirror 10 Cylindrical correcting lens 11 BD sensor ...

Страница 215: ...ed on the drum surface keeps the beam diame ter constant and corrects for the vertical alignment of the polygon mirror to ensure that the focal plane of the laser beam is on the drum surface 6 Mirror Reflects the laser beam and changes the irradiation direction 7 Mirror Reflects the laser beam and changes the irradiation direction 8 BD sensor mirror Reflects the laser beam to the BD sensor to gene...

Страница 216: ...ng a static latent image on the drum The static latent image of the letter A for example is formed on the drum surface as shown in Figure 2 1 12 Electrical charge is dissipated on the area of the drum surface irradiated by the laser The focal point of the laser beam is moved line by line and adjacent lines slightly overlap each other Figure 2 1 12 Less than 100 µm Less than 85 µm Main scanning dir...

Страница 217: ...utput to the engine PWB EPWB The engine PWB EPWB that has received the signal turns on the toner replenishment sole noid TNFSOL and replenishes toner from the toner container to the developing unit Also the toner container sensor TCS checks whether or not toner remains in the toner container Figure 2 1 13 Developing section Figure 2 1 14 Flow of the toner 1 Developing unit housing 2 Developing rol...

Страница 218: ...2GN 2GP 2GR 2 1 11 Figure 2 1 15 Developing section block diagram TNFSOL TNFSOL TCS TNS SIG TNS BVSEL1 BVSEL2 HVTPWB EPWB YC1 14 DB YC1 6 YC9 B2 TCS YC9 A5 YC9 A9 YC7 1 YC7 9 ...

Страница 219: ...the developing sleeve by an electric field of the magnetic pole Then when the developing sleeve rotates and passes through the nearest location to the drum on the portion of the drum that has been exposed to light toner is attracted toward the drum by potential difference between the developing bias and the drum surface and development is performed On the other hand on the portion of the drum that...

Страница 220: ...ransfer roller for transfer charging Paper after transfer is separated from the drum by applying separation bias that is output from the high voltage trans former PWB HVTPWB to the separation electrode Figure 2 1 17 Transfer and separation sections Figure 2 1 18 Transfer and separation sections block diagram Drum separation claw Drum Separation electrode Transfer roller THVDR TC SC RHVDR YC1 5 YC1...

Страница 221: ... toner back to the waste toner box The cleaning lamp CL consists of LEDs and removes residual charge on the drum before main charging Also the toner quantity in the waste toner box is sensed with the overflow sensor OFS Figure 2 1 19 Cleaning and charge erasing sections Figure 2 1 20 Cleaning and charge erasing sections block diagram Cleaning spiral Cleaning roller Drum Cleaning lamp CL Cleaning b...

Страница 222: ...he fuser section becomes abnormally hot fuser unit thermostat 1 and 2 FTS1 2 operates shutting the power to the fuser heaters off When the fusing process is completed the paper is separated from the heat roller by its separation claws and is conveyed from the machine to eject and switchback section Figure 2 1 21 Fuser section Figure 2 1 22 Fuser section block diagram 1 Upper fuser unit cover 2 Fus...

Страница 223: ...ransferred to the job separa tor or the internal finisher the feedshift solenoid FSSOL is turned on to activate the feedshift guide to switch the paper transfer path Figure 2 1 23 Eject and switchback sections Figure 2 1 24 Eject and switchback sections block diagram 1 Feedshift guide 2 Eject roller 3 Eject pulley 4 Switchback roller 5 Switchback pulley 6 Eject switch ESW 7 Feedshift switch FSSW 8...

Страница 224: ...ack section and conveyed to the duplex section The paper is then conveyed to the paper feed section by the upper and lower duplex feed rollers Figure 2 1 25 Duplex section Figure 2 1 26 Duplex section block diagram 1 Feedshift guide 2 Upper duplex feed roller 3 Lower duplex feed roller 4 Duplex feed pulley 5 Duplex feed pulley 6 Duplex paper conveying switch DUPPCSW YC10 B4 YC10 B2 EPWB DUPPCSW DU...

Страница 225: ...uplex section via the eject roller and the switchback roller Paper that has been conveyed to the duplex section is conveyed to the paper feed section again by rotation of the upper duplex feed roller and the lower duplex feed roller and copying onto the front side is performed Figure 2 1 27 Copying onto reverse side normal rotation of eject motor Switchback operation reverse rotation of eject moto...

Страница 226: ...rols the exposure lamp 7 SHD PWB SHDPWB Controls the shading correction and AGC of CCD 8 CCD PWB CCDPWB Reads the image off originals 9 Main operation unit PWB OPWB M Controls touch panel and LCD indication 10 Right operation unit PWB OPWB R Consists of the operation keys and display LEDs 11 Left operation unit PWB OPWB L Consists of the operation keys and display LEDs 12 Upper operation unit PWB ...

Страница 227: ...8 Lower lift limit switch LICSW L Detects the cassette 2 lift reaching the upper limit 9 Upper paper size length switch PLSW U Detects the length of paper in the cassette 1 10 Lower paper size length switch PLSW L Detects the length of paper in the cassette 2 11 Upper paper size width switch PWSW U Detects the width of paper in the cassette 1 12 Lower paper size width switch PWSW L Detects the wid...

Страница 228: ... duplex copy 26 Toner sensor TNS Detects the toner density in the developing unit 27 Toner container detection switch TCDSW Detects the presence of the toner container 28 Toner container sensor TCS Detects the quantity of toner in a toner container 29 Waste toner box detection switch WTDSW Detects the presence of the waste toner box 30 Overflow sensor OFS Detects when the waste toner box is full 3...

Страница 229: ...ne interior controller box 13 Cooling fan motor 7 CFM7 Cools the machine interior operation panel 14 Cooling fan motor 8 CFM8 Cools the machine interior and supports paper transfer for duplex copying 15 Cooling fan motor 9 CFM9 Cools the machine interior and supports paper transfer for duplex copying 16 Cooling fan motor 10 CFM10 Cools the machine interior and supports paper transfer for duplex co...

Страница 230: ...y paper feed 9 Duplex feed clutch DUPFCL Controls the drive of the duplex feed roller 10 Feedshift solenoid FSSOL Operates the feedshift guide 11 Toner feed solenoid TNFSOL Replenishes toner 12 Exposure lamp EL Exposes originals 13 Cleaning lamp CL Removes residual charge from the drum surface 14 Fuser heater M FH M Heats the heat roller 15 Fuser heater S FH S Heats the heat roller 16 Fuser unit t...

Страница 231: ...2GN 2GP 2GR 2 2 6 ...

Страница 232: ... NEUTRAL Zero cross signal output circuit Cassette heater Fuser heater Switching regulator Heater control circuit F201 F202 F101 L101 L102 F103 FH M CFM4 ZCROSS SLEEP 3R3VD 5VDF 24VDF 24VD 5VD 5V 12VD FH S FH M FH S FH LIVE TB4 TB3 Power source PWB MSW F203 F102 TB2 TB1 YC5 TB4 TB3 TB1 TB2 YC7 YC10 YC4 YC2 YC8 YC3 YC6 YC9 YC1 1 1 1 1 1 1 1 1 1 1 6 2 7 7 14 6 10 16 3 3 ...

Страница 233: ... V DC 24 V DC power output YC2 1 GND Ground Connected to the engine PWB 2 FH S ON I 0 5 V DC FH S On Off 3 FH M ON I 5 V DC FH M On Off 4 5VD O 5 V DC 5 V DC power output 5 ZCROSS O 0 5 V DC pulse Zero cross signal 6 CFM3 4 I 0 24 V DC CFM3 4 On Off YC3 1 SGND Ground Connected to the optional document finisher 2 SGND Ground 3 SGND Ground 4 SGND Ground 5 SGND Ground 6 SGND Ground YC4 1 CFM3 4 O DC0...

Страница 234: ...cted to the optional cassette heater 3 NEUTRAL O 120 V AC 220 240 V AC AC power output YC8 1 V24V O 24 V DC 24 V DC power output Connected to the optional paper feeder optional document finisher and hard disk 2 V24V O 24 V DC 24 V DC power output 3 5 1V O 5 V DC 5 V DC power output 4 PGND Ground 5 FGND Ground 6 PGND Ground 7 12VD O 12 V DC 12 V DC power output 8 GND Ground 9 GND Ground 10 5VD O 5 ...

Страница 235: ...wer output 4 5V O 5 V DC 5 V DC power output 5 5V O 5 V DC 5 V DC power output 6 5V O 5 V DC 5 V DC power output 7 5V O 5 V DC 5 V DC power output 8 5V O 5 V DC 5 V DC power output 9 GND Ground 10 GND Ground 11 GND Ground 12 GND Ground 13 GND Ground 14 GND Ground 15 GND Ground 16 GND Ground Connector Pin No Signal I O Voltage Description ...

Страница 236: ... G A U8 Driver U12 Optional finisher Optional paper feeder Switches Sensors Clutches Motors Driver U13 Reset IC U9 HVTPWB LSU YC21 YC5 YC3 YC18 YC10 YC16 YC19 YC13 YC12 YC14 YC2 YC15 YC22 YC1 YC17 YC9 YC6 YC7 YC23 YC24 YC8 YC20 YC11 1 1 B10 B1 A10 A1 A1 B11 A11 B1 8 1 1 1 1 1 1 1 A1 B14 A14 B1 A1 B15 A15 B1 1 6 1 1 1 1 1 1 15 14 7 18 14 13 7 10 7 18 12 A1 B19 A19 B1 A1 1 2 B16 A16 B1 12 12 8 ...

Страница 237: ...nal 6 SISEL Not used 7 DFRDY I 0 5 V DC Document finisher READY signal 8 SIRDY Not used YC5 1 GND Ground Connected to the optional paper feeder 2 5VD O 5 V DC 5 V DC power output 3 PFSEL O 0 5 V DC Paper feeder SELECT signal 4 PFSCLK O 0 5 V DC pulse Paper feeder CLOCK signal 5 PFSDI I 0 5 V DC pulse Paper feeder serial communication data signal 6 PFSDO O 0 5 V DC pulse Paper feeder serial communi...

Страница 238: ...V DC Main charging On Off 5 HVCLK O 0 5 V DC pulse Developing bias CLOCK signal 6 RHVDR O 0 5 V DC Separation charging On Off 7 RISEL O 0 to 5 V DC Separation charging control voltage 8 TICTL O 0 to 5 V DC Transfer charging control voltage 9 BVSEL2 O 0 to 5 V DC Developing bias control voltage 10 THVDR O 0 5 V DC Transfer charging On Off 11 NC Not used 12 NC Not used 13 NC Not used 14 NC Not used ...

Страница 239: ...und B7 CL O 0 5 V DC CL On Off B8 EEDATA I 0 5 V DC Drum unit EEPROM DATA signal B9 EESCLK O 0 5 V DC pulse Drum unit EEPROM CLOCK signal B10 GND Ground B11 DRUNITN I 0 5 V DC Drum unit detection signal B12 5VD O 5 V DC 5 V DC power output B13 MCCM_FWD O 0 24 V DC MCCM On Off B14 MCCM_REV O 0 24 V DC MCCM On Off YC10 A1 GND Ground Connected to the regis tration switch fuser unit duplex feed clutch...

Страница 240: ...DM_ON O 0 24 V DC DM On Off 10 PFM_ON O 0 24 V DC PFM On Off 11 DM_LOCK I 0 5 V DC DM LOCK signal 12 PFM_LOCK I 0 5 V DC PFM LOCK signal 13 DM_CLK O 0 5 V DC pulse DM CLOCK signal 14 FCL1 O 0 24 V DC FCL1 On Off 15 24VDR O 24 V DC 24 V DC power output 16 GND Ground 17 FSW1 I 0 5 V DC FSW1 On Off 18 5VD O 5 V DC 5 V DC power output YC12 1 24VDR O 24 V DC 24 V DC power output Connected to the Upper ...

Страница 241: ...Off A13 LM U SW2 I 0 5 V DC LM U SW2 On Off A14 GND Ground A15 LM U SW1 I 0 5 V DC LM U SW1 On Off A16 GND Ground A17 LM U REM O 0 24 V DC LM U On Off A18 GND Ground A19 PLSW L I 0 5 V DC PLSW L On Off B1 GND Ground B2 PLSW U I 0 5 V DC PLSW U On Off B3 LM L SW2 I 0 5 V DC LM L SW2 On Off B4 GND Ground B5 LM L SW1 I 0 5 V DC LM L SW1 On Off B6 GND Ground B7 LM L REM O 0 24 V DC LM L On Off B8 GND ...

Страница 242: ...4 PFCL L O 0 24 V DC PFCL L On Off B5 24VDR O 24 V DC 24 V DC power output B6 RCL O 0 24 V DC RCL On Off B7 3VD O 3 3 V DC 3 3 V DC power output B8 HUMS I 0 to 5 V DC HUMS detection voltage signal B9 GND Ground B10 THOUT I 0 to 5 V DC Thermistor detection voltage signal B11 EM_B O 0 24 V DC pulse EM drive control signal B12 EM B O 0 24 V DC pulse EM drive control signal B13 EM_A O 0 24 V DC pulse ...

Страница 243: ... DC Job separator connection signal 6 GND Ground 7 EPDSW I 0 5 V DC EPDSW On Off 8 5VD O 5 V DC 5 V DC power output 9 LED REM O 0 5 V DC LED On Off 10 5VD LED O 5 V DC 5 V DC power output 11 FSSOL2 O 0 24 V DC FSSOL On Off return 12 FSSOL1 O 0 24 V DC FSSOL On Off activate 13 24VDR O 24 V DC 24 V DC power output YC20 1 SCKN I 0 5 V DC pulse CLOCK signal Connected to the main PWB 2 EGSI I 0 5 V DC ...

Страница 244: ... registration cleaner UNDER CLEANER REGIST 2BL07950 7 15 Registration guide GUIDE REGIST F 2BL16130 7 22 Right registration cleaner PARTS REGISTRATION CLEAN 2BL93450 5 44 Laser scanner unit LK 710 302GR93090 2GR93090 13 1 Platen PARTS CONTACT GLASS M ASSY 302GR93310 2GR93310 10 1 Platen PARTS CONTACT GLASS I ASSY 302GR93320 2GR93320 10 1 Slit glass PARTS CONTACT GLASS DP ASSY 302GR94380 2GR94380 1...

Страница 245: ...BL07030 7 5 Duplex feed pulley PULLEY DU 2BL07040 7 6 Eject roller ROLLER EXIT 302BL21021 2BL21021 8 24 Switchback roller ROLLER FEED SHIFT 302BL21031 2BL21031 8 25 Eject pulley PULLEY EXIT C 2BL21520 8 22 Eject pulley PULLEY EXIT 302GR28060 2GR28060 8 32 Switchback pulley PULLEY FEED SHIFT 2BL21330 6 36 Dust filter 1 PARTS FILTER DUST F1 ASSY 302GR94430 2GR94430 13 13 Dust filter 1 PARTS FILTER D...

Страница 246: ... 40 50 Replace P 1 5 4 MP forwarding pulley Replace 400K 30 500K 40 50 Replace P 1 5 4 MP feed roller 1 Clean 400K 30 500K 40 50 Clean with alcohol MP feed pulley Clean 400K 30 500K 40 50 Clean with alcohol MP feed roller 2 Clean 400K 30 500K 40 50 Clean with alcohol Left registration roller Clean 400K 30 500K 40 50 Clean with alcohol Right registration roller Clean 400K 30 500K 40 50 Clean with a...

Страница 247: ...es appear on the copy image Reflector Clean User call Clean with a dry cloth only if vertical black lines appear on the copy image Exposure lamp Check or replace User call Replace if an image problem occurs P 1 5 11 Optical rail Grease User call Check noise and shifting and then apply scanner rail grease EM 50L Original size detection sensor Check or clean User call Clean the sensor emitter and se...

Страница 248: ...occurs P 1 5 32 Heat roller separation claw Clean 400K 30 500K 40 50 Clean with alcohol Check and replace when user call occurs P 1 5 29 Press roller Check or replace User call Check and replace when user call occurs P 1 5 30 Press roller separation claw Clean 400K 30 500K 40 50 Clean with alcohol Check and replace when user call occurs Section Maintenance part location Method Maintenance cycle Po...

Страница 249: ...ions Page Covers Covers Clean Every service Clean with alcohol or a dry cloth Dust filter 1 Clean Every service Vacuum Dust filter 2 Clean Every service Vacuum Section Maintenance part location Method Maintenance cycle Points and cautions Page Other Image quality Check and adjust Every service ...

Страница 250: ...eder printing adjustment Adjusting the position of the rack adjuster U034 LSU OUT LEFT U034 test pattern Adjusts the position of each paper source Adjusting the leading edge registra tion printing adjustment Registration clutch turning on timing secondary paper feed start timing U034 LSU OUT TOP U034 test pattern P 1 3 18 Adjusting the leading edge margin printing adjustment LSU illumination start...

Страница 251: ...U066 For copying an original placed on the platen U071 For copying originals from the DP Adjusting the leading edge margin scanning adjustment Adjusting the original scan data image adjustment U403 U404 B MARGIN B MARGIN B MARGIN BACK Test chart P 1 3 65 P 1 3 66 U403 For copying an original placed on the platen U404 For copying originals from the DP Adjusting the trailing edge margin scanning adj...

Страница 252: ... 31 10 9 8 7 6 5 4 3 2 1 20 19 18 17 16 15 14 13 12 11 30 29 28 27 26 25 24 23 22 21 40 39 38 37 36 35 34 33 32 31 10 9 8 7 6 5 4 3 2 1 20 19 18 17 16 15 14 13 12 11 30 29 28 27 26 25 24 23 22 21 40 39 38 37 36 35 34 33 32 31 1 2 2 1 4 3 2 1 5 1 2 3 4 5 6 7 8 9 10 11 12 4 3 2 1 2 3 4 5 4 3 2 1 1 2 7 6 5 4 3 2 1 5 2 3 4 5 1 5 4 3 2 6 2 3 4 5 1 5 4 3 2 6 5 1 2 3 4 5 6 7 8 9 10 11 12 13 14 15 1 11 10...

Страница 253: ...INSTALLATION GUIDE FOR THE DOCUMENT PROCESSOR ...

Страница 254: ...les 1 C Herraje de fijación 2 D Herraje de control de ángulo 1 E Pasador 3 F Tornillo TP M4 14 4 G Etiqueta Procedimiento operativo excepto para modelos de 100 V 1 para especificaciones en el sistema métrico para especificaciones en el sistema de pulgadas H Etiqueta de precaución Retire original excepto para los modelos de 100 V 1 I Etiqueta de precaución Original cara arriba excepto para los mode...

Страница 255: ...rs tension et à débran cher la fiche d alimentation de la prise murale Procedimiento de instalación Cuando instale el DP asegúrese de apagar el interruptor principal del MFP y desenchúfelo del tomacorriente de la pared Installationsverfahren Schalten Sie vor Installation des DP unbedingt den MFP Hauptschalter aus und ziehen Sie den Netzstecker aus der Steckdose Istruzioni per il montaggio Spegnere...

Страница 256: ...originales 3 y la unidad del carro 4 3 Retire la película 5 y el material amortigua dor 6 Monte el herraje de fijación 4 Alinee el saliente del MFP 7 con el orificio 8 del herraje de fijación C e inserte el herraje de fijación C en el MFP 5 Asegure el herraje de fijación C con dos pasadores E Instale el DP 6 Alinee el orificio de bisagra 9 del DP A con el pasador 10 del herraje de fijación C y col...

Страница 257: ... y dos tornillos TP M4 14 F Instale el herraje de control de ángulo Para ajustar el DP abra o cierre el ángulo 60 grados 9 Instale el herraje de control de ángulo D en el lado trasero de la bisagra derecha con dos tornillos TP M4 14 F Para ajustar el DP abra o cierre el ángulo 30 grados 10 Saque cuatro tornillos 11 y retire la cubierta trasera 12 del DP A 8 DP A sicher mit einem Stift E und zwei M...

Страница 258: ...as líneas de señal 15 Conecte la línea de señal de control 15 del DP A y la línea de señal de datos 16 al MFP 16 Gire los pomos de fijación 17 de ambos lados del conector en sentido horario para asegurar las líneas de señal 11 Anschlagring 13 von der Winkeleinstellbefestigung D abnehmen die in Schritt 12 montiert wurde um die Welle 14 zu entfernen 12 Welle 14 in die Rückseite des rechten Scharnier...

Страница 259: ...cortada de la alfombrilla para originales B con la esquina interior izquierda del panel de instrucciones del original 18 Cierre el DP A y fije la alfombrilla para originales B con el velcro Befestigen der Originalmatte 17 Die Originalmatte B mit dem Klettband 18 nach oben über das Kontaktglas legen Die Ecke der Originalmatte B deren Oberfläche nicht ausgeschnitten ist mit der linken inneren Kante ...

Страница 260: ...la cubierta de originales 22 Pegue la etiqueta de precaución Retirar ori ginal H del idioma correspondiente al des tino del MFP sobre la etiqueta de la cubierta de originales Figura b Pegue la etiqueta de precaución Ori ginal cara arriba excepto para los modelos de 100 V 23 Limpie con alcohol la etiqueta de la cubierta de originales 24 Pegue la etiqueta de precaución Original cara arriba I del idi...

Страница 261: ...de copia 4 Compare el original a con el ejemplo de copia Si la separación supera el valor de referencia realice los siguientes ajustes según el tipo de separa ción Compruebe las imágenes del DP después de comprobar y ajustar las imágenes del MFP Para más detalles lea el manual de servicio Funktionsprüfung 1 Zum Prüfen der Gerätefunktion das Original a vorbereiten auf das 4 Linien b 20 mm von den K...

Страница 262: ... referencia Copiado por una cara 2 mm Copiado dúplex dentro de 3 mm Cuando se usa el original de ajuste automático del DP se pueden realizar los ajustes automáticos a excepción del ajuste de la posición oblicua del DP Para los ajustes que usan el original de ajuste automático del DP consulte la página 20 Die Einstellungen müssen in der folgenden Reihenfolge vorgenommen werden Sonst kann die Einste...

Страница 263: ...stela siguiendo este procedimiento Valor de referencia Para el copiado por una cara la separación horizontal de la línea 2 debe estar dentro de 3 mm Para el copiado dúplex la separación horizontal de la línea 2 debe estar dentro de 4 mm Prüfen der Schräglage des DP 1 Den horizontalen Abstand zwischen der Linie 1 des Originals a und der Linie 2 der Kopierbeispielspositionen prüfen Wenn der Abstand ...

Страница 264: ...plo de copia d gire el tornillo de ajuste en sentido antihorario y mueva el DP al lado interno Para el ejemplo de copia e gire el tornillo de ajuste en sentido horario y mueva el DP al lado frontal Magnitud del cambio por escala aprox 1 mm 3 Haga una copia de prueba Einstellen der Schräglage des DP 1 Die zwei M4 14TP Schrauben F an der rechten und linken Befestigungshalterung C lösen 2 Die Einstel...

Страница 265: ...la línea 2 debe estar dentro de 3 mm Para el copiado dúplex la separación horizontal de la línea 2 debe estar dentro de 4 mm 5 Una vez hecho el ajuste vuelva a apretar los dos tornillos TP M4 14 F que ha aflojado en el paso 1 4 Die obigen Schritte wiederholen bis der Abstand der Linie 2 des Kopierbeispiels die folgenden Bezugswerte aufweist Bezugswert Einzelkopie Der horizontale Abstand der Linie ...

Страница 266: ...una cara y para el copiado dúplex respectivamente Para el copiado por una cara ajuste CONVEY SPEED velocidad de transporte dirección de exploración secundaria Para el copiado dúplex ajuste CIS MAIN ADJ aj principal CIS direc ción de exploración principal del reverso y CIS SUB ADJ aj secundario CIS dirección de exploración secundaria del reverso Prüfen der Originalgröße des DP 1 Den Abstand zwische...

Страница 267: ... Valor de referencia Para la dirección de exploración secundaria separación vertical de la línea 2 dentro de 1 5 Para la dirección de exploración principal separación horizontal de la línea 3 dentro de 1 5 2 Die Werte einstellen Für die kürzere Länge des Kopierbeispiels f h Den Wert erhöhen Für die längere Länge des Kopierbeispiels g i Den Wert verringern Änderung pro Schritt 0 42 mm 3 Eine Testko...

Страница 268: ...para el copiado con giro de 180 grados respectivamente Para el copiado por una cara ajuste ADJUST DATA1 ajustar datos 1 extremo guía Para el copiado dúplex ajuste ADJUST DATA3 ajustar datos 3 dirección de exploración principal del reverso Para el copiado con giro de 180 grados ajuste ADJUST DATA5 ajustar datos 5 giro de 180 gra dos Prüfen des Vorderkantentaktes des DP 1 Den Abstand zwischen der Li...

Страница 269: ...o por incremento 0 17 mm 3 Haga una copia de prueba 4 Repita los pasos 1 a 3 anteriores hasta que la separación de la línea 2 del ejemplo de copia presente el valor de referencia Valor de referencia Separación vertical de la línea 2 dentro de 2 5 mm 2 Die Werte einstellen Für den schnelleren Vorderkantentakt Kopierbeispiel j Den Wert verringern Für den langsameren Vorderkantentakt Kopierbeispiel k...

Страница 270: ...ia ajústela siguiendo este procedimiento Valor de referencia Diferencia horizontal de la línea de centro 2 para el copiado por una cara 2 mm Diferencia horizontal de la línea de centro 2 para el copiado dúplex 3 mm Prüfen der Originalmittellinie des DP 1 Den Abstand zwischen der Mittellinie 1 des Originals a und der Mittellinie 2 des Kopierbeispiels prüfen Wenn der Abstand größer als der Bezugs we...

Страница 271: ...o dúplex ajuste ADJUST DATA1 ajustar datos 1 anverso Para el reverso en el copiado dúplex ajuste ADJUST DATA2 ajustar datos 2 reverso Para el copiado con giro de 180 grados ajuste ADJUST DATA3 ajustar datos 3 giro de 180 grados Einstellen der Originalmittellinie des DP 1 Den Wartungsmodus U072 einstellen und das Kopierbeispiel für jede Einzelkopie Duplexkopie und um 180 Grad gedrehte Kopie einstel...

Страница 272: ...a línea 2 del ejemplo de copia presente el valor de referencia Valor de referencia Diferencia horizontal de la línea de centro 2 para el copiado por una cara 2 mm Diferencia horizontal de la línea de centro 2 para el copiado dúplex 3 mm 2 Die Werte einstellen Wenn die Mitte nach vorne verlagert ist Kopierbeispiel l Den Wert erhöhen Wenn die Mitte nach innen verlagert ist Kopierbeispiel m Den Wert ...

Страница 273: ...ha finalizado Si aparece ERROR XX el ajuste ha fallado Com pruebe la posición del original colocado y repita los pasos 1 a 2 hasta que aparezca RESULT OK 00 resultado correcto 00 Para mas detalles lea el manual de servicio Einstellung mit der automatischen Einstellung des Originals des DP 1 F und R der automatischen Einstellung des Originals des DP nach oben zeigen und das Original an die mit F un...

Страница 274: ...e ha fallado Com pruebe la posición del original colocado y repita los pasos 4 a 5 hasta que aparezca RESULT OK 00 resultado correcto 00 Para mas detalles lea el manual de servicio 4 Nach dem Abschluss der Oberflächeneinstellung F und R der automatischen Einstellung des Originals des DP nach unten zeigen und das Original einstellen indem die mit F und R markierte Seite zuerst in den DP eingeführt ...

Страница 275: ...INSTALLATION GUIDE FOR BUILT IN FINISHER ...

Страница 276: ... trasera 1 G Bandeja de copias 1 H Cartucho de grapas 1 I Expulsión por resorte plano 1 J Placa a tierra 1 K Etiqueta de tiro 1 L Tornillo TP M3 05 7 M Pasador de fijación de la sección de funcionamiento 1 Gelieferte Teile A Transfereinheit 1 B Zwischenablage 1 C Hefterabdeckung 1 D Große Auswurfabdeckung 1 Deutsch E Vordere Auswurfabdeckung 1 F Hintere Auswurfabdeckung 1 G Kopienablage 1 H Heftkl...

Страница 277: ...a que suba la sección de funcionamiento y asegure utilizando el pasador de fijación de la sección de funcionamiento M Nota Después de instalar el finalizador la sección de funcionamiento queda fijada y no puede ajustar el ángulo 2 Abra la cubierta de transferencia izquierda y la cubierta frontal Hinweis Wenn die Transfereinheit A auf den Boden oder dergleichen gestellt wird muss sie auf den Kopf g...

Страница 278: ... gancho 4 en el lado derecho y desmonte la cubierta delantera izquierda 5 5 Quite el tornillo 6 y el pasador 7 para desmontar la cubierta superior izquierda 8 3 Den Heftklammerhalter 1 entfernen die zwei Schrauben 2 an der Ober und Vorderseite herausdrehen und die zwei Schrauben 3 auf der linken Seite lösen 4 Den Haken 4 auf der rechten Seite öffnen und die linke Frontabdeckung 5 abnehmen 5 Die Sc...

Страница 279: ...erior 12 8 Quite el tornillo 13 ubicado en el frente del eliminador de carga estática del MFP encaje la expulsión por resorte plano I del lado inferior y asegúrelo con el tornillo quitado 13 6 Die zwei Schrauben 9 entfernen und dann die Auswurfabdeckung 10 mit der Montageplatte abnehmen 7 Die zwei Schrauben 11 entfernen und dann die innere Auswurfabdeckung 12 abnehmen 8 Die Schraube 13 an der Vord...

Страница 280: ...adores 16 9 Retirer la vis bleue 14 de l unité de transfert A puis enlever la plaque de fixation 15 10 Retirer la bande de fixation 17 du connecteur à treize broches 16 passer le fil au dessous du moteur de l agrafeuse et connecter le fil à l aide du connecteur à treize broches 16 9 Die blaue Schraube 14 von der Transfereinheit A entfernen und dann die Halteplatte 15 abnehmen 10 Das Sicherungsband...

Страница 281: ...L y el pasador 18 colocado en la unidad de transferencia A 11 Insérer l unité de transfert A dans le MFP depuis l avant et le faire glisser vers la gauche Fixer l unité avec deux vis TP M3 05 L et la goupille 18 qui a été ajustée dans l unité de transfert A 11 Inserite nell MFP l unità di trasferimento A dal lato frontale e quindi fatela scorrere a sinistra Fissate l unità usando due viti TP M3 05...

Страница 282: ...ornillo 25 de nuevo en el orificio inferior 13 Den Haken 20 und das Loch 22 der Transfereinheit A in das Langloch 19 und den Vorsprung 21 des MFP Rahmens einpassen und die Einheit mit einer TP Schraube M3 05 L sichern Das Kabel 23 unter den Metallbeschlägen 24 hindurchführen 14 Die Schraube 25 von der linken Rückseite des MFP entfernen den Hebel 26 nach oben drehen und die Schraube 25 wieder in da...

Страница 283: ...nettori dell MFP come illustrato in figura Collegate il connettore grigio 28 con più contatti al connettore superiore e il connettore grigio 28 con meno contatti al connettore inferiore 15 Insérer le plateau intermédiaire B et connecter le connecteur blanc 27 du plateau intermédiaire B à l unité de transfert Connecter les connecteurs gris 28 aux connecteurs du MFP comme montré dans l illustration ...

Страница 284: ...erior izquierda en el paso 5 y el tornillo 7 a cada una 18 Encaje la cubierta de grapas C utilizando los dos tornillos 3 en el lado izquierdo para asegurar y utilizando los dos tornillos 2 que se retiraron en el paso 3 y un tornillo TP M3 05 L 19 Vuelva a colocar el soporte de grapas que fue desmontado en el paso 3 a su posición original y cierre la cubierta izquierda de transferencia y la cubiert...

Страница 285: ...ffatrice H 23 Chiudere il coperchio della graffatrice C 24 Dopo che avete pulito con alcol fissate l etichetta staccabile K scritta nella lingua appropriata sull etichetta del vassoio intermedio B come richiesto 21 排出トレイ G を取り付ける 22 ステープルカバー C を開き ステープル カートリッジ H をステープルに挿入する 23 ステープルカバー C を開める 24 必要に応じて 中間トレイ B のラベルの上 に アルコール清掃後言語に合った PULL ラ ベル K を貼り付ける G H C K B 21 Die Kopienablage G anbringen 22 ...

Страница 286: ... 1 Inserite il cavo di alimentazione dell MFP nella presa di rete e quindi accendetela 2 Selezionate il modo graffatrice e quindi eseguite una copia graffata in modo da vericare che la graffatrice funzioni correttamente 動作確認 1 MFP 本体の電源プラグをコンセントに差し込 み メインスイッチを ON にする 2 ステープルモードを選択して ステープルコ ピーを行い ステープルされるか確認する Betriebsprüfung 1 Den Netzstecker des MFP in eine Netzsteckdose einstecken und den Haupts...

Страница 287: ...レイ O のフック部 2 箇所を MFP 本体排 出部のスリット 1 2 箇所に引っ掛けて取り付 ける Agregando un procedimiento a la instalación del finalizador Se agrega el siguiente paso después del paso 24 en la página 10 Partes suministradas O Bandeja secundaria 1 Inserte los dos ganchos en la bandeja secundaria O en las dos ranuras 1 en la sección de expulsión de MFP para instalar la bandeja secundaria Hinzufügung eines Verfahrens zur Fixie...

Страница 288: ...INSTALLATION GUIDE FOR JOB SEPARATOR ...

Страница 289: ...nillo TP M3 05 1 Procedimiento Precaución Cuando se instala un separador de trabajos asegúrese de desconectar el interruptor principal del MFP y desenchufar el cable eléctrico del tomacorriente de la pared Gelieferte Teile A Jobtrenner 1 B LED Leiterplatte 1 C Jobtrenner Kopienablage 1 D Linke Frontabdeckung JS 1 Deutsch E TP Schraube M3 05 1 Vorgang Vorsicht Schalten Sie vor der Installation des ...

Страница 290: ...e el soporte de grapas 4 saque los dos tornillos 5 del lado superior y el lado delantero y afloje los dos tornillos 6 en el lado izquierdo 4 Abra el gancho 7 en el lado derecho y desmonte la cubierta delantera izquierda 8 1 Die LED Leiterplatte B in den Jobtrenner A einführen Den 2 poligen Steckverbinder 2 des Jobtrenners A mit dem 2 poligen Steckverbinder 1 der LED Leiterplatte B verbinden indem ...

Страница 291: ...os 11 y desmonte la cubierta de expulsión interior 12 7 Si bajó la palanca de presión de ramal 13 en el lado trasero del separador de trabajos A levántela 5 Die zwei Schrauben 9 entfernen und dann die Auswurfabdeckung 10 mit der Montageplatte abnehmen 6 Die zwei Schrauben 11 entfernen und dann die innere Auswurfabdeckung 12 abnehmen 7 Falls der Zweigdruckhebel 13 auf der Rückseite des Jobtrenners ...

Страница 292: ...trasero utilizando un pasador 14 y el lado delantero utilizando un tornillo TP M3 05 E 9 Conecte el conector 15 del separador de trabajos en el conector inferior 16 del MFP 8 Den Jobtrenner A von der Vorderseite in den MFP einführen und nach links schieben Die Rückseite mit einem Stift 14 und die Vorderseite mit einer TP Schraube M3 05 E sichern 9 Den Steckverbinder 15 des Jobtrenners an den unter...

Страница 293: ... la sección de fijación 18 en el lado derecho de la bandeja del separador de trabajos C en la parte entrada 19 del MFP Ponga el gancho 20 en el lado derecho del pasador 21 ubicado dentro del MFP 10 Die Jobtrennerablage C von der Vorderseite auf die Schiene 17 des Jobtrenners A schieben Die Passkante 18 auf der rechten Seite der Jobtrennerablage C in die Aussparung 19 des MFP einführen Den Haken 20...

Страница 294: ...aje la cubierta delantera izquierda JS D 12 Encaje la cubierta delantera izquierda JS D utilizando los dos tornillos 6 en el lado izquierdo y utilizando los dos tornillos 5 que fueron desmontados en el paso 3 11 Die drei Laschen 23 der in Schritt 4 entfernten linken Frontabdeckung 8 lösen um den weißen rechten Seitenteil 22 abzunehmen und die linke Frontabdeckung JS D anbringen 12 Die linke Fronta...

Страница 295: ...ine Probekopie anfertigen um zu prüfen ob die Kopie in die Jobtrennerablage C ausgeworfen wird Verifica di funzionamento 1 Inserite il cavo di alimentazione dell MFP nella presa di rete e quindi accendetela 2 Premete Org Carta Finitura e Vassoia di uscita sul pannello a sfioramento in questo ordine per selezionare Vass separat Lavori 3 Effettuate una copia di prova per verificare che essa venga es...

Страница 296: ...r de trabajos sólo para las especificaciones métricas Se agrega el siguiente paso después del paso 9 en la página 4 Partes suministradas F Tope de expulsión de A3 1 Después de utilizar alcohol para limpiar la parte de la bandeja del separador de trabajos C que aparece en la figura pegue el tope de expulsión de A3 F por las líneas de referencia Hinzufügung eines Verfahrens zur Jobtrenner Installati...

Страница 297: ...INSTALLATION GUIDE FOR FAX System M ...

Страница 298: ...era no utilizar 1 Procedimiento de instalación Asegúrese de apagar el MFP colocando el interruptor principal a OFF y desenchufe el MFP del suministro de red eléctrica antes de instalar el sistema de fax Desmonte la cubierta 1 Quite dos tornillos 1 y desmonte la cubierta OPT 1 2 Instale la tarjeta de circuitos de fax 2 Inserte la tarjeta de circuitos de fax A a lo largo de la ranura de OPT1 y asegú...

Страница 299: ...l terminal de línea a la línea telefó nica Para el modelo de 120 V utilice el cable conector modular B suministrado Instale el núcleo de ferrita línea telefó nica del teléfono independiente 5 Al conectar un teléfono separado al MFP coloque el núcleo de ferrita D a la línea telefónica del teléfono separado Asegúrese de dar dos vueltas al cable a través del núcleo de ferrita Conecte el MFP al teléfo...

Страница 300: ...INSTALLATION GUIDE FOR Data Security Kit C ...

Страница 301: ...tage s affiche Demander au client de changer le code de cryptage L utilisation de la valeur par défaut du code de cryptage 000000 n affecte pas la fiabilité de la sécurité des données Si le client désire changer le code prier le client d effectuer les opérations suivantes Appuyer sur Code de cryptage Appuyer sur Retour arrière pour effacer 000000 Entrer le code de cryptage caractères alphanumériqu...

Страница 302: ...o eliminati Prima di iniziare l attivazione verificare con il cliente che i dati possano essere eliminati Accertarsi che l interruttore di alimentazione principale della macchina sia spento Procedura di attivazione 1 Inserire la chiave USB nel relativo slot di memoria della macchina e accendere l interruttore di alimentazione principale vedere Figura A 2 Una volta visualizzata la schermata inizial...

Отзывы: