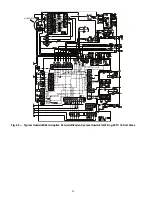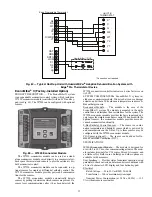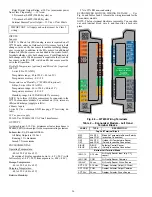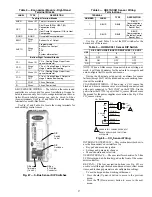
47
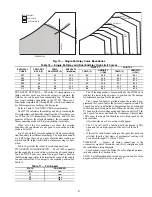
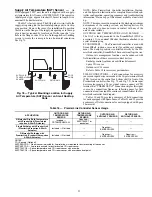
Fig. 70 — Single Enthalpy Curve Boundaries
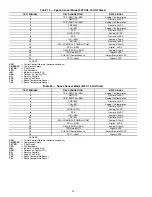
Table 16 — Single Enthalpy and Dual Enthalpy High Limit Curves
ENTHALPY SETTINGS — When the OA temperature, en-
thalpy and dew point are below the respective setpoints, the
Outdoor Air can be used for economizing. Fig. 70 shows the
new single enthalpy boundaries in the W7220. There are 5
boundaries (setpoints ES1 through ES5), which are defined by
dry bulb temperature, enthalpy and dew point.
Refer to Table 17 for ENTH CURVE setpoint values.
The W7220 calculates the enthalpy and dew point using the
OA temperature and humidity input from the OA enthalpy sen-
sor. When the OA temperature, OA humidity and OA dew
point are all below the selected boundary, the economizer sets
the economizing mode to YES, economizing is available.
When all of the OA conditions are above the selected
boundary, the conditions are not good to economize and the
mode is set to NO.
Fig. 70 shows the 5 current boundaries. There is also a high
limit boundary for differential enthalpy. The high limit bound-
ary is ES1 when there are no stages of mechanical cooling en-
ergized and HL (high limit) when a compressor stage is ener-
gized.
Table 16 provides the values for each boundary limit.
TWO-SPEED FAN OPERATION — The W7220 controller
has the capability to work with a system using a 2-speed supply
fan. The W7220 does not control the supply directly but uses
the following input status to determine the speed of the supply
fan and controls the OA damper to the required position, see
Table 17 — Fan Speed
The W (heating mode) is not controlled by the W7220 but it
requires the status to know where to position the OA damper
for minimum position for the fan speed.
The 2 speed fan delay is available when the system is pro-
grammed for 2 speed fan (in the System Setup menu item). The
2 speed fan delay is defaulted to 5 minutes and can be changed
in the Advanced Setup menu item. When the unit has a call for
Y1 In and in the free cooling mode and there is a call for Y2 In,
the 2-speed fan delay starts and the OA damper will modulate
100% open, the supply fan should be set to high speed by the
unit controller.
After the delay one of two actions will happen:
• The Y2 In call will be satisfied with the damper 100%
open and fan on high speed and the call will turn off
OR
• If the call for additional cooling in the space has not been
satisfied then the first stage of mechanical cooling will
be enabled through Y1 Out or Y2 Out.
CHECKOUT — Inspect all wiring connections at the
economizer module’s terminals, and verify compliance with
the installation wiring diagrams.
For checkout, review the Status of each configured parame-
ter and perform the Checkout tests.
NOTE: For information about menu navigation and use of the
keypad see Interface Overview on page 37.
ECONOMIZING
AVAILABLE
NOT AVAILABLE
ENTHA
LPY
RA
HUM (%RH)
RA
TEMP
TEMPERATURE
ABSOLUTE HUMIDITY
ES5
ES4
ES3
ES2
ES1
HL
P1
(T,RH)
P2 (T,RH)
SINGLE ENTHALPY
DUAL ENTHALPY
HIGH LIMIT
ENTHALPY
CURVE
TEMP. DRY
BULB (F)
TEMP.
DEWPOINT (F)
ENTHALPY
(btu/lb/da)
POINT P1
POINT P2
TEMP. (F)
HUMIDITY
(%RH)
TEMP. (F)
HUMIDITY
(%RH)
ES1
80
60
28.0
80
36.8
66.3
80.1
ES2
75
57
26.0
75
39.6
63.3
80.0
ES3
70
54
24.0
70
42.3
59.7
81.4
ES4
65
51
22.0
65
44.8
55.7
84.2
ES5
60
48
20.0
60
46.9
51.3
88.5
HL
86
66
32.4
86
38.9
72.4
80.3
STATE
FAN SPEED
OCC
Low
Y1
Low
Y2
High
W
High
Содержание Carrier WeatherMaker 50TC A08 Series
Страница 4: ...4 Fig 2 Unit Dimensional Drawing Size 08 09 12 Units...
Страница 5: ...5 Fig 2 Unit Dimensional Drawing Size 08 09 12 Units cont...
Страница 6: ...6 Fig 3 Unit Dimensional Drawing Size 14 Unit...
Страница 7: ...7 Fig 3 Unit Dimensional Drawing Size 14 Unit cont...
Страница 9: ...9 Fig 4 Unit Dimensional Drawing Size 16 Unit cont...
Страница 13: ...13 Fig 8 Roof Curb Details Size 16 Unit...
Страница 33: ...33 Fig 62 Typical Humidi MiZer Adaptive Dehumidification System Humidistat Wiring 50TC 08 14 Unit Sizes...
Страница 34: ...34 Fig 63 Typical Humidi MiZer Adaptive Dehumidification System Humidistat Wiring 50TC 16 Unit Sizes HUMIDISTAT...
Страница 50: ...50 Fig 73 50TC 16 Control Box Component PremierLink Locations...
Страница 51: ...51 Fig 74 Typical PremierLink Control Wiring Diagram...
Страница 52: ...52 Fig 75 Typical PremierLink Control Wiring Diagram with Humidi MiZer System Option...
Страница 64: ...64 Fig 106 Typical RTU Open Controller Wiring Diagram 50TC 08 14 Size Units...
Страница 65: ...65 Fig 107 Typical RTU Open Controller Wiring Diagram 50TC 16 Size Unit...
Страница 66: ...66 Fig 108 Typical RTU Open Controller Wiring Diagram with Humidi MiZer System Option 50TC 08 14 Size Units...
Страница 67: ...67 Fig 109 Typical RTU Open Controller Wiring Diagram with Humidi MiZer System Option 50TC 16 Size Units...


