
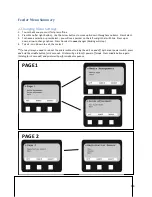


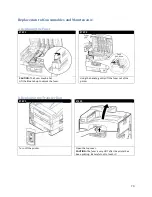


STEP 3
STEP 4
Remove the four image drums/toner cartridge
units and place them on a flat surface.
Cover them with dark paper or plastic to protect them
from light.
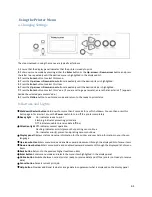
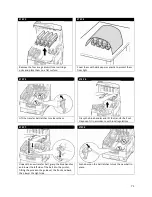
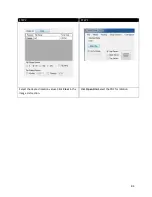
STEP 5
STEP 6
Lift the transfer belt latches to release them.
Grasp the blue handles and lift the transfer belt out.
Dispose of it in accordance with local regulations.
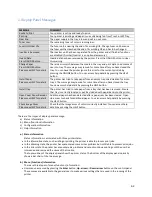
STEP 7
STEP 8
Unpack the new transfer belt, grasp the blue handles
and lower the left side of the belt into the printer,
fitting the pins into the guides at the front and back,
then lower the right side.
Push down on the belt latches to lock the new belt in
place.
71
Содержание iCOLOR 900
Страница 1: ...iCOLOR 900 APEX2Print Installation and User Guide ...
Страница 23: ...Navigate to the 2 Install RIP vR2 Folder Run the Prepare_Uninet_RIP_v2 1 exe file 23 ...
Страница 24: ...STEP 3 of 8 The KEYLOK and Sentinel Drivers will install 24 ...
Страница 26: ...STEP 5 of 8 Click Done STEP 6 of 8 26 ...
Страница 27: ...Navigate to the 3 Install APEX2Print folder Run the APEX2Print_Install msi file Click Next 27 ...
Страница 53: ...Appendix 53 ...
Страница 57: ...57 ...
Страница 59: ...PAGE 3 59 ...
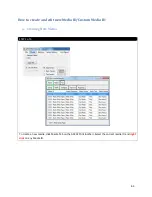
Страница 68: ...STEP 2 of 4 The Creating a New User Media Entry window will display Click Edit STEP 3 of 4 68 ...
Страница 80: ...STEP 7 of 10 The job is ready for printing Click Print Nesting 80 ...
Страница 87: ...STEP 3 The Preview Screen will display the scaled object 87 ...
Страница 100: ...Example 2 Guide Arms Example 3 Cutter Blade Glue Residue Glue Residue 100 ...
Страница 104: ...Open the Guide Cover and Guide Channels Feed the paper under the orange Tension Swing as shown 104 ...
Страница 108: ...STEP 21 Close the Guide Door and the system is ready to print 108 ...


