


b. Feeder Error Messages
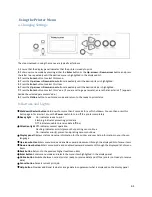
Help Button
Your printer has a built-in help system. When an error message appears on the display, press HELP. The display
shows information that will help you correct the error. Use the
∇
key to move down through the Help information.
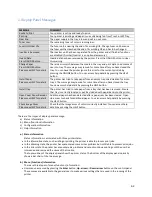
Feeder Error Messages
Errors 1 to 9 – Emergency Stop, Control PCB Internal Errors
If the feeder menu displays errors 1 to 9 ensure that all doors on the cart are closed completely and the media is
loaded into the printer correctly. Also ensure that the media is located under the media sensors. If the feeder
menu continues to display this error, remove all media and reboot the printer.
Errors 10 to 19 – Media load, unload, and feed errors
If the feeder menu displays errors 10 to 19 check the media path and ensure that the media is loaded into the
printer correctly also ensure that the media is located under the media sensors. If the cart menu continues to
display this error, remove all media and reboot the printer.
Errors 20 to 29 – Swing Errors
If the feeder menu displays errors 20 to 29 check the media path and ensure that the media is loaded into the
printer correctly and the media is located under the media sensors. If the feeder menu continues to display this
error, remove all media and reboot the printer.
Errors 30 to 39 – Cutter Errors
If the feeder menu displays errors 30 to 39 check the media path and ensure that the media is loaded into the
printer correctly. If the feeder menu continues to display this error, reload the media and ensure all the proper
settings have been set.
If you still receive an error message please contact Uninet Service Support by phone 1-866-415-4797, or by email
60
Содержание iCOLOR 900
Страница 1: ...iCOLOR 900 APEX2Print Installation and User Guide ...
Страница 23: ...Navigate to the 2 Install RIP vR2 Folder Run the Prepare_Uninet_RIP_v2 1 exe file 23 ...
Страница 24: ...STEP 3 of 8 The KEYLOK and Sentinel Drivers will install 24 ...
Страница 26: ...STEP 5 of 8 Click Done STEP 6 of 8 26 ...
Страница 27: ...Navigate to the 3 Install APEX2Print folder Run the APEX2Print_Install msi file Click Next 27 ...
Страница 53: ...Appendix 53 ...
Страница 57: ...57 ...
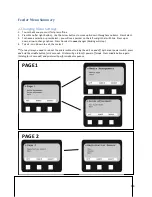
Страница 59: ...PAGE 3 59 ...
Страница 68: ...STEP 2 of 4 The Creating a New User Media Entry window will display Click Edit STEP 3 of 4 68 ...
Страница 80: ...STEP 7 of 10 The job is ready for printing Click Print Nesting 80 ...
Страница 87: ...STEP 3 The Preview Screen will display the scaled object 87 ...
Страница 100: ...Example 2 Guide Arms Example 3 Cutter Blade Glue Residue Glue Residue 100 ...
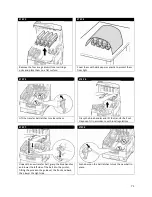
Страница 104: ...Open the Guide Cover and Guide Channels Feed the paper under the orange Tension Swing as shown 104 ...
Страница 108: ...STEP 21 Close the Guide Door and the system is ready to print 108 ...


