background image

18

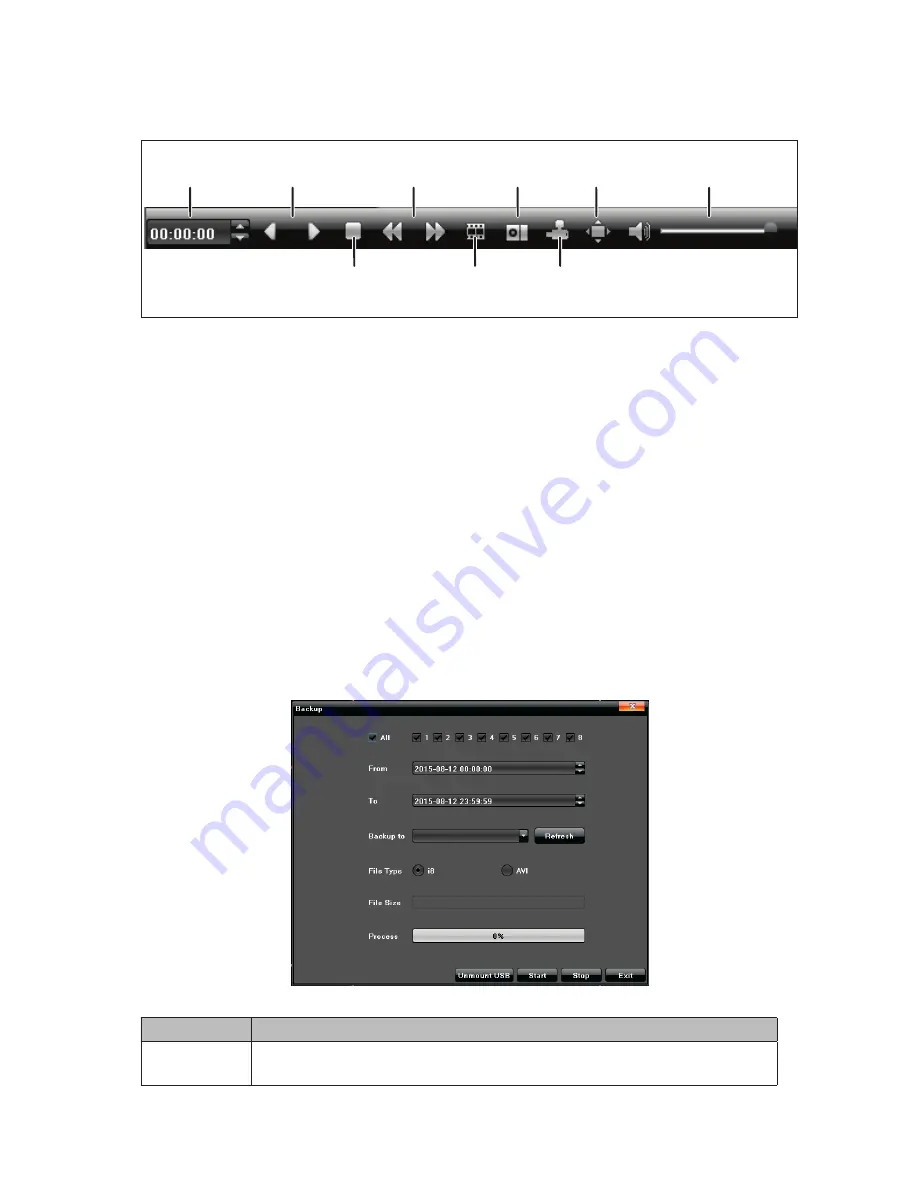
A control bar displays above a daily recording indicator.

Video Playback 

Counter

Reverse or 

Forward

Play/Pause

Take a 

Snapshot

Backup

Full Screen

Volume 

Control

Slow down / Speed up 

playback  

View single 

frame

•  Pause: Pause the current playback.
•  Stop: Stop the current playback.
•  Slow: Slow down the playback speed (1/2,1/4,1/8,1/16 times available).
•  Fast: Speed up the playback process(2, 4,8,16 times available). 
•  Snapshot: Take a screen capture of any playback channel.
•  Frame play: Play recording one frame at a time. 
•  Backup: Make a backup video for any channel. 
•  Full screen: Video image playback on full screen. 
•  Volume: Adjust the volume of playback audio.
•  Double-click channel bar or click “Play” button to play the video.
•  Double-click any single channel screen to get full screen display.

Backup

Copy the recorded files from the hard disk to an external storage device such as a USB 

drive.

FIELD

DESCRIPTION

Channel

Select the backup data for a specific channel (1-4 or 8 if applicable, or 

All)

Содержание UDVR46-4

Страница 1: ...Digital Video Recorder UDVR46 4 UDVR86 4 UDVR86 8 User Guide Please read this guide thoroughly before operation and retain it for future reference 2016 Uniden America Corporation Issue 1 June 2016 Irving Texas ...

Страница 2: ...en com Note Images in this manual may differ slightly from your actual product Uniden surveillance products are not manufactured and or sold with the intent to be used for illegal purposes Uniden expects consumer s use of these products to be in compliance with all local state and federal law For further information on video surveillance and audio recording legal requirements please consult your l...

Страница 3: ...g and maintenance servicing instructions in the literature accompanying the device The lightning flash with arrowhead symbol within an equilateral triangle is intended to alert the user to the presence of uninsulated dangerous voltage within the device s casing that may be of sufficient magnitude to constitute a risk of electric shock WARNING TO PREVENT FIRE OR SHOCK HAZARD DO NOT EXPOSE THIS UNIT...

Страница 4: ...iv ...

Страница 5: ...Video Cable to Gateway Video Input and Power 8 Step 3 Connect the Power Block to Power and to the Gateway 8 SET UP PERIPHERALS 9 Connect the Mouse 9 Connect the Ethernet Cable 9 Connect the Monitor 9 Connect the Mouse 9 Left Button 10 Right Button 10 Scroll Wheel 10 Power Up the UDVR 10 INSTALLING CAMERAS 11 Installation Tips 11 Installing the Cameras 11 GETTING STARTED 13 START UP THE UDVR SYSTEM...

Страница 6: ...r 23 Setting Screen 23 Device Tab 24 Channel Tab 27 Network Tab 33 Alarm Tab 38 Account Tab 42 System Tab 43 Record 47 Display Setting 48 Image Setting 50 START MENU OPTIONS 50 Quick Setup 51 Power Off 51 Reboot 51 Logout 51 Device Time 51 Volume 51 BASIC OPERATION 52 REMOTE ACCESS 55 FIRMWARE UPDATE 56 MAINTENANCE 57 RECYCLING AND DISPOSAL INFORMATION 57 SPECIFICATIONS 58 COMPLIANCE AND WARRANTY ...

Страница 7: ...l out the safety features This will help avoid any potential hazard from electrical shock or fire If in doubt contact qualified service personnel INSTALLATION PRECAUTIONS 1 Read and Follow Instructions Read all safety and operating instructions before setting up and using the device Follow all operating instructions 2 Retain Instructions Keep these safety and operating instructions for future refe...

Страница 8: ... Do not place it in a built in installation such as a bookcase or rack unless proper ventilation is provided and all of these instructions and cautions have been followed 11 Attachments Only use Uniden or Uniden recommended attachments 12 Water and Moisture Do not use this device near water for example near a bath tub wash bowl kitchen sink or laundry tub in a wet basement near a swimming pool etc...

Страница 9: ...oid the warranty resulting in costly repairs or replacement When the device exhibits a distinct change in performance 3 Replacement Parts Use only replacement parts verified by Uniden customer care specialists to have the same safety characteristics as the original parts Use Uniden specified replacement parts to prevent fire electric shock or other hazards MAINTENANCE 1 Cleaning Unplug the device ...

Страница 10: ...drive Continuous scheduled and motion recording H 264 video compression HDMI cable included for simple connection to HD TVs PTZ cameras supported remotely controlled through a mobile App Accurate time stamps with NTP daylight savings time Digital zoom in live view and playback 2 video outputs HDMI VGA to connect multiple monitor types Instant USB backup of live video from selected camera Upgradeab...

Страница 11: ...5 PACKAGE CONTENTS RECEIVER PACKAGE 6 ft Ethernet Cable 6 ft HDMI Cable UDVR Receiver 12V AC DC Adapter and 12V DC Power Connector USB Mouse CAMERA PACKAGE Outdoor Camera 4 or 8 ...

Страница 12: ...6 CABLE PACKAGE 100 Cat5E Cable 4 or 8 UDVR RECEIVER FRONT PANEL Note The UDVR reciever front panel is common to all models 1 2 3 4 1 Power on off LED 2 Hard Disk Drive LED 3 Alarm LED 4 USB port ...

Страница 13: ...an HDMI monitor to view the system interface live video or recorded video 5 VGA Input Connect a VGA cable included from this port to an HD television to view the system interface live video or recorded video 6 USB port Connect the USB mouse 7 WAN port Connect the Ethernet cable to your existing routor or network for local and remote connectivity 8 RS 485 and Alarm In Out connections Connects to ex...

Страница 14: ...amera cable end to its appropriate connector Step 2 Connect Power Video Cable to Gateway Video Input and Power The other end of the Power Video cable also has 2 connectors one connects to the video input jack on the back of the receiver and the other connects to one of the 4 power block connectors The power block also has a separate connector to the receiver s power input Connect the Power Video c...

Страница 15: ... the LAN port on the receiver s rear panel 2 Connect the other end of the Ethernet cable to a router on your network Connect the Monitor Connect the HDMI cable from the HDMI port of the receiver s rear panel to the HDMI port on the TV or monitor OR Connect a VGA cable not included from the VGA port on the receiver s rear panel to the VGA port on the TV or monitor ...

Страница 16: ...lied with the camera Installation Tips Test the cameras before permanent installation Make a plan for camera wire routing and for camera angle Mount the camera so the lens is away from direct and intense sunlight Plan to route the wiring so it does not interfere with power lines or telephone lines Ensure that the camera wiring is not exposed or easily cut Mount the camera in an area that is visibl...

Страница 17: ...tor 2 Hold the camera in the location where you want it mounted Check the display on the monitor to verify that the location is acceptable 3 Mount the camera s to the desired surface using the parts in the supplied mounting kit Choose a firm mounting surface If mounting on drywall use the drywall anchors supplied in the kit Table Mount Wall Mount Ceiling Mount Note Camera may not be exactly as sho...

Страница 18: ...stem Left button Right button Scroll Wheel Mouse Control Left Button In Live view click to open the Navigation Bar Right click to close it In Live view while in a split screen display mode double click an individual channel to view it in full screen Double click again to return to the split screen display mode While navigating menus click to open a menu option Right Button In Live view right click...

Страница 19: ...d UDVR 4 Screen Format with 4 Active Cameras UDVR 8 Screen Format with 4 Active Cameras Changing the Main Camera View To display a different channel in the larger screen 8 channel format only drag and drop any channel live view into the larger screen To view a channel in full screen mode double click any channel ...

Страница 20: ...ce you log in you should set a password for system access and set the time date and display format 1 Right click on the Live view screen The Main Menu displays 2 Hover the cursor over Start A sub menu displays Access Login Screen 3 Click Login The Login screen displays Login Screen Channel No Manually record video Zoom Take a snapshot Click to ...

Страница 21: ...rmat Local time and date are set automatically through the network connection However use the following procedure if you want to reset the time date or display format See page 26 for more detailed information 1 From the Main Menu select Setting Device Device Number Select Setting for Device Time The Device Time screen displays 2 Click on a field year month day hour minutes or seconds and then clic...

Страница 22: ...Screen 8 Screen and 9 Screen menu items allow for displaying 4 6 8 or 9 Live view screens at the same time Click the desired screen configuration The screen options displayed will vary according to system configuration Note When in Quad view 4 screen with more than 4 cameras Series 1 and 2 change from viewing Cameras 1 4 to viewing Cameras 5 8 Start Click on Start to access the Main Menu subscreen...

Страница 23: ...Set alarms for motion detection video loss tampering and other functions see page 21 File Manager Organizes saved video and captured files see page 22 Setting Configure Device Channel Network Alarm and System parameters see page 22 Record Set up recording for individual or all channels see page 46 Display Setting Set parameters for Text Language Auto Logout Image Display Image Resolution Camera Di...

Страница 24: ...6 times available Snapshot Take a screen capture of any playback channel Frame play Play recording one frame at a time Backup Make a backup video for any channel Full screen Video image playback on full screen Volume Adjust the volume of playback audio Double click channel bar or click Play button to play the video Double click any single channel screen to get full screen display Backup Copy the r...

Страница 25: ...s in the Back to field 4 Select a single channel or all channels for backup 5 Use the From and To fields to enter the start and stop date time range to be backed up 6 Click Start to begin the backup The backup proceeds automatically Click Stop to stop the backup at any time PTZ Pan Tilt Zoom Note This function requires a camera with PTZ capability This screen lets you set up a specific path patter...

Страница 26: ... settings Vertical Horizontal Zoom Iris Focus Zoom Zoom in or out Iris Controls the amount of light coming through the lens Focus Sharpen or relax focus Aux Device Light Wipers Fan Heater Equipment1 Equipment2 Preset 1 255 Cruise Camera rotation speed 1 255 Track Detect follow and record video of moving persons or objects 1 255 ...

Страница 27: ...uise speed click Add to confirm the settings Click Delete to clear the preset 2 To recall a cruise setting select the desired cruise number in the drop down list then click About Track This feature allows a PTZ camera to automatically detect follow and record video of moving persons or objects 1 Select a track number in the drop down list 2 Click Track Start to set the PTZ camera operation then cl...

Страница 28: ...ard disk drive as well as any video or capture files stored on an attached external storage device such as a USB drive File Manager Screen 1 In the File Manager screen click Refresh to ensure the latest files display Picture or Video display 2 Click on either Picture or Video A list of dates displays Each date contains files recorded captured on that date Click on one of those dates 3 File names d...

Страница 29: ...ecorded video The Device tab has 5 sub tabs Device Number System Version PTZ Setting DST Setting QR Code Device Number Sub Tab The Device Number sub tab screen is the same as the main Device Tab screen above FIELD DESCRIPTION Device Name Create a name for the system Device Number Assign a number to the device Record Replace Enable Record Overwrite ...

Страница 30: ...ore than 1 is installed Alarm Input Number Number slot where the input from an alarm device connects to the DVR rear panel Alarm Output Number Number slot where the input from an alarm device connects to the DVR rear panel Video Format NTSC or PAL Stream Type Video Stream Resolution Device Time Set the system s time date and date display preference Audio Output Choose between Normal or HDMI System...

Страница 31: ...Setting Sub Tab This sub tab sets Daylight Savings Time for the UDVR system FIELD DESCRIPTION Enable Daylight Saving Time Click the Enable Daylight Saving Time box to activate the DST settings From Set Daylight Saving time to begin on the first Sunday in March and to end on the first Sunday in November To Set Daylight Saving time to end on the first Sunday in November DST Bias 30 60 90 120 minutes...

Страница 32: ...ystem during ProHD app setup QR Code Screen Channel Tab The term Channel refers to each monitoring camera attached to the UDVR system The Channel tab has several sub tabs Display Setting Video Parameters Schedule Record Motion Video Lost Tampering Alarm Video Mask Channel Screen Device Number Sub Tab Sets parameters for each camera s screen display ...

Страница 33: ...t Select either 12 or 24 hour format as the time display format Date Format Select a date format to display MMDDYYYY DDMMYYYY YYYYMMDD OSD Position Select a location on the screen where the date time stamp will display Camera live view displays with red box Move box to desired location click OK to return to Display Settng menu Image Setting Adjust the brightness contrast saturation and hue of the ...

Страница 34: ...from a drop down list Frame Rate Select an appropriate frame rate from the drop down list Note The higher the resolution bit rate and frame rate the larger the recorded video file size Video Quality Choose the video quality level Default Highest Copy To Copy these settings to a selected channel Schedule Record Sub Tab This sub tab sets up a recording schedule for each channel according to 5 variab...

Страница 35: ...Screen Set Scheduled Recording Times You can set the system to record based on a schedule or you can manually turn recording on and off By default the system is set to an always on recording schedule Motion Sub Tab Enable motion detection with this screen Select Enable Motion Detection to access parameters Set parameters on each channel for detecting motion Use the Copy To feature to transfer the ...

Страница 36: ... or Cancel to delete the settings and return to the Motion sub tab screen Sensitivity Drag the tab along the sensitivity bar to increase or decrease motion sensor sensitivity Arm Schedule Select Setting for this field to display a 7 day calendar Drag the cursor along the day time during which you want motion sensor active for that channel Linkage Select this field to link motion detection to alarm...

Страница 37: ...PTION DESCRIPTION CH Select the channel whose alarm notifications you want to set should tampering with the camera occur Enable Video Tampering Check this box to turn on the video tampering options for this screen Sensitivity Drag the tab along the sensitivity bar to increase or decrease sensitivity Area Settings This field lets you mask certain viewing areas so they will not indicate video tamper...

Страница 38: ...rn on the video masking options for this screen Area Settings This field lets you mask certain viewing areas so they will not record 1 Select Settings to display the live view for that channel 2 Left click and drag the cursor over an area Release A red box displays over the area to mask it 3 Right click and drag over the red box to delete it 4 Click OK to save the settings or Cancel to delete the ...

Страница 39: ...oud Server for remote access to your system via an iPhone iPad and Android device using the Uniden ProHD app Network Settings Screen OPTION DESCRIPTION NIC Network Interface Card IP DHCP Internet Protocol Dynamic Host Configuration Protocol If checked IP address automatically assigned If unchecked enter static IP address ...

Страница 40: ... Real Time Message Protocol port Default 1935 RTSP Port Real Time Streaming Protocol port Default 554 RTSP Http Port Outgoing port for Real Time Streaming Protocol Default 8002 Advance Set up hosting information alarm management user name and password etc DDNS Server Settings Sub Tab The DDNS server allows a PC with a fixed IP address to connect to the internet This sub tab displays what the conne...

Страница 41: ... Enables Network Time Protocol to synchronize system clocks Server Address Server where NTP accesses time NTP Port NTP software port Update Frequency How often the DVR synchronizes time Select Time Zone Time zone GMT Hour Minute Adjust for DST Email Setting Sub Tab Set up parameters so the UDVR can send status messages for motion detection or other events through email ...

Страница 42: ...ct to allow the Secure Socket Layer to establish a secure link between the browser and the web server Attachment Check this box if there is an attachment with the email User Name Email Address Receiver block Send to email address Sending Interval Set how often the system checks for outgoing email SMTP Server Provided by the email provider SMTP Port Platform Sub Tab Set parameters management protoc...

Страница 43: ... Alarm Tab The Alarm screen allows UDVR system alarm configuration The system alerts you by popping up live video and playing sound alerts for events such as motion detection video loss or hard disk drive problems This tab has 3 sub tabs Alarm Input Alarm Output Exception Alarm Screen ...

Страница 44: ...reen OPTION DESCRIPTION Alarm Input Channel with originating alarm Address Local alarm Alarm Name Use popup keyboard to name the alarm Alarm Status Choose normally open or normally closed according to the alarm devices used Alarm Handle Alarm Management Alarm Schedule Linkage Copy To Copy these settings to the selected channel ...

Страница 45: ... Screen OPTION DESCRIPTION Alarm Output Alarm devices Address Local alarm location Delay Alarm time Arm Schedule Schedule of times when the alarms will be armed Copy To Copy these settings to the selected channel Exception Sub Tab Set the conditions for which an alarm will NOT trigger ...

Страница 46: ... Illegal Access Video Signal Exception Alarm on Monitor Alarm message displays on the monitor Pop Up Message Alarm message displays on the monitor in a pop up message Audio Warning Alarm sounds Upload to Center Upload the alarm to the video management system Trigger Alarm Output Alarm devices will be affected ...

Страница 47: ...er account details through the Account Setting sub tab The other sub tab User Online displays what users are online Account Screen Account Setting Sub Tab Enter user name password and specify user type Account Setting Screen ...

Страница 48: ...AC address used other users cannot log in User Online Sub Tab Check the status of an online user s connection User Online Screen System Tab The System tab allows for setting up system parameters as needed There are 6 sub tabs Device Log Stream Info HDD Setting Update Auto Reboot Recovery Configuration Device Log Sub Tab Review the device logs according to the video type and date time ...

Страница 49: ...Type Alarm Exception Operation Sub Type Detailed information about log type From Log start date To Log end date Search Search those dates Export Export file to USB drive Stream Info Sub Tab View the band width of data streaming for each channel System Screen Stream Info ...

Страница 50: ...in Stream Low Resolution Sub Stream Low Resolution HDD Setting Sub Tab Check the capacity and free space of the HDD hard Disk Drive and format the HDD if needed System Screen HDD Setting The system displays the following information HDD No Capacity MB Free Space Status Normal etc Type Serial Number ...

Страница 51: ...em OPTION DESCRIPTION Upgrade File Select Browse to locate the files on the USB drive to upload Status bar Shows percentage complete of uploading new firmware to the DVR Upgrade Cancel Click to complete the upgrade process or cancel the process completely Auto Reboot Sub Tab Enable or disable the UDVR system for rebooting once daily or weekly System Screen Auto Reboot ...

Страница 52: ...Confirmation OPTION DESCRIPTION Export Configuration Select the device on which to export the system s configuration Import Configuration Select the file to import containing the new configuration Default Select the UDVR category to return to default configuration Network Account Setting Stream Type Alarm Display Setting Schedule Record Other Record Main Menu Record ...

Страница 53: ...t this option to enable manual recording Once you select Manual a red circle displays on the Live view screen Click on that red circle to start and stop manual recording See page 14 for an image of the Live view screen Schedule Record Select this option to enable automatic recording according to schedules previously set up Display Setting Display Setting fields set up how the TV or monitor display...

Страница 54: ...ystem automatically logs out Display Adjust the following display parameters Brightness Contrast Saturation Hue Transparancy Resolution Select a resolution to match the connected TV or monitor Enable SEQ Click the icon in front of Enable SEQ to include the channel in the image rotation Rotation Interval Set the amount of time live video displays on a single camera before it cycles to another ...

Страница 55: ...each slider to adjust the following items in the Image Setting screen Brightness Contrast Saturation Hue START MENU OPTIONS Hover the mouse over Start in the Main Menu and these options display Quick Setup Power Off Reboot Logout Device Time Volume ...

Страница 56: ... to fully remove power from the receiver Reboot Click Reboot to reboot the UDVR system automatically Logout Click Logout to exit the advanced feature items in the Main Menu Device Time Click Device Time to display the date and time in Live view Volume Click Volume to change the volume of the SELECTED live screen Note The camera on the channel showing the live view screen must be equipped with a mi...

Страница 57: ...elect a specific camera s or ALL cameras Select OK The Schedule Recording screen displays again 6 After you ve finished setting the recording schedule s select the Save button on the top icon bar Set up motion detection recording 1 Select Main Menu Setting Channel Schedule Record Schedule Record screen displays 2 Select a channel select Motion in Trigger section under schedule 3 Copy to other chan...

Страница 58: ...Menu Backup backup screen displays 3 Select the camera files to back up or all and the From and To dates times to back up 4 Select the backup location drive etc If no locations display select Refresh 5 Select Start A progress bar displays 6 When the backup is complete select Unmount USB Remove the USB and store it in a safe place Find the device log Main Menu Settings System Device Log Manually re...

Страница 59: ...a screen The screen displays Completed when the snapshot is taken From the Main Menu select Capture The screen displays Completed when the snapshot is taken To view snapshots 1 Click File Manager in the Main Menu 2 In the File Manager screen click Refresh to verify that the snapshot taken is listed 3 Double click the file name in the left portion of the screen to display the snapshot ...

Страница 60: ...ou can also remotely access your UDVR system through Uniden s ProHD app for iOS or Android devices Go to the Apple App Store or Google Play to download the free Uniden ProHD app The app is designed to be self explanatory ...

Страница 61: ...here is a firmware version that is later than the firmware version on your system download it to your USB drive 4 Insert USB drive into USB port on front of the DVR 5 Go into Settings System Menu and select Update 6 Select Browse button and choose the new FW file on the USB drive 7 Select Upgrade button 8 System will upgrade and then reboot In some cases there may be an additional file that accomp...

Страница 62: ...nternal componants Check plugs and cords periodically for wear RECYCLING AND DISPOSAL INFORMATION Do not dispose of electronic devices or any of their components especially batteries and LCD displays in your municipal trash collection Consult your local waste management authority or a recycling organization like Earth911 com to find an electronics recycling facility in your area ...

Страница 63: ...Out Yes Video Input Resolution 1920 x 1080 PTZ Control RS 485 Pelco P Protocol Power 12V DISPLAY Live Display 4 Channel full quad Live Display 8 Channel full quad 8 9 Live Display Speed 4 ch NTSC 30fps each channel Live Display Speed 8 ch NTSC 30fps each channel Navigation Mouse Motion Area Masking 22 x 17 Sensitivity Levels 6 FW Upgrade USB Internet Security Set by admin Time Sync NTP Server Reco...

Страница 64: ...ecovery Playback Playback Speed Variable up to 16x Search By Time and Event Log Search Motion detection configuration changes connects disconnects video loss STORAGE AND ARCHIVE Storage 1 HDD SATA 1 TB included Max Capacity 4TB Backup Media USB Flash and HDD Backup File Format AVI Recording time max channels max cameras 1TB drive 6 days 1080p 13 days 720p 17 days 960h 3 days 1080p 6 days 720p 9 da...

Страница 65: ...pixel Video Format NTSC PAL Effective Pixels H 1920 V 1080 Resolution 1080P Lens Type Fixed Max Aperture 3 6mm FOV 70 Scan Progressive Sync System Internal IR LED 850nm 30 pieces ICR Yes Night Vision Range 100ft Total Darkness Min Illumination 0 05 Lux w o IR LED 0 Lux w IR LED Video Output BNC Cable BNC Video Power Cable Length 100ft Power 12V Power Consumption 15W With HDD Operating Temp 14 F to...

Страница 66: ...d your authority to operate the equipment Cet appareil est conforme aux normes RSS exemptes de licences d Industrie Canada Son fonctionnement est soumis aux deux conditions suivantes 1 cet appareil ne doit pas causer d interférences nuisibles et 2 il doit pouvoir accepter les interférences incluant celles pouvant nuire à son fonctionnement normal Tout changement ou modification non approuvé expres...

Страница 67: ...OES NOT COVER OR PROVIDE FOR THE REIMBURSEMENT OR PAYMENT OF INCIDENTAL OR CONSEQUENTIAL DAMAGES Some states do not allow this exclusion or limitation of incidental or consequential damages so the above limitation or exclusion may not apply to you LEGAL REMEDIES This warranty gives you specific legal rights you may also have other rights which vary from state to state This warranty is void outside...

Страница 68: ......

Отзывы: