


UNIBLOC-PD Operation & Service Manual: PD600-677 21
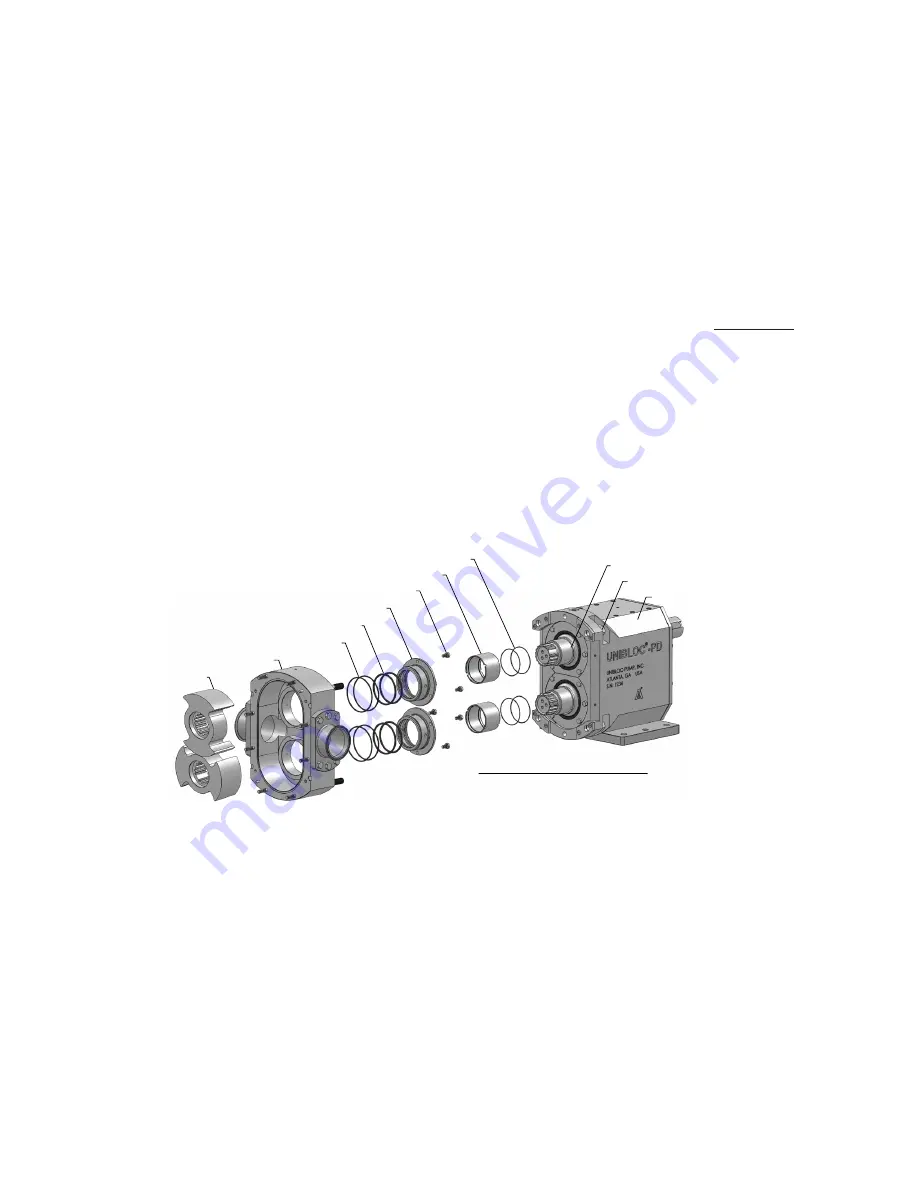
SEAL FLUSH HOUSING O-RINGS (INNER)
ROTOR HOUSING
ROTORS
SEAL FLUSH HOUSING O-RINGS (OUTER)
SEAL FLUSH HOUSINGS
WEAR SLEEVES
WEAR SLEEVE O-RINGS
ANTI-ROTATION PINS
SEAL FLUSH HOUSING BOLTS
BEARING HOUSING
FRONT VEW- ROTOR & BEARING HOUSING
REAR ROTOR HOUSING STUD NUTS
fig. 4.9
sleeve
6192B
(see section 6.3.2) over the splined end of the shaft and lubricate the surface of the mounting sleeve.
Place new
Seal Cartridge O-rings
into the grooves on the outside of the
Seal Cartridges
. Slide the
Seal Cartridge
on the mounting sleeve. Rotate the
Seal Cartridge
if necessary so that it will slide in the slots of the
Retainer Ring
.
Tap the
Seal Cartridge
into the
Rotor Housing
seal bore using mounting sleeve
6192A
(see section 6.3.2). When
properly installed the
Seal Cartridge
will bottom out against the
Retainer Ring
and will be flush or slightly below the
seal bore face. Remove the mounting sleeves and repeat for the other
Shaft.
Slide the
Rotors
on the
Shafts
. See
section 4.4.6 for completing the installation.
4.4.5 Double O-Ring Seal
This type of seal uses two o-rings to seal against a rotating shaft. It is most frequently used when the liquid viscosity
is greater than 2,000 cPs or is sticky. The maximum shaft rotational speed for this seal is 350 rpm and the maximum
service pressure should not exceed 8 bar (115 psig). This seal must never be allowed to run dry because the o-rings
will be damaged. It must be lubricated with grease or a flushing system as discussed in section 3.3. This seal also
uses the pumped product as a lubricant.
The rotor housing must be removed to service the rear loaded Double
O-Ring Seal on the PD600, PD650, and PD675 models.
4.4.5.1.1 Double O-Ring Seal Removal (REAR LOADED)- MODELS: PD600, PD650, PD675
(reference figs. 4.1, 4.9)
Slide the
Rotors
off the
Shafts
. If the rotors will not slide off they can be removed simultaneously with the
Rotor
Housing
. Unless they are being replaced,
DO NOT USE PLIERS OR CHANNEL LOCKS TO REMOVE THE RO-
TORS
.
THEY WILL BE DAMAGED.
To remove the
Rotor Housing
disconnect the flushing system, if applicable,
and loosen the
Rear Rotor Housing Stud Nuts
. Use a hoist and eye bolt to support the
Rotor Housing
. Tap on the
ports with a rubber mallet and pull the
Rotor Housing
off. Remove the
Seal Flush Housing Bolts
and slide out the
Seal Flush Housing
. Remove the
Seal Flush Housing O-rings (inner and outer)
. Slide off the
Wear Sleeves
and
remove the
Wear Sleeve O-rings
.
4.4.5.1.2 Double O-Ring Seal Installation (REAR LOADED)- MODELS: PD600, PD650, PD675
(reference figs. 4.1, 4.9, 4.15)
Clean all components prior to installing the seals. Check the
Wear Sleeves
for excessive wear. If grooves are notice
-
able, the sleeves may have to be replaced. Otherwise, the inner
Seal Flush Housing O-rings
may not seal properly
or may fail prematurely. Coat all surfaces that will have contact with o-rings with a lubricant approved for contact with
the pumped product. Place new
Seal Flush Housing O-rings (inner and outer)
into the grooves of the
Seal Flush
Housings
. Attach the
Seal Flush Housings
to the
Rotor Housing
with the
Seal Flush Housing Bolts
. Place new
Wear Sleeve O-rings
into the grooves of the
Wear Sleeves
. Slide the
Wear Sleeves
on the
Shafts
and locate on
the
Anti-Rotation Pins
. Using a lifting eye bolt, hoist the
Rotor Housing
on the
Dowel Pins
(see fig. 4.15 on pg.
24) and slide it on, while at the same time threading on the
Rear Rotor Housing Stud Nuts
. Tap the housing with a
rubber mallet to seat it properly against the
Bearing Housing
. Tighten the
Rear Rotor Housing Stud Nuts
in a cross
pattern. Slide the
Rotors
on the
Shafts
. See section 4.4.6 for completing the installation. It is imperative that the
cavity between
Seal Flush Housing O-rings (inner)
is filled with product compatible grease or the flushing system is
reconnected before operation is resumed.