background image

32 ULEAD DVD WORKSHOP USER GUIDE

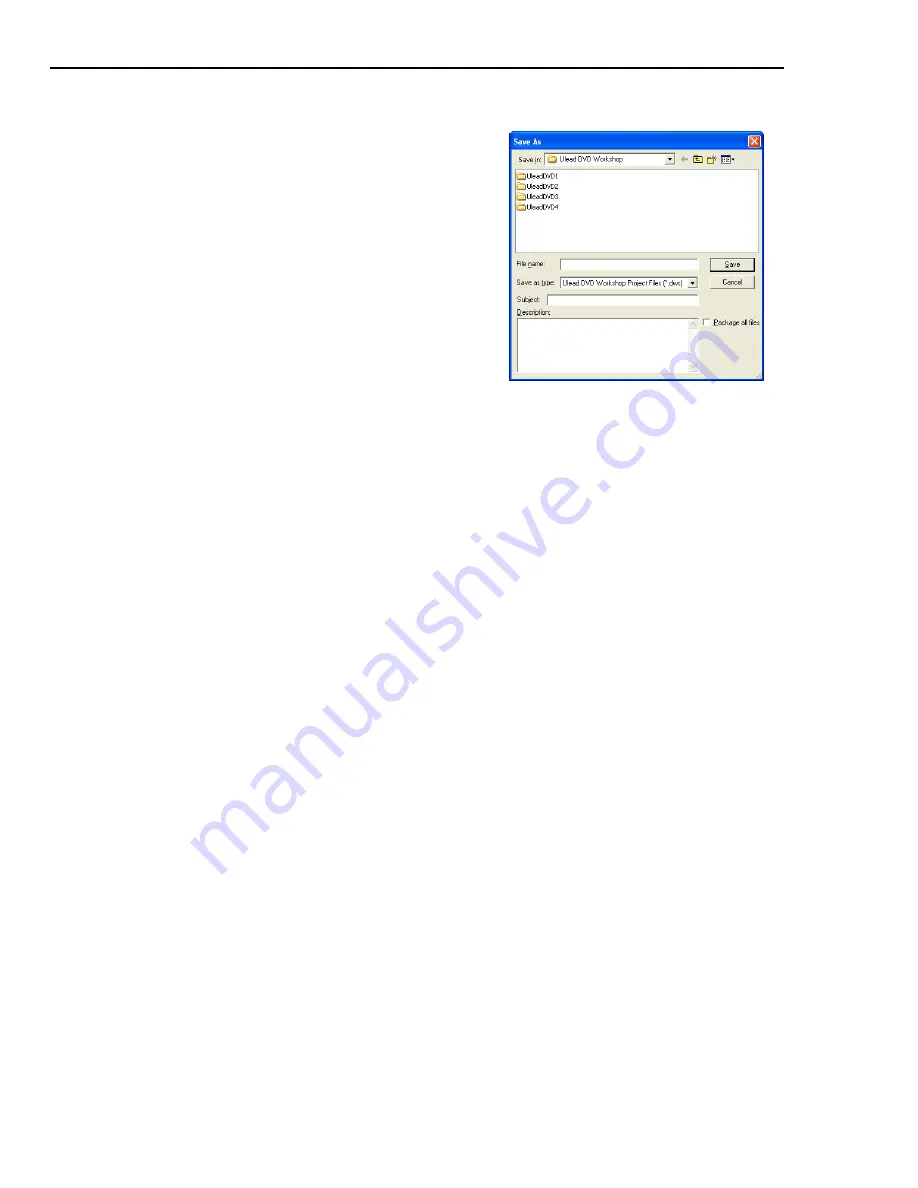
To save your project as a new file:

1. Click the arrow beside 

Save

 and select 

Save As/Package

 to open the 

Save As


dialog box. 

2. Enter a location where your new project 

version will be saved in 

Save in

.

3. Type in a new file name. 
4. Enter a subject and description for your new 

project.

5. Click 

Save

.

Tip: 

If you are planning to share your 

project to others or work on it on another 
computer, select 

Package all files

. DVD 

Workshop will save all the files that you 
used in your project (e.g. video, audio, and 
subtitle text) including the project file in the 
project folder. The files will be saved in 
different subfolders.

Содержание DVD WORKSHOP 2 -

Страница 1: ...User Guide Ulead Systems Inc December 2003 ...

Страница 2: ... of Microsoft corporation in the United States and or other countries Apple QuickTime and the QuickTime logo are trademarks of Apple Computer Inc registered in the United States and other countries QuickTime and the QuickTime logo are trademarks used under license Dolby and Double D Symbol are trademarks of Dolby Laboratories All other product names and any registered and unregistered trademarks m...

Страница 3: ...ngs 17 The Options Panel 18 The Navigation Panel 19 Navigation Panel Capture Step 20 Navigation Panel Edit Step 20 The Preview Window 21 The Preview Window context menu 22 The Content Window 23 The Title List 23 The Menu List 25 The Chapter List 26 The Chapter List context menu 26 The Library 27 The Library Manager 28 The Library context menu 29 Setting Preferences 29 General 30 Default Settings 3...

Страница 4: ...3 Video tab 53 Image tab 54 Audio Panel 55 Audio tab DVD 56 Subtitle tab DVD 56 Titles and Chapters 57 Working with titles 57 Adding titles to your project 57 Creating a slideshow 58 Setting a First Play Video 61 Playing back titles and audio clips 61 Using Split by Scene 62 Rearranging titles in the Title List 63 Trimming titles or audio clips 64 Cutting titles 65 Deleting titles 66 Renaming titl...

Страница 5: ...from metadata 78 Menu 81 What are menus 81 Creating menus 82 Create Menu Blank 82 Create Menu Template 82 Create Menu Wizard 83 Objects and buttons in the menu 83 Objects 83 Buttons 84 The Preview Window 84 The Menu Step Options Panel 85 Menu tab 85 Button tab 86 Text tab 90 Editing your menus 90 Editing the Playlist 93 Real time preview for Motion Menus 94 Finish 97 The Preview Window 97 The Remo...

Страница 6: ...lead DLT Writer options 105 Appendix A DVD Region Codes 111 Appendix B Capture checkup 112 Before you capture 112 System Tweaks 112 Appendix C Glossary 114 Shortcuts 119 Capture Step 119 Edit Step 119 Add Edit Subtitles dialog box 120 Menu Step 120 Finish Step Remote Control 121 Global Settings 122 Index 125 ...

Страница 7: ......

Страница 8: ......

Страница 9: ...tle tracks These can feature different languages subtitles for the hearing impaired training guides and more Multiple audio tracks Add multiple audio tracks with different languages commentaries programming for the visually impaired or different levels of instruction Use up to DVD s standard maximum of 8 audio tracks with control of over all audio levels and fade in fade out behavior Copy protecti...

Страница 10: ...and content Abundant preset menu templates and objects are available in the Library You can also visit the Ulead DVD Workshop Web site and download additional menu templates Motion menu Add animated backgrounds and buttons giving you more options for enhancing your menus PowerMenus Choose from three levels for designing scene selection menus use a preset template for the fastest results modify a t...

Страница 11: ...z or equivalent and 512MB DDR RAM 16 bit color display using 1024x768 or higher resolution DVD ROM drive Supported file formats Import Video MPEG 1 MPEG 2 MICROMV WMV AVI QuickTime Image BMP GIF JPG JP2 JPC PNG TGA TIF UFO PSD Audio MPEG audio MPA WAV MP3 WMA Dolby Digital Export Disc DVD 5 DVD 9 miniDVD VCD and SVCD Audio LPCM audio MPEG audio Dolby Digital Tape Digital Linear Tape DLT Supported ...

Страница 12: ... encounter problems with the software 1 Insert the DVD Workshop CD onto your computer s disc drive 2 If AutoRun is enabled the DVD Workshop Setup screen automatically appears Follow the step by step instructions to complete the installation process Note The TV system option will determine the disc templates that will be included in the installation Select the TV system for the country you are in o...

Страница 13: ......

Страница 14: ......

Страница 15: ...active step is highlighted in blue and the contents of the Options Panel change accordingly Start Create a new project or open an existing one for burning or further editing Capture Capture footage from a video source to your computer You can capture video from analog or digital video sources as well as TV footage Edit Arrange edit and trim video clips You can also set chapters for your menus and ...

Страница 16: ...jects in this panel Above the Options Panel the project name and total project file size are dis played 4 Navigation Panel Contains buttons that can be used to go through a clip In the Capture Step this also acts as the device control for the DV device if the device control is properly set up 5 Subtitle and Audio Track Allows you to switch to a different audio and or sub title track when previewin...

Страница 17: ...essible through the Global Settings menu Global Settings Opens a menu where you can access options for changing program settings Save or Save As Package Lets you save the changes made in the project or opens a dialog box where you can save the same project using a different file name Undo Reverses past actions performed This command can be disabled in the Preferences dialog box Redo Reverses the u...

Страница 18: ...D Workshop Online Registration Launches your Web browser then takes you to the page on the Ulead Web site where you can register your copy of DVD Workshop About Ulead DVD Workshop Displays product and copyright information about DVD Workshop Exit Closes the program The Options Panel The Options Panel is located at the left hand side of the program window It contains various tools you can use to cr...

Страница 19: ...menu Switch between tabs to select the menu component you want to edit Menu Allows you to set menu properties You can set your menu to have motion attributes and background music Button Allows you to adjust the button properties You can add frames shadows and more This is also where you can create a playlist for your buttons There are five panels available in this tab Attributes Style Frame Shadow...

Страница 20: ...s to the previous frame of the video 6 Next Frame Goes to the next frame of the video 7 Fast Forward Goes forward through the video at a faster rate 8 Timecode Displays how many minutes seconds into the video the current frame in the Preview Window appears Navigation Panel Edit Step When you double click a clip in the Capture Step or switch to the Edit Step the Navigation Panel will display a diff...

Страница 21: ...m Bar Drag the Mark in Mark out sliders to trim the currently selected clip 11 Set Mark in Click to mark the beginning point where the clip will be trimmed 12 Set Mark out Click to mark the end point where the clip will be trimmed 13 Add Chapter Click to add the currently displayed frame to the Chapter List 14 Audio Subtitle Allows you to switch to a different audio and or subtitle track when prev...

Страница 22: ...to the selected button Set Chapter Thumbnail Uses the currently displayed frame in the Preview Window as the thumbnail for the selected chapter in the Chapter List Add to Title List Adds the currently displayed clip to the Title List Copy Copies the selected item to the clipboard Paste Adds the item on the clipboard to the menu Delete Removes the selected item from the menu Arrange Allows you to r...

Страница 23: ...dd titles to your project by dragging a selected clip from the Library to the Title List or using the buttons above the Title List see Working with titles on page 57 The buttons above the Title List are The Title List context menu Right click a thumbnail in the Title List to access the context menu This menu contains options that allow you to add remove or rename a title You can also control how t...

Страница 24: ...tle Properties Opens a dialog box where you can view the attributes of the selected title Output Display Options Opens a dialog box where you can specify how your video will be displayed on the TV screen see Output Display Options on page 68 Set as First Play Video Assigns the selected title as the First Play Video see Setting a First Play Video on page 61 Edit Displays the selected title in the P...

Страница 25: ...to add remove or rename your menus as well as add a custom menu to the Library as a menu template Delete Removes the selected menu from the Menu List Create Menu Blank Creates a custom menu All the elements in this menu such as buttons text and background image must be manually added Create Menu Template Opens the Select Menu Template dialog box This is where you select preset menu templates that ...

Страница 26: ...images in the Chapter List Below the Chapter List is the Title Selector This displays the thumbnail of the title you are currently working on If you have more than one title on your project use the arrows to go through them The Chapter List context menu Right click a thumbnail in the Chapter List to access the context menu which allows you to add or remove chapters to your menu Delete Chapter Remo...

Страница 27: ...nus These frames can also be used as borders for your menu objects but not for text objects Object Library Contains various images that you can use to enhance your menu You can also use these objects to create links for your menus chapters or titles Highlight Image Library Contains images that can be used to indicate that a button is focused or selected Text Effect Library Contains numerous text e...

Страница 28: ...ick OK You can import audio tracks from a CD by selecting the disc drive containing the CD in the Load Audio File dialog box then choosing the CD track you want to import The chosen track will be copied into your project folder Tip Drag and drop edited titles or menu pages back to the Library so you can use them in the future 1 Click Global Settings Library Manager to open the Library Manager dial...

Страница 29: ... Step Adds the selected clip to the Title List Add to Menu Menu Step Adds the selected clip as objects to the currently active menu Edit Edit Step Displays the currently selected clip in the Preview Window for editing Rename Allows you to assign another name to the selected clip Properties Opens a dialog box where you can view specific attributes of the selected clip Split by Scene Opens a dialog ...

Страница 30: ...ically perform a cross check between the clips in the project and their associated source files allowing you to relink the source files to the clips This is important when the file in the library is moved to another location Always show relink message Select to display the Relink dialog box when you click an unlinked clip in the Library Image clip duration Specify the default duration of image cli...

Страница 31: ...ate Once you have opened a new or an existing file click Save to automatically store recent changes made in the project into the same file Save As on the other hand will prompt a dialog box where you can save the same project version using a different file name Note Save and Save As Package are not available in the Finish Step Press OK to capture Select to display a message box that confirms if yo...

Страница 32: ...d in Save in 3 Type in a new file name 4 Enter a subject and description for your new project 5 Click Save Tip If you are planning to share your project to others or work on it on another computer select Package all files DVD Workshop will save all the files that you used in your project e g video audio and subtitle text including the project file in the project folder The files will be saved in d...

Страница 33: ......

Страница 34: ......

Страница 35: ... project 1 Click New Project in the Options Panel The New Project dialog box opens 2 Enter a Project name 3 Specify the path for your project folder in Location 4 Select the Media type you want to use for your project Note Be sure of the media type and TV system to use before you start your project as this cannot be changed afterwards 5 Enter a Subject and Description for your project 6 Click OK ...

Страница 36: ... To open an existing project 1 Click Open Project in the Options Panel The Open dialog box opens 2 Browse for your project DWS then click Open Tip The Options Panel displays up to four recent project files you created or modified Click a project file to open it ...

Страница 37: ......

Страница 38: ......

Страница 39: ...tings for capturing video Select Device Control Opens a dialog box where you can set up device control This will allow you to control your DV device using the Navigation Panel Change Capture Plug in Opens a dialog box where you can specify what plug in to use for capturing video Duration Specify the length of video to capture The capturing process automatically stops after the duration is reached ...

Страница 40: ...s ends the capturing process Capture Image Captures the currently displayed frame in the Preview Window and save it as an image file Capturing Digital Video DV Digital Video DV combines a movie s audio and video aspects into a single binary language that can be broken down by computers This gives DV the capability of getting digitally enhanced edited and adjusted To connect a DV camcorder to your ...

Страница 41: ... your videotape into the video source and turn it on Make sure it is in Play VCR VTR mode Check the machine s manual for specific instructions 3 Go to the Capture Step and check if your device is displayed in the Options Panel under Source Note If your capture device supports multiple video sources click Options in the Options Panel then select Video and Audio Capture Property Settings This allows...

Страница 42: ... to capture 7 Click Capture Video to start capturing 8 Click Stop Capture or press Esc to stop capturing 1 Turn on your camcorder and set it to VCR Play mode 2 Create a new project or open an existing one and go to the Capture Step 3 Select the capture file format in Format and locate the path where you want to save your captured videos in Capture Folder 4 Click Options then select Video and Audio...

Страница 43: ...ferences on the Global Commands Bar 2 In the Preferences dialog box click the Capture tab 3 Select a format in Captured still image save format 4 Click OK To capture still images 1 Connect your DV or analog device to your computer Turn it on and set it to Play VCR VTR mode 2 Create a new project or open an existing one and go to the Capture Step 3 Use the Navigation Panel or your device s playback...

Страница 44: ... Audio input source are correct Notes The available settings vary based on the video format you choose You should be able to hear and see your selected program in the Preview Window 6 Click Capture Video to start capturing 7 Click Stop Capture or press Esc to stop capturing 1 Create a new project or open an existing one then go to Capture Step 2 Select a capture file format in Format and locate th...

Страница 45: ...me capturing from DV to MPEG format Capturing straight to MPEG saves hard drive space as its file size is smaller compared with DV AVI To capture video in MPEG format 1 Click Options in the Options Panel then select Capture Options 2 In the Capture Options dialog box select Scene detection 3 Click OK 1 Connect your camcorder or VCR to your capture card Turn it on then set it to Play VTR VCR mode 2...

Страница 46: ... dialog box then set other attributes Note If you are capturing from a USB device or analog source select Video and Audio Capture Property Settings from the Options menu to specify the desired frame size 6 Click Capture Video to start capturing 1 Connect your Sony MICROMV camcorder to the IEEE 1394 interface card 2 Insert your video tape into the camcorder and turn it on Make sure it is in Play VC...

Страница 47: ...EG Capture Plug in then click OK 8 Use the Navigation Panel to go to the start of the section you want to capture Tip To capture live video just set the camcorder to Camera mode You don t have to insert a blank tape 9 Click Capture Video to start capturing 10 Click Stop Capture or press Esc to stop capturing 1 Connect your camcorder or VCR to your capture card Turn it on then set it to Play VCR VT...

Страница 48: ... System defined profiles are preset profiles that cannot be edited However you can create custom profiles based on them Custom profiles Create a custom profile by modifying the settings of a system defined profile then saving it with a different name Tip You can also create a new profile by clicking New in the Manage Profiles dialog box This will open a task wizard that will guide you in creating ...

Страница 49: ...ck Select 5 In the Select Profile dialog box click Customize 6 Manage Profiles lists all the available profiles installed in your computer There are two types of profiles System defined profiles and Custom profiles Click Edit to modify the attributes of a custom profile 7 Under General Information specify a name for the edited profile in Name of Profile 8 Select the media types supported by the pr...

Страница 50: ... Video format Select the capture video format to use DVD VCD SVCD Select Customize to set up your own video format Frame size Select the dimensions of images in the video or animation sequences Speed Quality Set the percentage level of video quality to be created after capturing Advanced Opens a dialog box that contains advanced options for capturing TV tuner Displays various options for capturing...

Страница 51: ......

Страница 52: ......

Страница 53: ... Mark out Displays the end point of the video clip Auto Add Chapters Opens a dialog box that automatically detect scenes in the current video You can then select the scenes and insert them as chapters in your project Add Delete Chapter Adds the current frame of the video in the Preview Window to the Chapter List These chapters will be used when you create your menus These chapters act as anchor po...

Страница 54: ... value to increase or decrease the audio volume Fade in Fade out VCD SVCD Click to gradually increase decrease the volume of the selected track as it starts ends playing Loop audio VCD SVCD Repeats the audio track to match the duration of the video during playback Image tab The Image tab displays various options that you can use to edit your image clips and create your slideshows Total duration Di...

Страница 55: ...CD Drag the slider or enter a value to increase or decrease the audio volume Fade in Fade out VCD SVCD Select to gradually increase decrease the volume of the background audio as it starts ends playing Loop audio VCD SVCD Repeats the background audio to match the duration of the slideshow during playback Rotate Rotates the selected image in the slideshow 90 degrees to the left right Duration Displ...

Страница 56: ...your video on a DVD player Add audio track Opens a dialog box where you can select an audio file that you can add to the Audio tracks list Remove audio track Removes the selected audio track from the Audio tracks list Audio tracks Contains all the audio tracks associated with the title You can add up to eight audio tracks to each of your titles Volume Drag the slider or enter a value to increase o...

Страница 57: ...following sections to learn about the various operations associated with titles Adding titles to your project There are several ways to add titles to your project You can drag and drop or browse and select depending on where the titles are located To add titles from the Library 1 Select the title in the Library that you want to add to your project 2 Drag the selected title to a placeholder in the ...

Страница 58: ... image files you want to import Images imported this way will be added to the Title List as a slideshow title To create a slideshow 1 Import the images that you want to include in the slideshow into the Library 2 Drag an image to a placeholder in the Title List then drag the rest of the images you want to include in your slideshow into the same placeholder All the images in the slideshow are displ...

Страница 59: ...how long each image will appear on the screen in Image Duration 5 Select Add transition then choose a transition effect from the list The selected effect will be applied to all the images in the slideshow 6 Drag the slider or enter a value in Transition Duration to set how long the transition will take 7 To assign a chapter in your slideshow right click any of the images to be assigned as chapter ...

Страница 60: ...from the Audio tracks list and click Add audio track 4 Select the audio file you want to add and click Open Tip Select the audio track in the Options Panel then click Remove audio track to remove the background audio 1 Select the slideshow where you want to add background audio in the Title List 2 In the Options Panel click Browse and select the audio file you want to add in the Open dialog box 3 ...

Страница 61: ... select Set as First Play Video Playing back titles and audio clips Play back your titles or audio clips in the Preview Window using the Navigation Panel There are several ways to select a clip for playback Drag a clip from the Library to the Title List Double click a thumbnail in the Library or the Title List Right click a thumbnail in the Library or the Title List then select Edit Drag a clip fr...

Страница 62: ... or MPEG file into the Video Library 2 Right click its thumbnail then select Split by Scene to open the Scenes dialog box 3 Select the scan method from the Scan Method list MPEG files can only be scanned using the differences in the frame content 4 Click Scan to start detecting scenes in the video All detected scenes are displayed in the Detected scenes list Tip Click Reset to remove all the detec...

Страница 63: ...s 1 and 2 from the list of detected scenes 2 Between the two selected clips highlight the second selection 3 Click Join These two scenes will now be merged as one Notice that scene 2 is not in the list of scenes anymore Scene 1 is now composed of two scenes and its duration is longer Repeat the process to join other scenes Tip To split scenes select the merged scene then click Split Rearranging ti...

Страница 64: ...mark in point 2 Click Mark in or press F3 to set the mark in point 3 Move to the frame where you want the clip to end This will be your mark out point 4 Click Mark out or press F4 to set the mark out point To trim using the Trim Bar 1 Select the video clip you want to trim 2 To set the mark in time drag the left Trim Bar slider to the desired position The Mark in time is displayed in the Options P...

Страница 65: ...it your title then click Cut Title in the Options Panel Two new titles with different mark in and mark out points are displayed in the Title List Check the mark in and mark out fields in the Options Panel You will see that the mark in of the first new title is A and its mark out C while the mark in of the second new title is C and its mark out is B You can split these two new titles further by sel...

Страница 66: ...lect a thumbnail from either the Library or Title List 2 Right click the thumbnail and select Rename 3 Type a new name for the thumbnail and press Enter Replacing the audio track of a title DVD Workshop allows you to replace a title s audio track You can either replace it with a voice dub or a background music To replace the audio track of a title DVD 1 Select the video or slideshow in the Title L...

Страница 67: ...ecrease the volume as the audio track starts ends Notes Setting the volume to the highest level may produce distortion or audio clipping Adjust your volume to a lower setting if this happens Click Global Settings Preferences and go to Default Settings tab to specify the default duration of the audio track s fade in fade out effect You can view information about a clip in the Properties dialog box ...

Страница 68: ...e displayed on a standard TV Letterbox only Select if you want the DVD player to recognize the letterbox properties of the video The letterbox process preserves the entire frame and proportionally reduces the size so that the whole picture fits on the TV screen Proportional display reduction will result in mattes black bands above and below the image Pan Scan only Select if you want the DVD player...

Страница 69: ...ep aspect ratio Select to proportionally resize a 4 3 video to fit a widescreen TV This option preserves the entire picture and adds vertical mattes on each side of the display Keep aspect ratio no pillarbox Select to proportionally resize a 4 3 video to fit a widescreen TV This option fits the entire picture to fill out the screen by cropping some parts of the picture Note Selecting either Keep a...

Страница 70: ...r of frames This sequence of frames I P or B frames is called Group of Pictures GOP To add chapters to the Chapter List To add a video title s I frames to the Chapter List 1 Select a video title from the Title List 2 Select Locate I frame in the Options Panel 3 Use the Navigation Panel Go to next I frame and Go to previous I frame to search for I frames 4 Click Add Chapter in the Options Panel or ...

Страница 71: ...t the combined scene then click Split Deleting chapters from the Chapter List To remove chapters from the Chapter List select the chapter either by double clicking the thumbnail or using one of the following methods Click Delete Chapter in the Options Panel Right click the Preview Window then select Delete Chapter Select the chapter you want to remove from the Chapter List then press Delete 1 Go t...

Страница 72: ...le in DVD projects 1 select the thumbnail that you want to change in the Chapter List 2 Use the Navigation Panel to search for the frame you want to use as a chapter 3 Right click the chapter thumbnail in the Chapter List and select Set Chapter Thumbnail The displayed frame in the Preview Window will replace the selected thumbnail in the Chapter List To set chapters for a slideshow 1 Select the sl...

Страница 73: ...l be moved down to the next field in the Audio tracks list 5 Set other options for the added audio track see Audio tab DVD on page 56 Specifying Language Settings and Characteristics The Language Settings dialog box allows you to specify the audio track s language as well as its characteristics Characteristics classify audio tracks into categories that can be displayed in some DVD players that sup...

Страница 74: ...s or aid the hearing impaired Adding subtitles A Subtitle Track is a compilation of subtitles that will appear on the video at specific times The Add Edit Subtitles dialog box provides tools and options to create your subtitles To add subtitles 1 In the Title List select the title where you want to add a subtitle 2 In the Options Panel click the Subtitle tab 3 Click Add Edit Subtitles to open the ...

Страница 75: ...here you want the segment to start Do the same process for the End field to specify where you want the segment to end Tips You can modify the start and end points of the subtitle segment by Using the Jog Bar and the Set start end time buttons in the Navigation Panel of the Preview Window Pressing F3 for start time and F4 for end time while playing back the video 6 To add a new subtitle segment sel...

Страница 76: ...subtitle track to your title Tip To delete a subtitle track select a subtitle track in Current track then click Delete current track Specifying Language Settings and Characteristics Just like audio tracks you can specify a subtitle track s language and its characteristics Characteristics can be displayed in some DVD players that support this feature To set a subtitle s language and characteristics...

Страница 77: ...le in File name 3 Select the subtitle properties you want to include in the text file under Options 4 Click OK Text format Allows you to change the type size and style of the text as well as add borders and change the alignment Text color and transparency Allows you to assign colors for the text face border and background using the Color Palette Drag the sliders to control the transparency of the ...

Страница 78: ...dditional subtitle tracks in the Title List 2 Click the Subtitle tab in the Options Panel then click Add Edit Subtitles 3 Click Add subtitle from metadata in the Add Edit Subtitles dialog box 4 In the Add Subtitle DV EXIF Information dialog box select the information you want to include in the subtitle 5 Specify how long the subtitle is displayed in Duration then click OK 6 Click OK to apply the s...

Страница 79: ......

Страница 80: ......

Страница 81: ...te your project What are menus Think of menus as the video equivalent of a book s table of contents They are divided into sections called chapters Like books DVDs feature menus based on titles and chapters These menus allow users to instantly access specific portions of the video In DVD Workshop you can create your own menu or choose from a selection of ready to use templates Add flair to your men...

Страница 82: ...o drawing on a blank piece of paper All menu elements need to be added manually You can add buttons titles and objects by dragging them from the Library Title List or Chapter List to the Preview Window Create Menu Template Create Menu Template allows you to choose from a list of preset menu templates that you can use for creating menus The menu background thumbnail placeholders and buttons are alr...

Страница 83: ...zed when you use them in your menus 1 Click Create menu from wizard above the Menu List 2 In the Select Title dialog box select the title in the Titles in current project list then click Add Click Next Tip Click Add all to automatically add all the titles to the Selected titles list 3 In the Select Menu Template dialog box select the title that you want to create a menu for in Select title track 4...

Страница 84: ...holders Buttons Buttons are menu objects that have associated links Through these buttons viewers can play back a video navigate within the menus or access chapters in the video The Preview Window The Preview Window acts as your workspace for creating your menu You can drag items from the Library or Content Window to the Preview Window Additional commands are also available when you right click th...

Страница 85: ... volume of the audio track as it starts ends playing Loop audio Repeats the audio track to match the duration of the video slideshow during playback Still menu time out period DVD Enter how much idle time must pass before the specified button in After loop Time out button automatically plays This option is only available if the menu does not contain a motion background motion buttons and backgroun...

Страница 86: ...me out button VCD SVCD Select which button to activate when the time specified in Menu time out period elapses Button tab This tab displays various options that you can use to edit the attributes of your buttons Style DVD Apply color mapping Select whether to apply the state colors to either the frame placeholder or to both objects This option is only available when a frame is applied to the butto...

Страница 87: ...otation Drag the slider or enter a value to rotate a button Add Shadow Select to apply a shadow to the button Clear to remove the shadow Shadow color Select from eight pre defined shadow colors and apply them on a button Click the large color box to select from a wider color range Soft edge Set the smoothness of the shadow s edges A higher value specified means softer edges Transparency Set the op...

Страница 88: ...w Link Select to enable the Playlist of the selected button Default Highlight Button Select to assign the button as the default whenever the menu is displayed There are various frame presets that you can add to your buttons To add a frame drag a frame from the Library to the object in your menu You can only apply a single frame to an object To add a frame Drag a frame preset from the Options Panel...

Страница 89: ...ns a different subtitle and or audio track to the selected play item Add Play all titles Adds all titles in the Title List to the Playlist Add start and end loop points DVD Automatically repeats the sequence of play items The loop start point can be inserted anywhere in the Playlist Window as long as it has at least one play item to repeat Playlist Window Displays the play items included in the Pl...

Страница 90: ... object or a button You can also drag buttons from the Library to the Preview Window Replacing an existing button object Drag an image or button template from the Library to an existing button to replace the button image The button link is unchanged with the replacement Replacing an existing button s link Drag a title or menu from the Content Window to an existing button in the menu Adding a text ...

Страница 91: ...bject Take note that the top right handle is used for rotating objects and not for resizing them Rotating objects buttons Select an object then drag the rotate top right handle to rotate the object You can also enter a value or use the slider in the Button tab in the Options Panel under Attributes Aligning objects buttons Select the objects that you want to align then right click one of them Choos...

Страница 92: ...nformation and guides Click any of the four buttons on the upper right corner section above the Menu List to help guide you and show link information when editing you menus Show Hide Highlight Images Toggles between showing and hiding inserted highlight images in the Preview Window Show Hide Button Information Toggles between showing and hiding link information for each button Note The information...

Страница 93: ...ck Move up Move down to rearrange the sequence of play items Looping the playlist Select a play item in the Playlist Window then click Start and end loop points The loop will start from the play item you selected Select Loop start point in the Playlist Window then click Move up Move down to move the loop start point to another position Assigning tracks Select a play item in the Playlist Window the...

Страница 94: ...s you to preview your motion menu and buttons in real time by clicking Play in the Navigation Panel To create motion menus drag video files from the Library to the Preview Window then select Motion Background and Motion Button in the Menu and Button tabs see Editing your menus on page 90 ...

Страница 95: ......

Страница 96: ......

Страница 97: ...age file and creating a master copy to write onto a Digital Linear Tape for mass reproduction The Preview Window The Preview Window displays the title menu or chapter you select using the Remote Control The default aspect ratio of the Preview Window is 16 9 widescreen TV Your titles will be displayed according to the preferences you set in the Output Display Options dialog box see Output Display O...

Страница 98: ...le 3 Timecode Displays how many hours minutes seconds into the clip the current frame in the Preview Window appears 4 Play Pause Toggles between playing back your project and temporarily stop ping the playback of your title 5 Stop Ends project playback 6 Go to Previous Menu Goes to the previous menu 7 Go to Next Menu Goes to the next menu 8 Direction buttons DVD Use it to navigate through a menu p...

Страница 99: ...ew a project Click Play on the Remote Control to preview your menu and your video Use the different buttons available on the Remote Control to preview your project Disc templates Disc templates are preset output settings for your projects Based on preferences when creating a new project DVD Workshop provides preset templates that you can use You can also create several versions of a single project...

Страница 100: ...olders and a disc image file You can also use this option to adjust the settings of your burner The Burn tab The Burn tab allows you to do three things with your project Burn your project directly onto a disc if you have a disc burner installed Create DVD folders where you can organize your DVD files This allows you to view your DVD using a DVD player in your computer Create disc image file which ...

Страница 101: ...roject is in DVD format This also allows you to view the finished DVD title on the computer using a DVD player Create disc image file Select to retain a disc image file on your hard drive after burning This is recommended if you plan to burn multiple copies of your video Disc burner Determine the settings to use for your burner Drive Select a disc burner drive About Click to open a dialog box wher...

Страница 102: ...enough to send data to the burner device at the specified write speed If your burning device has Buffer Underrun Protection and it is enabled you can clear Perform writing test before burning to save time when burning Buffer underrun protection Select to ensure an uninterrupted flow of data to minimize the risk of error in the burning process This option is only enabled if your burning device has ...

Страница 103: ...roprietary intellectual property rights of Macrovision Corporation of Santa Clara California U S A and users require a usage agreement with Macrovision Corporation before analog protection system activation bits are set to on Region code Select to specify regional codes for your DVD Most DVD players are given a code of the region in which they are sold Such players will not play discs that are not...

Страница 104: ...ies of your project at any time Burn Disc Image or DVD Folder is used to burn a disc image file or DVD folder Disc image Select to burn an existing disc image file onto a disc DVD folder Select to burn an existing DVD folder VIDEO_TS folder onto a disc Volume name Enter a volume label for the disc Disc image path Browse for the location of the disc image file or the DVD folder Note Please refer to...

Страница 105: ...e burning process Writing to a Digital Linear Tape Digital Linear Tape DLT is the industry standard master tape used for mass replication of DVDs The Ulead DLT Writer allows you to write on a DLT using DVD 5 one layer on one side or DVD 9 two layers on one side format You can also use advanced replication features such as CSS copy protection and regional coding The Ulead DLT Writer options DLT dev...

Страница 106: ...area which bridges the point where the first layer ends and the second layer starts The second layer is read from the outside of the disc to the inside If you are using a single layer disc DVD specification still allows you to select a track path but the DVD mastering plant will ignore it If you are creating two different versions of a movie such as a widescreen and a pan scan version on the same ...

Страница 107: ... Select to adjust the split point to the nearest cell boundary For seamless playback the split point should be set in an ECC block boundary equal to 16 DVD blocks a block is equal to 2048 bytes DLT Writer prompts the user if no suitable cell boundary can be found Either the original split point is kept or a newly found cell boundary will replace the old one The default split point value is 130310 ...

Страница 108: ...T writer in DLT device and enter the DVD disc image file or DVD Video folder path in ISO image file 4 Under DDPID information select the DVD specification for content the type of DVD media to be used the track path and minimum readout rate for the final disc 5 Select Apply CSS to prevent users from easily copying your DVD 6 If your disc image file is larger than 4 4GB select Use DVD 9 to output DV...

Страница 109: ......

Страница 110: ......

Страница 111: ... 1 United States of America Canada 2 Europe Japan South Africa Middle East 3 Korea Taiwan Hong Kong Singapore Malaysia Indonesia 4 Australia New Zealand Central and South America 5 India Africa 6 Mainland China 7 Reserved 8 Special International Venues Airplanes Cruise Ships etc ...

Страница 112: ...e software to your system drive usually C and store captured videos in your other drive usually D Make sure DMA is enabled Go to Control Panel then select System Device Manager Select IDE controller Primary Secondary Advanced then select DMA on each of your drive Note To access Device Manager in Windows XP open the Control Panel then select Performance and Maintenance Click System to open the Syst...

Страница 113: ...nge under Virtual Memory Direct Memory Access DMA is a method of transporting data from the system s main memory without passing through the CPU It is useful when making direct back ups while doing real time capturing Write Behind Caching otherwise known as copy back caching is a technique wherein revisions to the content of the data in the special high speed storage mechanism aren t copied to the...

Страница 114: ...a title that is used in creating menus and serves as a movie s key frame or entry point Create Menu Blank A menu type that allows you to create your own menu page giving you con trol over all the necessary elements of a menu such as background images and buttons You can design your own menu from scratch or choose attributes from available presets Create Menu Template A menu template type that allo...

Страница 115: ...deo stream coded without any reference to any other frames This means that the quality of the file although better will be much larger Image A picture file or graphic equivalent to a single frame of video Link The process of assigning a command or attribute to an object to make it func tional Linking an object to a command makes it possible for the object to per form a specific task such as openin...

Страница 116: ...o This is done focusing on certain elements of the picture that can fit the desired aspect ratio at any one time Playlist A sequence of play item linked to a menu button When a menu button is selected these play item will run according to their arrangement in the playlist Split by Scene A command which is applicable to cap tured DV AVI files in the Library This automatically splits a single video ...

Страница 117: ......

Страница 118: ......

Страница 119: ...ion Shortcut Key Play Pause Enter Stop S Play preview range mark in mark out Space Previous edit point Page Up Previous frame Left Arrow Next frame Right Arrow Next edit point Page Down Repeat R Mark in F3 Mark out F4 Home Home End End Automatically add chapters Alt A Add chapter A Cut title Alt C Add current frame to Library F8 ...

Страница 120: ...ht Arrow Next subtitle segment Page Down Repeat R Set subtitle segment start time F3 Set subtitle segment end time F4 Home Home End End Function Shortcut Key Play button for motion menu Enter Create Menu Blank Alt B Create Menu Template Alt T Create Menu Wizard Alt W Show Hide button information Alt I Show Hide highlight images Alt H Show Hide object boundaries Alt O Show hide grid lines Alt G ...

Страница 121: ... Step Remote Control Function Shortcut Key Play Pause Space Stop S Previous Page Up Next Page Down Menu M Top Menu T Up Up Arrow Down Down Arrow Left Left Arrow Right Right Arrow Enter Enter Return R 10 1 1 2 2 3 3 4 4 5 5 6 6 7 7 8 8 9 9 0 0 ...

Страница 122: ...122 ULEAD DVD WORKSHOP USER GUIDE Global Settings Function Shortcut Key Project Properties Alt Enter Preferences F6 Undo Ctrl Z Redo Ctrl Y Save Ctrl S Save As Ctrl E Help F1 ...

Страница 123: ......

Страница 124: ......

Страница 125: ...ing objects buttons 91 Assigning tracks 93 Audio and Subtitles 72 Audio Library 27 Audio Panel 19 Audio tab 19 55 56 Audio tracks 56 Specifying Language Settings and Characteristics 73 Audio Subtitle 21 Auto activate 89 Auto Add Chapters 53 Automatically inserting scenes to the Chapter List 71 B Background Music 54 85 Brightness 87 Burn Disc Image or DVD Folder 99 104 Disc image 104 Disc image pat...

Страница 126: ...Options 40 Capture Step Options Panel 18 39 Capture Video Stop Capture 40 Capturing analog video 41 Capturing Digital Video DV 40 Capturing from a TV Tuner 44 Capturing still images 43 Capturing using Split by Scene 45 Change Capture Plug in 39 Changing text attributes 77 Chapter List 17 26 Chapters 57 Clip duration 55 Color Mapping 86 90 Content Window 16 23 Contrast 87 Convert to Disc Template 5...

Страница 127: ...utes for menu buttons 92 F Fade in Fade out 54 55 56 61 85 Finish 15 97 Format 39 Frame 88 Frame Library 27 G Global Commands Bar 16 17 Global Settings 17 Burn Disc Image or DVD Folder 18 Disc Template Manager 17 Library Manager 18 Preferences 17 Project Properties 17 Write Disc Image to DLT 18 Group of Pictures 70 H Highlight Image Library 27 I I frames 70 Image Library 27 Image tab 19 54 Import ...

Страница 128: ...Move down 89 Move up 89 Moving objects buttons 91 N Navigation Panel 16 19 O Object Library 27 Objects 83 Opening an existing project 36 Options 39 Options Panel 16 18 Output Display Options 68 Display aspect ratio 68 On standard TV 68 Both letterbox and pan scan 68 Letterbox only 68 Pan Scan only 68 On widescreen TV 69 As Is 69 Keep aspect ratio 69 Keep aspect ratio no pillar box 69 Source is let...

Страница 129: ... track 56 Remove item 89 Removing play items 93 Renaming titles 66 Renumber all buttons 89 Replace Background Music 54 61 Replacing the audio track of a title 66 Resizing objects buttons 91 Rotate 55 Rotating objects buttons 91 Rotation 87 S Save or Save As Package 17 Saving your project as a new file 32 Saving to a text file 77 Saving your projects 31 Scenes dialog box 63 Select Device Control 39...

Страница 130: ...4 Trimming titles or audio clips 64 TV channel 39 U Ulead DLT Writer 105 Ulead DLT Writer options 105 Align split point to cell boundary 107 CSS 106 DDPID information 106 DVD book version 106 DVD part version 106 DVD 9 107 Header format 107 Minimum readout rate 106 Output control data 107 Output DDP data 107 Region code 106 Rewind after writing 108 Split point between layers for DVD 9 107 Track pa...

Страница 131: ...UIDE 131 Working with audio tracks 73 Working with chapters 70 Working with subtitles 74 Working with titles 57 Write Disc Image to DLT 99 Writing to a Digital Linear Tape 105 Writing to Digital Linear Tape 108 X X Y offset 87 ...

Страница 132: ...NOTES ...

Страница 133: ...NOTES ...

Страница 134: ...NOTES ...

Страница 135: ...NOTES ...

Страница 136: ...NOTES ...

Отзывы: