


18
Chapter 5: Device Tab
TOUGHSwitch
™
PoE User Guide
Ubiquiti Networks, Inc.
Total Throughput
for
TX
and
RX
are also displayed.
Place your mouse over a port to view its
PoE
status,
Speed
setting, duplex mode, and statistics for
TX
and
RX
throughput.
Revert Changes
To cancel your changes, click
Revert
Changes
.
Test Changes
To try the changes without saving them,
click
Test Changes
. To keep the changes, click
Apply
. If
you do not click
Apply
within 180 seconds (the countdown
is displayed), the device times out and resumes its earlier
configuration.
Save Changes
To immediately save your changes, click
Save Changes
.
Firmware Update
This section manages the firmware maintenance.
Firmware Version
Displays the current firmware version.
Build Number
Displays the build number of the firmware
version.
Check for Updates
By default, the firmware automatically
checks for updates. To manually check for an update, click
Check Now
.
Update Firmware
The TOUGHSwitch firmware update
is compatible with all configuration settings. The system
configuration is preserved while the TOUGHSwitch is
updated with a new firmware version. However, we
recommend that you click
Download
in the
Configuration
Management
section to back up your current system
configuration before updating the firmware.
Updating the firmware is a three-step procedure:
1. Click
Choose File
to locate the new firmware file. Select
the file and click
Open
.
2. Click
Upload
to upload the new firmware to the
TOUGHSwitch.
3. The
Uploaded Firmware Version
is displayed. Click
Update
to confirm.
If the firmware update is in process, you can close the
firmware update window, but this does not cancel the
firmware update. Please be patient, as the firmware
update routine can take three to seven minutes. You
cannot access the TOUGHSwitch until the firmware update
routine is completed.
WARNING:
Do not power off, do not reboot, and do
not disconnect the TOUGHSwitch from the power
supply during the firmware update process as
these actions will damage the TOUGHSwitch!
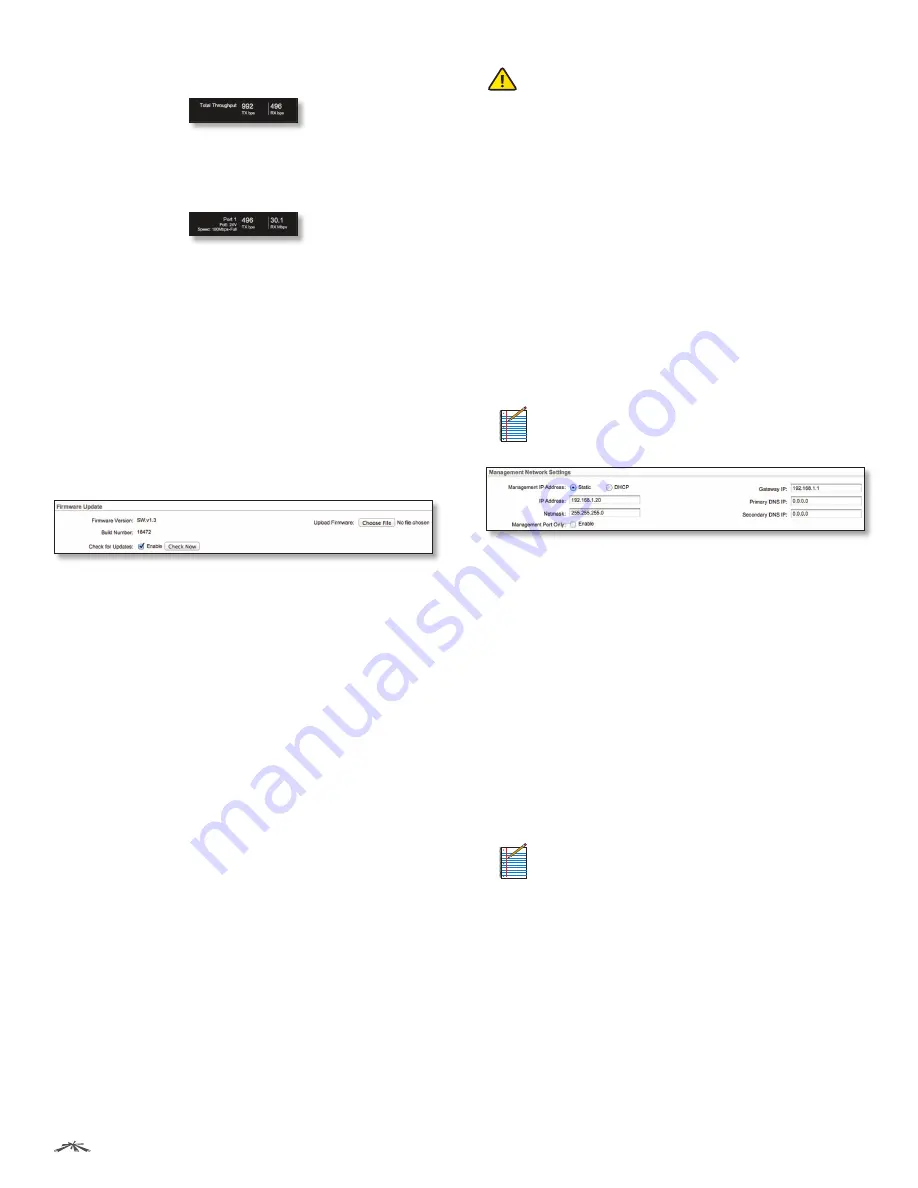
Management Network Settings
The
Management Network Settings
configure the IP
settings and management access of the TOUGHSwitch.
Because the TOUGHSwitch is a Layer 2 device, the
IP
Address
and
Netmask
are not mandatory; however, if you
want to manage the TOUGHSwitch, then you will need to
configure the
IP Address
and
Netmask
unless you select
DHCP
.
Management IP Address
The TOUGHSwitch can use a
static IP address or obtain an IP address from its DHCP
server.
•
Static
Assign static IP settings to the TOUGHSwitch.
Note:
IP settings should be consistent with the
address space of the TOUGHSwitch’s network
segment.
-
IP Address
Specify the IP address of the
TOUGHSwitch. This IP will be used for device
management purposes. The default is
192.168.1.20
.
-
Netmask
When the netmask is expanded into its
binary form, it provides a mapping to define which
portions of the IP address range are used for the
network devices and which portions are used for host
devices. The netmask defines the address space of
the TOUGHSwitch’s network segment. The default
255.255.255.0 (or “/24”) netmask is commonly used on
many Class C IP networks.
-
Management Port Only
By default, this option is
disabled and you can manage the TOUGHSwitch
through any port. To restrict management access to
only the
Management
port, check this box.
Note:
The
Management Port Only
option must be
disabled if you want traffic to flow between the
Management
port and numbered ports. Traffic
will be limited to 10/100 Mbps and, under heavy
load, may cause performance degradation of the
TOUGHSwitch.
-
Gateway IP
Typically, this is the IP address of the host
router, which provides the point of connection to the
Internet. This can be a DSL modem, cable modem,
or WISP gateway router. The TOUGHSwitch directs
packets to the gateway if the destination host is not
within the local network. The default is
192.168.1.1
.
-
Primary DNS IP
Specify the IP address of the primary
DNS (Domain Name System) server.


