background image

28

29

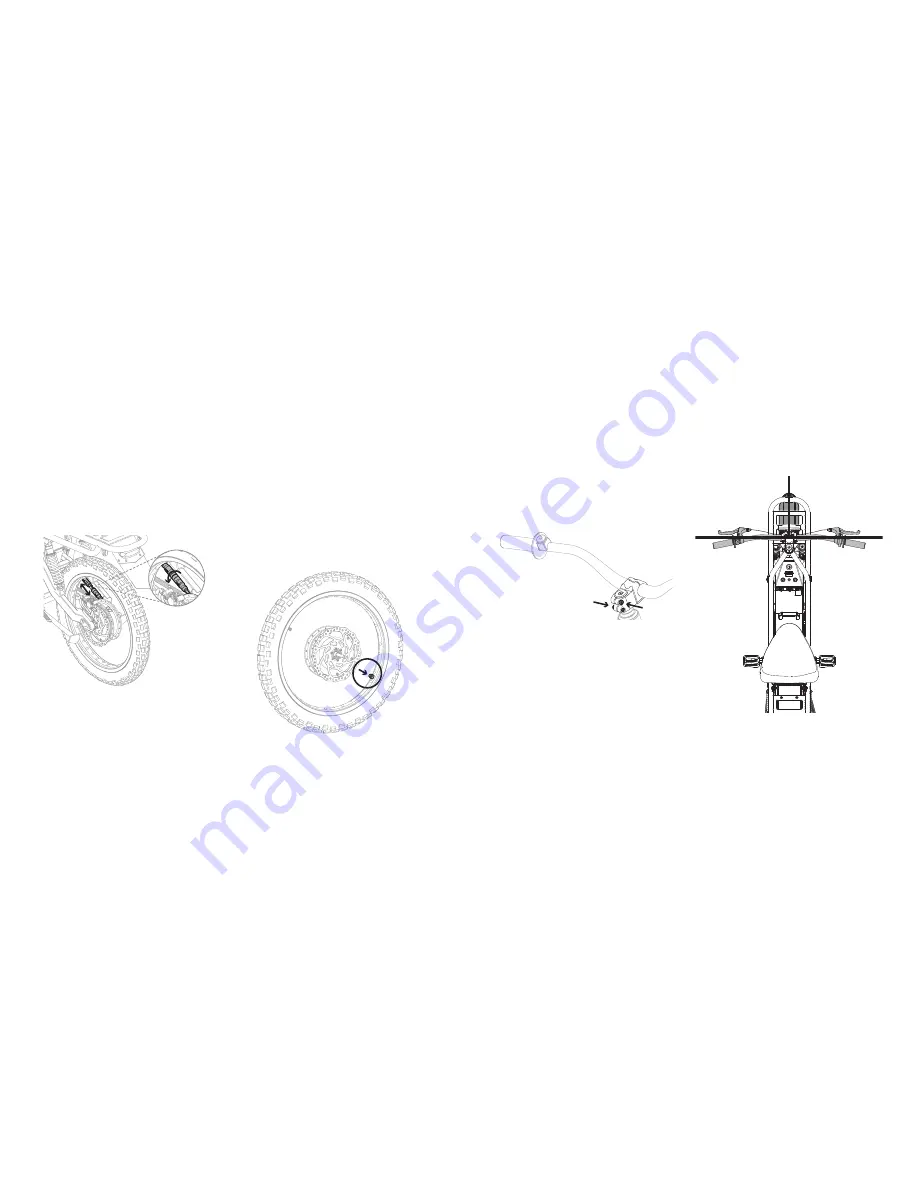
Step 14: Rim Lock

The wheels include a rim lock, which helps keep 
the tyre securely on the rim. 
Check the tension on the M8 nut installed on the 
threaded bolt on the inside face of the rim, directly 
opposite the tyre valve. It should be tight against 
the rim. 
Do not over-tighten the rim lock, as this can cause 
distortion to the rim.

b.

a.

Step 13:

Rear Motor:

Repeat Step 12b to connect rear motor cables.

Step 15: Steering Alignment

a.

 Locate the side bolts that hold the handlebars 

on the stem. Loosen them enough to allow the 
handlebars to rotate without turning the wheel. 

b.

 Sitting on the bike, align the handlebars so 

they are perpendicular to the wheel. Once the 
handlebars are aligned, tighten the two bolts 
slowly, alternating between the left side and 
the right side; tighten to the setting specified 
on the headset. 

Note: 

Tightening the bolt on one side fully before 

tightening the other side can damage the threads 
and put strain on the bolts.

Proper alignment:

Содержание 2X2

Страница 1: ...2 2 USER MANUAL ASSEMBLY GUIDE...

Страница 2: ...er manual carefully it outlines everything you will need to know when owning an Ubco 2 2 Pay special attention to the safety messages that appear throughout the manual This manual should be considered...

Страница 3: ...eflective or bright clothing Wear gloves to protect yourself from knocks and scrapes Wear eye protection to protect yourself from branches stones and any other external elements Riders We recommended...

Страница 4: ...we do not advise you ride on public roads Battery safety The Lithium Ion battery and charger are designed to work exclusively with the 2 2 Do not attempt to use any battery or charger other than thos...

Страница 5: ...att wall or bench mount Charge time standard 6 8 hours 100 charged Input Standard 110V or 240V DRIVETRAIN Transmission Single Stage Planetary Gear Reduction CHASSIS SUSPENSION BRAKES Front suspension...

Страница 6: ...icle and headlight Controls include Twist throttle Horn Front and rear brake levers 04 Console The front console houses the brains of the bike Key ignition switch turns the bike on and off Battery lev...

Страница 7: ...not attempt to charge the battery with anything other than the supplied charger The battery is interchangeable and can be removed from the bike simply by unlatching unplugging and lifting with care T...

Страница 8: ...er 2 Battery Strap 3 Seat 4 Ubco 2 2 Frame 5 Throttle Front Brake Calliper 6 Headlight 7 Handlebars 8 Front Forks 9 Foot Pegs 10 Front Carrier 11 Mud Guard 12 Kick Stands Not Shown Fasteners attached...

Страница 9: ...ing brake levers while callipers have no disc rotor between them can damage the brakes Top Cap with fastening bolt Head Tube Fork Bridge Steering Tube Bearing Cap Steering Tube Compression Ring Spacer...

Страница 10: ...e grip onto the right hand side of the handlebar ensuring the handlebar does not touch the end face of the grip Tighten the two fastening screws on the top of the throttle ensuring the throttle actuat...

Страница 11: ...plate on the head tube with M6 x 25 bolts and washers from above and M6 nuts and washers from below Step 4 Cable Tidy Up a Secure the front motor cable with a small tube clamp under carrier When faci...

Страница 12: ...e plates with fasteners in this order from the outside in M6 x 25mm bolt frame lug seat bush M6 washer seat lug M6 washer M6 nut Step 6 Foot Pegs Using M8 x 25mm bolts and M8 nuts install the foot peg...

Страница 13: ...ear Wheel TIP It is helpful to have a 10mm spanner on hand to help with aligning the motor axle with the dropout during wheel installation a Remove the brake calliper spacers from the rear brake calli...

Страница 14: ...ith aligning the motor axle with the dropout during installation a Remove the nut and hat washer from the axle on either side c Re install the hat washer onto the axle ensuring the flat face is facing...

Страница 15: ...e through the fork tube clamp Fix the clamp onto the fork using one M6 x 20mm bolt two M6 washers and one M6 nut b Plug the two ends of cable together ensuring they are correctly aligned Screw the two...

Страница 16: ...nect rear motor cables Step 15 Steering Alignment a Locate the side bolts that hold the handlebars on the stem Loosen them enough to allow the handlebars to rotate without turning the wheel b Sitting...

Страница 17: ...d so that it lies flat on top of the battery keeping the clip close to the left hand bar Ensure battery is tightly secured Final Checklist F F Turn the bike on to check battery level The battery level...

Страница 18: ...heck they are operational F F Check for any loose nuts bolts and or fixings General Riding Do not wheely or jump the bike This can damage the hub motors causing gear shock when the motor accelerates r...

Страница 19: ...installed or uninstalled from the bike The battery meter is an approximation of the battery life remaining The lights will flash or the display will delay if the charge is too low How to charge the ba...

Страница 20: ...battery outside of this temperature range could damage your battery or effect performance and life span Store the battery in a cool place indoors Due to a low fire risk always charge the battery in a...

Страница 21: ...ter display will illuminate on the console of the bike and you are good to go Position 1 OFF Position 2 ACC the low current accessories are now active lights horn USB port and 12V outlet Position 3 RU...

Страница 22: ...cool the brakes For recommended load limits and riding gradients see Section 01 Safety Slow Fast Adjustable Suspension Front The front forks have adjustable rebound dampening control that controls the...

Страница 23: ...ug is clean and connected Check motor cable for damage Power Surge Protection _ _ Long short long short Turn key off then on Throttle Communication Fault _ _ Long short long 3 short Contact your servi...

Страница 24: ...nd tools When out and about you are able to charge your hand held devices and tools via outlets on the console of the bike Be aware that charging your tools and devices will drain your battery Turn th...

Страница 25: ...a full service every 6 months A small fee may apply A full listing of certified dealers is available online ubcobikes com support Cleaning Do Clean your 2 2 after each day of use especially when expos...

Страница 26: ...is temperature range could damage your battery or effect performance and life span Store the battery in a cool place indoors Due to a low fire risk always charge the battery in a non flammable environ...

Страница 27: ...otor In extreme stress they may be damaged in order to protect the motor s integrity The motor warning light will provide an indicator if something has malfunctioned Please contact your service provid...

Страница 28: ...he defect and or to quote serial numbers from defective parts where visible You must allow an Ubco Representative or your dealer to inspect the bike for the purpose of assessing your warranty claim If...

Страница 29: ...6530 Bethlehem Tauranga 3147 New Zealand Physical Address 25b Nature Place Greerton Tauranga New Zealand Contact Us ubcobikes com info ubcobikes com 0800 UBCO 2X2 Social Media fb com ubcobikes ubcobik...

Отзывы: