10
III. PACKAGED BOILER ASSEmBLy - TRIm AND CONTROLS
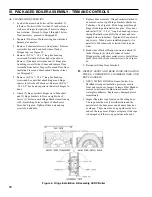
Figure 4: Hinge Installation & Assembly, LEDV Boiler
A.
CHANGE HINGE POSITION
1. Look at the area where boiler will be installed. If
left side of boiler will be less than 12 inches from a
wall, move hinges to right side of boiler to change
door rotation. Proceed to Steps 2 through 9 below.
If not necessary, proceed to Paragraph B.
2. Separate (2) halves of burner swing door interlock
harness at connector.
3. Remove 8 sheet metal screws from jacket. Remove
rear jacket box and bend both sides of Jacket
Wrapper up, see Figure 30.
4. Remove (2) 5/16" - 18 x 3" long hex head cap
screws and flatwashers from right side of door.
Remove (2) hairpin cotter pins and (2) hinge pins
from hinges on left side of door and remove Door
Assembly from boiler. Inspect Front and Rear Door
Insulation Pieces and Combustion Chamber Liner,
see Paragraph C.
5. Remove (4) 5/16" - 18 x 1" long hex head cap
screws and hex nuts that attach hinges and hinge
spacers to left side of Tubesheet. Remove (4) 5/16"
- 18 x 1/2" hex head cap screws that attach hinges to
door.
6. Attach (2) hinge brackets & spacers to Tubesheet
and (2) hinge brackets to Door on right side of
boiler. (3) Holes in each Hinge Bracket must line up
with (3) matching holes in Spacer, Tubesheet or
Door. See Figure 4. Tighten all hex nuts and cap
screws by hand only.
7. Replace door assembly. Hinge brackets attached to
door must rest on top of hinge brackets attached to
Tubesheet. See Figure 4. Slide hinge pins through
hinges from top and install cotter pins. Close door
and install 5/16" - 18 x 3" long hex head cap screws
through flatwashers and left side of door and into
tapped holes in tubesheet. Tighten all hex nuts and
cap screws. When door is installed properly, it is
parallel to Tubesheet when viewed from top and
sides.
8. Bend sides of Jacket Wrapper down and attach (2)
Jacket Straps to (4) slots at bottom of Jacket
Wrapper sides with sheet metal screws. Install Rear
Jacket Box with (4) sheet metal screws. See Figure
30.
9. Reconnect Swing Door Interlock.
B.
INSPECT FRONT AND REAR DOOR INSULATION
PIECES, COMBUSTION CHAMBER LINER AND
ROPE GASKETS.
1. OPEN SWING DOOR on front of boiler. Use
flashlight to inspect insulation pieces secured to
front and rear doors. Inspect Ceramic Fiber Blanket
secured to bottom of combustion chamber with
water glass adhesive. Replace any damaged pieces
immediately.
2. Inspect fiberglass rope located on the swing door.
The rope must be evenly distributed around the
perimeter of the door groove and cannot bunch or
overhang. There must not be a gap where the two
ends of the rope meet. Repair or replace if the rope
is damaged or if there is a gap between the ends.
Содержание LE DV Series
Страница 5: ...5 I General Information Figure 1A LEDV Packaged Water Boiler with Beckett AFII Burner ...
Страница 6: ...6 I General Information continued Figure 1B LEDV Packaged Water Boiler with Riello BF Burner ...
Страница 19: ...19 v venting continued Figure 11 Vent Installation Figure 12 Vent Connector Un Assembled ...
Страница 20: ...20 v venting continued Figure 13 Vent Connector Assembled Figure 14 Air Intake Installation ...
Страница 48: ...48 xiii Repair Parts continued Figure 29 LEDV Bare Boiler Assembly ...
Страница 50: ...50 xiii Repair Parts continued Figure 30 LEDV Boiler Jacket Insulation ...
Страница 55: ...55 xiii Repair Parts continued Figure 33 Vent Kit Repair Parts ...
Страница 60: ...60 U S Boiler Company Inc P O Box 3020 Lancaster PA 17604 1 888 432 8887 www usboiler net ...

