background image

u-line.com

1


General Information

NOTICE

• PLEASE READ all instructions before installing, 

operating, or servicing the appliance.

• Proper installation procedures must be followed when 

completing an installation or relocation of a unit. An 
INSTALLATION GUIDE for the unit, providing complete 
installation information, is available from U-Line 
Corporation direct. Consult the installation guide before 
any installation begins. U-Line contact information 
appears on the rear cover of this guide.

• This unit requires connection to a dedicated 15 Amp 

grounded (three-prong), polarized receptacle, installed by 
a qualified electrician, compliant with applicable electrical 
codes.

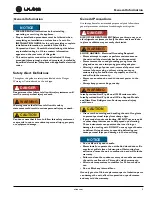
Safety Alert Definitions

Throughout this guide are safety items labeled with a Danger, 
Warning or Caution based on the risk type:

DANGER

!

Danger means that failure to follow this safety statement will 
result in severe personal injury or death.

WARNING

!

Warning means that failure to follow this safety 
statement could result in serious personal injury or death.

CAUTION

!

Caution means that failure to follow this safety statement 
may result in minor or moderate personal injury, property 
or equipment damage.

General Precautions

Use this appliance for its intended purpose only and follow these 
general precautions with those listed throughout this guide:

DANGER

!

RISK OF CHILD ENTRAPMENT. Before you throw away your 
old refrigerator or freezer, take off the doors and leave shelves 
in place so children may not easily climb inside.

WARNING

!

SHOCK HAZARD - Electrical Grounding Required.
• Never attempt to repair or perform maintenance on 

the unit until the electricity has been disconnected.

• Never remove the round grounding prong from the 

plug and never use a two-prong grounding adapter.

• Altering, cutting of power cord, removal of power cord, 

removal of power plug, or direct wiring can cause 
serious injury, fire and/or loss of property and/or life, 
and will void the warranty.

• Never use an extension cord to connect power to the 

unit.

• Always keep your working area dry.

WARNING

!

Install provided Anti-Tip kit on all 3000 series models.  
Install provided Anti-Tip kit on all Wine Captain Models 
and Glass Door Refrigerators. Serious personal injury 
could occur.

CAUTION

!

• Use care when moving and handling the unit. Use gloves 

to prevent personal injury from sharp edges.

• If your model requires defrosting, DO NOT use an ice pick 

or other sharp instrument to help speed up defrosting. 
These instruments can puncture the inner lining or 
damage the cooling unit. DO NOT use any type of heater 
to defrost. Using a heater to speed up defrosting can 
cause personal injury and damage to the inner lining.

NOTICE

• Do not lift unit by door handle.
• Never install or operate the unit behind closed doors. Be 

sure front grille is free of obstruction. Obstructing free 
airflow can cause the unit to malfunction and will void the 
warranty.

• Failure to clean the condenser every six months can cause 

the unit to malfunction. This could void the warranty.

• Allow unit temperature to stabilize for 24 hours before 

use.

• Do not Block any internal Fans.

Use only genuine U-Line replacement parts. Imitation parts 
can damage the unit, affect its operation or performance 
and may void the warranty.

General Information

Содержание U-3018RFOL-00

Страница 1: ...U 3024RGLOL 01 U 3018RGLOL 00 U 3018WCS 15 U 3024RGLS 00 U 3018RGLOL 01 U 3024BEVOL 00 U 3024RGLS 01 U 3018RGLS 00 U 3024BEVOL 01 U 3024WCOL 00 U 3018RGLS 01 U 3024BEVS 00 U 3024WCOL 01 U 3018RGLS 13...

Страница 2: ...pump both the unit and the drain pump regardless of the manufacturer must be returned to U Line To complete the damage claim process for the consumer please obtain the following information This info...

Страница 3: ...usting Temperature Settings 10 Interior Lighting 11 Error Notification 11 Customer Menu 11 Service Menu 13 USB Communication 18 Quick Guide 21 Convection Cooling 23 3000 Series Maintenance Leveling 24...

Страница 4: ...rical Grounding Required Never attempt to repair or perform maintenance on the unit until the electricity has been disconnected Never remove the round grounding prong from the plug and never use a two...

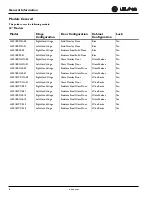
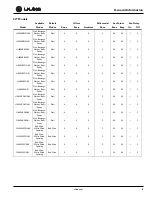
Страница 5: ...r Glass Shelves No U 3018RGLS 00 Right Hand Hinge Stainless Steel Glass Door Glass Shelves No U 3018RGLS 01 Left Hand Hinge Stainless Steel Glass Door Glass Shelves No U 3018WCOL 00 Right Hand Hinge G...

Страница 6: ...d Overlay Door Bins U 3024RFS 00 Right Hand Hinge Stainless Steel Solid Door Bins U 3024RFS 01 Left Hand Hinge Stainless Steel Solid Door Bins U 3024RGLOL 00 Right Hand Hinge Glass Overlay Door Glass...

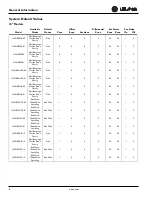
Страница 7: ...everage Market Root Pantry Deli 1 0 0 2 36 42 1 2 U 3018RGLS 00 Deli Beverage Market Root Pantry Deli 1 0 0 2 36 42 1 2 U 3018RGLS 01 Deli Beverage Market Root Pantry Deli 1 0 0 2 36 42 1 2 U 3018WCOL...

Страница 8: ...rket Root Pantry Deli 0 0 0 2 36 42 1 2 U 3024RFS 00 Deli Beverage Market Root Pantry Deli 0 0 0 2 36 42 1 2 U 3024RFS 01 Deli Beverage Market Root Pantry Deli 0 0 0 2 36 42 1 2 U 3024RGLOL 00 Deli Be...

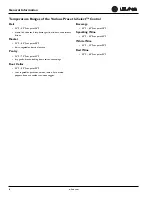
Страница 9: ...F set point 38 F fruits vegetables berries lettuce Pantry 34 F 70 F set point 42 F dry goods breads baking items spices seasonings Root Cellar 45 F 55 F set point 50 F root vegetables potatoes onions...

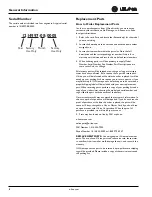
Страница 10: ...cluded If you work on more than one unit per service call please submit a separate claim for each unit U Line tracks all defects through warranty claims Please be specific on what repair was completed...

Страница 11: ...return a part or if you may field scrap it If U Line requires a defective part to be returned a prepaid shipping label will be included with your new replacement part When returning parts enclose a c...

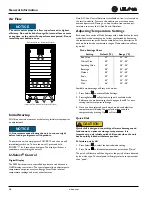
Страница 12: ...n and or element wear may make calibration necessary Calibration To calibrate a thermistor one must first prepare an ice water of crushed ice and water in a suitable container Allow the ice water temp...

Страница 13: ...series of Mode Settings with a default value for each mode Each mode setting can be further customized by fine tuning the temperature set point See the table below for a description of each mode and...

Страница 14: ...ct to Select Exit Actual Temps The Actual Temps option displays the offset corrected temperature of each zone evaporator as well as ambient temperature 1 To view actual temperatures first select Actua...

Страница 15: ...to select Off 3 Press Select Off will begin to flash 4 Use Up or Down to change Off to On 5 Press Select to Confirm your selection The display will fade out as the unit enters Sabbath mode Sabbath re...

Страница 16: ...o access the Help menu select Help from the Customer Menu Use Up or Down to scroll through available information The Help screen displays the following Model U Line contact information Software versio...

Страница 17: ...ost communication to the display Check display cable Replace if necessary Zone T Open Zone thermistor circuit open Check connection Replace if necessary Evap T Open Evaporator thermistor circuit open...

Страница 18: ...ugh available information To exit the Input Status menu use Up to select Return to Menu and press Select to confirm Outputs Outputs is used to monitor the state of DC outputs To access Outputs 1 Use D...

Страница 19: ...layed and the main control board is functioning properly If an error is listed attempt to correct it before changing control board See troubleshooting for tips on correcting errors To access Self Test...

Страница 20: ...ify customer service will result in voiding of the manufacturer warranty Call U Line Customer Service for assistance Re Select Model allows the unit s model configuration to be modified Changing the u...

Страница 21: ...amed uline csv on the flash disk In the event the file already exists new data will automatically be appended to the end of the existing file The file is output in a comma delineated text format and m...

Страница 22: ...Showroom Mode 2 Press Select 3 Use Down to select Off and press Select Off will begin to flash 4 Press Up or Down to toggle between off and on 5 Press Select to confirm If set to on showroom mode will...

Страница 23: ...plugged in 19 Relay 5 unassigned 5 active inactive 2 Temperature of Zone in F C 20 Relay 6 unassigned 6 active inactive 3 Not used 21 Compressor relay 7 active inactive 4 Not used 22 Evaporator fan 1...

Страница 24: ...018 3024 ADJUST MODES PRESS AND RELEASE TO SCROLL THROUGH THE MODES 4 3036 ADJUST TEMPERATURE PRESS TO SELECT ZONE PRESS TO SET THE TEMPERATURE 3018 3024 ADJUST TEMP PRESS TO SET THE TEMPERATURE 5 303...

Страница 25: ...CH AND HOLD TO EXIT SHOWROOM MODE SCROLL DOWN TO EXIT TOUCH AND RELEASE TO EXIT SERVICE MODE CONFIGURES THE ON BOARD USB PORT FOR FLASH DRIVE OR PC LINK DISPLAYS THE NUMBER OF TIMES AN ERROR HAS OCCUR...

Страница 26: ...ate of the door switch In order to operate efficiently the evaporator fan blade and vents should be unobstructed and free of any dust buildup Evaporator Fan Replacement Should the evaporator fan need...

Страница 27: ...grille lock screws See below 3 Gently pull grille away from unit until it stops 4 Push grille rails towards the center of the unit to lift rails off lock screws 5 Pull grille free from unit Installin...

Страница 28: ...over extend or damage it during door alignment Overlay Models Removing Overlay 1 Open door completely 2 Remove gasket 3 Remove six screws seated in gasket pocket Stainless Models Removing Wrap 1 Open...

Страница 29: ...d component should activate deactivate with the switching of the relay If it does not see Component Testing on page 27 Inputs The main control monitors a number of thermistor inputs and switch states...

Страница 30: ...ow is an example of how to properly test a component for functionality An evaporator fan is used Condition Customer complains of the unit not cooling properly The main screen of the display lists an e...

Страница 31: ...oblem Airflow through the grill below the door in front cannot be obstructed Also the unit cannot be installed behind a closed door or in a closet The unit is too cold or freezing product Control set...

Страница 32: ...er to Quick Chill Section of this manual Control set too cold Refer to Adjusting Temperature Settings Section of this manual Review logged error codes Refer to Fault System Diagnosis Guide Section of...

Страница 33: ...the compressor inlet The compressor takes the low pressure vapor and compresses it increasing both pressure and temperature The hot high pressure gas is pumped through the discharge line and into the...

Страница 34: ...he unit will rely on a preset defrost timer during defrost cycles The unit will otherwise operate normally Evaporator thermistor errors are hidden from the display and recorded in All Errors and displ...

Страница 35: ...rm Extremely cold near inlet outlet below room temperature Lower than normal Partial Restriction Somewhat lower than normal in vacuum Warm near room temperature Very hot Top passes warm lower passes c...

Страница 36: ...nts or damage Repair split or pinched cabling Amb Thrm Short Inspect thermistor cable for pinch points or damage Replace if necessary Inspect wire harness from main control board for pinch points or d...

Страница 37: ...Captain Models Combo Models Refrigerator Freezers Refrigerators Drawer Models and Beverage Centers The U Line brand offers products in the 1000 Series 2000 Series and the Modular 3000 Series The 1000...

Отзывы: