7
the Anti Lag Valve is home correctly while torqueing the nut to
not have a false torque as this will likely contribute to exhaust
leaks. Ensure O-Ring is in place on the inlet compressed air side
of the valve.
Connecting Your Anti lag valve
The Turbosmart Electronic Anti-lag valve comes
unterminated with 6, or 7 wires. A revision was made to include
the additional (Blue) wire for internal / development only
purposes.
Revision A
can be identified by its total of 6 wire
count, while
Revision B
can be identified by its total wire count
of 7.
Revision B (current)
– Wiring
Colour
Description
1 single core
wire each
Large Gauge Red
Motor A tending towards
0%
Large Gauge
Black
Motor B tending towards
100%
Multi Core
Wire
Red
5V
Black
Sensor ground 0V
White
Position Signal 0-5V
Blue
(Rev B Only)
*
Unfiltered
Signal (Position Output)
Yellow
(Orange
Rev A)
Temperature Signal 0-5V
*Note: The Blue (unfiltered position signal) is not required
for use & is for development purposes only.
Sensor Voltage Limits
Deg C (Deg F)
Temperature
Sensor
Output (mV) Rev A
Temperature
Sensor
Output (mV) Rev B
0 (32)
500
2630
150 (302)
2000
538
Position Sensor
Target Voltage (V)
Duty Cycle (Rev B
only)
100%
0.20-0.60V
~16%
0%
4.40-4.80V
~84%
CAUTION!
Turbosmart recommends calibrating the position sensor
before connecting the motor wires to your motor drive.
The two large wires are directly connected to the motor of the
anti-lag valve and need to be connected to high power drives in
a Full bridge configuration like that of an electronic throttle drive
circuit, see your ECU supplier documents for suitable
connections. Turbosmart recommends the anti-lag valve should
be driven by an External dual H-Bridge, that is at least 20A for
seamless operation.
Connect the small Red Wire to a 5V power source from your ECU
as well as the Black wire to Sensor ground. Connect the white
wire to a 0-5V analogue input on your ecu as well as the orange
temperature sensor signal. The blue wire (Revision B only) is an
unfiltered position output signal for development purposes - This
can be left unterminated.
CAUTION!
Whilst the temperature sensor is not required for operation,
it is recommended for activating failsafe protocols.
CAUTION!
Ensure all connections are high quality and away from any
heat source.
CAUTION!
It is important during the setup of the eGate, that some
precautions are taken to ensure that the unit does not
malfunction. Firstly, the output from the ECU should be
limited to 15%. As well as an inline fuse (5A-10A) or breaker
to protect the eGate. Once correct operation has been
verified the fuse and limits can be removed.
3
3
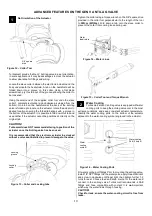
Figure 7
– Vee Band Clamp
Figure 8
– Exploded Drawing


