10
ADVANCED FEATURES ON THE GEN V ANTI LAG VALVE
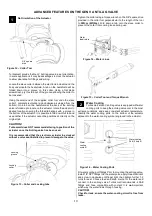
Re-Orientation of the Actuator
Turbosmart provide the Gen V Anti lag valve in a set orientation,
in some applications it may be advantages to clock the actuator
to allow clearance for fittings and wiring.
Locate the slave collar between the electronic actuator and the
body underneath the heatshield, A tab on the heatshield will be
folded down into a groove on this collar. Using a flat blade
screwdriver, pry this tab out of the groove allowing the collar to
be loosened.
Using the small end of the supplied collar tool undo the slave
collar 1 complete revolution (anti-clockwise as viewed from the
bottom). One tab on the heatshield at the back of the anti-lag
valve is folded up to locate on the actuator, rotate the actuator to
desired location ensuring the folded tab aligns with a groove in
the bottom of the actuator. It is possible to fold down this tab and
use another if the actuator cannot be positioned correctly on the
original tab.
CAUTION!
Turbosmart does NOT recommend altering to position of the
actuator once the Anti lag valve has been used.
It is recommended that the electronic actuator be clocked
without a valve seat installed to prevent damage to the valve.
Tighten the collar using a torque wrench on the 3/8” square drive
provided in the collar tool perpendicular to the length of the tool
to
30N.m (22ft/lbs).
Fold down a tab onto the slave collar to
prevent the collar from coming loose during use.
Water Cooling
Turbosmart’s Gen V anti lag valve is equipped with water
cooling ports to keep the anti-lag valve cool in the most
extreme conditions and keep consistent actuator temperature.
Identify the water cooling ports on the bottom of the actuator
adjacent to the water-cooling symbol engraved in the actuator.
Fit water-cooling port fittings Prior to mounting the anti-lag valve,
install 1/8” NPT fittings into the water ports, apply thread lubricant
and screw in clockwise until finger tight, then tighten further 1-2
turns for seal. Choose feed and drain source for the water and
connect to the anti-lag valve. Turbosmart recommends -4SAE
fittings and hose compatible with coolant. It is
not
important
which way the water flows through housing.
CAUTION!
Check for leak, ensure the water-cooling circuit is free from
leaks.
Water cooling
Port (2 holes)
1
3
2
3
Water
cooling
symbol
Locking
collar
Locking
groove
3/8” square
drive
Water
feed/return
Figure 12
– Collar Tool
Figure 14
– Water Lines
Figure 15
– Collar Tool and Torque Wrench
Figure 13
– Collar and Locking tabs
Figure 16
– Water Cooling Ports


