TruVision TVB-5412 Скачать руководство пользователя страница 67


TruVision ANPR IP Camera Configuration Manual 

65 

Storage settings 

Under Camera Configuration, use the Storage menu to set the desired parameters for 
the recording schedule, capturing and uploading snapshots, and managing storage.  
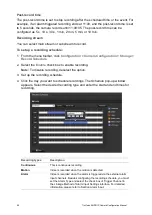
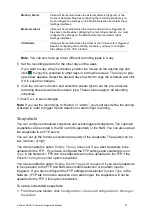
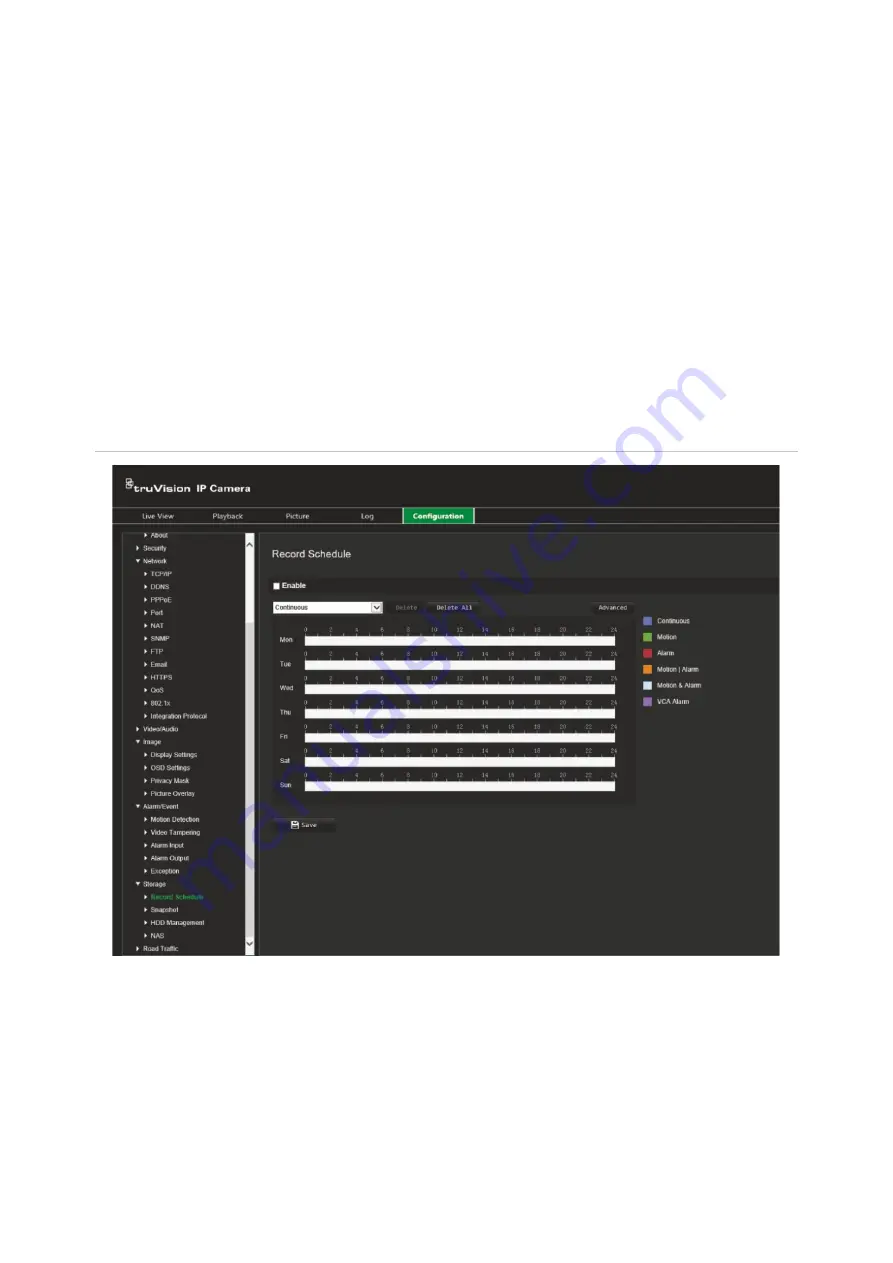
Recording schedule 

You can define a recording schedule for the camera in the “Record Schedule” window. 
The recording is saved on to the SD card or NAS in the camera. The camera’s SD card 
provides a backup in case of network failure. The SD card is not provided with the 
camera. 

The selected recording schedule applies to all alarm types. 

Figure 11: Recording schedule window 


Pre-record time 

The pre-record time is set to start recording before the scheduled time or event. For 
example, if an alarm triggers a recording at 10:00, and the pre-record time is set to 5 
seconds, the camera starts to record at 9:59:55. The pre-record time can be configured 
as No Pre-record, 5 s, 10 s, 15 s, 20 s, 25 s, 30 s, or Not Limited. 

Содержание TVB-5412

Страница 1: ...TruVision ANPR IP Camera Configuration Manual P N 1073573 EN REV B ISS 01JUN21...

Страница 2: ...patents TruVision names and logos are a product brand of Aritech a part of Carrier Other trade names used in this document may be trademarks or registered trademarks of the manufacturers or vendors of...

Страница 3: ...erview 13 Configuration menu overview 13 Local configuration 16 System settings 18 Basic information 18 Time settings 19 RS 485 settings 20 Maintenance and firmware upgrade 21 About 24 Security settin...

Страница 4: ...ring 61 Alarm inputs and outputs 62 Exception alarms 63 Storage settings 65 Recording schedule 65 Snapshots 67 HDD management 69 NAS settings 70 Road traffic settings 71 Detection configuration 71 Pic...

Страница 5: ...ility for errors or omissions Product Warnings YOU UNDERSTAND THAT A PROPERLY INSTALLED AND MAINTAINED ALARM SECURITY SYSTEM MAY ONLY REDUCE THE RISK OF EVENTS SUCH AS BURGLARY ROBBERY FIRE OR SIMILAR...

Страница 6: ...eplacement batteries Warranty Disclaimers CARRIER HEREBY DISCLAIMS ALL WARRANTIES AND REPRESENTATIONS WHETHER EXPRESS IMPLIED STATUTORY OR OTHERWISE INCLUDING ANY IMPLIED WARRANTIES THE WARRANTIES OF...

Страница 7: ...r refer to the data sheet and user documentation For the latest product information contact your local supplier or visit us online at firesecurityproducts com The system should be checked by a qualifi...

Страница 8: ......

Страница 9: ...ANPR IP Camera Configuration Manual 7 Introduction This is the configuration manual for the following TruVision IP camera models TVB 5412 2 MP ANPR IP camera 2 8 to 12 mm TVB 5413 2 MP ANPR IP camera...

Страница 10: ...owser s security level 1 In Internet Explorer click Internet Options on the Tools menu 2 On the Security tab click the zone to which you want to assign a web site under Select a web content zone to sp...

Страница 11: ...the CD to find the IP address of the camera Activation via the web browser 1 Power on the camera and connect the camera to the network 2 Input the IP address into the address bar of the web browser an...

Страница 12: ...ce The password must contain characters from at least two of these groups We also recommend that you reset your password regularly For high security systems it is particularly recommended to reset the...

Страница 13: ...gure 1 Overview of the browser windows Name Description 1 Menu toolbar Live view Click to view live video See Live view mode on page 79 for further information Playback Click to play back video See Pl...

Страница 14: ...d time of files to search 3 Viewer View live or playback video depending on the menu chosen Time date and camera name are displayed here 4 Live View Playback toolbar Click the buttons to control the l...

Страница 15: ...ure the cameras over the internet The camera web browser lets you configure the camera remotely using your PC Web browser options may vary depending on camera model There are two main menus in the con...

Страница 16: ...n on the different groups of parameters that can be defined 3 System Defines device basic information including SN and the current firmware version time settings maintenance and serial port parameters...

Страница 17: ...information 8 Alarm Event Defines motion detection video tampering alarm input output and exception See Alarm event settings on page 56 for further information 9 Storage Defines recording schedule sto...

Страница 18: ...Delay Auto or Fluent 3 Enable Meta Data Overlay It refers to the rules on your local browser Specify whether to display the colored marks when motion detection face detection and intrusion detection...

Страница 19: ...ra Configuration Manual 17 9 Save Snapshots during Playback To Specifies the directory for saving snapshots in playback mode 10 Save Clips during Playback to Specifies the directory for saving video c...

Страница 20: ...e camera Basic information This section displays the following information Device name Plugin version Device number Number of channels Camera model Number of HDDs Serial number Number of alarm inputs...

Страница 21: ...k Time Protocol is a protocol for synchronizing the clocks of network devices such as IP cameras and computers Connecting network devices to a dedicated NTP time server ensures that they are all synch...

Страница 22: ...inutes Or Set manually Enable the Manual Time Sync function and then set the system time from the pop up calendar Note You can also select the Sync with computer time check box to synchronize the time...

Страница 23: ...85 2 Select the RS 485 port parameters Note The Baud Rate PTZ Protocol and PTZ Address parameters must be the same as the PTZ camera parameters 3 Click Save to save changes Maintenance and firmware up...

Страница 24: ...nfiguration file The administrator can export and import configuration settings from the camera This is useful if you want to copy the configuration settings to camera or if you want to make a backup...

Страница 25: ...p up window to confirm restoring operation To import export a configuration file 1 Click Configuration Camera Configuration System Maintenance 2 Click Browse to select the local configuration file and...

Страница 26: ...e Manager 1 In the FW Upgrade window of TruVision Device Manager select a device or hold the Ctrl or Shift key to select multiple devices for simultaneous upgrading 2 Click the Browse button to locate...

Страница 27: ...ne RTSP authentication 1 Click Configuration Security RTSP Authentication 2 Select the RTSP Authentication type Digest basic or Digest in the drop down list 3 Click Save to save the changes IP address...

Страница 28: ...dd an IP address and enter the address 5 Click Modify or Delete to modify or delete the selected IP address 6 Click Clear to delete all the IP addresses 7 Click Save to save the changes MAC address fi...

Страница 29: ...n list Forbidden or Allowed 4 Click Add to add a MAC address and enter the address 5 Click Modify or Delete to modify or delete the selected MAC address 6 Click Clear to delete all the MAC addresses 7...

Страница 30: ...rs The administrator can create up to 31 individual users for the cameras listed in this manual When new users are added to the list the administrator can modify permissions and password of each user...

Страница 31: ...on of live view playback and log search However they cannot change any configuration settings Add and delete users The administrator can create up to 31 users Only the system administrator can create...

Страница 32: ...elect the desired user under the User tab 2 Click Delete button A message box appears Note Only the administrator can delete a user 3 Click Save to save the changes Modify user information You can eas...

Страница 33: ...TruVision ANPR IP Camera Configuration Manual 31 To see online users 1 Click Configuration Security Online Users The list of online users appears Click Refresh to update the display...

Страница 34: ...You can set up the following TCP IP parameters Function Description NIC Type Enter the NIC type Default is Auto Other options include 10M Half dup 10M Full dup 100M Half dup and 100M Full dup IPv4 Add...

Страница 35: ...ferred DNS Server or Alternate DNS Server 5 Click Save to save changes DDNS parameters DDNS is a service that maps Internet domain names to IP addresses It is designed to support dynamic IP addresses...

Страница 36: ...Enter the port used for the Internet Explorer IE browser Default value is 80 RTSP Port RTSP Real Time Streaming Protocol is a network control protocol designed for use in entertainment and communicat...

Страница 37: ...ion 3 Select the Port Mapping Mode to be Auto or Manual When you choose Manual mode you can set the external port as you want 4 Click Save to save changes SNMP parameters SNMP is a protocol for managi...

Страница 38: ...he anonymous access to the FTP server Directory In the Directory Structure field you can select the root directory Main directory and Subdirectory When the Main directory is selected you have the opti...

Страница 39: ...tion Encrypt via SSL TLS NONE is default Attached Snapshot Select this check box if you want to send emails with attached alarm images Interval This is the time between two actions of sending attached...

Страница 40: ...d 2 Click Test to test the email parameters set up 3 Click Save to save changes HTTP parameters Specifies authentication of the web site and its associated web server which protects against Man in the...

Страница 41: ...DSCP Event Alarm DSCP or Management DSCP The valid value range of the DSCP is 0 to 63 The larger the DSCP value the higher the priority 3 Click Save to save changes 802 1x parameters When the feature...

Страница 42: ...configured Please apply and register a user name and password for 802 1X in the server Integration protocol Enable ONVIF when the camera needs to communicate to a recorder or VMS using the ONVIF prot...

Страница 43: ...Substream or Third Stream Note The Third stream is only available when this function is enabled in System System Service Stream Control Specify the stream type to record Select Video Stream to record...

Страница 44: ...able Video Coding is an extension of the H 264 AVC standard Select OFF ON to disable enable the SVC function Select Auto and the device will automatically extract frames from the original video when t...

Страница 45: ...22 1 G 711 ulaw G 711alaw G 726 MP2L2 or PCM For MP2L2 you can set the sampling rate and audio stream bitrate For PCM you can set the sampling rate Audio Input Select MicIn or LineIn for the connected...

Страница 46: ...region number and draw it on screen The best image quality will be inside the region s rectangle ROI Level Select the level to enhance the selected region s image quality The range is between 1 and 6...

Страница 47: ...ar click Configuration Camera Configuration Video Audio Target Cropping 2 Select the Enable Target Cropping check box A red rectangle appears on screen to mark the cropped region 3 Select the desired...

Страница 48: ...cation background in order to get the best image quality You can adjust the brightness contrast saturation hue and sharpness of the video image Display settings Use this menu to also adjust camera beh...

Страница 49: ...ounting Scenario Defines the image quality Normal Select when the lighting conditions are constant or indoors Road Select when the lighting conditions are variable or outdoors Use this option to bette...

Страница 50: ...lso three tabs to configure the day night settings Common The settings are identical for both day and night modes for Exposure Settings and Day Night Switch Day Image Adjustment Exposure Settings Back...

Страница 51: ...efines whether the camera is in day or night mode The day color option could be used for example if the camera is located indoors where light levels are always good Select one of the following options...

Страница 52: ...ea This option is not available when WDR is enabled If you focus on an object against strong backlight the object will be too dark to be seen clearly BLC compensates for the background light so that t...

Страница 53: ...5 9 Video Adjustment Mirror Inverts the image Options are Left Right Up Down Center and OFF Default is OFF Hallway View To invert the 16 9 aspect ratio enable the rotate function Best used when instal...

Страница 54: ...amera s name on screen You can modify the name in the text box of Camera Name 3 Select Display Date to display the date time and Display Week to include the day of the week Also select the time and da...

Страница 55: ...e of overlay text selecting the next string number Note Remove an overlay text by deselecting its text line 5 Click Save to save changes Privacy masks Privacy masks let you conceal sensitive areas suc...

Страница 56: ...Save to save changes Picture overlay Picture overlay enables you to overlay a picture on the image This function enables an enterprise or users to overlay their logo on the image for example The pict...

Страница 57: ...ure from your library or online and click Upload to upload it 3 Select Enable Picture Overlay check box to enable the function Note X coordinate and Y coordinate values are the location of the picture...

Страница 58: ...triggered by the movement of a person but not that of a cat You can define the area on screen where the motion is detected the level of sensitivity to motion the schedule when the camera is sensitive...

Страница 59: ...do not want the detected object to be marked with the green frame select Disable from Configuration Local Configuration Live View Parameters Enable Meta Data Overlay 3 Under Configuration select Norma...

Страница 60: ...tings See NAS settings on page 70 for further information To upload the snapshot to an FTP you must first configure the FTP settings See FTP parameters on page 36 for further information Enable the Up...

Страница 61: ...wing when clicked Note You can draw up to eight motion detection areas on the same image Click Stop Drawing to finish drawing Click Clear All to delete all areas marked and restart drawing 6 Move the...

Страница 62: ...ct the Attached Snapshot option Notify Alarm Recipient Send an exception or alarm signal to remote management software when an event occurs Upload to FTP Memory Card NAS Capture the image when an alar...

Страница 63: ...the web browser on page 23 for more information 5 Specify the linkage method when an event occurs Select one or more response methods for the system when a video tampering is triggered Normal Actions...

Страница 64: ...nput 1 Click Configuration Camera Configuration Alarm Event Alarm Input 2 Select Enable Alarm Input Handling 3 Select the desired alarm input number and type from Alarm Input No and Alarm Type drop do...

Страница 65: ...pshot parameters See Snapshots on page 67 for further information Trigger Alarm Output Trigger external alarm outputs when an event occurs Select Select All or each individual alarm output Note This o...

Страница 66: ...ly selects Send Email Notify Alarm Recipient and Upload to FTP Memory Card NAS Send Email Send an email to a specified address when there is a motion detection alarm Note You must configure email sett...

Страница 67: ...ard or NAS in the camera The camera s SD card provides a backup in case of network failure The SD card is not provided with the camera The selected recording schedule applies to all alarm types Figure...

Страница 68: ...d Schedule 2 Select the Enable check box to enable recording Note To disable recording deselect the option 3 Set up the recording schedule 4 Click the day you want to schedule recordings The Schedule...

Страница 69: ...nd post recording times as well as the stream type These values apply to all recording schedules 7 Click Save to save changes Note If you set the record type to Motion or Alarm you must also define th...

Страница 70: ...to be taken Enter the desired schedule for each day of the week Click the Advanced button and select the stream type Click OK 7 Click Save to save changes To set up event triggered snapshots 1 From t...

Страница 71: ...Once formatting is completed reboot the camera otherwise the device will not function properly Figure 12 HDD management window To format the storage devices 1 From the menu toolbar click Configuratio...

Страница 72: ...e available within the network and correctly configured to store the recorded files log files etc Notes Up to eight NAS disks can be connected to a camera The recommended capacity of NAS is between 9G...

Страница 73: ...Use this function to set up the area on screen to be detected and to capture a vehicle s number plate information To set up license plate detection 1 From the menu toolbar click Configuration Camera...

Страница 74: ...uploading the license plate into the system The lower the interval the higher the speed of the vehicle You can select a time interval between 1 and 15 000 ms Alarm Input An input alarm triggers the ca...

Страница 75: ...rmation To upload the snapshot to an FTP you must first configure the FTP settings See To define the FTP parameters on page 36 for further information Enable the Upload Type option To upload the snaps...

Страница 76: ...ave changes Camera You can display on the captured snapshot the device number camera number as well as camera information To set up the camera information displayed on the snapshot 1 From the menu too...

Страница 77: ...e license plates marked in the list as authorized vehicles Other Captured license plates that are not part of the list are automatically marked as Other If you do not have already a list of your black...

Страница 78: ...c Blacklist Whitelist Click Browse to select a file from your library or online and click Import to import it to the camera Note By default a list of maximum 2 048 license plates can be loaded in the...

Страница 79: ...ection matching result and country Click on the captured snapshot in the Real Time LPR Result window to see the whole image with the LPR data embedded on the bottom of the photo See Figure 14 below Fi...

Страница 80: ...le below the image Wiegand Wiegand is a serial data communication for access control To set up the Wiegand bit format 1 From the menu toolbar click Configuration Camera Configuration Road Traffic Wieg...

Страница 81: ...logging in You can change the language of the interface from the drop down menu in the top right corner of the window If you do not change the default password for admin a message will always pop up r...

Страница 82: ...ayed 10 Click to manually turn on off the alarm 11 Click to select the window size 4 3 12 Click to select the window size 16 9 13 Click to select the original window size 14 Click to select the self a...

Страница 83: ...e a snapshot image of the playback video Start Stop clipping video files 7 Digital zoom Start stop digital zoom 8 Audio control Control level of audio Audio on and adjust audio Audio mute 9 Time momen...

Страница 84: ...to right newest 4 Input the desired time and click to locate the playback start point The timeline bar is color coded to display the type of recording Click a location on the timeline to move the cur...

Страница 85: ...t the check box of the desired files to download and click Download Search event logs You must configure NAS or insert a SD card in the dome camera to be able to use the log functions The number of ev...

Страница 86: ...top Tamper proof Face Detection Started Face Detection Stopped Cross Line Detection Started Cross Line Detection Stopped Intrusion Detection Started Intrusion Detection stopped Defocus Detection Start...

Страница 87: ...anual 85 To search the logs 1 From the menu toolbar click Log 2 In the Major Type and Minor Type drop down lists select the desired option 3 Select start and end time of the log 4 Click Search to star...

Страница 88: ...alarms types 63 F Firmware upgrade 22 using TruVision Device Manager 24 Focus 49 H HDD capacity 69 HDD error alarm 63 HDD full alarm 63 I Illegal login 27 Image flip 46 Invalid login alarm 63 IP addr...

Страница 89: ...RS 485 settings 20 RTSP authentification 25 S SD card 69 Snapshots event triggered 67 scheduled 67 search 82 specify directory to save 16 T Tamper proof alarms set up 61 Text display on screen appeara...

Страница 90: ......

Отзывы: