


37
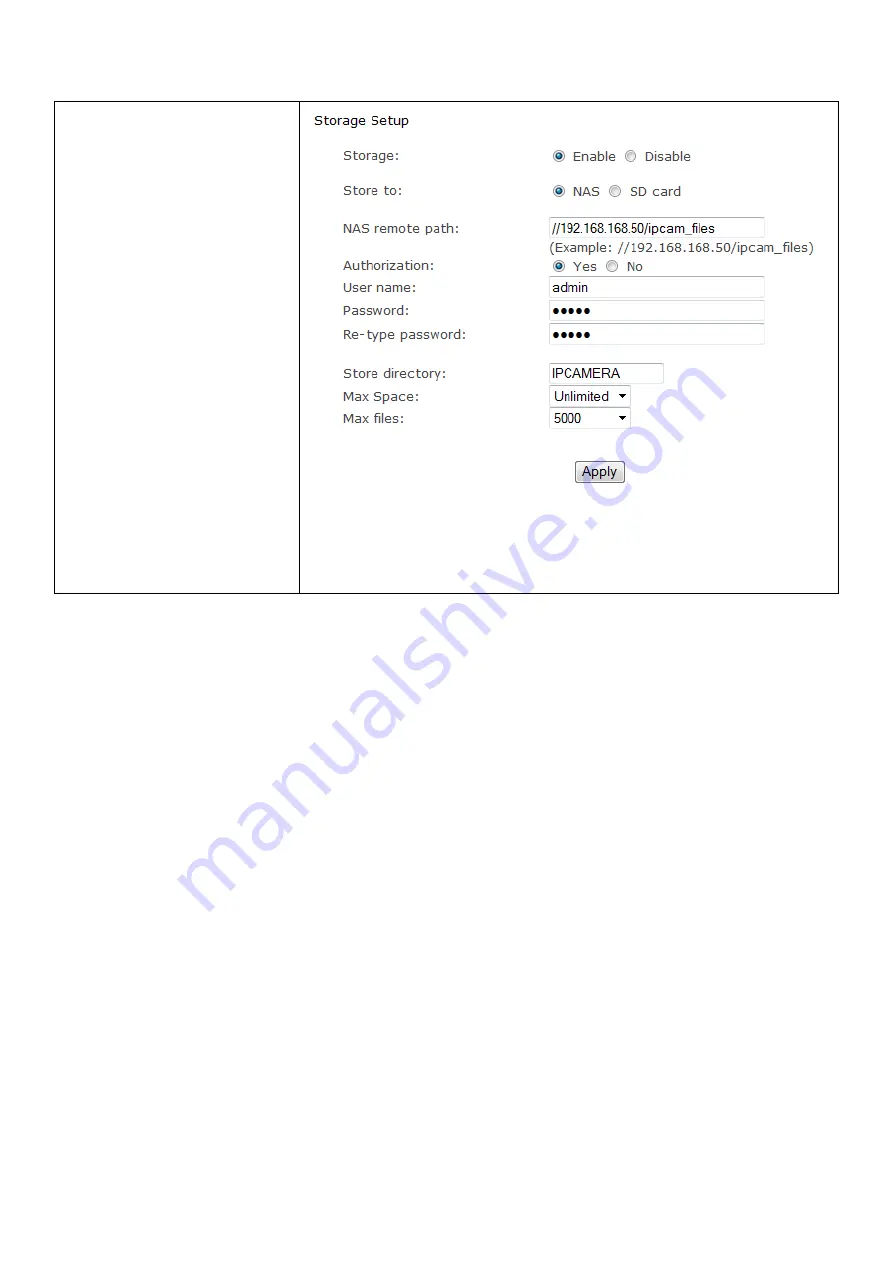
7.5.3 NAS STORAGE SETUP
[Storage Select]
Select
whether you want to record
on NAS or micro SD card
[NAS remote path]
This is the
address & path where to save
the files on NAS Drive (up to a
maximum of 2 directory
levels). Enter the path that you
wish to save the files to on
your NAS Drive. Remember the
camera only accepts one level
directory e.g.
//192.168.1.3/ipcam_files as
opposed to
//192.../ipcam_files/abc.
[Authorization]
Select
whether authentication is
required by the NAS Drive.
[User name] & [Password]
Type the user name and password of the
NAS Drive. This field is required if your NAS Drive requires
authentication. Click
Apply
to confirm your setting.
Please note :
Ensure that your NAS drive is compatible with the CIFS or SMB protocol
–
most are but best to check
first anyway (refer to the user manual for your NAS box).
First of all, you will need to specify a static IP address for the NAS so that it works reliably with your
camera(s). Locate and make a note of your IP address of your NAS box (this can be found within your
NAS settings or by using the Search program that came with the drive). Should be in the form something
like 192.168.x.x or 10.x.x.x.
Create a folder in the root of your NAS drive for where you want the video to be saved to e.g.
/ipcam_files. The camera only saves to folders one directory deep from the root of the NAS drive (e.g.
192.168.1.3/ipcam_files) so don’t create a directory like /ipcam_files/downloads/camera/video.
We recommend you now create a new user login in your NAS drive settings. When creating the user,
give it access to the directory you have just created, and make sure it has Read and Write access to it. If
your NAS drive doesn’t allow you to create new users, or you don’t want to, just remember your admin
username and password.
Next, we need to create a username on the NAS that the cameras can use to send video to the NAS, and
you can use to view the video from your laptop. In the NAS configuration, click on Control Panel. Click User.
Click the Create button. In the name box, type "video" (without the quotes), and enter a password into the
"Password" and "Confirm password" boxes. At the "Assign privileges - shared folders" screen put a check in
the Read/Write column for the "camera" shared folder that we created in the earlier step.
Next, please confirm if the user name and password doesn’t include some special characters, such as
@#$%^!=. if you have such password, then change it to alphabetic or number.


