background image

Printer Settings

2-16

8

Press the 

S

 key or the 

T

 key to select 

Change #

.

9

Press the 

Enter

 key.

10

Press the 

S

 key or the 

T

 key to select the frame 

mode.

11

Press the 

Enter

 key.

12

Press the 

Reset

 key. The message display returns to the printer basic screen.

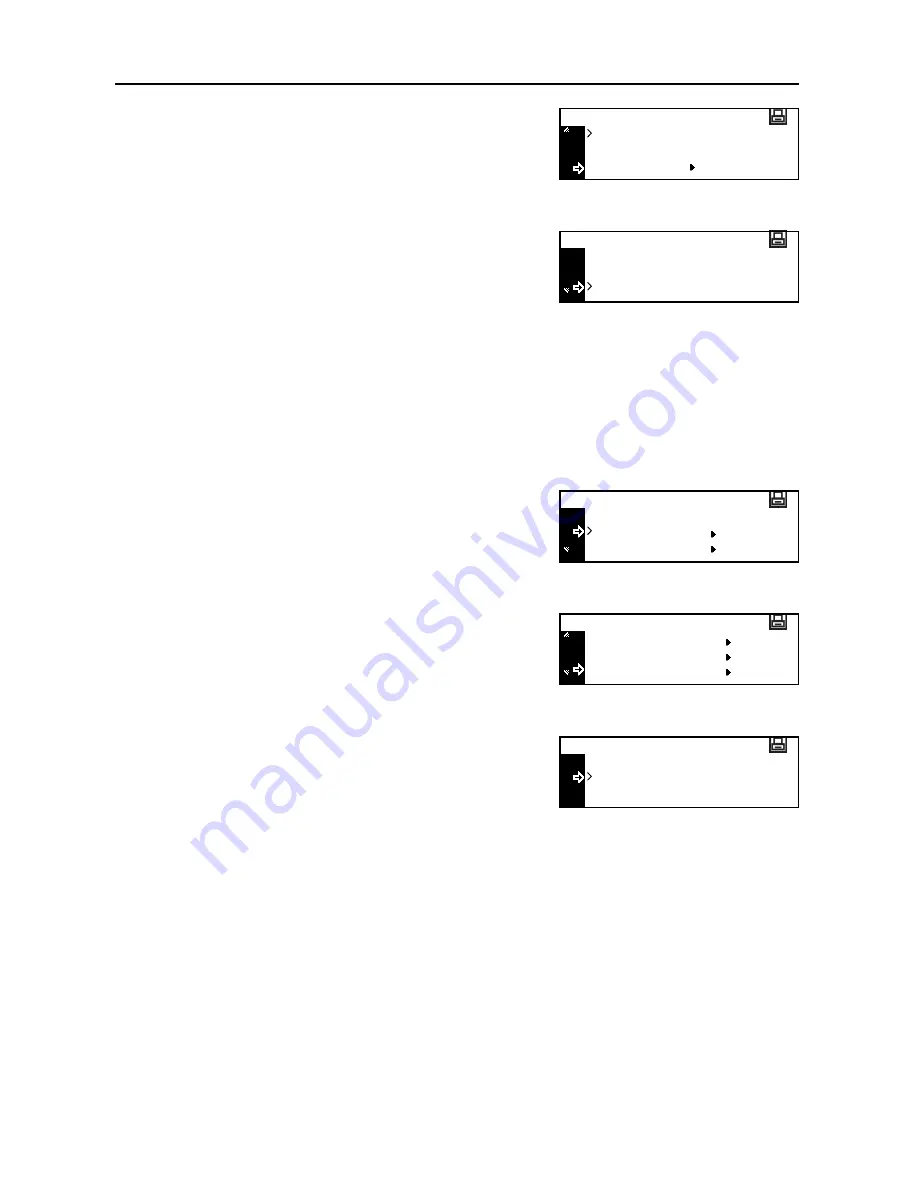
EtherTalk

When using this machine by connecting to an Apple Macintosh computer, turn EtherTalk 

On

.

1

Display the 

Interface

 screen.

2

Press the 

S

 key or the 

T

 key to select 

Network

.

3

Press the 

Enter

 key.

4

Press the 

S

 key or the 

T

 key to select 

EtherTalk

.

5

Press the 

Enter

 key.

6

Press the 

S

 key or the 

T

 key to select 

On

.

7

Press the 

Enter

 key. 

8

Press the 

Reset

 key. The message display returns to the printer basic screen.

On

NetWare

Off

Change #

Back

Auto

NetWare Frame

802.3

Back

USB

Interface

Network

Network Setting

NetWare

TCP/IP

EtherTalk

Back

On

EtherTalk

Off

Содержание DC 2218

Страница 1: ...Instruction Handbook Advanced DC 2218 2222 Digital Multifunctional System...

Страница 2: ...This Advanced Operation Guide is for DC 2218 and DC 2222 This Operation Guide mentions that DC 2218 is a 18 ppm prints per minute model and DC 2222 is a 22 ppm model...

Страница 3: ...the other general settings that can be made in this machine 4 Job Accounting This chapter explains the settings of the job accounting functions Appendix This chapter includes a table of paper that can...

Страница 4: ...ii...

Страница 5: ...Copy Proof and Hold 2 9 Printing Private Print Stored Job 2 9 Deleting Private Print Stored Job 2 10 Printing Virtual Mailbox Data 2 10 Printing Virtual Mailbox List 2 11 Printing Code Job List 2 12 e...

Страница 6: ...ther Settings 2 49 Form Feed Timeout 2 49 Received Data Dump 2 50 Printer Function Resetting 2 50 Resource Protect Mode 2 51 Auto Continue 2 51 Duplex Printing Error Detection 2 52 Stapling Error Dete...

Страница 7: ...er Job Accounting 4 14 Fax Job Accounting 4 15 Operation against Excess over Limit 4 16 Using Job Accounting 4 17 Appendix Appendix 1 Paper Appendix 2 Basic Specifications of Paper Appendix 2 Proper P...

Страница 8: ...vi...

Страница 9: ...er Source Selection Original Size Selection Image Quality Mode Copy Density Adjustment Number of Copies Original Orientation Offset Copying Staple Copying Margin Mode Border Erase Mode Continuous Copy...

Страница 10: ...utomatically selected 2 To change the paper size press the Paper Select key to select the desired paper source Notes When using the multi purpose tray set the paper size and the paper type referring t...

Страница 11: ...riginal 2 Press the Original Size key 3 Press the S key or the T key to select the desired original size 4 Press the Enter key 5 Press the Start key Copying starts Selecting an Original Size from Othe...

Страница 12: ...or the key to set the vertical size You can set the vertical size to 2 to 11 5 8 in 1 8 increments 50 to 297 mm in 1 mm increments 6 Press the T key to move to the horizontal size 7 Press the key or...

Страница 13: ...ty Adjustment for Text Photo Originals on page 3 7 Density Adjustment for Text Originals on page 3 8 and Density Adjustment for Photo Originals on page 3 8 If you select the Photo mode the manual copy...

Страница 14: ...t See Auto Density Adjustment on page 3 6 If you select Photo as the image quality mode you cannot select the auto density mode Manual Density Mode Press the Lighter key or the Darker key to adjust th...

Страница 15: ...n set the number of copies to 999 at the maximum 1 Set the original 2 Use the numeric keys to set the desired number of copies Note To cancel the number of copies press the Stop Clear key The number o...

Страница 16: ...aten When the originals are set in the document processor Note You can change the default setting of the orientation of the original See Original Orientation on page 3 18 1 Press the Function key 2 Pr...

Страница 17: ...n page 1 15 The paper sizes that can be used for offset copying are limited to A4 B5 11 8 1 2 and 16K 1 Set the original 2 Press the Offset key 3 Press the Collate key 4 Input the number of copies and...

Страница 18: ...sher must be installed The following options are available for stapling copies Cassette Paper Load Direction Cassette Paper Load Direction Original Orientation Top Edge Back Edge Original Orientation...

Страница 19: ...e originals have been set in the optional document processor copying starts automatically If the original has been set on the platen a message prompting replacement of the original is displayed In thi...

Страница 20: ...default value of the margin width See Margin Width Default Value on page 3 10 1 Set the original 2 Press the Margin key 3 Press the S key or the T key to select Left Margin or Top Margin 4 Press the...

Страница 21: ...order erase width You can set the width to 1 8 to 3 4 in 1 8 increments 1 mm to 18 mm in 1 mm increments 6 Press the Enter key 7 Press the Start key Copying starts Mode Description Sheet Erase Use thi...

Страница 22: ...he originals 2 Press the Function key 3 Press the S key or the T key to select Continuous scan 4 Press the Enter key 5 Press the S key or the T key to select On 6 Press the Enter key 7 Press the S key...

Страница 23: ...re A4 11 8 1 2 or smaller sizes A3 B4 Folio 11 17 Ledger 8 1 2 14 Legal or 8K cannot be used for auto rotation You can select whether or not to enable auto rotation at a default setting See Auto Rotat...

Страница 24: ...will be a little lighter You can select whether or not to turn on the ecoprint mode at a default setting See EcoPrint Mode on page 3 4 1 Set the original 2 Press the Function key 3 Press the S key or...

Страница 25: ...et of the same size Notes The maximum number of sheets that can be set in the document processor in this mode is 30 The original sizes that can be used for the auto selection mode Inch Specification 1...

Страница 26: ...program number to register 1 to 8 Note You can also select the program number using a numeric key 6 Press the Enter key The program is registered Using a Program to Make Copies 1 Press the Program key...

Страница 27: ...as a network printer use the operation panel The principal settings that can be made are shown below Using This Machine as a Network Printer Menu Hierarchical Diagram Status Page Printing e MPS Functi...

Страница 28: ...work cable Refer to the Basic Operation Guide Connecting the Network Cable Setting operation from the operation panel of this machine See this chapter Principal setting items Network Emulation selecti...

Страница 29: ...code JOB No Print e MPS Configuration Quick Copy Number of JOB 0 to 50 Temp Code Job Size 0 to 9999 M Byte Perm Code Job Size 0 to 9999 M Byte VMB Size 0 to 9999 M Byte Interface Network NetWare On O...

Страница 30: ...I ID I Detail 4 to 999 75 Point 0 44 to 99 99 CPI Courier Dark Regular Letter Gothic Dark Regular Option ID S M H O Detail 4 to 999 75 Point 0 44 to 99 99 CPI Code Set List of Inter Fonts No Print Li...

Страница 31: ...lete Data Delete Font Delete Program Delete Macro Delete the language List of Partitions No Print Memory Card Read Fonts OK Read Macro OK Read Data Read Program Write Data OK Delete Data Delete Font D...

Страница 32: ...to 495 sec Print HEX DUMP OK Printer Reset On Resource Prot Off Permanent Perm Temp Auto Continue On Off Change 0 to 495 sec Finishing Error Proces Duplex print On Off Staple mode On Off Service Prin...

Страница 33: ...ter key 2 Press the S key or the T key to select MENU 3 Press the Enter key 4 Press the S key or the T key to select Print Status Page 5 Press the Enter key 6 Press the S key or the T key to select Pr...

Страница 34: ...select e MPS 5 Press the Enter key The e MPS screen is displayed Next perform the setting referring to the following description of each setting item Printing Quick Copy Proof and Hold If you set qui...

Страница 35: ...py Proof and Hold 2 Press the S key or the T key to select Delete 3 Press the Enter key Printing Private Print Stored Job In private printing you can execute printing by using the operation panel to i...

Страница 36: ...rned off Jobs stored with the stored job function however are not deleted 1 Select the job to delete referring to steps 1 to 7 of Printing Private Print Stored Job 2 Press the S key or the T key to se...

Страница 37: ...rtual Mailbox List A list that includes the currently set virtual mailbox tray numbers mailbox numbers presence of accumulated data data sizes etc is printed 1 Display the e MPS screen 2 Press the S k...

Страница 38: ...ed e MPS Detail Settings The e MPS settings such as the maximum number of documents that can be stored in the hard disk and the capacity assigned to each function can be changed Maximum Number of Quic...

Страница 39: ...mp Code Job Size Temp code Job size 5 Press the Enter key 6 Press the key or the key to input the capacity for storage of temporary code jobs You can set the capacity to 0 to 9999 MB 7 Press the Enter...

Страница 40: ...ize however is the size of available hard disk space 1 Display the e MPS screen 2 Press the S key or the T key to select e MPS Configuration 3 Press the Enter key 4 Press the S key or the T key to sel...

Страница 41: ...twork setting is required This section describes the setting required for using the network function Note Before setting the IP address ask your network administrator to obtain the address and prepare...

Страница 42: ...Apple Macintosh computer turn EtherTalk On 1 Display the Interface screen 2 Press the S key or the T key to select Network 3 Press the Enter key 4 Press the S key or the T key to select EtherTalk 5 P...

Страница 43: ...ey DHCP This machine supports DHCP Dynamic Host Configuration Protocol When using DHCP turn DHCP On 1 Display the TCP IP screen referring to steps 1 to 5 of TCP IP setting 2 Press the S key or the T k...

Страница 44: ...Enter key 6 Use the numeric keys to input the IP address Enter the first block of 3 digits of the address in the highlighted area 7 Press the key Enter the next block of 3 digits of the address in th...

Страница 45: ...Page Printing When printing the status page you can also print the network status page in succession 1 Display the Interface screen See How to Display the Interface Screen on page 2 15 2 Press the S...

Страница 46: ...rror that occurs during printing can be printed 1 Press the Printer key 2 Press the S key or the T key to select MENU 3 Press the Enter key 4 Press the S key or the T key to select Emulation 5 Press t...

Страница 47: ...r of dots 6 Press the Enter key 7 Press the S key or the T key to select Back 8 Press the Enter key 9 Press the S key or the T key to select KC GL Page Set 10 Press the Enter key 11 Press the S key or...

Страница 48: ...Alternative Emulation Selection If you set KPDL AUTO switching between KPDL and an alternative emulation mode will be automatically performed according to print data Continue the procedure from step...

Страница 49: ...Press the S key or the T key to select Font 5 Press the Enter key 6 Press the S key or the T key to select the interface to set 7 Press the Enter key The Font screen is displayed Next perform the sett...

Страница 50: ...g is displayed 1 Display the Font screen See How to Display the Font Screen on page 2 23 2 Press the S key or the T key to select Select Font 3 Press the Enter key Note If optional fonts as well as in...

Страница 51: ...character pitch to 0 44 to 99 99 cpi 7 Press the Enter key 8 Press the Reset key The message display returns to the printer basic screen Courier Letter Gothic Font Setting You can select the thickness...

Страница 52: ...desired code set 5 Press the Enter key 6 Press the Reset key The message display returns to the printer basic screen Font List Printing 1 Display the Font screen See How to Display the Font Screen on...

Страница 53: ...ing of the font list starts Internal Scalable and Bitmapped Fonts List Font Name Scalable Bitmap Password Selection FSET Font ID PRESCRIBE Internal Scalable and Bitmapped Fonts List Font Name Scalable...

Страница 54: ...select Page Set 5 Press the Enter key 6 Press the S key or the T key to select the interface to set 7 Press the Enter key The Page Set screen is displayed Next perform the setting referring to the fo...

Страница 55: ...select the desired paper size 5 Press the key 6 Press the S key or the T key to select the desired output size The reduction ratio is automatically set and displayed 7 Press the Enter key 8 Press the...

Страница 56: ...ect Auto 5 Press the Enter key 6 Press the Reset key The message display returns to the printer basic screen Line Feed LF Action Set the action of the machine to be executed when it receives a line fe...

Страница 57: ...age return and line feed Ignore CR Does not perform a carriage return 5 Press the Enter key 6 Press the Reset key The message display returns to the printer basic screen Wide A4 The print area of the...

Страница 58: ...ext perform the setting referring to the following description of each setting item KIR Mode Smoothing realizes the print quality of 2400 dpi equivalent 600 dpi 1 Display the Print Quality screen See...

Страница 59: ...ssage display returns to the printer basic screen Resolution Setting With this machine three types of resolution are available 300 dpi 600 dpi and Fast 1200 Mode 1 Display the Print Quality screen See...

Страница 60: ...How to Display the Print Quality Screen on page 2 32 2 Press the S key or the T key to select Print Density 3 Press the Enter key 4 Press the key or the key to set the print density 5 Press the Enter...

Страница 61: ...Press the Enter key 4 Press the S key or the T key to select Memory Card 5 Press the Enter key The Memory Card screen is displayed Next perform the setting referring to the following description of ea...

Страница 62: ...ss the Enter key 4 Press the S key or the T key to select the data to read 5 Press the Enter key The selected data is read from the memory card 6 Press the Reset key The message display returns to the...

Страница 63: ...memory card Deleting Data 1 Display the Memory Card screen See How to Display the Memory Card Screen on page 2 35 2 Press the S key or the T key to select Delete Data 3 Press the Enter key 4 Press th...

Страница 64: ...to select the macro data to delete 5 Press the Enter key The selected macro data is deleted from the memory card 6 Press the Reset key The message display returns to the printer basic screen Deleting...

Страница 65: ...the memory card starts When formatting is complete format information is output Printing a Partition List 1 Display the Memory Card screen See How to Display the Memory Card Screen on page 2 35 2 Pre...

Страница 66: ...Printer Settings 2 40 5 Press the Enter key The partition list is printed PARTITION LIST...

Страница 67: ...eting Macro Data Deleting Language Data Formatting Hard Disk Printing a Partition List 1 Press the Printer key 2 Press the S key or the T key to select MENU 3 Press the Enter key 4 Press the S key or...

Страница 68: ...be lower or insufficient memory occurs depending on the RAM disk setting value The RAM disk functions are disabled at the default setting To use the RAM disk functions set as follows 1 Press the Print...

Страница 69: ...ct MENU 3 Press the Enter key 4 Press the S key or the T key to select RAM Disk Mode 5 Press the Enter key 6 Press the S key or the T key to select Change 7 Press the Enter key 8 Press the S key or th...

Страница 70: ...Printer Settings 2 44 11 Press the Enter key 12 Press the Reset key 13 Press the S key or the T key to select Yes 14 Press the Enter key This machine restarts Yes No Do you want to restart...

Страница 71: ...setting referring to the following description of each setting item Multi Purpose Tray Mode If you select First any paper set in the multi purpose tray will be fed 1 Display the Paper Handling screen...

Страница 72: ...returns to the printer basic screen Duplex Print Mode Set the binding position on finished prints in duplex printing Note This setting is displayed only if the optional duplex unit is installed 1 Disp...

Страница 73: ...key or the T key to select the desired paper output destination 5 Press the Enter key 6 Press the Reset key The message display returns to the printer basic screen Override A4 Letter The A4 and 8 1 2...

Страница 74: ...Printer Settings 2 48 4 Press the S key or the T key to select On or Off 5 Press the Enter key 6 Press the Reset key The message display returns to the printer basic screen Back On Override A4 LT Off...

Страница 75: ...Feed Timeout If this machine does not receive any information indicating the end of data after receiving the last data the machine waits for a certain time without printing the last page When the pre...

Страница 76: ...the printer Dump pages are printed 7 Press the S key or the T key to select GO 8 Press the Enter key 9 Press the Reset key The message display returns to the printer basic screen Printer Function Res...

Страница 77: ...screen Auto Continue If any of the following error messages appears the error can be cleared and printing can be continued after the preset recovery time elapses auto continue Memory Overflow Press G...

Страница 78: ...le if the optional duplex unit is installed You can select whether or not to display Duplex disabled Press GO when you select duplex printing and specify a paper type that cannot be used for duplex pr...

Страница 79: ...en on page 2 49 2 Press the S key or the T key to select Finishing Error 3 Press the Enter key 4 Press the S key or the T key to select Staple Setting 5 Press the Enter key 6 Press the S key or the T...

Страница 80: ...een See How to Display the Others Screen on page 2 49 2 Press the S key or the T key to select Service 3 Press the Enter key 4 Press the S key or the T key to select Print Status Page 5 Press the Ente...

Страница 81: ...stem settings concerning the general operation of this machine The principal settings that can be made are shown below Default Setting Mode Multi Purpose Tray Settings Browsing and Printing the Total...

Страница 82: ...iority Cassette Default Magnification Auto Density Adjustment Auto OCR Density Adjustment Density Adjustment for Text Photo Originals Density Adjustment for Text Originals Density Adjustment for Photo...

Страница 83: ...s the S key or the T key to select Auto or Manual 5 Press the Enter key 6 Press the Reset key The message display returns to the copier basic screen Original Image Quality Set the default original ima...

Страница 84: ...key to select Background adjst 3 Press the Enter key 4 Press the key or the key to adjust the background color Moving right darkens the background color and moving left lightens it 5 Press the Enter...

Страница 85: ...n page 3 14 1 Display the Copy Default screen See How to Display the Copy Default Screen on page 3 2 2 Press the S key or the T key to select Paper type Auto 3 Press the Enter key 4 Press the S key or...

Страница 86: ...the S key or the T key to select Default Magnif 3 Press the Enter key 4 Press the S key or the T key to select 100 or Auto 5 Press the Enter key 6 Press the Reset key The message display returns to th...

Страница 87: ...s it 5 Press the Enter key 6 Press the Reset key The message display returns to the copier basic screen Density Adjustment for Text Photo Originals Adjust the density of the central value in the manua...

Страница 88: ...opy Default screen See How to Display the Copy Default Screen on page 3 2 2 Press the S key or the T key to select Photo Ori Dnsity 3 Press the Enter key 4 Press the key or the key to adjust the densi...

Страница 89: ...y 4 Press the S key or the T key to select On or Off 5 Press the Enter key 6 Press the Reset key The message display returns to the copier basic screen Auto Rotation Copy Select whether or not to set...

Страница 90: ...sage display returns to the copier basic screen Border Erase Width Default Value Set the default value of the border erase width 1 Display the Copy Default screen See How to Display the Copy Default S...

Страница 91: ...ess noticeable Since the black streaking reduction processing reduces the reproducibility of fine characters it is normally recommended to use the factory default setting 1 Display the Copy Default sc...

Страница 92: ...nagement Code Change Auto Sleep Auto Clear Auto Clear Time Silent Mode Auto Drum Refresh Setting How to Display the Machine Default Screen Use the following procedure to display the machine default se...

Страница 93: ...T key to select On All types of paper On Only same paper type or Off 5 Press the Enter key 6 Press the Reset key The message display returns to the copier basic screen Paper Size cassettes 1 to 4 Set...

Страница 94: ...Screen on page 3 12 2 Press the S key or the T key to select the cassette for which you set the paper type from Paper Type 1st to 4th 3 Press the Enter key 4 Press the S key or the T key to select th...

Страница 95: ...e T key to select P type Weight 3 Press the Enter key 4 Press the S key or the T key to select the paper type for which you set the paper weight 5 Press the Enter key 6 Press the S key or the T key to...

Страница 96: ...e S key or the T key to select the paper type to set from Custom 1 to 8 5 Press the Enter key 6 Press the S key or the T key to select On or Off 7 Press the Enter key 8 When all setting is complete pr...

Страница 97: ...lustration A If the optional finisher is installed set the paper with the side for the first page face down as shown in illustration B If the optional finisher is installed the stapling mode may cause...

Страница 98: ...et a longer time if you use the machine frequently and to set a shorter time if not For the inch specification machine if the auto sleep function causes inconvenience for operation of this machine dis...

Страница 99: ...sage display returns to the copier basic screen Copy Output Destination Set the paper output destination with priority for copying Note This item is displayed only if the optional finisher or job sepa...

Страница 100: ...the copier basic screen Default Operation Mode Select the default screen to be displayed when the power is turned on from the copy screen or the fax screen Note This item is displayed only if the opti...

Страница 101: ...o the copier basic screen Date and Time Set the current date and time time difference from the Greenwich Mean Time GMT and summer time 1 Display the Machine default screen See How to Display the Machi...

Страница 102: ...e message display returns to the copier basic screen Display Contrast Adjustment Adjust the display contrast if the message display is indistinct 1 Display the Machine default screen See How to Displa...

Страница 103: ...management code 5 Press the Enter key 6 Press the Reset key The message display returns to the copier basic screen Auto Sleep The machine enters automatically the sleep mode when the preset time elaps...

Страница 104: ...uto Clear Time Set the time that elapses from completion of copying to activation of the auto clear function if you have turned On the auto clear function see page 3 24 Time that can be set 10 to 270...

Страница 105: ...o get horizontal line on the half tone section which is printed In this case please follow the following procedure to set for performing drum refresh automatically Once auto drum refresh is set On the...

Страница 106: ...copier basic screen Multi Purpose Tray Settings Set the following items for feeding paper from the multi purpose tray Paper Size Set the size of paper to be used from the multi purpose tray You can us...

Страница 107: ...nvelope C4 Comm 10 Comm 9 Comm 6 3 4 Monarch OufukuHagaki YOUKEI 2 YOUKEI 4 8K 16KR 16K 1 Press the System Menu Counter key 2 Press the S key or the T key to select MP Tray setting 3 Press the Enter k...

Страница 108: ...key The MP Tray Paper type screen is displayed Proceed to Paper Type described below Paper Type To set the paper type to be used in the multi purpose tray continue the procedure from Paper Size settin...

Страница 109: ...s the Enter key 9 Press the Reset key The message display returns to the copier basic screen Counter Report Output Note Ensure that A4 11 8 1 2 paper is set in the cassette when printing the counter r...

Страница 110: ...The following four items are included Total digital dot coverage Copy digital dot coverage Printer digital dot coverage Fax digital dot coverage 1 Press the System Menu Counter key 2 Press the S key...

Страница 111: ...d Italian Italiano 1 Press the System Menu Counter key 2 Press the S key or the T key to select Language 3 Press the Enter key 4 Press the S key or the T key to select the language to use 5 Press the...

Страница 112: ...System Menu 3 32...

Страница 113: ...accounting functions of this machine The principal functions that can be set are shown below Job Accounting Mode Managing Accounts Overall Account Management Individual Account Management Enabling Jo...

Страница 114: ...g in the default settings to On See Default Settings on page 4 13 The following functions are available in the job accounting mode Notes For settings on the computer required for using job accounting...

Страница 115: ...agement code set at the factory is 1800 for the 18 ppm model and 2200 for the 22 ppm model Note The four digit management code can be changed See Administrator Management Code Change on page 3 23 5 If...

Страница 116: ...9999999 can be input Note If you try to register an ID code that has been already input an error occurs Input another ID code 7 Press the Enter key Note After the ID code is registered message Please...

Страница 117: ...nable to use Prohibits copying 4 5 Print restriction Select whether to permit or prohibit printing Able to use Permits printing Unable to use Prohibits printing 4 6 Output limit Set the limit of total...

Страница 118: ...ge display returns to the Limit in use screen Output Limit You can set the limit of total count of copying and printing Note This item is not displayed if both Copy Restriction and Print Restriction a...

Страница 119: ...limit the Counter limit Default Value screen is displayed Proceed to the next step 6 Use the numeric keys to input the counter limit You can set the limit to 999 999 at the maximum in 1 sheet increme...

Страница 120: ...S key or the T key to select Edit Job Accounting 3 Press the Enter key 4 Press the S key or the T key to select Delete 5 Press the Enter key 6 Press the S key or the T key to select the ID code to del...

Страница 121: ...ess the S key or the T key to select Edit Job Accounting 3 Press the Enter key 4 Press the S key or the T key to select Change limit in use 5 Press the Enter key 6 Press the S key or the T key to sele...

Страница 122: ...press the S key or the T key to select Print Report 5 Press the Enter key The report is output 6 To clear the counter press the S key or the T key to select Counter clear 7 Press the Enter key The co...

Страница 123: ...displayed Check the counts 5 To clear the counter press the S key or the T key to select the ID code 6 Press the Enter key The confirmation screen is displayed 7 Press the S key or the T key to selec...

Страница 124: ...4 3 2 Press the S key or the T key to select Job Accounting On Off 3 Press the Enter key 4 Press the S key or the T key to select Off or On 5 Press the Enter key 6 Press the Reset key If you have sel...

Страница 125: ...unting screen See How to Display the Job Accounting Screen on page 4 3 2 Press the S key or the T key to select Job Accountg Def Set 3 Press the Enter key 4 Press the S key or the T key to select Copy...

Страница 126: ...for the scanner functions Note This item is displayed if the optional network scanner kit is installed 1 Display the Job Accounting screen See How to Display the Job Accounting Screen on page 4 3 2 P...

Страница 127: ...lect Job Accountg Def Set 3 Press the Enter key 4 Press the S key or the T key to select Fax Job Accountng 5 Press the Enter key 6 Press the S key or the T key to select Off or On 7 Press the Enter ke...

Страница 128: ...Job Accountg Def Set 3 Press the Enter key 4 Press the S key or the T key to select Excess limit Set 5 Press the Enter key 6 Press the S key or the T key to select Stop job immediately Stop after job...

Страница 129: ...and press the Enter key The copier basic screen is displayed Notes If you input an incorrect code press the Stop Clear key and input the code again If the input ID code does not match any registered I...

Страница 130: ...Job Accounting 4 18...

Страница 131: ...Appendix 1 Appendix This appendix explains the following topics Paper Glossary...

Страница 132: ...t quality Satisfactory print result cannot be obtained from poor quality paper Basic Paper Specifications The table below summarizes the basic specifications of paper that can be used in this machine...

Страница 133: ...be too thin Also if the paper is too thick paper jams may occur The recommended thickness of a sheet for this printer is between 0 086 and 0 110 mm Moisture Content Moisture content is expressed with...

Страница 134: ...fness Limp paper may buckle in the machine resulting in paper jams Curl Most paper naturally tends to curl one way if left unpacked When paper passes through the fixing unit it curls upward a little T...

Страница 135: ...n using special paper perform trial printing using this machine and check to see if the results are satisfactory before purchasing it Notes in printing for principal types of special paper are describ...

Страница 136: ...ng in a serious failure Some label paper has large margins on the top sheet When using such paper do not peel these margins from the carrier sheet before completing output Use label paper that conform...

Страница 137: ...hick paper and align the edges before loading it in the multi purpose tray Some thick paper has rough edges on the back those are created when the paper is cut In this case put the thick paper on a fl...

Страница 138: ...especially on network environments with a large number of client computers because it is not specifically necessary to assign a separate IP address to each client including printers dpi dots per inch...

Страница 139: ...on of data do not occur for a preset time In this mode the machine consumes less power than in the standby mode The default setting of the preset time is 15 minute You can use the operation panel to c...

Страница 140: ...preset time is 30 minutes 16 20 ppm model or 45 minutes 25 ppm model You can use the operation panel to change this time SMTP Simple Mail Transfer Protocol This is a protocol for transmission of e mai...

Страница 141: ...cations of paper Appendix 2 Black streaking reduction processing 3 11 Book erase 1 13 Border erase mode 1 13 Border erase width default value 3 10 C Carriage return CR action 2 31 Code job list 2 12 C...

Страница 142: ...8 Exposure mode 3 3 F Fax job accounting 4 15 Fax output destination 3 20 Fax transmission limit 4 7 Font 2 23 Font list 2 26 Font size 2 24 Form feed timeout 2 49 Appendix 8 H Hard disk 2 41 I IEEE12...

Страница 143: ...1 9 3 9 Operation against excess over limit 4 16 Original image quality 3 3 Original orientation 1 8 Original size selection 1 3 Other regular size 1 3 3 27 Others 2 49 Outline font Appendix 9 Output...

Страница 144: ...stering a program 1 18 Report 3 30 Reset 2 50 Resolution 2 33 Resource protect mode 2 51 S Scanner job accounting 4 14 Scanner transmission limit 4 7 Service status page 2 54 Sheet erase 1 13 Silent M...

Страница 145: ...Index Index 5 Using job accounting 4 17 V Virtual mailbox 2 10 2 11 W Wide A4 2 31...

Страница 146: ...Index Index 6...

Страница 147: ...For best print results and machine performance we recommend that you use only TA Triumph Adler original supplies for your TA Triumph Adler products...

Страница 148: ...UTAX GmbH Ohechaussee 235 22848 Norderstedt Germany...

Отзывы: