© Copyright 2018 TRENDnet. All Rights Reserved.
TRENDnet User’s Guide
TEW-829DRU
77
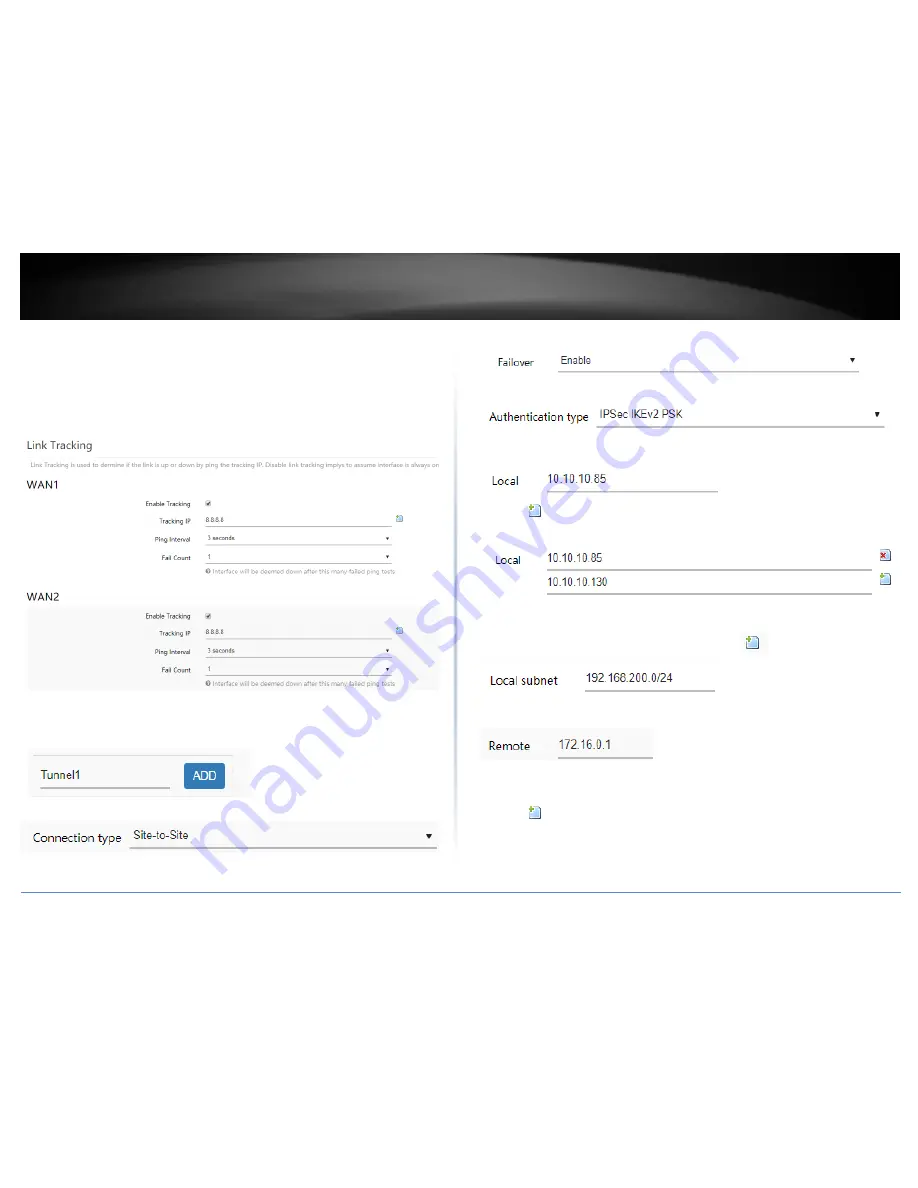
4. Click on Network and click on Multiple WAN.
5. Under the Link Tracking section, check Enable Tracking on both WAN1 and WAN2,
and enter an IP address or IP addresses on the Internet to check for connectivity and
quickly determine if the WAN interface is up or down (e.g. 8.8.8.8). Set the Ping
Interval to 3 seconds, and Fail Count to 1 for both WAN1 and WAN2 and click Apply
to save and commit the configuration changes.
6. Click on Network, click VPN, and click the IPsec tab.
7. Under Overview, enter a tunnel name and click Add. (e.g. Tunnel1)
8. Click the Connection type drop-down list and select Site-to-Site.
9. Click the Failover drop-down list and select Enable.
10. Click the Authentication type drop-down list and select IPSec IKEv2 PSK.
11. In the Local field, enter the local WAN1 IP address. (e.g. 10.10.10.85) This can also
be a domain name (ex: dynamic DNS host name)
12. Click
to add an additional IP address and enter the local WAN2 IP address (e.g.
10.10.10.130).
13. In the Local subnet field, enter the local LAN IP subnet. (e.g. 192.168.200.0/24) You
can add additional local subnets by click the add icon
(e.g. 192.168.20.0/24)
14. In the Remote field, enter the remote WAN1 IP address. (e.g. 172.16.0.1) This can
also be a domain name (ex: dynamic DNS host name)
15. Click
to add an additional IP address and enter the remote WAN2 IP address
(e.g. 172.16.0.80).
Содержание TEW-829DRU
Страница 1: ...TRENDnet User s Guide Cover Page...
Страница 8: ...Copyright 2018 TRENDnet All Rights Reserved TRENDnet User s Guide TEW 829DRU 5 Applications...
Страница 117: ......


