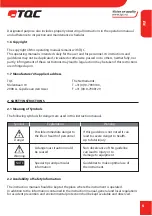


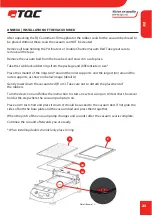


19
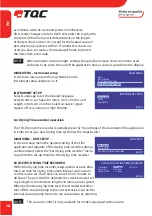
RUN SETUP LENGTH
The length of a drying time test can be set here. The
operation is the same as that for setting the length for an
application.
MAIN MENU
To perform a new drying time test select “Drying time
recorder” in the main menu. This will start a drying time
run with the setting of the previous menus.
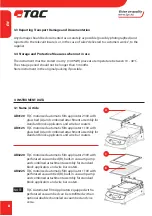
DTR-RUN (1)
The drying time recorder will now be initiated. Follow the
instruction on the screen, and position a test chart or a test
substrate. When placed, select confirm to continue.
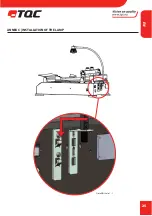
DTR-RUN (2)
The chart / test substrate is now fixed and the drying time
recorder tool can now be placed. Click the tool in place as
shown in below illustrations. When ready select run to
continue.
DTR-RUN (3)
The drying time recorder is now running. The display
shows the set time in the top left corner and the Running
time in the centre of the screen. To end the run select stop.
IT can appear that the drying time recorder is not reacting
to your command. The internal processor causes this. The
processor is at that time busy performing other tasks, and
will execute your command as soon as the performed task
is completed.
DTR-RUN (4)
When the RUN is ended the tool holder can be moved to
the points of interest on the test track by rotating the jog
shuttle. The display will show the elapsed time of when
the tool holder first passed that point. Select back to
confirm.
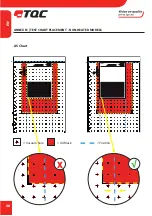
DTR-RUN (5)
At this step the vacuum or clamp will be released and the
chart / substrate can be removed from the test bed.
RUN SETUP-LENGTH
BACK
[
] DIN A5
[
] DIN A4
[√] DIN A3
[
] Custom
Start point
[ 44 ] mm
End point
[ 350 ] mm
Length
306
mm
[
√
] Auto return option
MAIN MENU
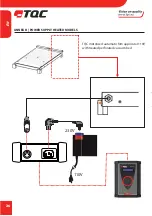
Run
Run setup
Instrument setup
Drying time recorder
DTR-RUN
Position chart
(chart will be fixed)
CONFIRM
BACK
01: 01
A3
DTR-RUN
Place pins
Stay clear from moving parts !
RUN
BACK
01: 01
A3
DTR-RUN
Run ended.
Rotate knob to locate position
Press knob to exit.
Time position: 00:00:27 H:M:S
01: 01
A3
BACK
DTR-RUN
Run completed, remove card
when repositioned
Repositioning . . .
01: 01
A3
DTR-RUN
Running . . .
Runing time: 00 : 00 H:M
STOP
01: 01
A3
EN
Содержание AB3075
Страница 25: ...25 ANNEX C INSTALLATION OF THE LAMP Detail A scale 1 1 EN...
Страница 39: ...39 TQC GRINDOMETER TOOL FOR AFA AB3075 ANNEX F TQC GRINDOMETER TOOL FOR AFA EN...
Страница 41: ...41 ANNEX F GRINDOMETER TOOL FOR AFA Weight WWW TQC EU AB3075 WWW TQC EU AB3075 100 g 805 g 114 g EN...
Страница 42: ...42 ANNEX F GRINDOMETER TOOL FOR AFA Tool Operation 1 WWW TQC EU AB3075 WWW TQC EU AB3075 EN...
Страница 44: ...44 ANNEX F GRINDOMETER TOOL FOR AFA Height adjustment 3 WWW TQC EU A B 5 mm WWW TQC EU AB3075 EN...
Страница 46: ...46 ANNEX F GRINDOMETER TOOL FOR AFA After drawdown 5 WWW TQC EU AB3075 EN...
Страница 47: ...47 TQC HARDNESS PEN HOLDER TOOL FOR AFA AB3090 ANNEX G TQC HARDNESS PEN HOLDER FOR AFA EN...
Страница 48: ...48 ANNEX G TQC HARDNESS PEN HOLDER FOR AFA Dimensions 60 mm 140 mm 25 mm 52 mm 23 mm EN...
Страница 49: ...49 ANNEX G TQC HARDNESS PEN HOLDER FOR AFA Weight 500 g 2220 g EN...
Страница 50: ...50 EN ANNEX G TQC HARDNESS PEN HOLDER FOR AFA Tool Mounting...
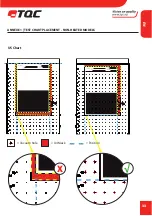
Страница 52: ...52 EN ANNEX G TQC HARDNESS PEN HOLDER FOR AFA TEST PANEL PLACEMENT Vacuum models X Vacuum hole Mask Position...
Страница 54: ...54 EN...
Страница 55: ...55 EN...


