4-34
T2100 Series
4.14 T2100 FL
Removing the T2100 FL
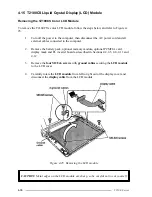
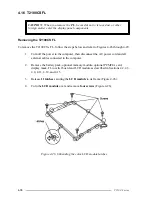
To remove the T2100’s FL, follow the steps below and refer to Figure 4-24.
1.
Turn off the power to the computer, then disconnect the AC power cord and all
external cables connected to the computer.
2.
Remove the battery pack, optional memory card, optional PCMCIA card, display
mask, FL inverter, and LCD module as described in Sections 4.2, 4.3, 4.4, 4.11,
4.12, and 4.13.
3.
Peel the tape off the lamp cover, then remove
three M1.5x3 brass flat-head
screws
securing the cover and take off the
FL cover
.
4.
Remove the
FL
.
Figure 4-24 Removing the FL
Содержание T2100 Series
Страница 5: ...T2100 Series 1 5 Figure 1 2 T2100 T2105 Series system unit configuration ...
Страница 25: ...T2100 Series 2 3 Figure 2 1 Troubleshooting flowchart 1 2 ...
Страница 114: ...3 64 T2100 Series ...
Страница 167: ...T2100 Series B 1 Appendix B Board Layout B 1 FHVSY System Board Figure B 1 FHVSY system board front ...
Страница 168: ...B 2 T2100 Series Figure B 2 FHVSY system board back ...
Страница 180: ...C 10 T2100 Series ...
Страница 181: ...T2100 Series D 1 Appendix D USA Display Codes Table D 1 USA display codes ...
Страница 182: ...D 2 T2100 Series ...
Страница 190: ...F 2 T2100 Series F 3 German GR Keyboard Figure F 3 GR keyboard F 4 French FR Keyboard Figure F 4 FR keyboard ...
Страница 191: ...T2100 Series F 3 F 5 Spanish SP Keyboard Figure F 5 SP keyboard F 6 Italian IT Keyboard Figure F 6 IT keyboard ...
Страница 196: ...H 2 T2100 Series ...
Страница 198: ...I 2 T2100 Series ...

