51
5.4 Advanced
Options
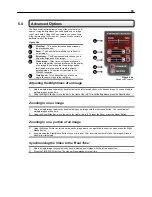
The Advanced Controls allow you to get the most out of your
search. Using the Brightness you can brighten up an image
to get more detail. Using the Zoom feature you can not only
bring the image up full screen, but you can also Zoom into a
particular area of the image.
Slow/Fast
– This option increases and decreases
the playback speed.
Zoom
– The Zoom Selector allows you to Zoom in
on an image.
Brightness
– The Brightness selector allows you to
adjust the Brightness of an image.
Clean
Image
– Often times, extensive motion can
create a ‘digital blur’ that can interfere with the quality
of an image. By selecting the Clean Image option,
two frames are interwoven to create a smooth,
detailed image. This option only pertains to the
720x480 resolution.
Time
Synch
– This option allows you to sync a
single channel of video to the real time.
Adjusting the Brightness of an Image
1) Select a single image to adjust by double-clicking the left mouse button on the desired image. You cannot adjust
multiple images at one time.
2) Using the Bright Slide Bar, move the bar to the right or the left. To reset the Brightness press the Reset Button
Zooming in on an image
1) Select a single image to adjust by double-clicking on an image with the left mouse button. You cannot adjust
multiple images at one time.
2) Using the Zoom Slide Bar, move the bar to the right or the left. To reset the Zoom, press the Reset Button.
Zooming in on a portion of an image
3) Using the Mouse Pointer, point to an area on the image where you would like to zoom in on and press the Right-
Mouse Button.
4) Keep pressing the Right-Mouse Button to zoom in further. After a certain number of clicks, the image will revert
back to its original size.
Synchronizing the Video to the ‘Real Time’
1) Select a single image to synchronize by double-clicking on an image with the left mouse button.
2) Press the TIME SYNCH button. The video will now playback in real time.
1
2
Figure 5.4a
3
4
Figure 5.4a
Advanced Controls
1
2
3
4
5
5
Содержание HVR16-X
Страница 1: ...Operations Manual Operations Manual KV KLR TM 8GHO44 96 ...
Страница 2: ...ii ...
Страница 54: ...42 4 Press FINISH to complete the setup The software is now ready to connect to a DVR ...
Страница 99: ...87 ...
Страница 100: ...88 C H A P T E R Backup Viewer This chapter includes the following information Overview Using the Backup Viewer ...
Страница 113: ...101 C H A P T E R Web Viewer This chapter includes the following information Overview Configuring the Web Viewer ...
Страница 116: ...104 C H A P T E R Remote Software This chapter includes the following information Overview Configuring Remote Software ...
Страница 121: ...109 Appendix A Appendix A ...

